Travis CI makes working in a team for a software project easier with automated builds. These builds are triggered automatically when each developer checks in their code to the repository. In this article, we will go through how we can integrate Travis CI easily with our project, which is hosted on Github. With automation, notification and testing in place, we can focus on our coding and creating, while Travis CI does the hard work of continuous integration!
Hello Travis & CI!
Travis CI is a hosted continuous integration platform that is free for all open source projects hosted on Github. With just a file called .travis.yml containing some information about our project, we can trigger automated builds with every change to our code base in the master branch, other branches or even a pull request.
Before we get started with how we can integrate Travis with our project, the following prerequisites will be helpful:
At the heart of using Travis, is the concept of continuous integration (CI). Let's say we are working on one feature and after we are done coding, we will typically build the project so as to create the executable as well as other files necessary to run the application. After the build is completed, good practices include running all the tests to ensure they are all passing and everything is working as expected.
The last step is ensuring that whatever we coded is indeed working even after we integrate it into the mainline code. At this point we build and test again. If the integrated build succeeds we can consider that the feature has been fully implemented. Travis CI automates this exact step of triggering a build and test upon each integration to the master branch, other branches or even a pull request, accelerating the time to detection of a potential integration bug.
In the following sections, we will take a simple project and trigger a failing build, correct it and then pass it. We will also see how Travis CI easily works with Github pull requests.
Travis Interface
When we land on the main homepage, we can also see the "busyness" of many open source projects going through automated build. Let's deconstruct the interface and understand the various parts:
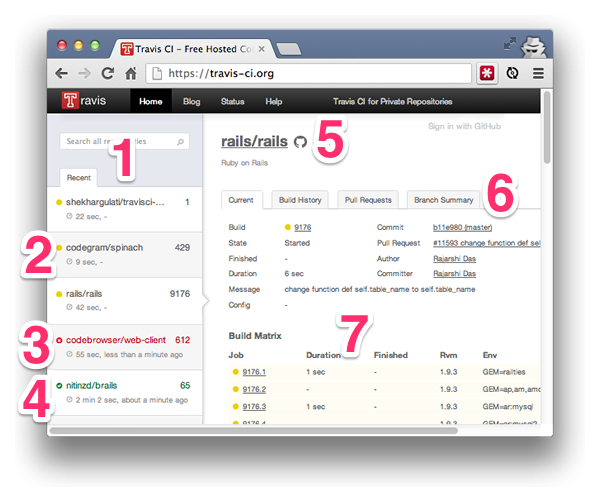
- Sidebar: This shows the list of public open source projects on Github currently going through automated builds. Each item has the hyperlinked project name, duration of the build so far and the sequential number of build.
- Build in progress [yellow]: A little yellow colored circle beside the project name indicates that the build is in progress.
- Build failed [red]: A little red colored circle beside the project name indicates that the build is complete and it has failed.
- Build passed [green]: A little green colored circle beside the project name indicates that the build is complete and it has passed.
- Project name and links: The title is in the format username/repository and it is linked to the Travis CI build page. The little Octocat symbol beside it links to the Github page of the repository containing its source code.
- Types of build: The automated builds can be triggered by committing the code to the master branch, other branches or even a pull request. By visiting the individual tab, we can get more information about the builds.
- Build activity: This section will include information about each of the tasks that the build is running.
Step 1: Hello World!
Before we integrate Travis CI, we will create a simple "hello world" project and create some build tasks. Travis supports various programming languages including Python, Ruby, PHP and JavaScript with NodeJS. For the purpose of our demo, we will use NodeJS. Let's create a very simple file hello.js as defined on the main website of NodeJS:
var http = require('http');

http.createServer(function (req, res) {
  res.writeHead(200, {'Content-Type': 'text/plain'});
  res.end('Hello World\n') // missing semi-colon will fail the build
}).listen(1337, '127.0.0.1');

console.log('Server running at http://127.0.0.1:1337/');
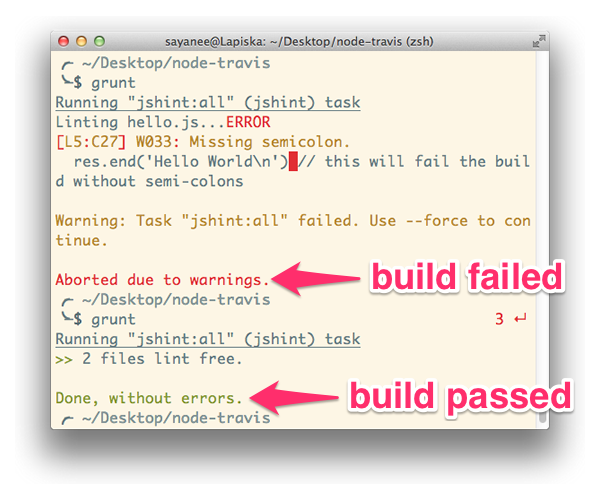
Do notice that there is a missing semi-colon so that later on JSHint, a JavaScript linter will be able to detect this and raise an error. We will build the project using a task runner called GruntJS that will include JSHint. This is of course an illustration, but in real projects, we can go on to include various testing, publishing, linting and hinting tasks.
To indicate the various packages required for GruntJS, JSHint and others, we will create a second file called package.json. This file will firstly contain the name and the version number of our simple application. Next, we will define the dependencies needed with devDependencies which will include GruntJS related packages including JSHint. With scripts, we will tell Travis CI to start running the test suite and the command grunt --verbose. Let's see the full contents of the file: package.json:
{
  "name": "node-travis",
  "version": "0.1.0",
  "devDependencies": {
    "grunt": "0.4.1",
    "grunt-cli": "0.1.9",
    "grunt-contrib-jshint": "0.6.0"
  },
  "scripts": {
    "test": "grunt --verbose"
  }
}
Next, let's prepare the Gruntfile.js that will include all the tasks required to run our build. For simplicity, we can include just one task - JavaScript linting with JSHint.
module.exports = function(grunt) {

  grunt.initConfig({
    jshint: {
      all: ['Gruntfile.js', 'hello.js']
    }
  });

  grunt.loadNpmTasks('grunt-contrib-jshint');
  grunt.registerTask('default', 'jshint');

};
Finally, we will run the build that contains only one task after we download all the related packages with npm install:
$ npm install
$ grunt
As expected, the build will not pass because the JSHint will detect a missing semi-colon. But if we place the semi-colon back into the hello.js file and run the grunt command once again, we will see that the build will pass.
Now that we have created a simple project locally, we will push this project to our Github account and integrate Travis CI to trigger the build automatically.
Step 2: Hello World With Travis CI
The very first step in integrating Travis CI is to create a file called .travis.yml which will contain the essential information about the environment and configurations for the build to run. For simplicity, we will just include the programming environment and the version. In our simple project, it is NodeJS version 0.10. The final contents of the file .travis.yml will be as follows:
language: node_js
node_js:
  - "0.10"
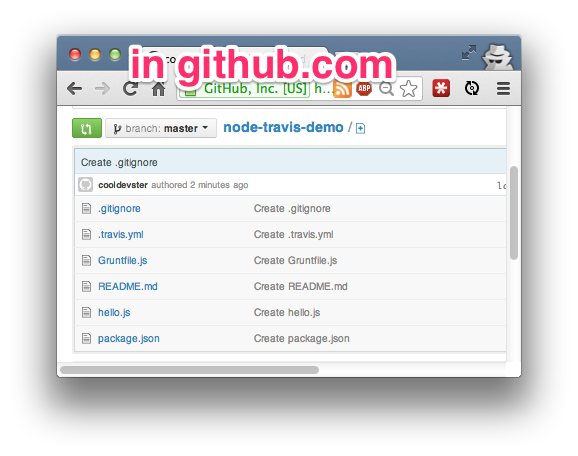
Now our project will consist of the following files along with README.md and .gitignore as required:
$ tree
.
|-- .travis.yml
|-- Gruntfile.js
|-- hello.js
|-- .gitignore
|-- README.md
`-- package.json
Let's now create a git repository and push to a new remote repository hosted on Github:
git init
git commit -m "first commit"
git remote add origin [email protected]:[username]/[repository].git
git push -u origin master
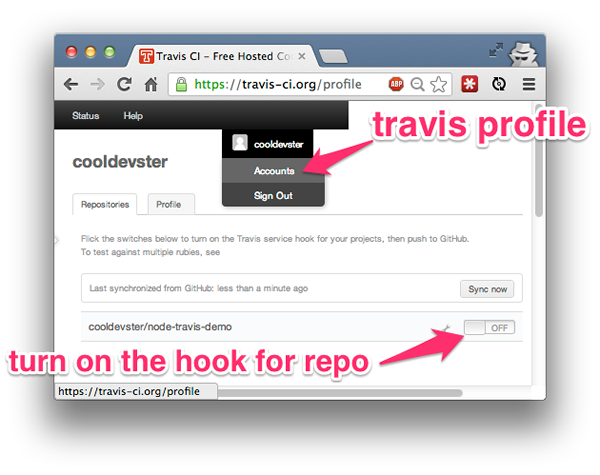
Next, log in to Travis CI and authorize Travis CI to access your Github account. Afterwards, visit your profile page to turn on the hook for the Github repository to trigger automated builds with Travis CI.
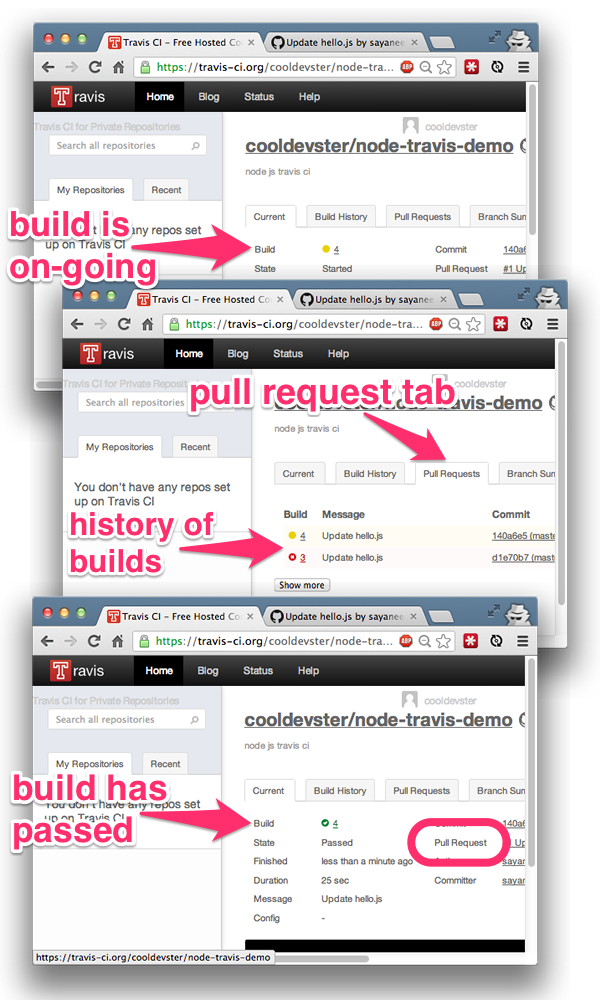
As a final step to trigger our very first build, we will need to push to Github. Let's remove the semi-colon in the file hello.js to make a failing build and then push to Github. This will trigger the automated build in Travis CI. Let's visit the URL: https://travis-ci.org/[username]/[repo] to see the first build in progress!
git add hello.js
git commit -m "removed semi-colon"
git push
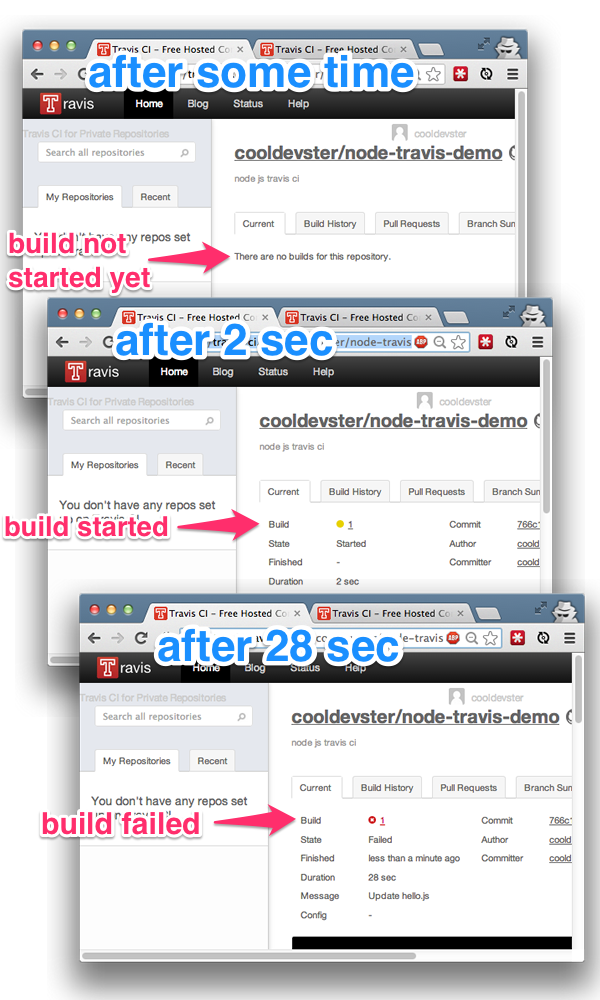
This failing build in the above example is really a simple illustration. But this situation is reflective of something that might happen in our real projects - we try to integrate our code and the automated build fails. By default, after each build is completed, Travis CI will send emails to the commit author and repository owner. In this way, the developer that pushed the code is immediately alerted and can then fix the integration errors. In our case, let's just insert the missing semi-colon and push to Github one more time.
git add hello.js
git commit -m "added semi-colon to pass the build"
git push
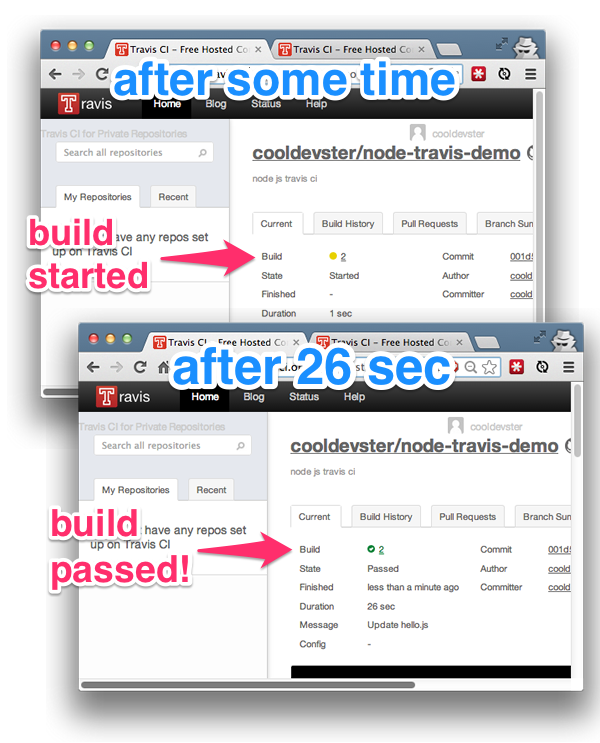
Hurray! The automated build has passed this time. Our code is integrated passing all the required tests. Now each time we try to integrate our changes whether it is to the master branch or even other branches, Travis CI will trigger an automated build.
Pull Requests
Once we have integrated Travis CI into our project, a pull request will also trigger an automated build. This is immensely useful for the repository owner or the developer who is in charge of merging the code base. Let's see how Travis CI will advise whether the pull request is good to merge or not.
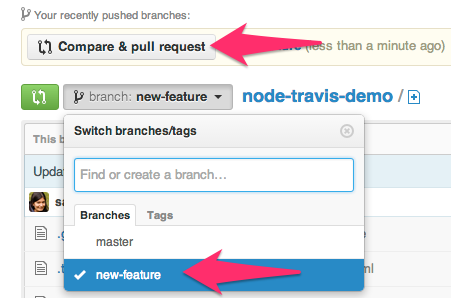
First, using another Github account, let's fork the original repository and pull request with the following steps:
- Fork the original repository
- Create a new branch in the forked repository
- Make the new changes and commit it
- Ensure the feature branch is chosen
- Compare and pull request
Merge With Caution
To simulate a failing build in the pull request, we will once again remove the semi-colon in the file hello.js, commit and push the changes and finally pull request.
Upon each pull request, Travis CI will automatically trigger the build. This time, we can also visit the "Pull Requests" tab to see the history of current or past builds triggered due to a pull request.
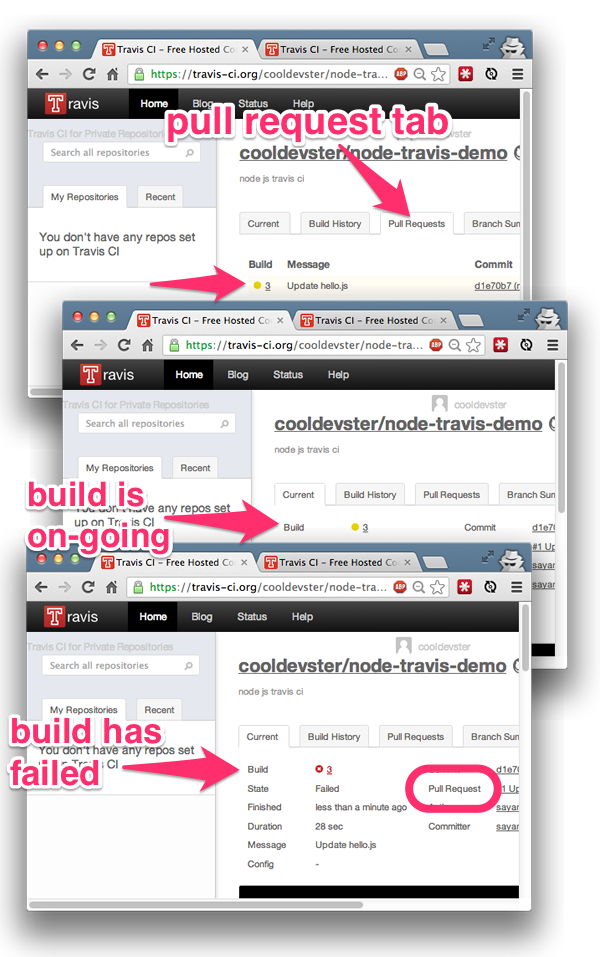
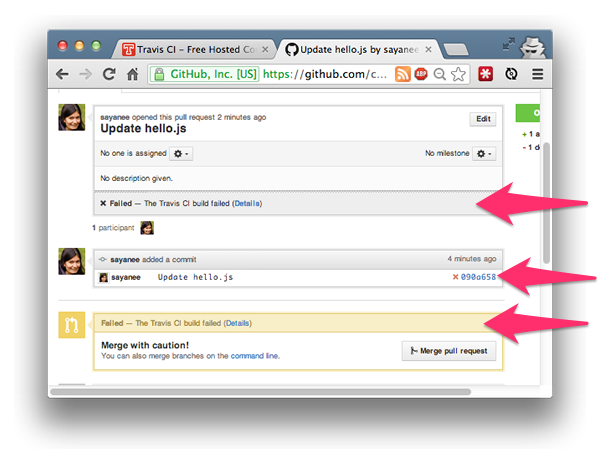
After Travis CI completes the build, if we visit the pull request page from the original repository, we will see that Travis CI has appended some user-interface changes to alert us that the build has failed.
Good to Merge
This failing build status will be immediately notified to the repository owner as well as the developer who did the pull request. And now, depending on the reason for the failing build, it can be rectified with another commit in the same branch. Hence, let's add on the semi-colon and pull request one last time. Github will automatically update the pull request page as well.
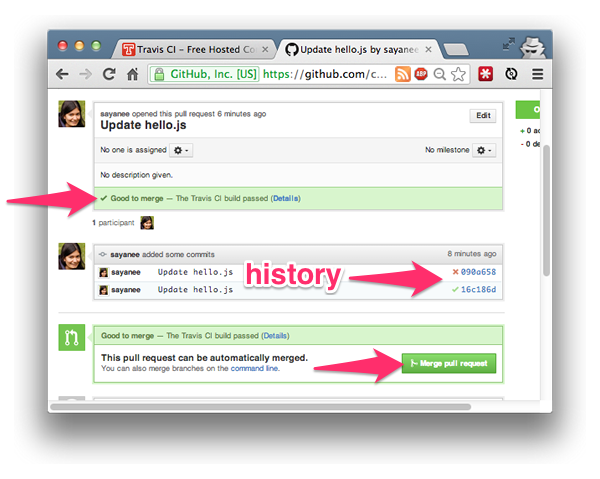
And finally, when we come back to the original repository's pull request page, this time we will see a "green" signal to go ahead and do a merge as our build is passing!
Build Configurations
The file .travis.yml defines the build configurations. Our example included just the language type and version, but we can add-on more useful ones as follows:
-
Language specific. This is an example for Ruby
	language: ruby
	rvm:
	  - 1.9.3
-
Commands or scripts to run before or after each build. This is an example of a command before running a script:
	before_script:
	    - git config --global user.name [myname]
-
Notifications in terms of emails or chat alerts are sent as declared by the build configurations. This is an example of turning off emails and sending it to IRC:
	notifications:
	  email: false
	  irc: "chat.freenode.net#travis"
Validating .travis.yml
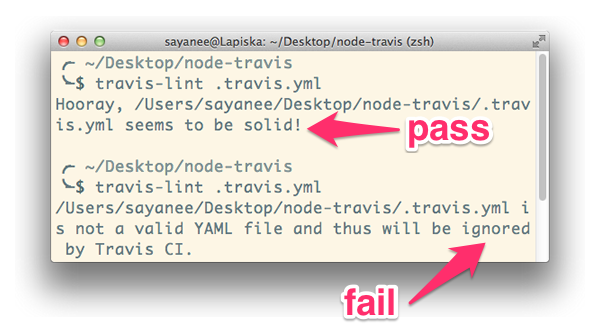
As you can see, the file .travis.yml becomes very important in triggering automated builds. If this file in not valid, Travis CI will not trigger the build upon each push to Github. Hence, ensuring that we have a valid file that Travis CI will interpret correctly is important. For this, we will install a gem called travis-lint and run the file .travis.yml
$ gem install travis-lint
$ travis-lint .travis.yml
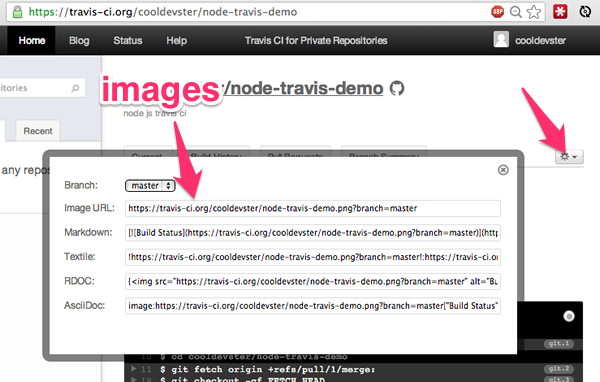
Build Status Images
It's really helpful to include a little image to indicate the current status of the build. The image itself can be accessed from the URL pattern http://travis-ci.org/[username]/[repository-name].png. Another way to quickly access the images embedded in various formats is on the Travis CI project page itself. For example, we can copy the Markdown format and embed in the project's README.md file.
Another cool way to track the build statuses of various open source projects while surfing around Github is to install one of the browser extensions. This will put the build status images prominently right next to each of the project names.
Resources on Travis CI
Here are some resources on the concept of continuous integration as well as learning and integrating Travis CI into our Github projects:
- Continuous Integration by Martin Fowler
- Travis CI documentation and blog
A fantastic way to learn what and how to include the various build configurations in the .travis.yml file is to actually browse through many of the popular open source repositories that already integrate Travis CI. Here are a few:
- Ruby on Rails (Ruby)
- BackboneJS (JavaScript)
- Composer (PHP)
- Flask (Python)
I hope this gave you a brief introduction to how we can easily integrate Travis CI in our Github projects. It's really easy to use, so give it a try and make continuous integration a breeze for your team!

Comments