Welcome to part 1 of 3 in my little series on authenticating users with Titanium. Titanium is an open source cross compiler that allows you to write iPhone and Android (soon to be blackberry too!) applications using Javascript. No Objective-C required! We will be using PHP as the server side language in this tutorial and my database will be MySQL.
Step 1: Create the Users Table and Insert a Row
Make a new database or use an existing one, then open it. To save time on this step, I've included the SQL code below to create the table for you. I've called it simply 'users'. After the table is created, add a new row. I've chosen 'rondog' as my username, '1234' as my password, my real name and my email. DO NOT FORGET to run the MD5 function on the password field when inserting. If your MySQL GUI doesn't offer the ability to run the MD5 function, use this md5 generator and copy/paste the 32 character string in the password field. Also no need to fill the 'id' field out as it is an auto-incrementing field.
CREATE TABLE `users` (
  `id` int(11) NOT NULL AUTO_INCREMENT,
  `username` varchar(255) NOT NULL,
  `password` varchar(32) NOT NULL,
  `name` varchar(255) NOT NULL,
  `email` varchar(255) NOT NULL,
  PRIMARY KEY (`id`)
) ENGINE=MyISAM  DEFAULT CHARSET=latin1 AUTO_INCREMENT=1 ;

Note: This SQL statement was exported from phpMyAdmin. If you get errors when copying/pasting this SQL statement you need to manually create the table and fields using the settings above.
Step 2: Create a New Titanium Project
Open up titanium and create a new project. The name you choose does not matter for this tutorial. Once the project is created, browse to the Resources/app.js file. Their is a lot of stuff in it already that we do not need. Go ahead and remove everything except the background color line at the top.
Now we need to create 3 things:
- a tab group
- a tab
- and a window
We will then add the window to the tab and the tab to the group and then open it.
// this sets the background color of the master UIView (when there are no windows/tab groups on it)
Titanium.UI.setBackgroundColor('#fff');
var tabGroup = Titanium.UI.createTabGroup();

var login = Titanium.UI.createWindow({
	title:'User Authentication Demo',
	tabBarHidden:true,
	url:'main_windows/login.js'
});

var loginTab = Titanium.UI.createTab({
	title:"Login",
	window:login
});

tabGroup.addTab(loginTab);
tabGroup.open();
Ok, so we've made our window, tab and tab group.
Note: Before you compile, notice the URL property on the window. In the Resources folder, make a new folder called 'main_windows' and a new JS file called login.js. The URL property tells the compiler to use login.js as our window. If you skip this part, Titanium will throw an ugly red error in the emulator.
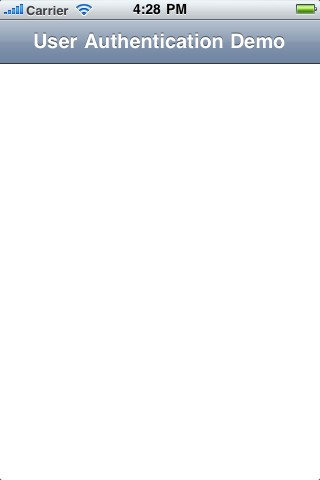
Upon a successful compile, your screen should look like this:
Step 3: Creating the Login Interface
Open up login.js after you've created it. We will be adding 2 text fields and a button.
var win = Titanium.UI.currentWindow;

var username = Titanium.UI.createTextField({
	color:'#336699',
	top:10,
	left:10,
	width:300,
	height:40,
	hintText:'Username',
	keyboardType:Titanium.UI.KEYBOARD_DEFAULT,
	returnKeyType:Titanium.UI.RETURNKEY_DEFAULT,
	borderStyle:Titanium.UI.INPUT_BORDERSTYLE_ROUNDED
});
win.add(username);

var password = Titanium.UI.createTextField({
	color:'#336699',
	top:60,
	left:10,
	width:300,
	height:40,
	hintText:'Password',
	passwordMask:true,
	keyboardType:Titanium.UI.KEYBOARD_DEFAULT,
	returnKeyType:Titanium.UI.RETURNKEY_DEFAULT,
	borderStyle:Titanium.UI.INPUT_BORDERSTYLE_ROUNDED
});
win.add(password);

var loginBtn = Titanium.UI.createButton({
	title:'Login',
	top:110,
	width:90,
	height:35,
	borderRadius:1,
	font:{fontFamily:'Arial',fontWeight:'bold',fontSize:14}
});
win.add(loginBtn);
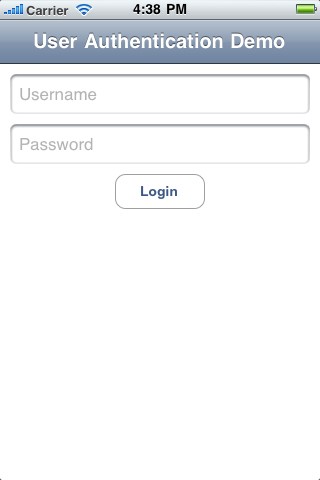
Go ahead and compile and your interface should look like this. Their will be no functionality yet, but you will be able to type.
Step 4: Make the Login Button Do Something
We need to create a click event listener, but before we go and check if the user exists in the database, we want to do some error checking on the fields. We will also create an HTTP client via the createHTTPClient() function.
var loginReq = Titanium.Network.createHTTPClient();

loginBtn.addEventListener('click',function(e)
{
	if (username.value != '' && password.value != '')
	{
		loginReq.open("POST","http://localhost:8888/post_auth.php");
		var params = {
			username: username.value,
			password: Ti.Utils.md5HexDigest(password.value)
		};
		loginReq.send(params);
	}
	else
	{
		alert("Username/Password are required");
	}
});
To explain the above, we first check if any of the fields are empty. If they are, then we present an alert saying they are required. If they both have values, we want to open our PHP file (we will create this next) and send some values to it. Notice I am running MD5 encryption on the password value.
Step 5: Creating our Authentication PHP File
This file will be the PHP file our app talks to when hitting the login button. The name must reflect the name in our loginReq.open() method in the previous step. I've named mine post_auth.php. Replace my mysql_connect and mysql_select_db settings with your connection settings.
<?php
// Connect to the database(host, username, password)
$con = mysql_connect('localhost','root','root');
if (!$con)
{
	echo "Failed to make connection.";
	exit;
}
// Select the database. Enter the name of your database (not the same as the table name)
$db = mysql_select_db('dbName');
if (!$db)
{
	echo "Failed to select db.";
	exit;
}

// $_POST['username'] and $_POST['password'] are the param names we sent in our click event in login.js
$username = $_POST['username'];
$password = $_POST['password'];

// Select eveything from the users table where username field == the username we posted and password field == the password we posted
$sql = "SELECT * FROM users WHERE username = '" . $username . "' AND password = '" . $password . "'";
$query = mysql_query($sql);

// If we find a match, create an array of data, json_encode it and echo it out
if (mysql_num_rows($query) > 0)
{
	$row = mysql_fetch_array($query);
	$response = array(
		'logged' => true,
		'name' => $row['name'],
		'email' => $row['email']
	);
	echo json_encode($response);
}
else
{
	// Else the username and/or password was invalid! Create an array, json_encode it and echo it out
	$response = array(
		'logged' => false,
		'message' => 'Invalid Username and/or Password'
	);
	echo json_encode($response);
}
?>
Step 6: Receiving Data in Login.js
Okay back to login.js. Let's do some data handling for when our PHP returns something. Place this code under var loginReq and above our click event.
loginReq.onload = function()
{
var json = this.responseText;
var response = JSON.parse(json);
if (response.logged == true)
{
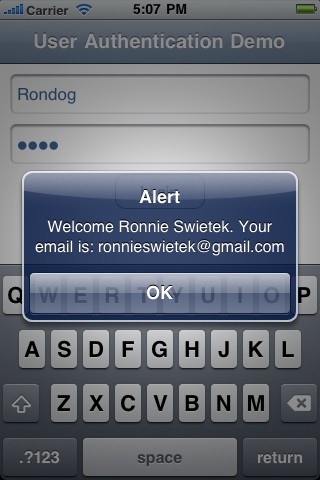
alert("Welcome " + response.name + ". Your email is: " + response.email);
}
else
{
alert(response.message);
}
};
JSON.parse() is part of the Titanium API. It parses the json_encode() string we created in our PHP file. Let's launch it now. Enter your username or password. Depending if you enter it correctly or not, you will either see the welcome message or you will see the invalid username/password message. Try both!
If you're getting an error in the Titanium console about being unable to parse the JSON string, that means you are failing to connect to the database or select the database. Try browsing directly to your post_auth.php file in your browser and see what the error is. I would browse to mine via this URL http://localhost:8888/post_auth.php
Conclusion
In part 1 of this series, we created the database and added a user. We then made our login interface by creating a tab group, a tab and a window. We then gave our login button some actions. Our PHP file queried our database and upon successful login it returned our name and email. If login failed, we returned a string simply stating invalid username and/or password. I hope you enjoyed this tutorial and that it wasn't too hard to follow considering we used 3 different technologies: PHP, MySQL and Titanium (Javascript)! Stay tuned for part 2 of this series where we will make a new tab that allows your users to create an account.

Comments