Welcome to the second part in our series on database driven Titanium Mobile development. In this tutorial, we will be inserting values int a local SQLite database and reading and writing data to a remote MySQL database. This tutorial will have a lot of code, but I've tried to be as thorough as possible without boring anyone. Bring your questions to the comments sections!
Recap
In the first part of this series, we created a local SQLite database and built only three files that generated pages with individual specs for each entry. Using this method, our application becomes easier to manage and has a smaller footprint. We will be using most of the code from the first tut.
NOTE: I changed two things in the source from the previous tut. One was a bad database name and the other was a variable name that had caused some confusion. Please download the source above to save some headaches.
Step 1: Setup the Application
Open Titanium Developer and create a new project. Choose Mobile and fill in all of the required information. Then click Create Project. Copy the "products" folder and the "products.sqlite" database into the new resources directory. These files will not have to be touched. We are now ready to get rolling.
Step 2: Building app.js
We are going to need four tabs for this tut. I like to use the app.js file only as a gateway to the application. I personally feel it is easier to keep things organized this way. We are going to create the tabs and have them open new files. Here is the final code for app.js. It is fairly simple and linear.
	var tabGroup = Ti.UI.createTabGroup();

	var win1 = Ti.UI.createWindow({
	    title:'Local Read',
		url:'products/product_category.js'
	});

	var tab1 = Ti.UI.createTab({
	    icon:'images/tabs/KS_nav_ui.png',
	    title:'Local Read',
	    window:win1
	});

	var win2 = Ti.UI.createWindow({
	    title:'Local Insert',
		url:'products/products_write.js'
	});

	var tab2 = Ti.UI.createTab({
	    icon:'images/tabs/KS_nav_ui.png',
	    title:'Local Insert',
	    window:win2
	});

	var win3 = Ti.UI.createWindow({
	    title:'Remote Read',
		url:'remote_read.js'
	});

	var tab3 = Ti.UI.createTab({
	    icon:'images/tabs/KS_nav_ui.png',
	    title:'Remote Read',
	    window:win3
	});

	var win4 = Ti.UI.createWindow({
	    title:'Remote Insert',
		url:'remote_write.js'
	});

	var tab4 = Ti.UI.createTab({
	    icon:'images/tabs/KS_nav_ui.png',
	    title:'Remote Insert',
	    window:win4
	});

	tabGroup.addTab(tab1);
	tabGroup.addTab(tab2);
	tabGroup.addTab(tab3);
	tabGroup.addTab(tab4);

	tabGroup.open();
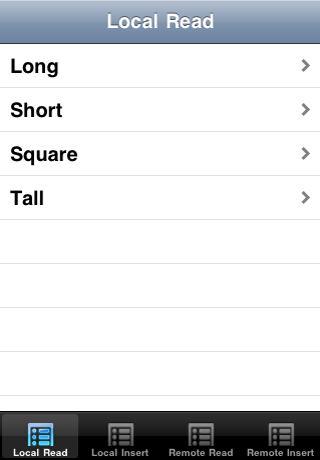
Tab 1 is the entire previous tut. We will not touch these files, but go ahead and create the placeholder files for the other three tabs.
Step 3: Writing to the Local Database
Open the "products_write.js" file. In this file we will need to create a text field for each field in our database, create a button and attach an eventListener to it to both perform some validation and execute a function, and create a function to insert the data. It is a lot of repeated code. Here is the final product:
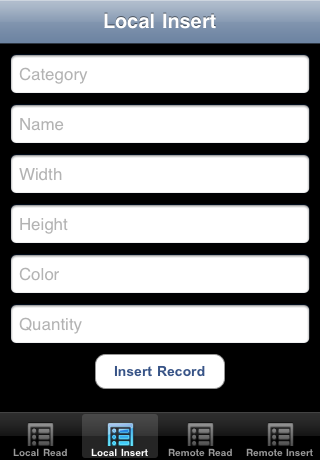
The stripped down code will look like the following. All of the text fields have the same attributes with the exception of the variables "top," and "hintText." We will only look at one.
// create var for the currentWindow
var currentWin = Ti.UI.currentWindow;
function insertRows(dbData) {
**FUNCTION HERE**
};
var category = Ti.UI.createTextField({
color:'#336699',
top:10,
left:10,
width:300,
height:40,
hintText:'Category',
keyboardType:Ti.UI.KEYBOARD_DEFAULT,
borderStyle:Ti.UI.INPUT_BORDERSTYLE_ROUNDED
});
currentWin.add(category);
var name = Ti.UI.createTextField({
...
});
currentWin.add(name);
var pwidth = Ti.UI.createTextField({
...
});
currentWin.add(pwidth);
var pheight = Ti.UI.createTextField({
...
});
currentWin.add(pheight);
var pcolor = Ti.UI.createTextField({
...
});
currentWin.add(pcolor);
var qty = Ti.UI.createTextField({
...
});
currentWin.add(qty);
var btn = Ti.UI.createButton({
title:'Insert Record',
top:310,
width:130,
height:35,
borderRadius:1,
font:{fontFamily:'Arial',fontWeight:'bold',fontSize:14}
});
currentWin.add(btn);
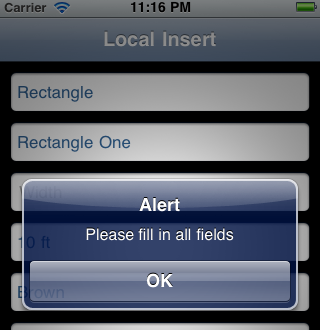
btn.addEventListener('click',function(e) {
if (category.value != '' && name.value != '' && pwidth.value != '' && pheight.value != '' && pcolor.value != '' && qty.value != '') {
var dbData = {
category: category.value,
name: name.value,
pwidth: pwidth.value,
pheight: pheight.value,
pcolor: pcolor.value,
qty: qty.value
};
insertRows(dbData);
} else {
alert("Please fill in all fields");
};
});
The text fields are created and attributes assigned. The variable name is what we will use later. The button is created, and then we add an eventListener. Here we are first checking to make sure that the text fields are not equal to ( != ) "blank" then creating a var with the text field values. These values are then passed to the insertRows() function. If a field is left blank an alert will fire.
The function receives the textfield values from dbData. We then create our SQL statement, use our db var and "execute" to create another var, call that var, and finally alert that the rows were inserted. If there is an error on inserting, this alert will not fire. What will likely happen is that the application will crash.
function insertRows(dbData) {

	var db = Ti.Database.install('../products.sqlite','products');

	var theData = db.execute('INSERT INTO products (category, name, pwidth, pheight, pcolor, qty) VALUES("'+category.value+'","'+name.value+'", "'+pwidth.value+'", "'+pheight.value+'", "'+pcolor.value+'", "'+qty.value+'")');

	theData;

	alert("Rows Inserted");

};
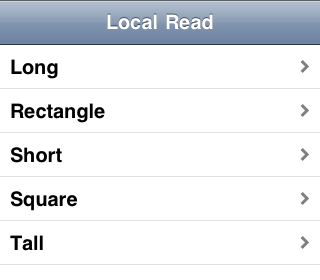
Here is our now updated local database. Note: I do not have an explanation for this, but the iOS simulator will not show the updates to your database until you exit and relaunch. This applies to local and remote databases.
Step 4: Reading From the Remote Database
Remote databases cannot be called directly from an application. We need to use Ti.Network.createHTTPClient(); to open a PHP file that will connect to our database, query it, and return the values to the application. We will do this using JSON.
First we need to create our remote database. For convenience, I exported my database. You can use phpMyAdmin to import it. We are going to work from the server to the application.
	<?php
	$mysqli = new mysqli("localhost","your_user_name","your_pass_word","your_table_name");
	if (mysqli_connect_errno()) {
	    printf("Can't connect to SQL Server. Error Code %s\n", mysqli_connect_error($mysqli));
	    exit;
	}
	// Set the default namespace to utf8
	$mysqli->query("SET NAMES 'utf8'");
	$json   = array();
	if($result = $mysqli->query("select * from colors")) {
	    while ($row=$result->fetch_assoc()) {
	        $json[]=array(
	            'shade'=>$row['shade'],
	        );
	    }
	}
	$result->close();

	header("Content-Type: text/json");
	echo json_encode(array( 'colors'  =>   $json ));

	$mysqli->close();
	?>
If you work with PHP and MySQL a lot, this should look pretty familiar. We are using mysqli (which is the improved version of PHP's MySQL driver) to create the connection to our database, return an error if it does not connect, create our array, and return it to our application. The only thing I really want to point out is with regard to populating the array. I have kept this very simple for time's sake. If you would like to pass more values, simply add on to the query and then add the values to the array.
The application file is also straightforward. We create our var with the Ti.Network.createHTTPClient(), set the URL with "open" to the PHP file, send the request, and then receive it and parse the response. We are using the same method as we did from the first tut to generate the array here, but using .push.
	var currentWin = Ti.UI.currentWindow;

	var sendit = Ti.Network.createHTTPClient();
	sendit.open('GET', 'http://www.danstever.com/sandbox/mobile_tuts/read.php');
	sendit.send();
	sendit.onload = function(){
	    var json = JSON.parse(this.responseText);

	    var json = json.colors;

		var dataArray = [];

	    var pos;
	    for( pos=0; pos < json.length; pos++){

			dataArray.push({title:'' + json[pos].shade + ''});
			// set the array to the tableView
			tableview.setData(dataArray);
	    };

	};

	var tableview = Ti.UI.createTableView({
	});

	currentWin.add(tableview);
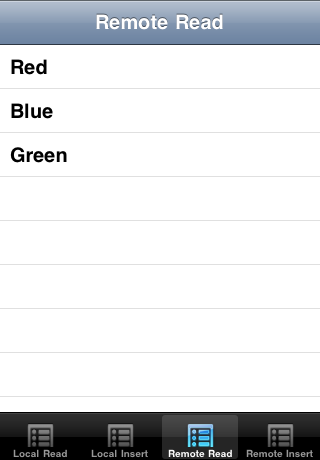
You should now be able to view the online database:
Step 5: Writing to the Remote Database
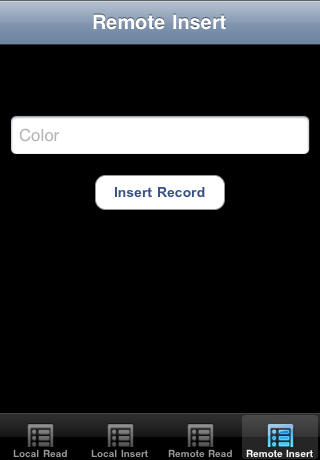
The local application file for the remote insert is almost exactly the same as above. There are two differences: we are using a PHP file and Ti.Network and have to catch any errors or alerts from the PHP file. Here is the insert tab:
	var currentWin = Ti.UI.currentWindow;

	var shade = Ti.UI.createTextField({
		color:'#336699',
		top:70,
		left:10,
		width:300,
		height:40,
		hintText:'Color',
		keyboardType:Titanium.UI.KEYBOARD_DEFAULT,
		borderStyle:Titanium.UI.INPUT_BORDERSTYLE_ROUNDED
	});

	currentWin.add(shade);

	var btn = Ti.UI.createButton({
		title:'Insert Record',
		top:130,
		width:130,
		height:35,
		borderRadius:1,
		font:{fontFamily:'Arial',fontWeight:'bold',fontSize:14}
	});
	currentWin.add(btn);


	var request = Ti.Network.createHTTPClient();
	request.onload = function()
	{
		if (this.responseText == "Insert failed")
		{
			btn.enabled = true;
			btn.opacity = 1;
			alert(this.responseText);
		}
		else
		{
			var alertDialog = Ti.UI.createAlertDialog({
			    title: 'Alert',
			    message: this.responseText,
			    buttonNames: ['OK']
			});
			alertDialog.show();
			alertDialog.addEventListener('click',function(e)
			{
				currentWin.tabGroup.setActiveTab(2);
			});
		}
	};

	btn.addEventListener('click',function(e)
	{
		if (shade.value != ''){

			request.open("POST","http://danstever.com/sandbox/mobile_tuts/insert.php");
				var params = {
					shade: shade.value
				};
				request.send(params);
		} else {
				alert("Please enter a color.");
		};
	});
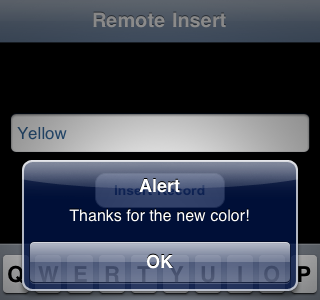
The onload function is listening for responses from the PHP page. If there is an error it will cause the application to issue an alert. This is very helpful for debugging. In the eventListener to the button, we again check to make sure the value is not blank, then pass it on to the PHP file.
	<?php
	$mysqli = new mysqli("localhost","your_user_name","your_pass_word","your_table_name");
	if (mysqli_connect_errno()) {
	    printf("Can't connect to SQL Server. Error Code %s\n", mysqli_connect_error($mysqli));
	    exit;
	}

	$shade 	= $_POST['shade'];

	$insert = "INSERT INTO colors (shade) VALUES ('" . $shade . "')";
	$mysqli->query($insert);
	printf("Thanks for the new color!");

	$mysqli->close();
	?>
We make the connection and declare the variable and assign it to the value sent from our application with $_POST['YourVarHere'];. We create the insert statement, alert if it was successful, and close the database connection.
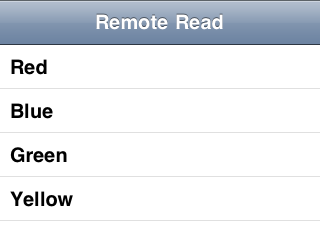
We now have our shiny new entry in our database, but, remember, you may have to restart the simulator for it to display!
Wrap Up
I know that was a lot to cover and maybe not a ton of explanation. If you are still struggling to grasp what is going on I encourage you to download the source and set it up in a separate application and work aside your current app. Remember, we have a very strong and helpful community. Please comment and ask any questions.

Comments