This tutorial will introduce you to SQLite and database-driven development with Titanium Mobile. Specifically, you will learn to build an application for managing products with a database instead of just the file system.
Why Make a Database-Driven Application?
It makes no logical sense to have to manage an individual file for a product. Especially when there is a large product catalog to maintain. Here's an example.
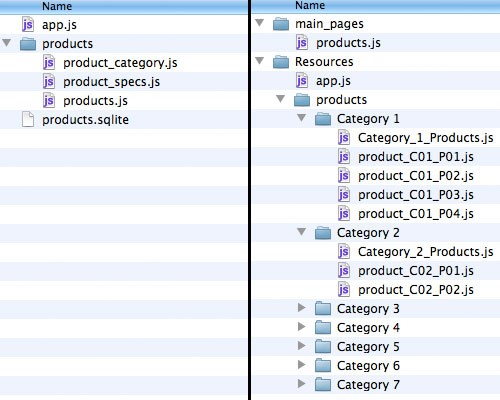
The folders and files on the left is how our project will look at the end. Just a few files in a folder and a database file. On the right is an out of control, daunting, directory. I feel this image should be enough motivation. One of the other benefits will be the reduced app footprint.
Prerequisites
We will need Titanium Mobile, a good text editor (anyone you are comfortable with will work), and an SQLite database manager. Here are the two SQLite managers I use:
- SQLite Manager - Firefox Add-on
- SQLite Database Browser
Both of these are great options. I really like SQLite Manager, but I personally dislike that it runs as a Firefox plugin rather than a standalone application. SQLite Database Browser does not look as polished, but it can be run as a standalone application. Because of this, I tend to use SQLite Database Browser.
Step 1: Create the Application
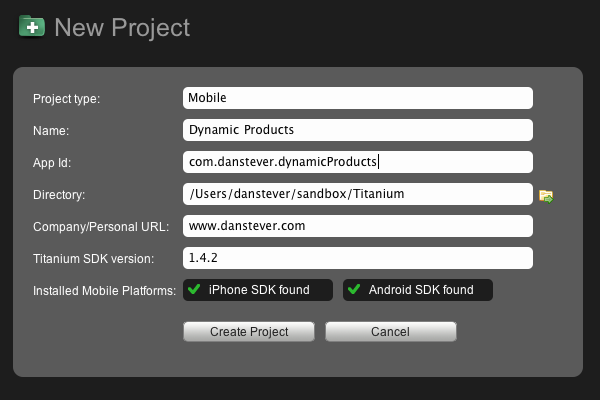
Open Titanium Developer and create a new project. Choose Mobile and fill in all of the required information. Titanium developer automatically detects if the iPhone SDK and the Android SDK are properly installed. Then click Create Project.
Step 2: Creating and Populating the Database
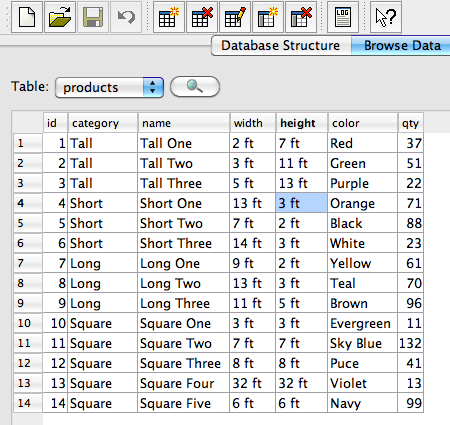
Open whichever program you choose and click on New Database. Name the database "products.sqlite". Application, database, and file names do not matter. Just remember what you use. Save the file in the Resources folder that Titanium Developer created. Fill in the database with your product information. Make sure you hit save.
Step 3: Building app.js
Open the app's Resources/app.js file (If you have not worked with Titanium Developer before, "app.js" is the main file for your application).
Remove all of the existing code.
With simplicity in mind, I want to keep all of the files for products in a single folder. Let's go to the Resources folder and create a folder named "products". We will save our other files here.
Back in app.js, we want to create a tab group because doing so will make it easy to add more tabs and content later. Set the window label, have that window open our products file, and add the window to our current view. You will need an image for your tab image. I copied an image from the tabs in the KitchenSink app, which is the showcase demo project provided by Appcelerator to showcase all of their features.
	// create tab group
	var tabGroup = Ti.UI.createTabGroup();

	// create main window
	var main = Ti.UI.createWindow({
	    title:'Product Categories',
		url:'products/product_category.js'
	});

	// craete main tab
	var tab = Ti.UI.createTab({
	    icon:'images/tabs/KS_nav_ui.png',
	    title:'Products',
	    window:main
	});

	// add the tab to the tab group
	tabGroup.addTab(tab);

	// open tab group
	tabGroup.open();
We will not have to touch the code in app.js again, so you can go ahead and close it if you'd like.
Step 4: Building the Product Category Page
Create a new JavaScript file in our products folder named product_category.js. The important thing to keep in mind with this page is that it will be the first to load when our application initially launches. That means we are going to have the bulk of our code in this file. The great thing is that this code will be reused for our next file, with only a few changes.
Before we code this page, we should think through what needs to happen. The page needs to open a database, read the category column, and display the results in a table view. To attach the database results to the tableView, we need to create an array and push the data to it. The best way to do this is by creating a function. This way we do not have to know ahead of time how many rows in the database need to be read. We will simply let the function iterate through the database until it reads all active rows.
We also need to create an EventListener for when one of the rows is clicked. Let's start by getting everything together except the function and EventListener.
	// create var for the currentWindow
	var currentWin = Ti.UI.currentWindow;

	// set the data from the database to the array
	function setData() {
		**FUNCTION HERE**
	};

	// create table view
	var tableview = Ti.UI.createTableView({
	});

	tableview.addEventListener('click', function(e)
	{
		**EVENTLISTENER HERE**
	});

	// add the tableView to the current window
	currentWin.add(tableview);

	// call the setData function to attach the database results to the array
	setData();
This is all pretty straightforward. Now the setData() function. Start by connecting to the database and querying it for the category. To remove duplicates and only return one row for each category, we are going to use the DISTINCT SQL command.
	var db = Ti.Database.install('../products.sqlite','products');

	var rows = db.execute('SELECT DISTINCT category FROM products');
Create the array and use a while statement to iterate through the database. Query the database for the field name "category" and set that to the row title. (Titanium Developer uses "fieldByName" to read from the defined column in a database. It is used in conjunction with our query to select our content.) Specify that there is a child element, and set the path to the next file.
	var dataArray = [];

	while (rows.isValidRow())
	{
	    dataArray.push({title:'' + rows.fieldByName('category') + '', hasChild:true, path:'../products/products.js'});
	    rows.next();
	};
Finally, attach the array to our tableView.
tableview.setData(dataArray);
Now, we need to create the EventListener to open the next page. One thing we will also need to do here is to pass the variables to the next file. This will be used to build the next SQL query and set the window title. We will also set the callback from the listener to the path to the next file, even though it is static.
	tableview.addEventListener('click', function(e)
	{
		if (e.rowData.path)
		{
			var win = Ti.UI.createWindow({
				url:e.rowData.path,
				title:e.rowData.title
			});

			var prodCat = e.rowData.title;
			win.prodCat = prodCat;
			Ti.UI.currentTab.open(win);
		}
	});
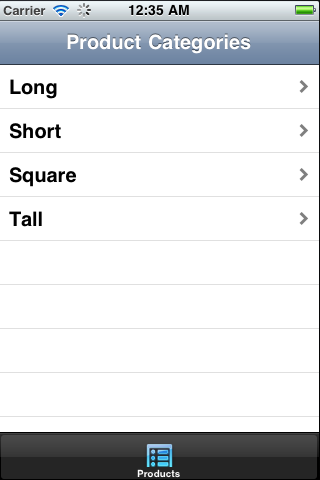
The listener catches the click, then creates a new window. This new window opens the next file and is setting the title of the new window to the content of the row. In our case it is the product's category. We then create a variable from the row content and pass it to the new window, naming the var. Lastly, the listener opens the new tab group, which is the next page.
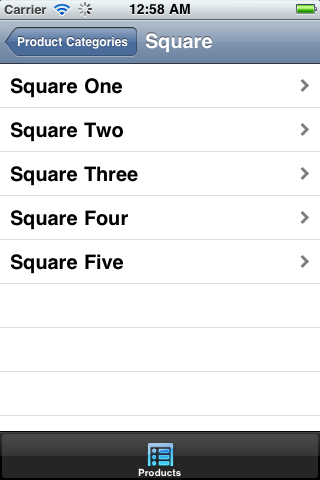
Here is what the "product_category.js" file shows:
Step 5: Building the Products Page
Select all of the code in the "product_category.js" file and hit copy. Create a new JavaScript file named "products.js" and paste the code. We only need to make a few modifications and add the variable we passed for this page to work.
Inside our function, underneath our call to open the database, add the following code, catching out passed var.
var prodCat = Ti.UI.currentWindow.prodCat;
Now we need to change our query to the database and use our new variable. We want to now read the product names from our previously selected category and display those products.
var rows = db.execute('SELECT * FROM products WHERE category="' + prodCat + '"');
Change the fieldByName in the row from "category" to "name" and the path to the next file.
dataArray.push({title:'' + rows.fieldByName('name') + '', hasChild:true, path:'../products/product_specs.js'});
The last thing needed to complete this page is to change the passed var in the EventListener. Change it to pass the product name and use a var name that makes sense.
	var prodName = e.rowData.title;
	win.prodName = prodName;
Done. Here is what "products.js" looks like:
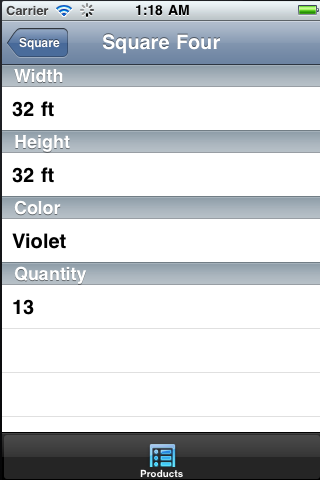
Step 6: Building the Individual Product Page
This is the last file we need to create for this tutorial. The goal of this page will be to display the content of the row for the individual product. Let' look at all of the code and then break it down.
	// create var for the currentWindow
	var currentWin = Ti.UI.currentWindow;

	var db = Ti.Database.install('../products.sqlite','productSpecs');

	var prodName = Ti.UI.currentWindow.prodName;

	var rows = db.execute('SELECT * FROM products WHERE name="' + prodName + '"');
	var data = [
	{title:'' + rows.fieldByName('width') + '', header:'Width'},
	{title:'' + rows.fieldByName('height') + '', header:'Height'},
	{title:'' + rows.fieldByName('color') + '', header:'Color'},
	{title:'' + rows.fieldByName('qty') + '', header:'Quantity'}
	];

	var tableview = Ti.UI.createTableView({
		data:data
	});

	currentWin.add(tableview);
What is happing above is the same thing that we have done on the previous pages, we are just not listening for an action, and are populating the array ourselves, rather than using a function. This way we are able to label the information with a row header and order the content how we want it to display.
All that needed to be done was to create an individual row in the array using our database column names.
Wrap Up
This seems like a lot of work in the beginning, but the result is well worth it. The best part is that once the code is complete in the first two product files, it will never need to be touched. The setData() function scales without any help. The same code will work regardless of whether the database has one row or fifty-three!

Comments