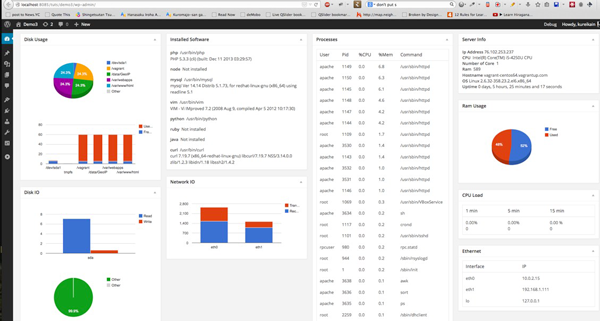
In the first two parts of this series, we completed, a full-featured plugin that shows us server status as dashboard widget. As such, it's available to every logged in user. Some of information can be sensitive, and we don't want them to see it so it's better to check for the user role to determine if we should make the widget available to them.
Using Roles or Capabilities to Limit Visibility
WordPress uses a concept of Roles, designed to give the site owner the ability to control what users can and cannot do within the site. Each role is allowed to perform a set of tasks called Capabilities. We can customize the role and its capabilities with add_roles and add_cap functions.
Our plugin will create a new capability call servermetric. Only the user who has that capability can load our dashboard widgets. We will add this capability for administrator role so all administrator users will see it by default.
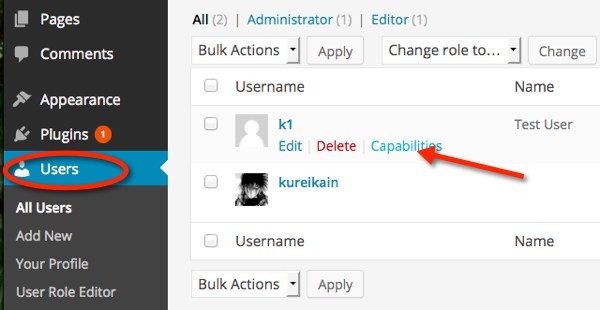
For the other users, you can use plugin User Role Editor to manage the capabilities of any particular user, and assign the servermetic capability for the user.
We use add_cap to add a new capability, however, this function writes to the database, so we should only do it when activating plugin. Once deactivating, we should clean up the database by removing the role with remove_cap.
class Dashboard {
  //...other code
  const CAP_METRIC = 'server_metric';

  /**
   * Start to setup hook
   */
  public function run() {
    add_action( 'wp_dashboard_setup', array( $this, 'add_dashboard_widgets' ) );
    add_action( 'admin_enqueue_scripts', array($this, 'add_asset'));
    add_action( 'admin_footer', array($this, 'footer'));

    register_activation_hook(__FILE__, array($this, 'add_servermetric_caps'));
    register_deactivation_hook(__FILE__, array($this, 'remove_servermetric_caps'));
  }

  /**
   * Add severmetric capability for admin by default
   */
  function add_servermetric_caps() {
    // gets the author role
    $role = get_role( 'administrator' );
    // This only works, because it accesses the class instance.
    // would allow the author to edit others' posts for current theme only
    $role->add_cap( self::CAP_METRIC );
  }

  function remove_servermetric_caps() {
    // get_role returns an instance of WP_Role.
      $role = get_role( 'administrator' );
  	$role->remove_cap( self::CAP_METRIC );
  }

  //...
}
We create a new constant call CAP_METRIC and set its value to server_metric so we can easily change the capability name later easily. We modify our run method to add two hooks.
The register_activation_hook runs when activating plugin. It accepts two parameters:
- (string) file name: path to the main plugin file
- (callback) (required) The function to be run when the plugin is activated
register_deactivation_hook runs when deactivating plugin. It accepts same parameter as register_activation_hook.
administrator and call add_cap or remove_cap on the roles object.Next, we will modify our
add_dashboard_widgets method to only register the widgets if the current user has the servermetric cap. /**
* Register dashboard widget proider to show up on dashboard
*/
function add_dashboard_widgets() {
if (!current_user_can(self::CAP_METRIC)) {
return false;
}
$widget = Widget::instance();
foreach ($widget->get_provider() as $name=>$provider) {
$widget->register($name);
}
}Next, we use current_user_can to check whether or not the current user has the request capability. Now, only the administrator will see the widget when loading the dashboard. If you want to enable the server status widget for other users, you can install plugin User Role Editor to manage roles and capabilities for any users.
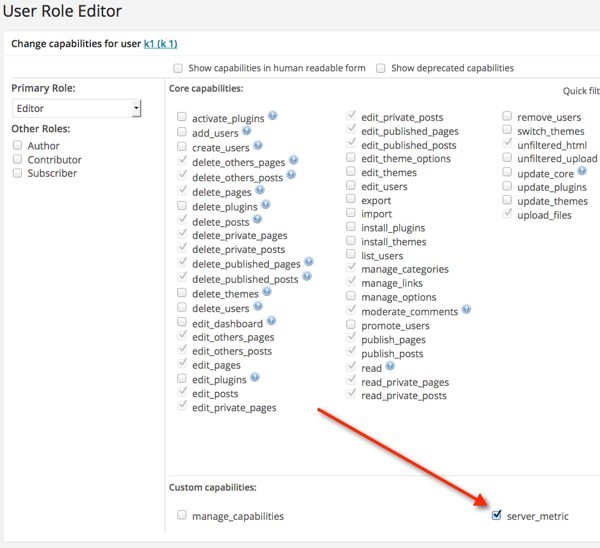
Then on capabilities screen, we can assign the server_metric cap.
By utilizing roles and capabilities, we enhanced our plugin security to make our widget available to only user we trust.
Caching the Server Metric
WordPress use the Transients API as a cache API. The data is serialized and stored into the wp_option table of WordPress with an expiration time of the cache.
Instead of getting metric data on every HTTP request, we can get the data once and cache it. However, we cannot simply put everything into the cache or use the same expiration time. For example, disk space can be cached for 15 minutes, and server information can be cached for 60 minutes since they rarely to change. Similarly, installed software can be cached for a day as it's rarely changes once the server setup and provisioned for production.
We use mostly get_transient and set_transient when working with the API. According to the WordPress documentation:
-
get_transient( $transient ): retrieve the transient name as string and return its data. If the data has expired, it returns false. We should use===operator to check because we can store an empty value for the transient. -
set_transient( $transient, $value, $expiration ): retrieves three parameters: the transient name, its value, and its expiration time in second. Note that the transient name should not be longer than 45 characters.
Our two options are to considering caching the metric data or caching the generated HTML data. Caching the HTML data can make our site very fast, but it puts a load on the database. To that end, we could do benchmark to decide which is best.
For our tutorial, let's just cache the metric data. Besides, we should have a way of invalidating cache - like an anchor - that will allow us to reload the dashboard data and force loading the data instead of from cache.
Caching Data for the Widget
We can directly use the function get_transient or set_transient to work with Transient API. However, if we decide to change the way we used Transient API, we have to go over
every place we use it and modify it for every widget.
Let's add one more layer to abstract the cache mechanism. We will design a simple cache class for our widget that has three methods:
-
set: set cache data for a widget
-
get: get cache data for a widget
-
load: try to loading from cache, if not existed, calculate data, set the cache and return
Let's compose the file widget/cache.php in the following way. Note that, as our auto loading convention, the class name will be Cache and its namespace is AX\StatBoard\Widget
<?php
namespace AX\StatBoard\Widget;
use AX\StatBoard\Widget\Provider;

class Cache {
  /**
   * Get cache for a particular widget
   */
  static function get(Provider $provider) {
    $cache_id = get_class($provider);
    if (false !== $data = get_transient($cache_id)) {
      return $data;
    }
    return false;
  }

  /**
   * Default we cached 5 minutes
   */
  static function set(Provider $provider, $value, $cache_time = 300) {
    $cache_id = get_class($provider);
    set_transient($cache_id, $value, $cache_time);
  }

  /**
   * Load data from cache. If not existed, pull the metric and
   * put into cache.
   *
   */
  static function load(Provider $provider, $cache_time = 300) {
    if (false !== $data = static::get($provider)) {
      return $data;
    }
    //no data yet, let's pull it and put it into cache
    $data = $provider->get_metric();
    static::set($provider, $data, $cache_time);
    return $data;
  }

}
First, notice that we've marked our caching methods as static. Our set and get methods are just wrappers for get_transient and set_transient. The load method sits on top of set and get. All of these methods expect to retrieve the widget provider object; therefore, inside of load method we can invoke get_metric method to get the real data. Time for using our
Cache class. We will try to implement Cache for widget/software.php. Change our original get_content method to:<?php
namespace AX\StatBoard\Widget;
class Software implements Provider {
//...
public function get_content() {
$cmds = Cache::load($this, 3600 * 24);
$content = '';
foreach ($cmds as $cmd=>$info) {
$content .= "<p><strong>$cmd</strong> $info</p>";
}
echo $content;
}
//...
}You can see that we get rid of $cmds = $this->get_metric() and simply replace it with Cache::load which will load data from cache, or will load it from system if no cache existed. Now that you've got the idea, you can repeat with every other widget that you would like to cache. Just replace
get_metric inside get_content with:Cache::load($this, $time_in_second);to have it take care of its caching.
The data of disk usage can be cached for hours, and the ethernet interface can be cache for a day or so. It's up to you to decide how long you want to cache it. We can also create an option page for the plugin to manage these lifetime cache value. That can be an exercise for you to work on after we've completed this article.
We have one final example with
widget/ethernet.php. We can add cache ability as following:<?php
namespace AX\StatBoard\Widget;
class Ethernet implements Provider {
//...
public function get_content() {
$interfaces = Cache::load($this, 3600 * 24 * 7);
$html = '<table class="wp-list-table widefat"><thead><tr>
<th>Interface</th>
<th>IP</th>
</tr></thead><tbody>';
foreach ($interfaces as $interface=>$ip) {
$html .= "<tr>
<td>{$interface}</td>
<td>{$ip}</td>
</tr>";
}
$html .= '</tbody></table>';
echo $html;
}
//....
}
Again, we only need to replace get_metric with Cache::load. The ethernet information and its IP address probably never changes so I set a very long cache life time to one week: 3600 seconds * 24 hours * 7 days. Force Loading Real Data
Once we've added a cache ability, we should support a mechanism so that the administrator can pull the widget without it being cached. The easiest way to do this is to use a special query parameter to indicate that we want real data.
How about small parameter like nocache for this? So instead of the default WordPress dashboard URL with domain.com/wp-admin/ we can use domain.com/wp-admin/?nocache.
Sound easy? Let's do it.
Edit our method get in widget/cache.php
  static function get(Provider $provider) {
    if (isset($_GET['nocache'])) {
      return false;
    }
    $cache_id = get_class($provider);
    if (false !== $data = get_transient($cache_id)) {
      return $data;
    }
    return false;
  }
As long as the nocache query parameter existed, we return false instantly and therefore force the real data is fetched instead of cached data.Now, let's think about adding this feature without the Cache class. We may have to go to every line of
get_transient and check for the query parameter there. Therefore, consider breaking things down into many layer when designing your plugin. Don't put everything in same file or copy paste code over and over.Now, let's try to visit
domain.com/wp-admin and domain.com/wp-admin?nocache and notice the different speed.
Here is the result with ?nocache=1 appended to the URL.

Using cronjob to Generate Cache
Even though we implemented and used a cache, if the cache is missing, the page is still slow. It still needs time to pull data from server. We still have room to improve with cronjob. We can schedule our plugin to be run at a specific interval. WordPress allows us to do this via wp_schedule_event. Ideally, we can use wp_schedule_event to schedule a hook which will be executed at a specific interval.
Looking at this example, our plugin can schedule a hook to invoke every three minutes, the hook, in turn will invoke another function to fetch the metric data. The data is always available in cache and fresh enough.
Open our main plugin file, serverdashboard.php, and update the run method to include new hook as well as new hook handler.
<?php

 /**
   * Start to setup hook
   */
  public function run() {
    add_action( 'wp_dashboard_setup', array( $this, 'add_dashboard_widgets' ) );
    add_action( 'admin_enqueue_scripts', array($this, 'add_asset'));
    add_action( 'admin_footer', array($this, 'footer'));

    register_activation_hook(__FILE__, array($this, 'add_servermetric_caps'));
    register_deactivation_hook(__FILE__, array($this, 'remove_servermetric_caps'));

    //New code to handle cronjob
    add_filter( 'cron_schedules', array($this, 'cron_3min') );
    add_action( 'metric_generate_every_3min', array($this, 'generate_metric') );
    add_action( 'init', array($this, 'setup_schedule') );

  }

  /**
   * Define a new kind of interval
   * https://codex.wordpress.org/Function_Reference/wp_get_schedules
   */
  function cron_3min($schedules) {
    $schedules['3min'] = array(
        'interval' => 3 * 60,
        'display' => __( 'Once every 3 minutes' )
    );
    return $schedules;
  }

  /**
   * Setup schedule for event. If the schedule isn't exist,
   * we register it to
   */
  function setup_schedule() {
    if ( ! wp_next_scheduled( 'metric_generate_every_3min' ) ) {
    	  wp_schedule_event( time(), '3min', 'metric_generate_every_3min');
	  }

  }

  /**
   * The main function that runs on cron and
   * generate data
   */
  function generate_metric() {
    $widget = Widget::instance();
    foreach ($widget->get_provider() as $name=>$provider) {
      //By calling get_content, we trigger Cache::load process.
      $provider->get_content();
    }
  }
}
First, the wp_schedule_event method only support three recurrence type: daily, hourly, and twicedaily. We have to add a new kind of recurrence with wp_get_schedules filter. $schedules['3min'] = array(
'interval' => 3 * 60,
'display' => __( 'Once every 3 minutes' )
);
return $schedules;We can customize the interval value to how many second we want the job to be repeated. Next we setup a metric_generate_every_3min hook. add_action( 'metric_generate_every_3min', array($this, 'generate_metric') );This is our custom hook , it doesn't exist in WordPress. We register an handle with method
generate_metric for that hook. Whenever metric_generate_every_3min hook is invoked, generate_metric will be executed.In next statement, we hook into action
init with setup_schedule method to check for existence of the next scheduled event of the hook metric_generate_every_3min. If it is not yet defined, we will schedule an event with wp_schedule_event, using our custom recurrence for every three minutes for that hook.Inside the
generate_metric method, we loop through all available widget provide, and call their get_content method. By doing that, we trigger Cache::load process for that metric. WordPress will automatically run those scheduled events whenever someone visits your WordPress site. It will try to find the scheduled event that need to be run and invoke it.
However, you can also run them manually. WordPress runs cronjob via visiting the file
wp-content.php with the URL yourdomain.com/wp-cron.php?doing_wp_cron. You may want to update your cronjob to add a new job that ping the above URL every minutes
Let's open your crontab on server with
crontab -e and append this line at the end of it:0 * * * *wget domain.com/wp-cron.php?doing_wp_cron > /dev/null 2>&1We used wget to make a HTTP request to the wp-cron.php file. Since we don't care about output and any error thing, we redirect all the output to
/dev/null. You can read more about setting up these cronjob in the following articles:
- http://tommcfarlin.com/wordpress-cron-jobs/
-
http://code.tutsplus.com/articles/insights-into-wp-cron-an-introduction-to-scheduling-tasks-in-wordp...

Comments