If your site uses multiple taxonomies to categorize information, it can be helpful to split up posts in a taxonomy archive by the terms of a second taxonomy.
In this tutorial I'll show you how to create a taxonomy archive to do just that.
If you've ever worked with multi-relational databases, you'll know that one of their great features is the way you can view data according to multiple taxonomies. For example, if you have a database of clients, you can easily see which clients have hired you for different categories of project, and then sort that further by seeing which web design clients are, say, in a given location.
When I first started working with WordPress I found it frustrating that you couldn't easily do this - at least you can't do it with an out-of-the-box WordPress installation running the default theme.
However, it is possible to classify your data by more than one taxonomy. In this tutorial. I'll show you how to create a taxonomy page to list posts in that taxonomy, ordered by the terms of another taxonomy which also apply to them.
I'll then create a second taxonomy archive for the second taxonomy, which lists its posts in order of the first taxonomy's terms (trust me - it will make more sense when you see it happen!)
What You'll Need
To complete this tutorial you'll need:
- a development installation of WordPress
- a code editor
1. Creating the Theme
For this tutorial, I'll be creating a child theme of twentyfourteen with two new template files, a stylesheet, and a functions file. If you're working with your own theme, just copy the code from my functions file into your theme's functions file, and add the template files with tweaks to reflect your theme's markup.
To create my theme, I create a file called style.css in my empty theme folder and populate it with the following:
/*
Theme Name:     WPTutsPlus Create a Taxonomy Archive to List Posts by a Second Taxonomy's Terms
Theme URI:      http://rachelmccollin.co.uk/wptutsplus-taxonomy-archive-list-by-second-taxonomy/
Description:    Theme to support WPTutsPlus tutorial on creating a custom taxonomy archive. Child theme for the Twenty Fourteen theme.
Author:         Rachel McCollin
Author URI:     http://rachelmccollin.co.uk/
Template:       twentyfourteen
Version:        1.0
*/

@import url("../twentyfourteen/style.css");
This creates my child theme.
2. Registering the Post Type and Taxonomies
For this tutorial I'm going to the use the same 'animals' post type and 'animal_cat' taxonomy that I used in my tutorial on creating a custom post type template. I'll also add a second taxonomy called 'habitat'.
To do this, I create a new file called functions.php. First, I add the function to register my post type:
<?php
// register a custom post type called 'animals'
function wptp_create_post_type() {
    $labels = array(
		'name' => __( 'Animals' ),
		'singular_name' => __( 'animal' ),
		'add_new' => __( 'New animal' ),
		'add_new_item' => __( 'Add New animal' ),
		'edit_item' => __( 'Edit animal' ),
		'new_item' => __( 'New animal' ),
		'view_item' => __( 'View animal' ),
		'search_items' => __( 'Search animals' ),
		'not_found' =>  __( 'No animals Found' ),
		'not_found_in_trash' => __( 'No animals found in Trash' ),
	);
	$args = array(
		'labels' => $labels,
		'has_archive' => true,
		'public' => true,
		'hierarchical' => false,
		'supports' => array(
			'title',
			'editor',
			'excerpt',
			'custom-fields',
			'thumbnail',
			'page-attributes'
		),
		'taxonomies' => array( 'post_tag', 'category'),
	);
	register_post_type( 'animal', $args );
}
add_action( 'init', 'wptp_create_post_type' );
?>
And then I register my two taxonomies within one function:
<?php
// register taxonomies
function wptp_register_taxonomies() {

	// register a taxonomy called 'Animal Family'
	register_taxonomy( 'animal_cat', 'animal',
		array(
			'labels' => array(
				'name'              => 'Animal Families',
				'singular_name'     => 'Animal Family',
				'search_items'      => 'Search Animal Families',
				'all_items'         => 'All Animal Families',
				'edit_item'         => 'Edit Animal Families',
				'update_item'       => 'Update Animal Family',
				'add_new_item'      => 'Add New Animal Family',
				'new_item_name'     => 'New Animal Family Name',
				'menu_name'         => 'Animal Family',
			),
			'hierarchical' => true,
			'sort' => true,
			'args' => array( 'orderby' => 'term_order' ),
			'rewrite' => array( 'slug' => 'animal-family' ),
			'show_admin_column' => true
		)
	);

	// register a taxonomy called 'Habitat'
	register_taxonomy( 'habitat', 'animal',
		array(
			'labels' => array(
				'name'              => 'Habitats',
				'singular_name'     => 'Habitat',
				'search_items'      => 'Search Habitats',
				'all_items'         => 'All Habitats',
				'edit_item'         => 'Edit Habitat',
				'update_item'       => 'Update Habitat',
				'add_new_item'      => 'Add New Habitat',
				'new_item_name'     => 'New Habitat Name',
				'menu_name'         => 'Habitat',
			),
			'hierarchical' => true,
			'sort' => true,
			'args' => array( 'orderby' => 'term_order' ),
			'show_admin_column' => true
		)
	);
}
add_action( 'init', 'wptp_register_taxonomies' );
?>
This creates the 'animal' post type and the two taxonomies that apply to it. Note that I've used 'show_admin_column' to make life a bit easier when administering my posts.
After adding some data and classifying the animals according to my taxonomies, I can now see my data in the WordPress dashboard, as shown below.
Note: My classification of the animals I've used is not very scientific - please don't comment on my understanding of habitats or families!

3. Creating the First Taxonomy Template File
The next step is to create a template file for the 'animal_cat' taxonomy archive. Create a file in your theme folder and call it taxonomy-animal_cat.php. Now add the wrapper code to it from your theme (I've copied this from my parent theme, yours will be different if you're using your own theme):
<?php
/*
WpTutsPlus tutorial for creating archive to display posts by mutiple taxonomy terms
Archive template for animal_cat taxonomy
*/
?>

<?php get_header(); ?>

    <div id="main-content" class="main-content">

	<div id="primary" class="content-area">
		<div id="content" class="site-content" role="main">


		</div><!-- #content -->
	</div><!-- #primary -->
	<?php get_sidebar( 'content' ); ?>
</div><!-- #main-content -->

<?php
get_sidebar();
get_footer();
This template file now needs to have some data added to it.
Identifying the Current Queried Term
The archive template will use WP_Query to create a custom query for each term. One of the queried objects will be the current taxonomy term being displayed, so you need to identify that and store it as a variable.
Below the get_header() line, add:
<?php
// get the currently queried taxonomy term, for use later in the template file
$animalcat = get_queried_object();
?>
You can then use that $animalcat variable later on.
Outputting a Page Heading
The archive doesn't currently have a main heading, so you need to add one using the variable you just defined.
After the opening <div id="content"> tag, add the following:
<header class="archive-header">
    <h1 class="archive-title">
		<?php echo $animalcat->name; ?>
	</h1>
</header><!-- .archive-header -->
Fetching Terms for the Second Taxonomy
Next you need to fetch the list of terms for the second taxonomy. Below the code you just added, insert this:
<?php //start by fetching the terms for the animal_cat taxonomy
$terms = get_terms( 'habitat', array(
    'hide_empty' => 0
) );
?>
This will fetch a list of all the terms and store it in an array. By using 'hide_empty' you can avoid any empty terms being displayed - but as you'll see shortly, this just prevents terms being queried which have no posts at all, not those which have no posts with the currently queried taxonomy term.
Creating the Loop
Now create a loop which will run for each of the terms:
<?php
// now run a query for each animal family
foreach ( $terms as $term ) {

    // Define the query
	$args = array(
		'post_type' => 'animal',
		'animal_cat' => $animalcat->slug,
		'habitat' => $term->slug
	);
	$query = new WP_Query( $args );

	// output the term name in a heading tag
	echo'<h2>' . $term->name . ' habitat</h2>';

	// output the post titles in a list
	echo '<ul>';

		// Start the Loop
		while ( $query->have_posts() ) : $query->the_post(); ?>

		<li class="animal-listing" id="post-<?php the_ID(); ?>">
			<a href="<?php the_permalink(); ?>"><?php the_title(); ?></a>
		</li>

		<?php endwhile;

	echo '</ul>';

	// use reset postdata to restore orginal query
	wp_reset_postdata();

} ?>
A few notes on this:
- For each term, a new query is defined.
- The arguments for the query include the term in the second taxonomy (
$term) and the term currently being queried ($animalcat). - If your taxonomies only apply to one post type, you could leave out the
'post_type'argument but I prefer to include it just in case. - The
$termvariable is used to output a title for each section using$term->name.
Now save your template file and take a look at the taxonomy archive for one of your Animal Family terms:
Adding a Check for Posts to Each Query
At the moment as you can see, the template is outputting empty lists. This is easily fixed by checking if each query has posts.
Wrap the following around your loop:
if ( $query->have_posts() ) {

}
Your loop will now look like this:
if ( $query->have_posts() ) {

	// output the term name in a heading tag
	echo'<h2>' . $term->name . ' habitat</h2>';

	// output the post titles in a list
	echo '<ul>';

		// Start the Loop
		while ( $query->have_posts() ) : $query->the_post(); ?>

		<li class="animal-listing" id="post-<?php the_ID(); ?>">
			<a href="<?php the_permalink(); ?>"><?php the_title(); ?></a>
		</li>

		<?php endwhile;

	echo '</ul>';
}
This prevents WordPress from running the loop if the query doesn't have any posts, removing those empty headings. Now my archive page looks like this:
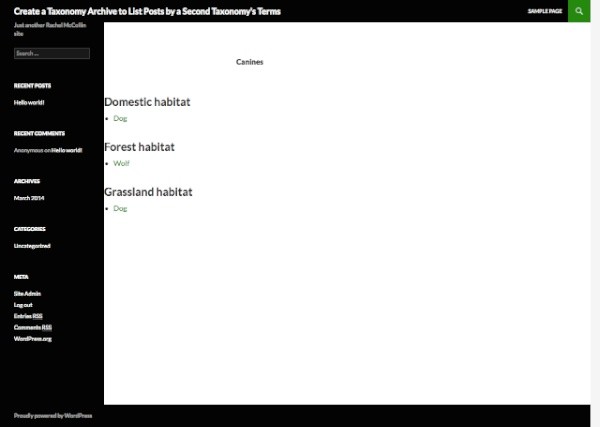
Much better!
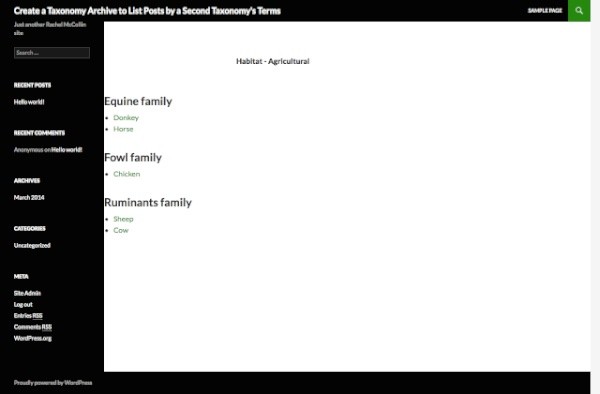
Creating the Template File for the Second Taxonomy
The final step is to create a template file for the second taxonomy's archives.
Copy your first template file and rename it taxonomy-habitat.php. Edit it so that the terminology is correct. The edits I need to make to my file are:
- tweaking the comments at the top of the file so they're accurate
- changing the name of the
$animalcatvariable to$habitat(you could avoid this problem by giving the variable a more generic name - but don't call it$termas you're using that elsewhere) - editing the
<h1>heading so it uses the$habitatvariable to output the name of the current queried term (I've also added some explanatory text here which is optional) - changing the first parameter of the
get_terms()function so it uses theanimal_catterm, not thehabitatterm. - editing the query arguments, essentially swapping the values for
'animal_cat'and'habitat'. - editing the
<h2>contents in the loop to refer to families not habitats.
This means that my new template file looks like this:
<?php
/*
WpTutsPlus tutorial for creating archive to display posts by mutiple taxonomy terms
Archive template for habitat taxonomy
*/
?>

<?php get_header(); ?>

<?php
// get the currently queried taxonomy term, for use later in the template file
$habitat = get_queried_object();
?>

    <div id="main-content" class="main-content">

	<div id="primary" class="content-area">
		<div id="content" class="site-content" role="main">

<header class="archive-header">
	<h1 class="archive-title">
		Habitat - <?php echo $habitat->name; ?>
	</h1>
</header><!-- .archive-header -->

<?php //start by fetching the terms for the animal_cat taxonomy
$terms = get_terms( 'animal_cat', array(
	'hide_empty' => 0
) );
?>

<?php
// now run a query for each animal family
foreach( $terms as $term ) {

	// Define the query
	$args = array(
		'post_type' => 'animal',
		'animal_cat' => $term->slug,
		'habitat' => $habitat->slug
	);
	$query = new WP_Query( $args );

	if( $query->have_posts() ) {

		// output the term name in a heading tag
		echo'<h2>' . $term->name . ' family</h2>';

		// output the post titles in a list
		echo '<ul>';

			// Start the Loop
			while ( $query->have_posts() ) : $query->the_post(); ?>

			<li class="animal-listing" id="post-<?php the_ID(); ?>">
				<a href="<?php the_permalink(); ?>"><?php the_title(); ?></a>
			</li>

			<?php endwhile;

		echo '</ul>';
	}


	// use reset postdata to restore orginal query
	wp_reset_postdata();

} ?>

		</div><!-- #content -->
	</div><!-- #primary -->
	<?php get_sidebar( 'content' ); ?>
</div><!-- #main-content -->

<?php
get_sidebar();
get_footer();
After making those changes, save your new template file and check one of your archives:

You now have a page for the second taxonomy that works in the same way as the first.
Summary
In this tutorial, you've learned a way of displaying data using multiple taxonomies. You could take this further by working with a third taxonomy, in one of two ways:
- Repeat the process of fetching terms, defining a query and running the loop for the third term after the second term, so that you have two separate lists.
- Merge your data using all three terms, by using each
$termvariable in a similar way to the$habitator$animalcatvariable and adding an extraforeach()statement inside your existingforeach()statement. You'd then need to think about how to lay out the resulting data using lists or a grid.
Why not have a go?

Comments