One of the many things that led me to decide that Sublime Text was going to be my text editor of choice was the way you could customize what's shown in the file list on the left. I had no idea that this level of customization was available. Here's a short tutorial that I hope will help you as much as it did me.
Step 1 - Adding a Folder
Note: If you already have a project set up, skip to Step 3.
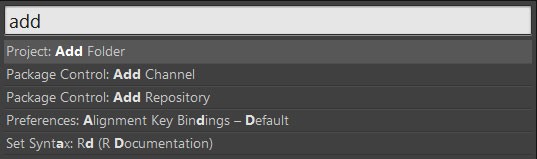
Upon opening up Sublime Text, add a folder to the project by pressing Ctrl+Shift+P (Cmd+Shift+p on Mac) to bring up the über handy Command Palette, typing "Add", and then hitting Enter.
Step 2 - Save the Project
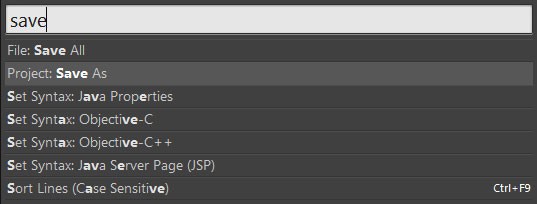
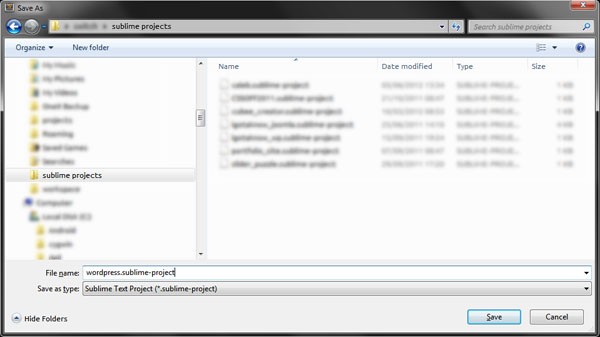
Now that you've added a folder to the project, bring up the command palette again, and type "Save" (or Project: Save As) to save your project. We're going to be editing this file in the next step.
Don't forget to give your project file the .sublime-project extension. Likely, this will be provided for you.
Step 3 - Get to Know the Project File
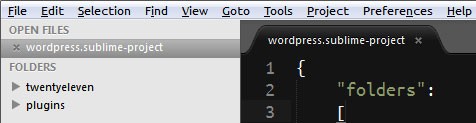
From the menu, select Project -> Edit Project to edit the project file you saved in Step 2. Or, of course, access this from the command palette.
You should now see something similar to the following in your editor window:
{
	"folders":
	[
		{
			"path": "/C/wamp/www/wordpress"
		}
	]
}
Fairly self explanatory, right? You'll notice that, as with all Sublime Text goodies, this file is formatted as JSON. Don't stress too much, if you don't know much about JSON. You should be able to figure it out as you go along.
3.1 - Displaying a Particular Folder
Let's now update it so that it points to our theme folder/directory:
{
	"folders":
	[
		{
			"path": "/C/wamp/www/wordpress/wp-content/themes/twentyeleven"
		}
	]
}
Now, keep an eye on the sidebar on the left and hit Ctrl+S (Cmd+S on a Mac) to save the file. The sidebar will be updated instantly with the new folder.
The next thing worth pointing out (if you haven't already noticed) is that the folders object is made up of an array literal (notated by the square brackets). If you've figured out that this means that we can specify more than one folder for our project, then you'd be absolutely correct. Let's go ahead and give it a go.
3.2 - Adding Multiple Folders
Fear not plugin developers, we care about you too, so let's add our plugins directory as well as the theme folder:
{
	"folders":
	[
		{
			"path": "/C/wamp/www/wordpress/wp-content/themes/twentyeleven"
		},
		{
			"path": "/C/wamp/www/wordpress/wp-content/plugins"
		}
	]
}
Save the file again, and you should see the following:
Step 4 - What Else Can We Do?
Sublime Text 2 is an amazing tool in your web development arsenal
I'm glad you asked! For starters, within each object in the folders array, there are a few different options available to us:
- path (string): As we've seen, lets you specify the folder/directory to show in the sidebar
(string): Specify a name for the item in the sidebar - file_exclude_patterns (array): Specify files to exclude
- folder_exclude_patterns (array): Specify folders to exclude
The path is already familiar to us, and the name is self explanatory, so let's dig in to the last two.
4.1 - Excluding Files
Admit it: there are some files that you will simply never edit, and these files are probably cluttering your project view. Instead, why don't we hide them, and then, on the very odd occasion that you actually do need to edit them, open them manually.
This bit comes down to preference, but here are the files that I typically exclude: '._', .bak, .ico, .sample, .swf, .tar, .tgz, files beginning with 'wp-' (let's not go editing the WordPress core files), and finally, .zip files. To do this, our file_exclude_patterns array should look as follows:
"file_exclude_patterns":[
	"._*",
	"*.bak",
	"*.ico",
	"*.sample",
	"*.swf",
	"*.tar",
	"*.tgz",
	"wp-*.php",
	"*.zip"
]
4.2 - Excluding Folders
If you don't want to specify each file individually, you can instead choose to exclude folders. This is the list that I generally use:
"folder_exclude_patterns": [
	"cgi-bin",
	"wp-admin",
	"wp-includes"
]
Note: You need to specify the file_exclude_patterns and the folder_exclude_patterns for each folder (see the final example below).
Step 5 - But Wait... There's More!
Other than the folders option, you can also specify two others:
-
settings: Any of the usual list of settings that you would like to apply on a project specific basis can go in here (for example:
tab_size). - build_systems: This allows you to add project-specific build system (which is beyond the scope of this tutorial).
Our Final Project File
Here is an example of what your final .sublime-project file might look like (shortened slightly to be more succinct):
{
	"folders":
	[
		{ // theme
			"path": "/C/wamp/www/wordpress/wp-content/themes/twentyeleven",
			"name": "Twenty Eleven Theme",
			"file_exclude_patterns":[
				"._*",
				"*.ico",
				"*.swf"
			],
			"folder_exclude_patterns": [
				"images"
			]
		},
		{ // plugins folder
			"path": "/C/wamp/www/wordpress/wp-content/plugins",
			"name": "Plugins Folder",
			"file_exclude_patterns":[
				"._*", // you need to specify this *again*
				"*.bak",
				"*.sample",
				"*.tar",
				"*.tgz",
				"*.zip"
			],
			"folder_exclude_patterns": [
				"akismet"//,
				// add any other plugins you wish to exclude
			]
		}
	],
	"settings":
	{
		"tab_size": 4
	}
}
To Conclude
Sublime Text 2 is an amazing tool in your web development arsenal, and it's features and possibilities reach way beyond this tutorial. For more on what it can do, be sure to dig around in the documentation... you're guaranteed to find some real gems hiding away in there.
Links:
- Documentation: See here and here
- Source documentation for this article

Comments