Introduction
In this tutorial, the third installment of the SpriteKit From Scratch series, we take a detailed look into the physics simulation functionality of SpriteKit and how this can be utilized in your 2D SpriteKit games.
This tutorial requires that you are running Xcode 7.3 or higher, which includes Swift 2.2 and the iOS 9.3, tvOS 9.2, and OS X 10.11.4 SDKs.
To follow along, you can either use the project you created in the previous tutorial or download a fresh copy from GitHub.
The graphics used for the game in this series can be found on GraphicRiver. GraphicRiver is a great source for finding artwork and graphics for your games.
1. Physics Worlds
The first part of any physics simulation in SpriteKit is the physicsWorld property of the current scene. This property is an SKPhysicsWorld object that defines properties such as your scene's gravity, speed of physics simulation, and contact delegate. Physics worlds can also define joints between objects to effectively pin multiple nodes together at specific points.
Gravity
For the top view style game we are creating in this series, we want to change the default gravity value provided by SpriteKit. The default gravity is intended for a front view game with a value of (0, -9.8) which simulates Earth's gravity, that is, 0 horizontal acceleration and a downwards acceleration of 9.8m/s². For our game, we need 0 vertical gravity so that the car doesn't start accelerating downwards once we set its physics properties.
Open MainScene.sks and click the grey background to select the scene. Next, open the Attributes Inspector and change Gravity so that both the X and Y components are set to 0.
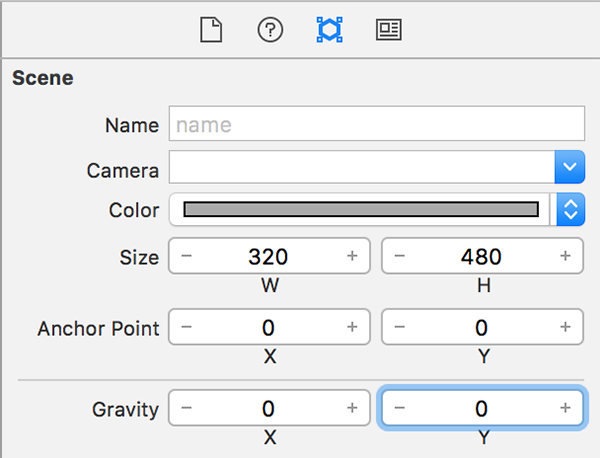
It is important to note that gravity is the only physics world property that can be changed using Xcode's scene editor. Any other properties need to be changed programmatically.
Contact Delegate
In order for the game to detect collisions between objects, we need to set the scene's physics world's contactDelegate property. This delegate can be any object that conforms to the SKPhysicsContactDelegate protocol. This protocol defines two methods, didBeginContact(_:) and didEndContact(_:). You can use these methods to perform actions based on the objects that are colliding in the scene.
To keep our code together, we are going to make the MainScene instance its own contact delegate. Open MainScene.swift and edit the MainScene class definition to conform to the SKPhysicsContactDelegate protocol.
import UIKit
import SpriteKit

class MainScene: SKScene, SKPhysicsContactDelegate {

    ...

}
In didMoveToView(_:), we set the MainScene instance as the contact delegate of the physicsWorld property.
override func didMoveToView(view: SKView) {

    ...

    physicsWorld.contactDelegate = self
}
We will implement the methods of the SKPhysicsContactDelegate protocol later. We first need to set up the physics properties of the nodes in the scene.
2. Physics Bodies
Any node in SpriteKit that you want to simulate physics on in some way must be assigned a unique SKPhysicsBody object. Physics bodies contain several properties including:
- mass
- density
- area
- friction
- velocity
In your games, you can also define up to 32 unique categories and a physics body can be assigned to any number of these categories. Categories are very useful for determining which nodes in your scene can interact with each other in terms of collisions.
On physics bodies, these categories are represented by the categoryBitMask and collisionBitMask properties, which are both given the 0xFFFFFFFF value by default. This means that all nodes belong to all categories. It is important to note that in this value, each hexadecimal digit F is a shorthand form and represents the number 15 in binary digits (1111) each of which correspond to one of the 32 categories you can use.
When two nodes collide, a logical AND operation is performed on the collisionBitMask and the categoryBitMask of the first and second body respectively. If the result is a non-zero value, then SpriteKit performs its simulation on the two nodes the bodies belong to.
Note that this AND calculation is performed twice with the two bodies swapped around. For example:
- Calculation 1:
bodyA.collisionBitMask & bodyB.categoryBitMask - Calculation 2:
bodyB.collisionBitMask & bodyA.categoryBitMask
If you don't know how an AND operator works, then here is a very simple example written in Swift:
let mask1 = 0x000000FF
let mask2 = 0x000000F0

let result = mask1 & mask2 // result = 0x000000F0
The AND operator determines which parts of the bit masks are the same and returns a new bit mask value containing the matching parts.
One important thing to note is that these bit masks only affect SpriteKit's side of the physics simulation and you are not notified of collisions detected in this manner. This means that bodies can interact with each other but none of the contact delegate's methods are called.
In order for these methods to be executed, you must specify a contactTestBitMask for each body, which produces a non-zero value when an AND operator acts on them. For all physics bodies, this bit mask has a default value of 0x00000000 meaning that you will not be notified of any collisions that the physics body takes part in.
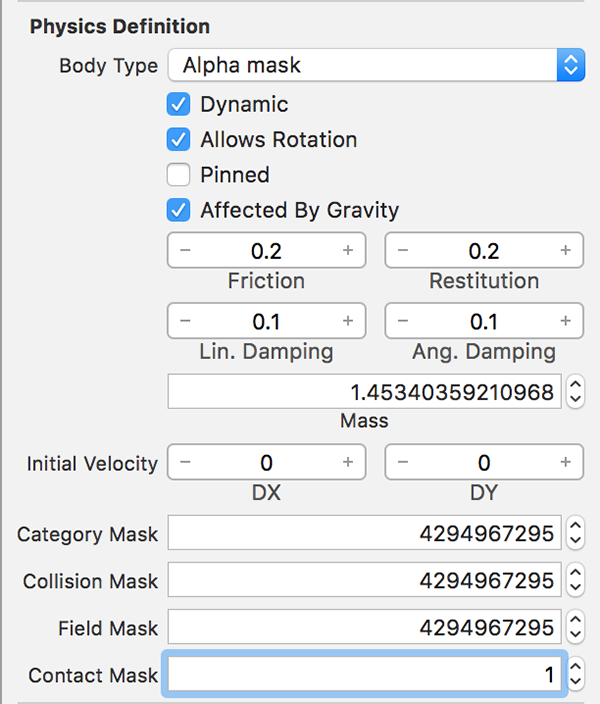
Physics bodies, including their various bit masks, can be set up in the Xcode scene editor. Open MainScene.sks, select the car, and open the Attributes Inspector on the right. Scroll down to the Physics Definition section.
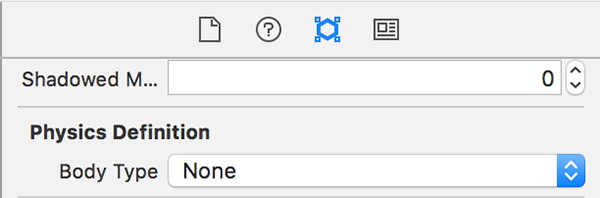
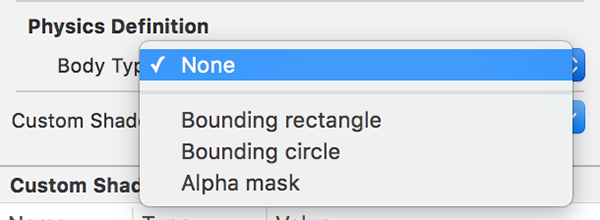
Because Body Type is set to None, none of the properties related to physics are visible. To change this, we need to set Body Type to a value other than None. Three body types are available:
- bounding rectangle
- bounding circle
- alpha mask
 Th
ThThese three physics body types are the most common in SpriteKit. Bounding rectangle and Bounding circle work by creating a barrier around the sprite to be used in physics simulations. This means that the sprite collides with another node whenever its bounding shape hits another node's physics body.
The edge of a bounding rectangle is exactly the same as the node's size shown in the scene editor. If you select Bounding circle, however, you see a thin light blue circle representing the shape of the bounding circle.
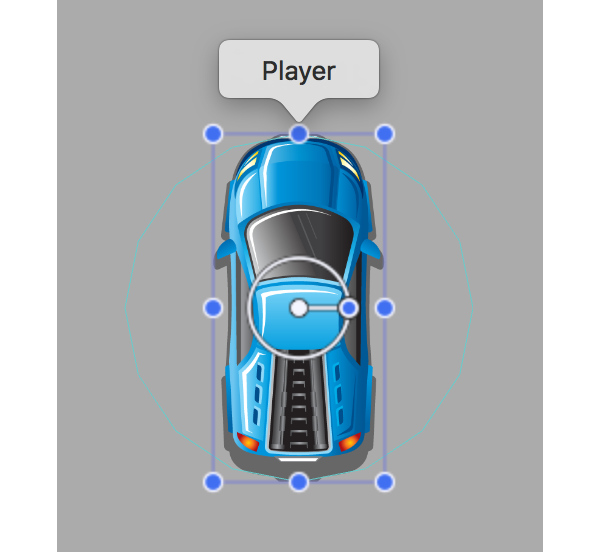
Alpha mask works a bit differently and looks at the actual image texture of the sprite to determine the physics body's edges. This body type is by far the most accurate in SpriteKit, but it can have a big impact on the performance of your game, particularly when using sprites with complex shapes.
For our game, since we are only using one car sprite and our scene is not particularly complex, we are going to use the Alpha mask body type. It is not recommended to use this body type for all sprites in your scene even though it is the most accurate. When you select this option from the drop down menu, you should see a light blue line appear around the edge of the car.
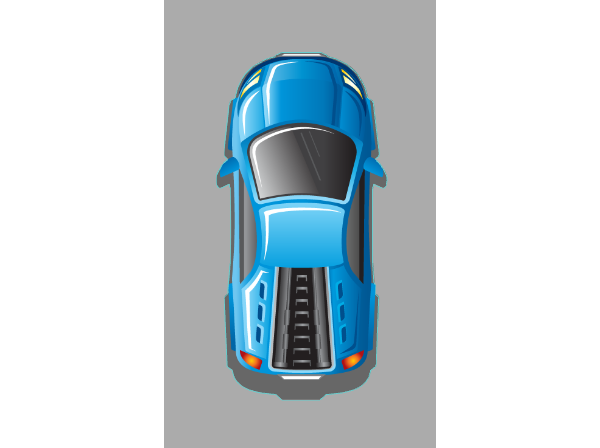
It is important to note that other types of physics bodies can be created programmatically, such as bodies from CGPath objects as well as circles and rectangles of custom sizes.
Still in the Attributes Inspector, you should now see more options available to you in the Physics Definition section. The only property we need to change is the Contact Mask. Change this to a value of 1.
With the car's physics body set up, we can start putting some obstacles into the game to collide with the car.
3. Detecting Collisions
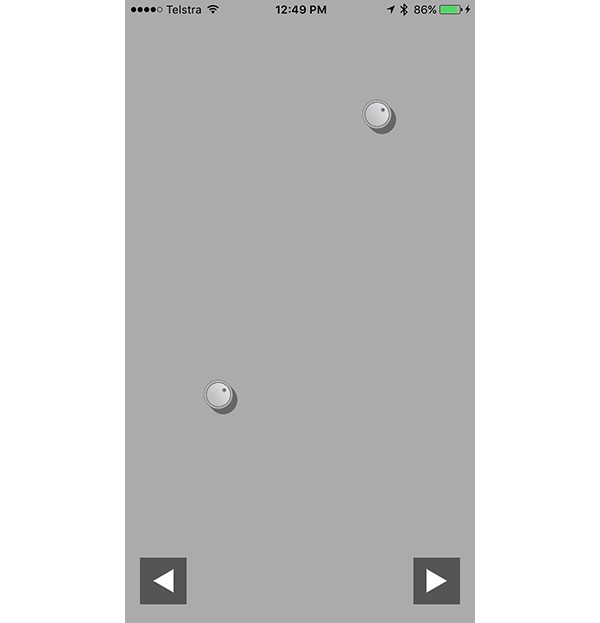
Before we implement the methods of the SKPhysicsContactDelegate protocol, we need to add some obstacles for the car to avoid. To do this, we are going to spawn a new obstacle every three seconds in front of the car and position the obstacle in a random lane.
Open MainScene.swift and add an import statement for the GameplayKit framework so we can use the random number generators provided by GameplayKit.
import GameplayKit
Next, add the following method to the MainScene class:
func spawnObstacle(timer: NSTimer) {
    if player.hidden {
        timer.invalidate()
        return
    }

    let spriteGenerator = GKShuffledDistribution(lowestValue: 1, highestValue: 2)
    let obstacle = SKSpriteNode(imageNamed: "Obstacle \(spriteGenerator.nextInt())")
    obstacle.xScale = 0.3
    obstacle.yScale = 0.3

    let physicsBody = SKPhysicsBody(circleOfRadius: 15)
    physicsBody.contactTestBitMask = 0x00000001
    physicsBody.pinned = true
    physicsBody.allowsRotation = false
    obstacle.physicsBody = physicsBody

    let center = size.width/2.0, difference = CGFloat(85.0)
    var x: CGFloat = 0

    let laneGenerator = GKShuffledDistribution(lowestValue: 1, highestValue: 3)
    switch laneGenerator.nextInt() {
    case 1:
        x = center - difference
    case 2:
        x = center
    case 3:
        x = center + difference
    default:
        fatalError("Number outside of [1, 3] generated")
    }

    obstacle.position = CGPoint(x: x, y: (player.position.y + 800))
    addChild(obstacle)
}
This method is invoked every three seconds. Let's break it down to see what is going on. If the current player node is hidden, which is true when the car hits an obstacle, then we invalidate the timer and stop spawning obstacles.
We obtain a random number between 1 and 2, and use this to create a sprite node with one of the two obstacle sprites available in the project. We then change the obstacle's scale so that they are small enough for the car to manoeuvre around.
Next, we create a physics body for this new obstacle with a circle with a radius of 15 and a contact mask of 0x00000001. We set pinned to true and allowsRotation to false so that the obstacle stays in place and doesn't move. The physics body is then assigned to the obstacle.
We generate another random number between 1 and 3 to determine which lane the obstacle should be placed in and give the obstacle its calculated position, adding it to the scene.
Note that the horizontal difference, 85, used in spawnObstacle(_:) is different from the one used when moving the car, 70. We do this to allow for a bit more space for the car to move between obstacles.
With the obstacle spawning logic in place, we can add the following code to the end of the didMoveToView(_:) method.
override func didMoveToView(view: SKView) {

    ...

    let timer = NSTimer(timeInterval: 3.0, target: self, selector: #selector(spawnInObstacle(_:)), userInfo: nil, repeats: true)
    NSRunLoop.mainRunLoop().addTimer(timer, forMode: NSRunLoopCommonModes)

    let camera = SKCameraNode()
    self.camera = camera
    camera.position = CGPoint(x: center, y: player.position.y + 200)
    let moveForward = SKAction.moveBy(CGVectorMake(0, 100), duration: 1.0)
    camera.runAction(SKAction.repeatActionForever(moveForward))
    addChild(camera)

    player.xScale = 0.4; player.yScale = 0.4 // Makes car smaller to fit better between obstacles
}
We create a timer to execute spawnObstacle(_:) every three seconds and add it to the main run loop. We also create an SKCameraNode to act as the camera for the scene and assign it to the camera property of the scene. This causes the scene to be rendered from this camera node's point of view. Note that the camera is centered horizontally and slightly above the car.
We also add an identical action to the camera so that it stays lined up with the car. We add the camera as a child node of the scene like any other regular node. Last but not least, we scale down the car so that it can fit between the obstacles a little bit better.
The last part for collision detection is implementing either one of the SKPhysicsContactDelegate protocol methods. In our case, we are going to implement the didBeginContact(_:) method as we want to be notified as soon as the car hits an obstacle. Add the following method to the MainScene class.
func didBeginContact(contact: SKPhysicsContact) {
    if contact.bodyA.node == player || contact.bodyB.node == player {
        player.hidden = true
        player.removeAllActions()
        camera?.removeAllActions()
    }
}
You can see that this method has one SKPhysicsContact parameter passed to it. This object contains key information about the collision, including its direction, impulse, and the objects involved.
In this code, we are only concerned about which nodes are involved in the collision. We check to see whether either of them was the car and, if true, hide the car in the scene and end the movement of the car and camera.
Build and run your app and play your game. You will see that, when you run into an obstacle, the car disappears and the scene stops moving.
Conclusion
You should now know how to set up physics bodies for the nodes in your scene and use these to simulate realistic physics. You should also be comfortable setting up collision detection in your scene by defining a contact delegate and assign contact test bit masks for the nodes you expect to collide with each other.
In the next tutorial of SpriteKit From Scratch, we are going to look at the more advanced visual functionality in SpriteKit, including particle systems, lights, and filters.
As always, be sure to leave your comments and feedback in the comments below.

Comments