In this series, we're taking a look at how to implement the WordPress Media Uploader in an actual plugin. The idea behind this series and its associated code is to give a clear understanding of how it works, how we can use it in the future, and how we can incorporate it into our work.
Up to this point, we've covered:
- Getting Started with the WordPress Media Uploader
- Adding and Removing Images with the WordPress Media Uploader
And throughout those articles, we've walked through the process of building a plugin that uses the WordPress Media Uploader to introduce a featured image into the footer of our blog posts (and pages).
But there's one problem: The image isn't saved nor is it displayed in the content of its associated blog post (or page).
In this article, we're going to pick up where we left off and finish implementing the rest of this plugin. Note that I'm assuming you've read the previous two posts and understand the source code that we've covered thus far.
With that said, let's resume.
Saving The Featured Image
The key to making sure that the image can be displayed on the front-end of WordPress is to save the image information that's provided by WordPress.
In the previous article, we used some of this this information to display the image in the meta box that we created, but none of that information actually saved. As such, the image can't be displayed in the dashboard or on the front-end of the site because WordPress doesn't actually remember it.
We're goign to fix that. Specifically, we're going to save fields for:
- The image URL so that we can set the image's
srcattribute - The image title so that we can set it as the image's
altattribute and as thetitleattribute
Introduce The Meta Data
The first thing that we need to do is to add another container with three input fields in the admin.php view of our plugin. Each of these fields will correspond to what of the values above.
Take a look at the code below after which I'll elaborate:
<p id="featured-footer-image-meta">
    <input type="text" id="footer-thumbnail-src" name="footer-thumbnail-src" value="" />
	<input type="text" id="footer-thumbnail-title" name="footer-thumbnail-title" value="" />
	<input type="text" id="footer-thumbnail-alt" name="footer-thumbnail-alt" value="" />
</p><!-- #featured-footer-image-meta -->
From the outset, it should be easy enough to understand:
- We've introduced a container that is identified by
featured-footer-image-meta - Has contains three input text elements each of which correspond to image element attributes that we'll be saving
At this point, we need to jump back into our JavaScript file so that we can take the information returned to us via the Media Uploader and populate the input fields with this information.
Open admin.js and then add the following three lines to the bottom of the handler function for the insert event (for file_frame):
// Store the image's information into the meta data fields
$( '#footer-thumbnail-src' ).val( json.url );
$( '#footer-thumbnail-title' ).val( json.title );
$( '#footer-thumbnail-alt' ).val( json.title );
From here, navigate to your WordPress dashboard, add a new post or edit an existing post and you should see something like the following image:
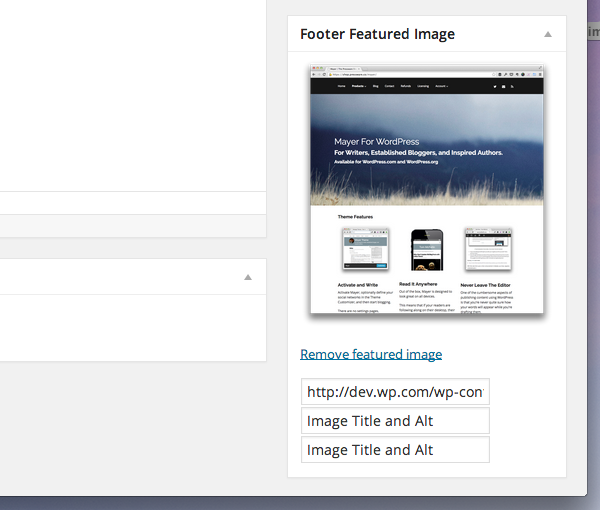
Assuming you've written all of the JavaScript directly, you should see something like this based on the data that you provided in the Media Uploader when selecting an image.
Note, however, that when you click "Remove featured image" the text remains. Before we look at actually saving this information, let's finish up the JavaScript so that it clears the input fields whenever the user removes the image.
Though there are a couple of ways to do this, I've opted to use the following code:
// Finally, we reset the meta data input fields
$( '#featured-footer-image-info' )
    .children()
    .val( '' );
Remember that this needs to be located in the event handler for the "Remove featured image" anchor. In the previous article, we named this function resetUploadForm.
At this point, you should be able to click on "Remove featured image" and see that the image and the input fields are reset. If you're having trouble, review the source code in the GitHub repository associated with this post (it will be in the master branch and will also be tagged as 1.0.0).
Saving The Meta Data
Now we need to introduce some code into the plugin that will sanitize the values of the input fields, associate them with the post, and save it to the database so that we can display the information at the footer of each post.
In the run function for Acme_Footer_Image, add the following line of code:
add_action( 'save_post', array( $this, 'save_post' ) );
Then we need to define a function that will be responsible for actually saving the values of the input fields to the database. There are two things to know about the following code:
- We're sanitizing the data before we're saving it
- We're associated the fields with keys that we will use to display the image on the front-end.
/**
 * Sanitized and saves the post featured footer image meta data specific with this post.
 *
 * @param    int    $post_id    The ID of the post with which we're currently working.
 * @since 0.2.0
 */
public function save_post( $post_id ) {

    if ( isset( $_REQUEST['footer-thumbnail-src'] ) ) {
		update_post_meta( $post_id, 'footer-thumbnail-src', sanitize_text_field( $_REQUEST['footer-thumbnail-src'] ) );
	}

	if ( isset( $_REQUEST['footer-thumbnail-title'] ) ) {
		update_post_meta( $post_id, 'footer-thumbnail-title', sanitize_text_field( $_REQUEST['footer-thumbnail-title'] ) );
	}

	if ( isset( $_REQUEST['footer-thumbnail-alt'] ) ) {
		update_post_meta( $post_id, 'footer-thumbnail-alt', sanitize_text_field( $_REQUEST['footer-thumbnail-alt'] ) );
	}

}
Before we're ready to test this, we need to make two more changes to the dashboard view before displaying the images on the front-end.
First, we need to make sure that we echo the meta data back to the input fields. Hop into the admin.php and update it one more time to include this:
<p id="featured-footer-image-info">
    <input type="text" id="footer-thumbnail-src" name="footer-thumbnail-src" value="<?php echo get_post_meta( $post->ID, 'footer-thumbnail-src', true ); ?>" />
	<input type="text" id="footer-thumbnail-title" name="footer-thumbnail-title" value="<?php echo get_post_meta( $post->ID, 'footer-thumbnail-title', true ); ?>" />
	<input type="text" id="footer-thumbnail-alt" name="footer-thumbnail-alt" value="<?php echo get_post_meta( $post->ID, 'footer-thumbnail-alt', true ); ?>" />
</p><!-- #featured-footer-image-meta -->
Here, we're making a call to the get_post_meta function to retrieve the values that are saved using the function we've declared above.
Next, we need to make sure that we populate the image element that we created earlier in this series with the same values:
<div id="featured-footer-image-container" class="hidden">
    <img src="<?php echo get_post_meta( $post->ID, 'footer-thumbnail-src', true ); ?>" alt="<?php echo get_post_meta( $post->ID, 'footer-thumbnail-alt', true ); ?>" title="<?php echo get_post_meta( $post->ID, 'footer-thumbnail-title', true ); ?>" />
</div><!-- #featured-footer-image-container -->
Of course, if the meta data is empty, then nothing will populate the attributes and the image will not display.
Assuming all goes well, you should see the image and its associated data displayed in the input fields when the save the post. Similarly, when you remove the featured image, the fields should clear out and should no longer be displayed.
Cleaning Up
Before we move on to displaying the image on the front-end, there are a few small things that we need to do in order clean up the display of the meta box.
First, we need to make sure that all of the input fields that were previous of type text are of type hidden.
<p id="featured-footer-image-info">
    <input type="hidden" id="footer-thumbnail-src" name="footer-thumbnail-src" value="<?php echo get_post_meta( $post->ID, 'footer-thumbnail-src', true ); ?>" />
	<input type="hidden" id="footer-thumbnail-title" name="footer-thumbnail-title" value="<?php echo get_post_meta( $post->ID, 'footer-thumbnail-title', true ); ?>" />
	<input type="hidden" id="footer-thumbnail-alt" name="footer-thumbnail-alt" value="<?php echo get_post_meta( $post->ID, 'footer-thumbnail-alt', true ); ?>" />
</p><!-- #featured-footer-image-meta -->
Next, we need to write a small JavaScript function that will display the image assuming that one has been saved. The function will check to see if the input field for the image URL is not an empty string.
If it's not, then it will display the image. So we add this function to our JavaScript file:
/**
 * Checks to see if the input field for the thumbnail source has a value.
 * If so, then the image and the 'Remove featured image' anchor are displayed.
 *
 * Otherwise, the standard anchor is rendered.
 *
 * @param    object    $    A reference to the jQuery object
 * @since    1.0.0
 */
function renderFeaturedImage( $ ) {

    /* If a thumbnail URL has been associated with this image
     * Then we need to display the image and the reset link.
     */
	if ( '' !== $.trim ( $( '#footer-thumbnail-src' ).val() ) ) {

		$( '#featured-footer-image-container' ).removeClass( 'hidden' );

		$( '#set-footer-thumbnail' )
			.parent()
			.hide();

		$( '#remove-footer-thumbnail' )
			.parent()
			.removeClass( 'hidden' );

	}

}
Then, make a call to the JavaScript function within the context of the DOM-ready function:
renderFeaturedImage( $ );
In short, when the page loads, it checks to see if a URL exists in our input field. If so, it renders the image and gives us the option to remove it. Otherwise, it just displays the empty featured image box.
Again, if you're having trouble following along with this code, be sure to check out the associated GitHub repository using the link in the sidebar of this page.
Displaying The Featured Image
At this point, we've done everything we need to do in the dashboard, so it's time to display the image on the front-end on the blog. In order to do this, we need to setup a hook that connects to the_content action, check to see if an image exists and, if so, append it to the post content.
To do this, first add the following line to the run method of your Acme_Footer_Image class:
add_action( 'the_content', array( $this, 'the_content' ) );
Next, we need to write a function that's hooked to this action. This function will be responsible for checking if we're only a single page (because we don't want to append an image to the footer of a post if a user has, say, a more tag as part of their content).
We do this using the following code:
/**
 * If the current post is a single post, check to see if there is a featured image.
 * If so, append is to the post content prior to rendering the post.
 *
 * @param   string    $content    The content of the post.
 * @since   1.0.0
 */
public function the_content( $content ) {

    // We only care about appending the image to single pages
	if ( is_single() ) {

		// In order to append an image, there has to be at least a source attribute
		if ( '' !== ( $src = get_post_meta( get_the_ID(), 'footer-thumbnail-src', true ) ) ) {

			// read the remaining attributes even if they are empty strings
			$alt = get_post_meta( get_the_ID(), 'footer-thumbnail-alt', true );
			$title = get_post_meta( get_the_ID(), 'footer-thumbnail-title', true );

			// create the image element within its own container
			$img_html = '<p id="footer-thumbnail">';
				$img_html .= "<img src='$src' alt='$alt' title='$title' />";
			$img_html .= '</p><!-- #footer-thumbnail -->';

			// append it to the content
			$content .= $img_html;

		}

	}

	return $content;

}
And with that, we should have a fully functional plugin appending a featured footer image to a post that renders on a single post page.
Conclusion
Throughout this series, we've covered a lot of material the least of which involved using the Media Uploader. Though this particular article spent more time showing us how to connect the data from the meta box to the front-end, it still demonstrates how to apply a practical application of the Media Uploader in the context of a plugin.
With that said, there's plenty of more to learn about the Media Uploader that we could cover in future topics. If you're interested, please let me know in the comments below. Additionally, if you have any questions about what you've read or this series in general, feel free to leave those, as well.
Don't forget to checkout the GitHub repository for this project - I hope it serves you well when working with the Media Uploader in the future!

Comments