In Part 1 of our custom meta box template tutorial series, we covered how to set up a custom meta box that loops through an array of fields and outputs each one with the necessary html for various types of form fields. Now we’re ready to start adding a few advanced items to the array and switch case.
Radio Group
Radio buttons are practically never used on their own as they are used to force a user to select one of at least two options, not as an on/off switch like a checkbox. The first thing we’ll need to do is add a radio item to our $custom_meta_fields array.
array (
	'label' => 'Radio Group',
	'desc'	=> 'A description for the field.',
	'id'	=> $prefix.'radio',
	'type'	=> 'radio',
	'options' => array (
		'one' => array (
			'label' => 'Option One',
			'value'	=> 'one'
		),
		'two' => array (
			'label' => 'Option Two',
			'value'	=> 'two'
		),
		'three' => array (
			'label' => 'Option Three',
			'value'	=> 'three'
		)
	)
)
Be sure to add this among the other array items in the original $custom_meta_fields array we started in Part 1.
This array is almost identical to our select box item. It has a main label, a description and unique id. The type is defined and then an array of options is added. It’s important that the option key is the same as the option value because we’re going to check our saved array for the saved value later.
// radio
case 'radio':
	foreach ( $field['options'] as $option ) {
		echo '<input type="radio" name="'.$field['id'].'" id="'.$option['value'].'" value="'.$option['value'].'" ',$meta == $option['value'] ? ' checked="checked"' : '',' />
				<label for="'.$option['value'].'">'.$option['label'].'</label><br />';
	}
break;
This code will be added after the last “break;” in our meta box switch.
- Loop through each option in the field’s nested “options” array
- Use an inline conditional to determine if the saved value matches the value of the current open and output the “checked” attribute if it’s true
- Use the option’s value as the unique id for the label
- Add a break at the end so that the next option is on a new line
- end it with the description field. No need for a preceding “<br />” since we have one left over from looping through the options
Checkbox Group
We’ve covered being able to use a checkbox as an on/off switch and how to be able to select one option from many, but what we want to be able to save more than one value for the same field? That’s where a checkbox group comes in handy.
array (
	'label'	=> 'Checkbox Group',
	'desc'	=> 'A description for the field.',
	'id'	=> $prefix.'checkbox_group',
	'type'	=> 'checkbox_group',
	'options' => array (
		'one' => array (
			'label' => 'Option One',
			'value'	=> 'one'
		),
		'two' => array (
			'label' => 'Option Two',
			'value'	=> 'two'
		),
		'three' => array (
			'label' => 'Option Three',
			'value'	=> 'three'
		)
	)
)
Again, we’re adding this to our $custom_meta_fields array and the set up is nearly identical to similar fields with a unique id, and the type defined.
// checkbox_group
case 'checkbox_group':
	foreach ($field['options'] as $option) {
		echo '<input type="checkbox" value="'.$option['value'].'" name="'.$field['id'].'[]" id="'.$option['value'].'"',$meta && in_array($option['value'], $meta) ? ' checked="checked"' : '',' />
				<label for="'.$option['value'].'">'.$option['label'].'</label><br />';
	}
	echo '<span class="description">'.$field['desc'].'</span>';
break;
The biggest difference here is that we’re saving this data as an array.
- Loop through each option defined in the array
- Store the data in an array by adding square brackets to the end of the name: []
- In our inline conditional for outputting the “checked” attribute, check for the value to be inside an array by using “in_array()”
- Just like before, add the value for each input, close the loop, and output the description
Taxonomy Select
Being able to have custom taxonomies for various uses is great, but sometimes you want to limit the user to only be able to select one term per post. A simple solution is to remove the default selection box WordPress adds to the Write Post page, and add it as a select box to your custom meta box.
array(
	'label' => 'Category',
	'id'	=> 'category',
	'type'	=> 'tax_select'
)
For this example, I’m just going to use the built in taxonomy, “category”. Add this to your $custom_meta_fields array. Make sure ‘id’ is identical to the name of taxonomy.
// tax_select
case 'tax_select':
	echo '<select name="'.$field['id'].'" id="'.$field['id'].'">
			<option value="">Select One</option>'; // Select One
	$terms = get_terms($field['id'], 'get=all');
	$selected = wp_get_object_terms($post->ID, $field['id']);
	foreach ($terms as $term) {
		if (!empty($selected) && !strcmp($term->slug, $selected[0]->slug))
			echo '<option value="'.$term->slug.'" selected="selected">'.$term->name.'</option>';
		else
			echo '<option value="'.$term->slug.'">'.$term->name.'</option>';
	}
	$taxonomy = get_taxonomy($field['id']);
	echo '</select><br /><span class="description"><a href="'.get_bloginfo('home').'/wp-admin/edit-tags.php?taxonomy='.$field['id'].'">Manage '.$taxonomy->label.'</a></span>';
break;
There is a little bit more information that we need for this field to work completely than the other fields we’ve already set up.
- Open the select box and add a blank value as “Select One”
- Get the all of the terms of the set taxonomy
- Get the terms that have been saved for the current taxonomy
- Begin looping through each term.
- To keeps things simple and easy to read, we’re using a full sized conditional an outputting an option that is selected if it matches the saved term, and a regular option for the rest.
- As you close the loop and the select box, we want to get a bit of information about the taxonomy and store it in a variable.
- Use the description area as an easy way to link the user to the area where they can manage the taxonomy terms. Use the label from the $taxonomy information we gathered so that the plural is correct (there’s no such thing as categorys).
Remove the Default Taxonomy Box
Since we want to override the default box with our custom select box and not have any conflicts in the UX or in saving the data, it’s necessary to remove the taxonomy’s edit box from the screen.
function remove_taxonomy_boxes() {
	remove_meta_box('categorydiv', 'post', 'side');
}
add_action( 'admin_menu' , 'remove_taxonomy_boxes' );
You could get fancy here and use the $custom_meta_fields array again to loop through each “tax_select” field and add it to this remove function, but it’s probably a lot simpler to name them individually. You’ll need to know the ID if the div for the taxonomy box in order to remove it properly. Read more about remove_meta_box() in the WordPress Codex.
Save the Terms
One final step to this field is to make sure that the taxonomy gets saved as such instead of as a custom field. To do that, we’ll go back and modify the save_custom_meta() function we created in Part 1 of this series.
First, skip it in the field loop. Find this line:
foreach ($custom_meta_fields as $field) {
and after that, add this line:
if($field['type'] == 'tax_select') continue;
Then after your foreach loop, add this:
// save taxonomies
$post = get_post($post_id);
$category = $_POST['category'];
wp_set_object_terms( $post_id, $category, 'category' );
This simply grabs the value from our category select field, then sets it as the taxonomy terms for the post.
Post Select
Another unlikely but useful field is to associate another post with a post by saving the ID in a custom field. This is very CMS-like and I have found it to be useful for things like linking a slide post type to go to another post or page on the site just by selecting it from a dropdown menu. You can use the ID to query the post later on in another function to get any information you need from that post.
array(
	'label' => 'Post List',
	'desc' => 'A description for the field.',
	'id' 	=>  $prefix.'post_id',
	'type' => 'post_list',
	'post_type' => array('post','page')
)
We have all of our usual suspects here, but then at the end we’ve added an additional variable the saves which post types you want to be in the list. You can include, posts, pages, and any other custom post type in this array.
// post_list
case 'post_list':
$items = get_posts( array (
	'post_type'	=> $field['post_type'],
	'posts_per_page' => -1
));
	echo '<select name="'.$field['id'].'" id="'.$field['id'].'">
			<option value="">Select One</option>'; // Select One
		foreach($items as $item) {
			echo '<option value="'.$item->ID.'"',$meta == $item->ID ? ' selected="selected"' : '','>'.$item->post_type.': '.$item->post_title.'</option>';
		} // end foreach
	echo '</select><br /><span class="description">'.$field['desc'].'</span>';
break;
There are a lot of options you can add to filter this query, but we’re using a basic grab of all posts of the set post types.
- Query all posts
- Open the select field and add a blank value
- Loop through each post and set the ID as the value of the option, and the title labeled with the post type as the displayed text to select from
- Close the loop and the select field and add the description
Conclusion
If you’ve been following along with both parts of this series so far, your final box should look like the one pictured here:
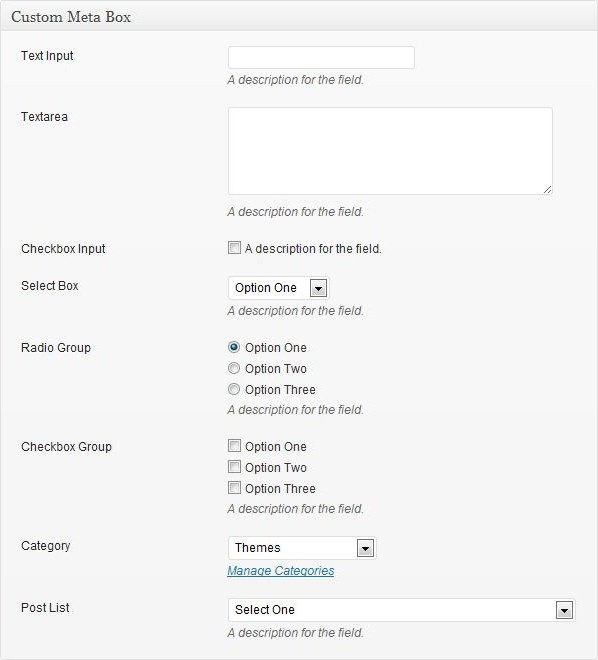
We are really filling out our reusable template for creating repeatable custom meta box fields with the additional of this advanced and perhaps even unorthodox fields. We’ll wrap up the series in the next post with a few even trickier but useful fields like a datepicker and image uploader.

Comments