Reusing code is one of the strengths of modern coding techniques. It simplifies your theme files and speeds up the development process by not having to constantly rewrite code. WordPress has a few standard includes built in, such as get_header(), get_footer(), and get_sidebar(). However, since WordPress 3.0 you can easily create your own custom includes using the get_template_part() function.
What are Includes and why should I use them?
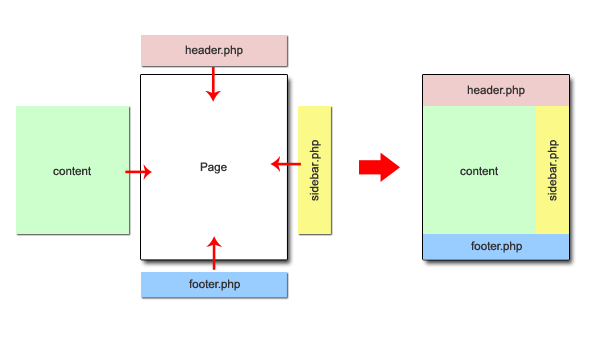
For those of you not familiar with includes, the concept is pretty simple. Think of it as different pieces of a puzzle being put together to make a whole picture.
The main advantage of using includes is that you can modify a single piece of code and have the changes display throughout the site without having to modify every page.
They’re also used to reduce the amount of code that needs to be written or modified, since you can re-use the same piece of code in multiple locations.
In addition, includes can be used to simplify a complex page of code by separating it into smaller chunks.
For theme developers, custom includes can be very useful in creating your own custom page templates. If the the template design requires a different sidebar or header to be used, creating the file as a custom include can be more useful than editing the main sidebar file.
Creating and using a custom include
So, now that we have the basics of what an include is all about, let’s go through a quick exercise in creating our own with WordPress’s get_template_part(); function.
For this example, we’re going to create a custom sidebar to use on the 404 page of WordPress’s default twentyten theme.
Step 1: Create the custom sidebar file
Create a new, blank document using your favorite code editor and add the following code:
<div id="primary" class="widget-area" role="complementary">
  <ul class="xoxo">

  </ul>
</div>
This provides us with the base div for the sidebar using the ID’s and classes that work with the twentyten CSS file.
Next, add the following code between the ul tags to add a search form:
   <li id="search" class="widget-container widget_search">
      <?php get_search_form(); ?>
   </li>
After the search li, we’re going to add a list of all the site pages:
   <li id="list_pages" class="widget-container">
      <h3 class="widget-title">Pages</h3>
      <ul>
        <?php wp_list_pages(); ?>
      </ul>
   </li>
Once you’ve added all the code, your completed sidebar code should look like this:
<div id="primary" class="widget-area" role="complementary">
  <ul class="xoxo">
    <li id="search" class="widget-container widget_search">
      <?php get_search_form(); ?>
    </li>
    <li id="list_pages" class="widget-container">
      <h3 class="widget-title">Pages</h3>
      <ul>
        <?php wp_list_pages(); ?>
      </ul>
    </li>
  </ul>
</div>
File Name Structure for get_template_part();
Before we get into naming and saving the include file, we need to understand how naming your file is important to get_template_part();
Include file names adhere to the following format:
{slug}-{name}.php
The concept behind the name of the file can be a little difficult for newcomers to grasp, but it’s pretty simple when you break it down:
“slug”
The slug is the generic or general name of the file. Think of the slug as the category or type of file to be included. For example, if we’re creating a file that is a sidebar, we might give it a slug of “sidebar”. Same can be said if the include file we’re creating is a type of footer, we might give it a slug of “footer”.
Now, multiple files can have the same slug and are distinguished from each other using a second parameter called a “name”.
“name”
The second parameter of a file name or “name” is the unique identifier for that specific file.
So, let’s say we’re going to create a sidebar to be used only on the 404 page.
In this case we might name our include “sidebar-errorpage.php”.
This tells the system that the file is a “sidebar” and has a name of “errorpage”.
You can use any unique combination of slugs and names as long as they’re in the format of:
{slug}-{name}.php
For example “dodad-lower.php” or “dodad-upper.php”.
Step 2: Name the file
Now that we understand how to name our file, let’s get back to our exercise and save our custom sidebar.
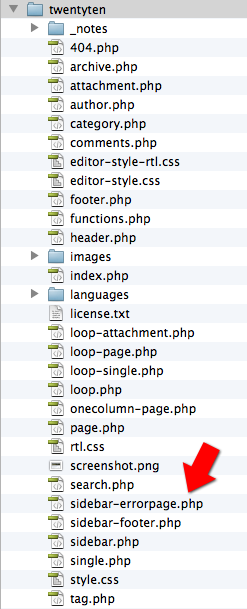
Go back to your editor and save it to the twentyten theme folder as:
sidebar-errorpage.php
NOTE: It is important to save it to the theme’s root folder and not the site root folder, otherwise, WordPress won’t be able to find it.
Step 3: Including your file on a template page
Once we have the include file named and saved to the twentyten theme folder, let’s include it on the 404.php page template.
We include a file on a page with the following function (with generic variables added):
<?php get_template_part($slug, $name); ?>
To use this function, we simply replace $slug with the slug we used to save our file and $name with the name we used to save the file.
Open up the twentyten 404.php page and add the following code just above the get_footer(); function:
<?php get_template_part('sidebar', 'errorpage'); ?>
As you can see, it has the slug and the name we used in the file to tell the function which file to use.
Here’s the whole code for that page with our include function near the end of the code:
<?php
/**
 * The template for displaying 404 pages (Not Found).
 *
 * @package WordPress
 * @subpackage Twenty_Ten
 * @since Twenty Ten 1.0
 */

get_header(); ?>

	<div id="container">
		<div id="content" role="main">

			<div id="post-0" class="post error404 not-found">
				<h1 class="entry-title"><?php _e( 'Not Found', 'twentyten' ); ?></h1>
				<div class="entry-content">
					<p><?php _e( 'Apologies, but the page you requested could not be found. Perhaps searching will help.', 'twentyten' ); ?></p>
					<?php get_search_form(); ?>
				</div><!-- .entry-content -->
			</div><!-- #post-0 -->

		</div><!-- #content -->
	</div><!-- #container -->
	<script type="text/javascript">
		// focus on search field after it has loaded
		document.getElementById('s') && document.getElementById('s').focus();
	</script>
<?php get_template_part('sidebar', 'errorpage'); ?>
<?php get_footer(); ?>
Save the 404.php template page with the edits we’ve made.
Step 4: Upload and check your work.

After you’ve saved your 404.php and sidebar-errorpage.php file, it’s time to see if it worked.
Upload both the 404.php and sidebar-errorpage.php to your server and enter a url in your site that you know does not exist to get to the 404 error page.
For example: http://www.yoursite.com/tieowkf
If all worked well, you should see the sidebar with only the search and the page listing we just created.
Then, if you navigate to any other page on the site, you should see the standard sidebar on those pages.
If you see nothing at all, check the following to make sure there were no mis-steps along the way:
- The include file is named sidebar-errorpage.php.
- The include file is saved to the twentyten theme folder.
- The include file is uploaded to the server.
- You entered the “slug” and “name” correctly in the get_template_part(); function.
Conclusion
There are many ways of including files in a WordPress document, however using WordPress’s built-in get_template_part(); function will help keep your files organized and clean by using a common WordPress taxonomy and structure.
There are much more powerful and complex ways to use this function to include our files, but this gives you a base to get you started.
I encourage you to check out the code of the twentyeleven theme included in WordPress to see other ways you can use this code.

Comments