Building an Android app that has multiple active components communicating with each other can get tedious. To save time, developers often end up with tightly coupled components in their apps. EventBus is a popular open-source library that was created to solve this problem using the publisher/subscriber pattern.
Using the EventBus library, you can pass messages from one class to one or more classes in just a few lines of code. Moreover, all classes involved are completely decoupled from each other, leading to code that is less complex, and easier to maintain and debug.
In this quick tip, you are going to learn how to use the EventBus library by building a simple Android application that displays the charging status of the device. Because changes in the charging status are system events, the app is going to have an Activity that needs to receive information from a BroadcastReceiver—the perfect scenario for using an event bus.
Prerequisites
Ensure that you have the Eclipse ADT Bundle set up. You can download it from the Android Developer website.
1. Create New Project
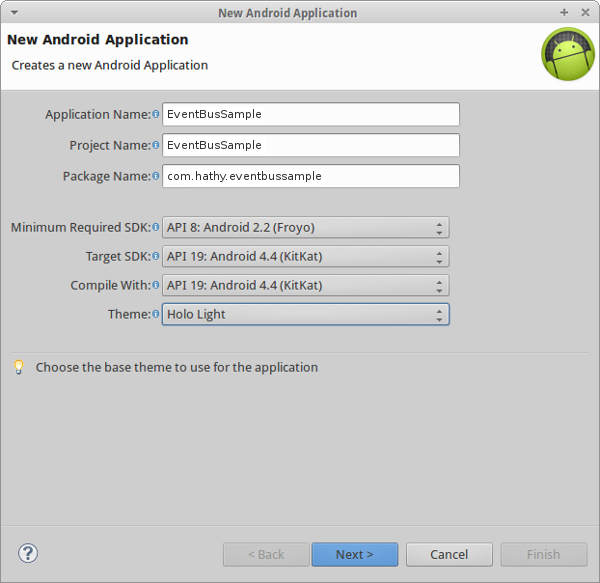
Start Eclipse and create a new Android application. Name the application EventBusSample. Choose a unique package name and set the Minimum Required SDK to Android 2.2 and the Target SDK to Android 4.4.
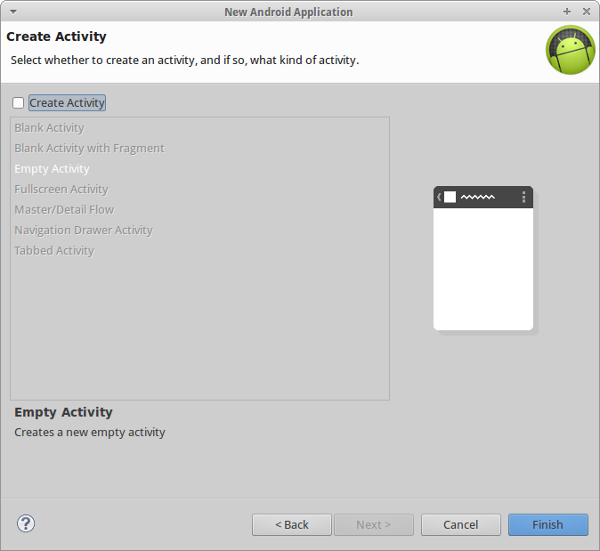
We're going to create the Activity ourselves, so deselect Create Activity and click Finish.
2. Edit Manifest
This app has one BroadcastReceiver that responds to the following actions:
android.intent.action.ACTION_POWER_CONNECTEDandroid.intent.action.ACTION_POWER_DISCONNECTED
Name the BroadcastReceiver ChargingReceiver and declare it in the AndroidManifest.xml file.
<receiver android:name=".ChargingReceiver">
    <intent-filter>
        <action android:name="android.intent.action.ACTION_POWER_CONNECTED" />
        <action android:name="android.intent.action.ACTION_POWER_DISCONNECTED" />
    </intent-filter>
</receiver>
The app has one Activity to display the charging status. Name it DisplayActivity and declare it as shown below.
<activity android:name=".DisplayActivity">
    <intent-filter>
        <action android:name="android.intent.action.MAIN"/>
        <category android:name="android.intent.category.LAUNCHER" />
    </intent-filter>
</activity>
3. Add EventBus Library
Download the latest version of the EventBus library as a JAR from Maven Central and add the JAR in your project's libs directory.
4. Create ChargingEvent Class
Events on the event bus are nothing but objects containing the information that needs to be communicated. Let ChargingEvent be the name of the class that contains the information passed from the BroadcastReceiver to the Activity. This is a simple class that has only a String to represent the information. It also has a constructor to set the value of the string and an accessor to get its value.
Create a new file named ChargingEvent.java and add the following code to it:
package com.hathy.eventbussample;

public class ChargingEvent {
    private String data;

	public ChargingEvent(String data){
		this.data = data;
	}

	public String getData(){
		return data;
	}
}
5. Create BroadcastReceiver Class
Create a new class named ChargingReceiver that extends BroadcastReceiver. This class uses the event bus to publish messages. It has a variable named bus, which references the bus created by the EventBus library. The bus is a singleton and you have to use the getDefault method to refer to it.
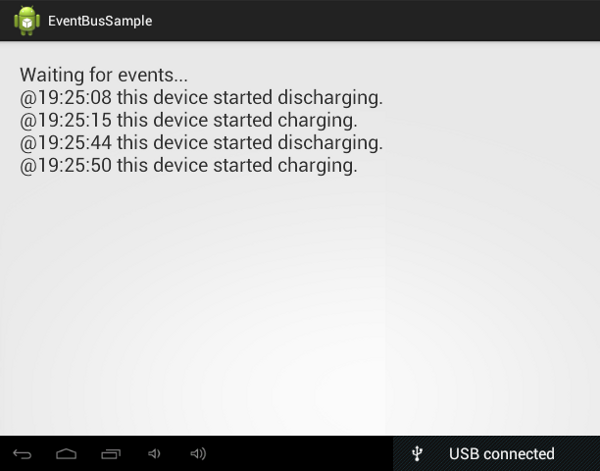
In the onReceive method, we create a new instance of the ChargingEvent class and add our message to it. Here is a sample message:
@14:23:20 this device started charging.
To generate this message, we need to do the following:
- Use the methods available in the
Timeclass to set the time at which the event occurred. - Append the string "this device started charging | discharging" based on
the action received. If the action received is
Intent.ACTION_POWER_CONNECTED, the device is charging. If it isIntent.ACTION_POWER_DISCONNECTED, the device is discharging.
Once the ChargingEvent object has the right information, it is published on the event bus using the post method. The implementation of the ChargingReceiver class should now look like this:
package com.hathy.eventbussample;

import de.greenrobot.event.EventBus;
import android.content.BroadcastReceiver;
import android.content.Context;
import android.content.Intent;
import android.text.format.Time;

public class ChargingReceiver extends BroadcastReceiver {

    private EventBus bus = EventBus.getDefault();

	@Override
	public void onReceive(Context context, Intent intent) {
		ChargingEvent event = null;

		// Get current time
		Time now = new Time();
		now.setToNow();
		String timeOfEvent = now.format("%H:%M:%S");

		String eventData = "@" + timeOfEvent + " this device started ";
		if(intent.getAction().equals(Intent.ACTION_POWER_CONNECTED)){
			event=new ChargingEvent(eventData+"charging.");
		} else if(intent.getAction().equals(Intent.ACTION_POWER_DISCONNECTED)){
			event=new ChargingEvent(eventData+"discharging.");
		}

		// Post the event
		bus.post(event);
	}

}
As you can see, publishing messages to the event bus takes just a single line of code. Moreover, the publisher doesn't need to know anything about the subscriber(s).
6. Create DisplayActivity Class
Create a new class named DisplayActivity. This class is responsible for displaying the messages of the events published on the event bus.
This class too has a variable that references the event bus. As the EventBus library follows the singleton pattern, the instance of the event bus available to this Activity is the same as the instance available to the BroadcastReceiver.
To allow a class to subscribe to events on the bus, the register method is invoked. In our Activity, we call it in the onCreate method.
Similarly, to stop receiving events, the unregister method is invoked. We call this method in the onDestroy method to make sure all resources are freed.
The Activity has a very basic layout, containing only a TextView that displays the messages. There's therefore no need to create a layout for it. We simply use the TextView as the content view of the Activity.
At this point, the implementation of the DisplayActivity class should look like this:
package com.hathy.eventbussample;

import android.app.Activity;
import android.os.Bundle;
import android.widget.TextView;
import de.greenrobot.event.EventBus;

public class DisplayActivity extends Activity {

	private EventBus bus = EventBus.getDefault();

	private TextView view;

	@Override
	protected void onCreate(Bundle savedInstanceState) {
		super.onCreate(savedInstanceState);

		view = new TextView(this);

		view.setTextSize(20f);
		view.setPadding(20, 20, 20, 20);
		view.setText("Waiting for events...");

		setContentView(view);

		// Register as a subscriber
		bus.register(this);
	}

	@Override
	protected void onDestroy() {
		// Unregister
		bus.unregister(this);
		super.onDestroy();
	}

}
Every class that intends to receive events from the event bus should contain an onEvent method. The name of this method is important, because the EventBus library uses the Java Reflection API to access this method. It has a single parameter that refers to the event. In our case, the parameter is going to be of type ChargingEvent.
All we do in this method is append the last received message to the contents of the TextView. The implementation of the onEvent method looks like this:
public void onEvent(ChargingEvent event){
    view.setText(view.getText() + "\n" + event.getData());
}
7. Run and Test
The app is now ready to be tested. Compile and run it on a physical Android device. Once the app has finished launching, plug and unplug the power cord a couple of times to see the charging status changing.
Conclusion
In this tutorial, you've learnt how to use the EventBus library and how much it simplifies the communication between classes. The library is optimized for the Android platform and is very lightweight. This means that you can use it in your projects without having to worry about the size of your app. To learn more about the EventBus library, visit the project on GitHub.

Comments