Geolocation is a crucial aspect of mobile development. Fortunately, finding the location of users on Windows Phone 8 is easy! This tutorial will show you how it's done by demonstrating the Geolocator class.
Tutorial Overview
The Windows Phone SDK is a very powerful development platform that lets developers create great applications with the Silverlight framework. The recent upgrade of the SDK to version 8.0 (Windows Phone 8) brings about a host of changes that makes some generic tasks easier to perform. One of the areas that saw an improvement in Windows Phone 8 is the Location API. In previous versions of the windows phone SDK, getting a user’s current location was a bit untidy, but the current technique for doing this has been polished and made a bit more direct.
The new technique uses Microsoft's ASYNC method call, which improves performance of applications while gaining access to a user's location. Let's dive in and take a look at this new way of accessing the current location on Windows Phone 8.
Prerequisites
To attempt this tutorial, I will assume you have a basic understanding of the Windows Phone platform. I would also like to believe you have some basic understanding of XAML and C# as these are the language we are going to write our application with. You will also need to have Visual Studio 2012 or higher with the Windows Phone 8 SDK and a working Windows Phone emulator installed on your local machine. You can alternatively use an actual Windows Phone device in place of the emulator.
1. Create a New Project
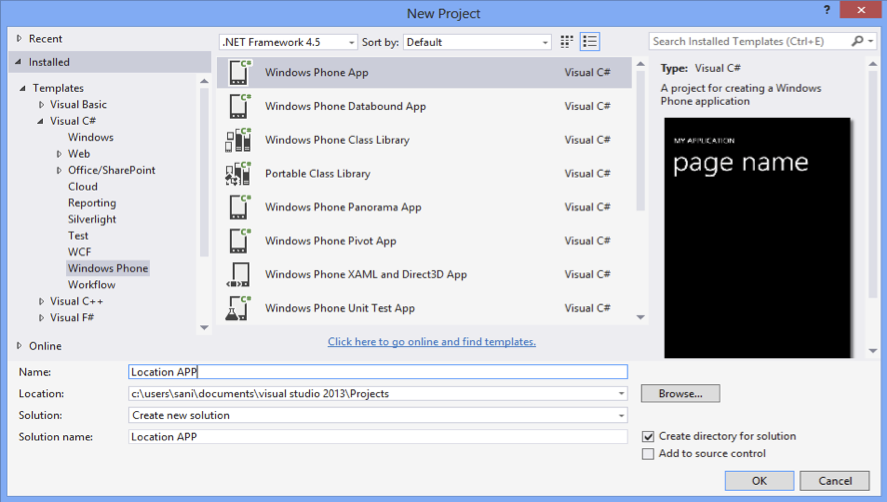
Open Visual Studio and create a new Windows Phone project with File -> New -> Project.
On the left hand pane of the new project window make sure you select the Windows Phone option under the Visual C# sub category. Choose Windows Phone App on the main window and name the project anything you would like and then click OK when you are done.
2. Setup the User Interface
Now that we have created our Application, we can focus on our main goal -getting the user's current location and displaying it on the screen. In simple terms, our application is going to have only 2 elements displayed, a Button and a TextBlock. The Button would be what we would click to tell our app to grab a user’s current location, and the TextBlock would display the geo coordinates of our current location.
Let’s go ahead and create our simple user interface. Use the Visual Studio ToolBox to drag and drop a Button and a TextBlock anywhere on the screen. At this point, your application should have a TextBlock and a Button as part of its User Interface.
It should look similar to this:
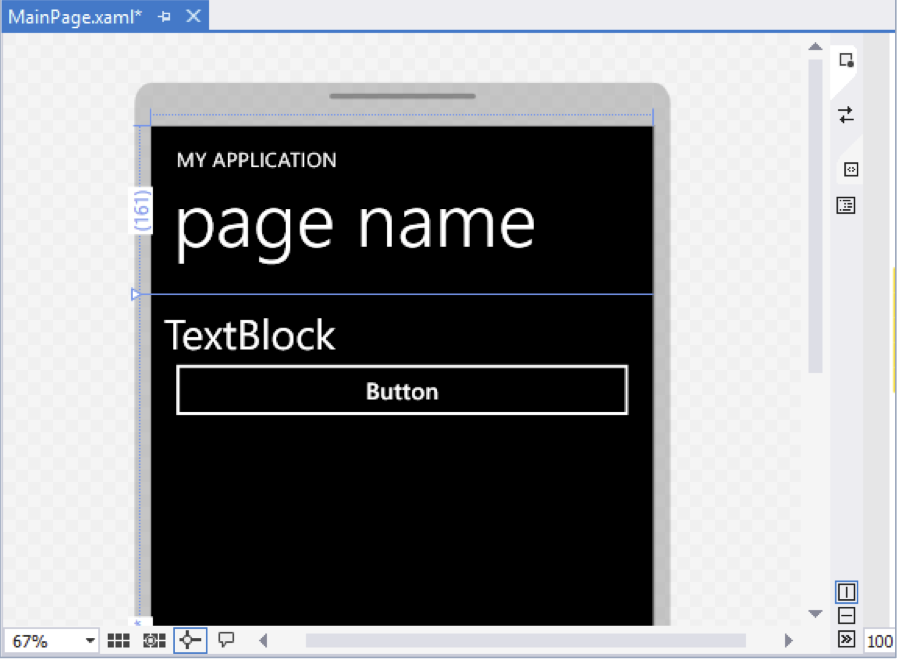
I would strongly recommend you to change the name property of both your Button and TextBlock in order to be consistent with this tutorial. Set the name of the Button to be MyButton and of the TextBlock to be MyTextBlock from your XAML code window.
<Button Name="MyButton" Content="Button" HorizontalAlignment="Left" Margin="0,76,0,0"
VerticalAlignment="Top" Width="456" Click="Button_Click"/>


<TextBlock x:Name="MyTextBlock" HorizontalAlignment="Left" Margin="0,10,0,0"
TextWrapping="Wrap" Text="TextBlock" VerticalAlignment="Top" Height="61" Width="456"
FontSize="27"/>
3. Add Geolocation Logic
At this point, we have our UI ready and we can go ahead and start writing the logic for our application. Double-click the Button from the designer view and Visual Studio should automatically take you to the code view with a method already created.
private void MyButton_Click(object sender, RoutedEventArgs e)
{

}
This generated method is a delegate or call back method for the click event of our button. This means the code within this method will only execute when our button is clicked. To align with our aim, we would put the code that gets our current location within this method since we want our current location determined whenever our Button is clicked. To achieve this, we are going to use the GeoLocator and the GeoPosition classes.
The GeoLocator class helps get our current location and does all the interaction with the GPS/Network and returns a GeoPosition object. On the other hand, the GeoPosition class provides us with a way of consuming the returned data that the GeoLocator returns. Basically, think of the GeoLocator as a request tool and the GeoPosition object as a response tool. These classes also provide room for customizing our requests and responses. For example, we can tell the GeoLocator how accurate (to the nearest meter) we want our current location to be, and how fast we want our current location polled.
I have written a method that helps get our current location and I will explain it in detail a bit later. For now, add the following namespace reference to your: Windows.Devices.Geolocation;. Next, copy the code snippet below and paste it in:
private async void GetCurrentLocation()
{
    Geolocator locationFinder = new Geolocator
    {
        DesiredAccuracyInMeters = 50,
        DesiredAccuracy = PositionAccuracy.Default
    };
    try
    {
        Geoposition currentLocation = await  locationFinder.GetGeopositionAsync(
            maximumAge: TimeSpan.FromSeconds(120),
            timeout: TimeSpan.FromSeconds(10));
            String longitude = currentLocation.Coordinate.Longitude.ToString("0.00");
            String latitude = currentLocation.Coordinate.Latitude.ToString("0.00");
            MyTextBlock.Text = "Long: " + longitude + "Lat: " + latitude;
    }
    catch (UnauthorizedAccessException)
    {
       MessageBox.Show("And Exception Occured");
    }
}

This method does all the work for us and even goes ahead to set our TextBlock text property for us. Let’s closely examine what the method is doing.
Firstly, we create a new GeoLocator Object called locationFinder. We then first tell it how accurate in meters we want our location to be and we set how accurate we want the result.
Geolocator locationFinder = new Geolocator
{
    DesiredAccuracyInMeters = 50,
    DesiredAccuracy = PositionAccuracy.Default
};
Next, we instantiate a GeoPosition object called currentLocation within a try/catch block in case of any exceptions. We then assign it to the returned GeoPosition object that our GeoLocator object returns using the GetGeoPostionAsync method.
Geoposition currentLocation = await locationFinder.GetGeopositionAsync(
    maximumAge: TimeSpan.FromSeconds(120),
    timeout: TimeSpan.FromSeconds(10));
String longitude = currentLocation.Coordinate.Longitude.ToString("0.00");
String latitude = currentLocation.Coordinate.Latitude.ToString("0.00");
Finally, we get our returned longitude and latitude and set our TextBlock to display these values.
MyTextBlock.Text = "Lon: " + longitude + "Lat: " + latitude;
It is that simple! There are a few more things to do before we test our application. First, we need to call our GetCurrentLocation method within the delegate method of our Button that was created for us initially.
private void MyButton_Click(object sender, RoutedEventArgs e)
{
    GetCurrentLocation();
}
This means that whenever we click our button, our GetCurrentLocation Method will execute and our current location would be retrieved for us.
Finally, we need to request permission to use the Location API on Windows Phone. We do this by editing our manifest file. In the solutions explorer, look for an entry titled Properties, and toggle it to see its subentries. One of the subentries filenames should be WMAppManifest.xml. Double-click this and you will see a GUI with four tabs, one of these is titled Capabilities. Select that tab and you should see something like this:
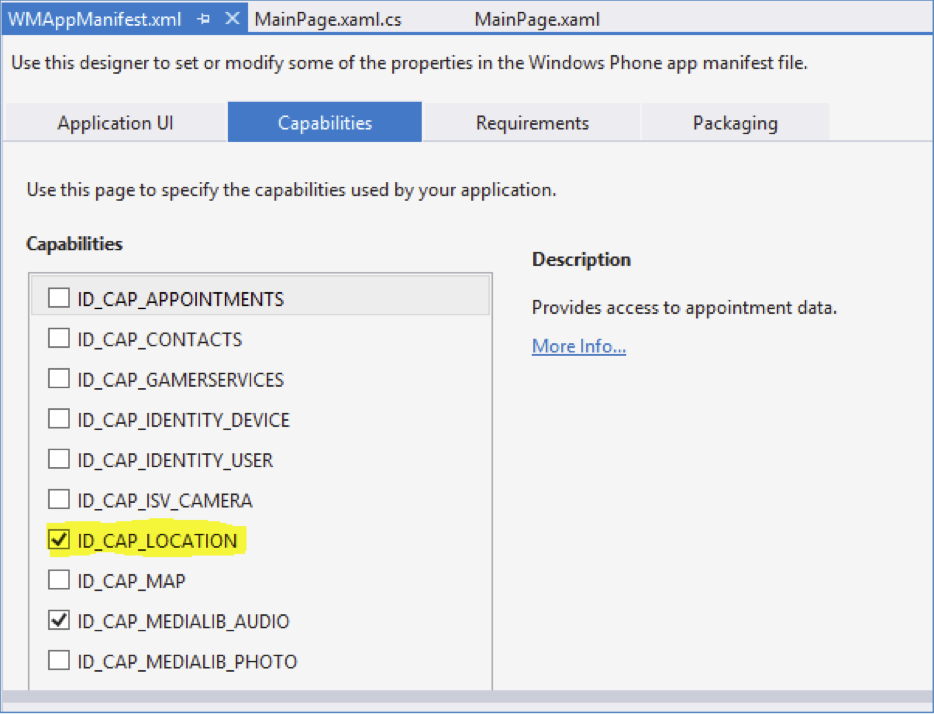
Now, check the Option ID_CAP_LOCATION if unchecked and save your project (CTRL + S). With that done, you can close the WMAppManifest.xml window. What we have just done is explicitly requested permission to allow our App to use the Windows Phone GPS/Location tool. With that done, we can now run our application for the first time!
If you are using a physical windows phone device for testing, make sure you have Location turned on in the setting and have a valid internet connection over a Wifi or Mobile network. This is very important and mandatory for our application to work. If you are using a windows phone emulator, also make sure the Location is enabled as well on the Emulator and that the Internet connection is a working one.
To launch the application, look for the Green Play Button on the visual studio menu and select your emulator or Device option if you are using a handset. Make sure the solution configuration on the right side of the button is set to Debug.

4. Test the App
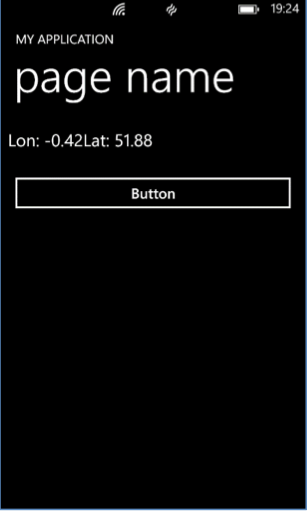
Click the Green Button to launch the application. The app should launch and display the page we drew our UI upon. Now, click the button to command the app to get our current location coordinates and you should be presented with a result that looks like this:
Conclusion
By now you may have noticed that we have successfully achieved what we set out to achieve and our current location is being displayed to us. You can see how easy it was to achieve this with such minimal programming! This is a very simple yet important operation in Windows Phone development Feel free to play around with the customizable settings of the GeoLocator and GeoPosition classes. Thanks for reading!

Comments