The first developer preview of Android O has arrived!
In this series of tips we’ll be exploring some of the new UI features that you can look forward to in the upcoming release of Android O(reo?).
In this first tip, we’ll be getting some hands-on experience with Android O’s new text autosizing feature, which lets you create text that contracts and expands automatically to fit the current layout.
Since this is our first look at Android O here at Envato Tuts+, let’s start by making sure our development environment is Android O-ready.
Set Up the Developer Preview
Currently, you can only access the Android O Developer Preview via the latest canary build of Android Studio.
Canary builds are the bleeding edge of Android Studio, and are typically updated on a weekly basis. While these builds are tested, they’re less stable than the official Android Studio releases, and therefore aren’t recommended for production development.
To download the latest canary build and grab the Android O preview, first launch Android Studio and select Android Studio > Preferences… from the toolbar. Select Appearance & Behavior > System Settings > Updates, and from the dropdown menu select Canary Channel.
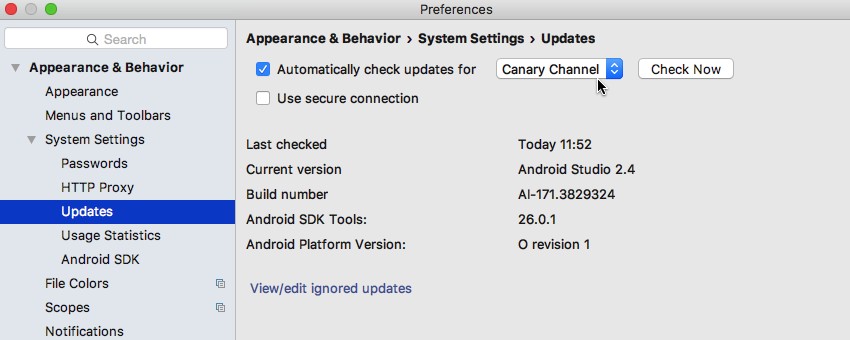
Then, click the accompanying Check Now button to download the latest release from the Canary Channel.
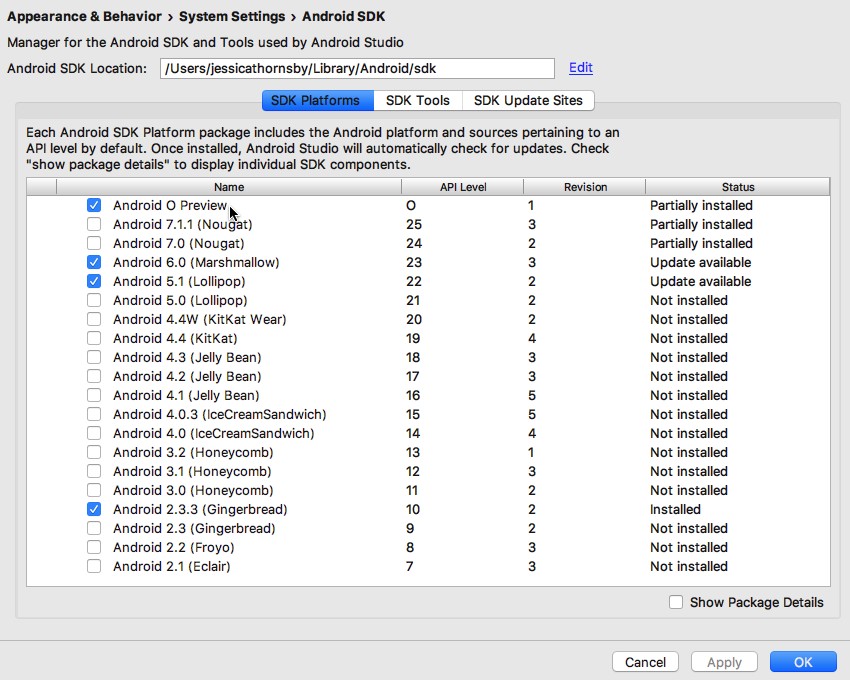
Next, restart your IDE, and open the SDK Manager. Making sure the SDK Manager’s SDK Platforms tab is selected, select the Android O Preview component.
Then switch to the SDK Tools tab, and select the following:
- Android SDK Build-Tools 26.0.0 (rc1 or higher)
- Android SDK Platform-Tools 26.0.0 (rc1 or higher)
- Android Emulator 26.0.0
- Support Repository
Click the OK button to download all of these components.
Finally, create a new Android project that targets Android O. For the sake of simplicity, set the project’s minimum SDK to Android 7+ O Preview and then select Empty Activity.
Configure Your Gradle File
Once Android Studio has created your project, open its module-level build.gradle file and change the buildToolsVersion version and the Support Library version to the latest releases:
apply plugin: 'com.android.application'

android {
  compileSdkVersion 'android-O'
  buildToolsVersion '26.0.0-rc1'
  defaultConfig {
      applicationId "com.jessicathornsby.myapplication"
      minSdkVersion 'O'
      targetSdkVersion 'O'
      versionCode 1
      versionName "1.0"
      testInstrumentationRunner "android.support.test.runner.AndroidJUnitRunner"
  }
Throughout this series, we’ll be adding a number of Android O features to this sample app. If you’re going to experience these features in action, then you’ll need to create an AVD that’s running the Android O system image. Launch Android Studio’s AVD Manager, select Create Virtual Device… and then follow the onscreen instructions to create an AVD. You can use the settings of your choice, but when Android Studio prompts you to select your system image, make sure you select O.
Creating More Dynamic Text
One of the new UI features that we can look forward to in Android O is text autosizing. With the addition of a few XML attributes, you can create TextViews that automatically increase and decrease the size of your text so it always fits perfectly within the confines of the TextView.
This automatic scaling can ensure your text remains easy to read across Android’s huge range of different screen sizes and densities. Auto-resizing can also help you avoid strange empty spaces in your layout, or text that gets cut off mid-sentence because you tried to cram too many words into a TextView.
There are two ways that you can implement text autosizing:
-
Granularity. This approach allows you to specify a minimum and maximum text size, plus a granularity value, which is how much your text can increase or decrease in size with each “step.” The
TextViewwill then scale your text horizontally and vertically by this incremental value, until it fits theTextViewperfectly. -
Preset sizes. This is where you define an array of all the sizes your text can possibly be. Android O will then select the most appropriate size from this array, based on the
TextView’s dimensions.
Whatever method you choose, you’ll always need to add the android:autoSizeText="uniform" XML attribute to your TextView, so open your layout resource file and add this element now.
Granularity
To implement autosizing using granularity, you’ll need to add the following XML attributes to your TextView:
-
autoSizeMinTextSize: The minimum size theTextViewcan use. -
autoSizeMaxTextSize: The maximum size theTextViewcan use. -
autoSizeStepGranularity: The increment value. This is1pxby default.
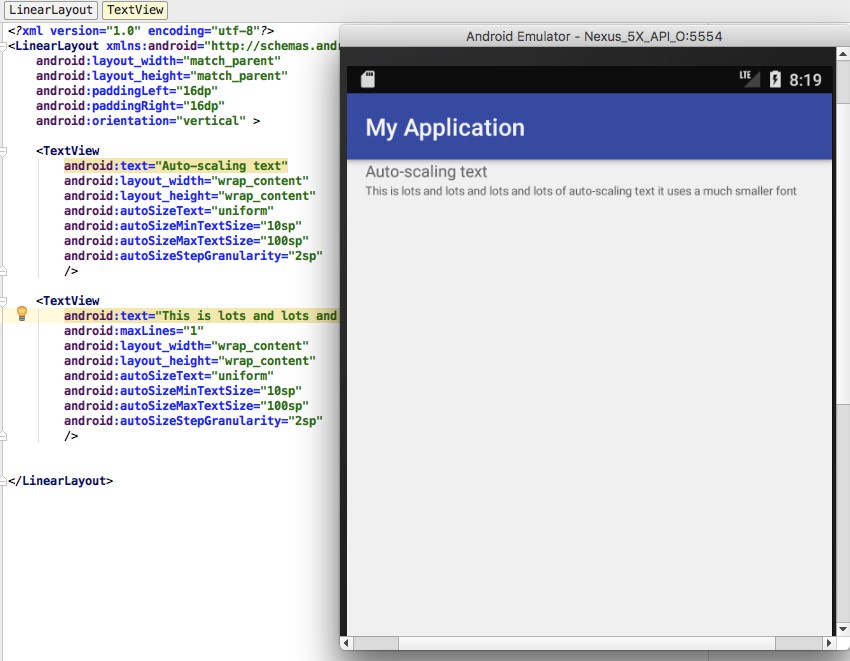
Here, I’m creating a view that can resize its text between 10sp and 100sp, in increments of 2sp:
<TextView
  android:text="This is some auto-scaling text"
  android:layout_width="wrap_content"
  android:layout_height="wrap_content"
  android:autoSizeText="uniform"
  android:autoSizeMinTextSize="10sp"
  android:autoSizeMaxTextSize="100sp"
  android:autoSizeStepGranularity="2sp"/>
Preset Sizes
The other option is to create an array of supported text sizes. Android O will then choose the most appropriate value from this list, based on the amount of text it has to display, the TextView’s dimensions, and the current screen configuration.
If your project doesn’t already contain an arrays.xml file, then you can create one by right-clicking your project’s res/values directory and selecting New > Values Resource File. In the window that appears, give this file the name arrays, and then click OK.
You can then open your new res/values/arrays.xml file and define all the sizes you want your TextView to use.
<?xml version="1.0" encoding="utf-8"?>
<resources>
  <array
      name="autosize">
      <item>10sp</item>
      <item>15sp</item>
      <item>25sp</item>
      <item>30sp</item>
      <item>100sp</item>
      <item>150sp</item>
  </array>
</resources>
Finally, reference this array using the autoSizePresetSizes attribute, for example:
<TextView
  android:text="This is some auto-scaling text"
  android:layout_width="wrap_content"
  android:layout_height="wrap_content"
  android:autoSizeText="uniform"
  android:autoSizePresetSizes="@array/autosize" />
Don't Forget to Test!
Once you’ve added autosizing to a TextView, boot up your Android O AVD and take a look at how your TextView renders on an emulated Android O screen. To check that autosizing is working correctly, update your TextView to display different amounts of text, and then see what impact this has on the final rendered image you see onscreen.
If you do implement autosizing, then it’s important that you test your text views across a range of different screen configurations, as you may need to tweak your minimum and maximum text sizes to ensure your text remains readable across different screens.
Conclusion
In this quick tip, I showed you how to create text that scales automatically. In the next tip, we’ll be looking at how Android O is about to make it much easier to use custom fonts in your Android apps. In the meantime, check out some of our other tutorials:


Comments