
In this Programming With Yii2 series, I'm guiding readers in use of the Yii2 Framework for PHP. You may also be interested in my Introduction to the Yii Framework, which reviews the benefits of Yii and includes an overview of what's new in Yii 2.x.
In today's tutorial, I will review how to build a REST API in Yii to connect your application to the cloud, mobile apps, and other services. I'll guide you through Yii's REST API quick start guide and provide context and examples of common requests.
Getting Started With Yii REST APIs
Building REST APIs in Yii is actually fairly straightforward. You can leverage the existing MVC framework, but you're creating a distinct access point that you intend to be accessed by different kinds of services (not website visitors).
The Benefits of the Yii REST Framework
The Yii Framework provides broad support and detailed documentation for building APIs. Here are some of the built-in capabilities when building APIs:
- Quick prototyping with support for common APIs for Active Record. This allows you to quickly and easily expose data model CRUD functionality via an API.
- Response format negotiation (supporting JSON and XML by default). There's built-in support for returning data in common output formats.
- Customizable object serialization with support for selectable output fields. It's easy to modify what data is returned.
- Proper formatting of collection data and validation errors.
- Support for Hypermedia As The Engine Of Application State (HATEOAS)
- Efficient routing with proper HTTP verb check.
- Built-in support for the
OPTIONSandHEADverbs. - Authentication and authorization.
- Data caching and HTTP caching.
- Rate limiting.
I won't have a chance to touch on all of this today.
My Interest in REST APIs
In this episode, I'll build an API to let us manipulate the Item table I created in the Twixxr service from this Twitter API tutorial. But I'm also planning to build an API for our startup tutorial series focus, Meeting Planner. A secure API will be necessary for building an iOS application for the service. The API will enable communication between the mobile app and the cloud service.
Building the REST Controller
With Yii's REST framework, we'll create an endpoint for our API and organize controllers for each type of resource.
The resources are essentially our application's data models. These extend yii\base\Model.
The yii\rest\UrlRule class provides ready-made routing mapping our data model to API CRUD endpoints:
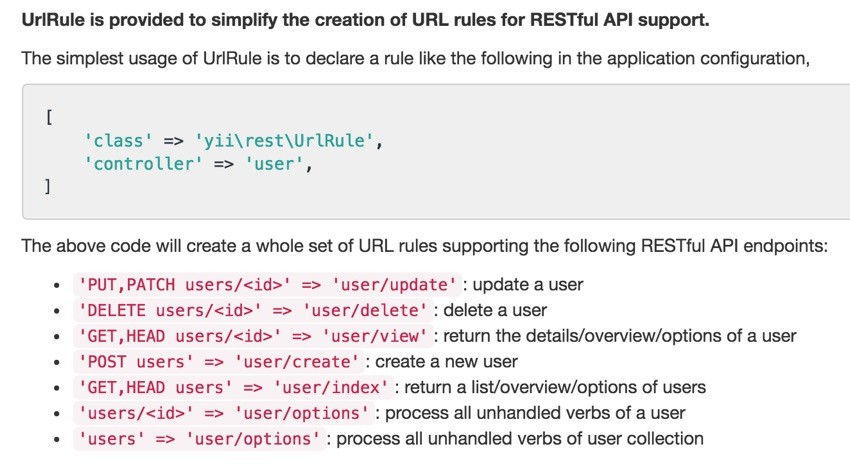
Creating a Tree to Act as an API Endpoint
In the Yii2 Advanced template, there is a front-end and back-end tree, and this is extensible. To separate out the API features, we'll create a third tree to act purely as an API endpoint.
Yii developer Alex Makarov provides this helpful guide to creating additional trees which I followed to create my third tree:
$ cp -R backend api
$ cp -R environments/dev/backend/ environments/dev/api
$ cp -R environments/prod/backend/ environments/prod/api
Then, I used the Atom editor to do a global find and replace of "backend" with "api" in the new api tree.
And I added the api alias to /common/config/bootstrap.php:
<?php
Yii::setAlias('@common', dirname(__DIR__));
Yii::setAlias('@frontend', dirname(dirname(__DIR__)) . '/frontend');
Yii::setAlias('@backend', dirname(dirname(__DIR__)) . '/backend');
Yii::setAlias('@api', dirname(dirname(__DIR__)) . '/api');
Yii::setAlias('@console', dirname(dirname(__DIR__)) . '/console');
Yii::setAlias('@twixxr', dirname(dirname(__DIR__)) . '/twixxr');
Configuring the URL Routing for Incoming Requests
In /api/config/main.php, we need to add the request[] to parse setup JSON parsing and the UrlRule to associate methods for the models and their endpoints:
return [
    'id' => 'app-api',
    'basePath' => dirname(__DIR__),
    'controllerNamespace' => 'api\controllers',
    'bootstrap' => ['log'],
    'modules' => [],
    'components' => [
      'request' => [
        'parsers' => [
          'application/json' => 'yii\web\JsonParser',
        ],
      ],
      'urlManager' => [
        'enablePrettyUrl' => true,
        'enableStrictParsing' => true,
        'showScriptName' => false,
        'rules' => [
          ['class' => 'yii\rest\UrlRule', 'controller' => 'item'],
          ['class' => 'yii\rest\UrlRule', 'controller' => 'user'],
        ],
      ],
That's basically all it takes to enable some rich API functionality for these models.
Examples With cURL
Let's begin making requests.
Requesting OPTIONS
Show me available API methods:
curl -i -H "Accept: application/json"
    -X OPTIONS "http://localhost:8888/api/items"
Here is the response (GET, POST, HEAD, OPTIONS):
HTTP/1.1 200 OK
Date: Tue, 25 Oct 2016 20:23:10 GMT
Server: Apache/2.2.31 (Unix) mod_wsgi/3.5 Python/2.7.12 PHP/7.0.10 mod_ssl/2.2.31 OpenSSL/1.0.2h DAV/2 mod_fastcgi/2.4.6 mod_perl/2.0.9 Perl/v5.24.0
X-Powered-By: PHP/7.0.10
Allow: GET, POST, HEAD, OPTIONS
Content-Length: 0
Content-Type: application/json; charset=UTF-8
GET Requests
Request: How much data is there?
curl -i --head "http://localhost:8888/api/items"
Answer: 576 records across 29 pages...
HTTP/1.1 200 OK
Date: Tue, 25 Oct 2016 23:17:37 GMT
Server: Apache/2.2.31 (Unix) mod_wsgi/3.5 Python/2.7.12 PHP/7.0.10 mod_ssl/2.2.31 OpenSSL/1.0.2h DAV/2 mod_fastcgi/2.4.6 mod_perl/2.0.9 Perl/v5.24.0
X-Powered-By: PHP/7.0.10
X-Pagination-Total-Count: 576
X-Pagination-Page-Count: 29
X-Pagination-Current-Page: 1
X-Pagination-Per-Page: 20
Link: <http://localhost:8888/api/items?page=1>; rel=self, <http://localhost:8888/api/items?page=2>; rel=next, <http://localhost:8888/api/items?page=29>; rel=last
Content-Type: application/json; charset=UTF-8
Request: Show me record 15:
curl -i "http://localhost:8888/api/items/15"
Response:
HTTP/1.1 200 OK
Date: Tue, 25 Oct 2016 23:19:27 GMT
Server: Apache/2.2.31 (Unix) mod_wsgi/3.5 Python/2.7.12 PHP/7.0.10 mod_ssl/2.2.31 OpenSSL/1.0.2h DAV/2 mod_fastcgi/2.4.6 mod_perl/2.0.9 Perl/v5.24.0
X-Powered-By: PHP/7.0.10
Content-Length: 203
Content-Type: application/json; charset=UTF-8

{"id":15,"title":"Jeff Reifman","path":"jeffreifman",
"detail":"","status":0,"posted_by":1,"image_url":"",
"favorites":0,"stat_1":0,"stat_2":0,"stat_3":0,"created_at":1477277956,"updated_at":1477277956}
Request: Show me all the data on page 3:
curl -i -H "Accept:application/json"
    "http://localhost:8888/api/items?page=3"
Response:
HTTP/1.1 200 OK
Date: Tue, 25 Oct 2016 23:30:21 GMT
Server: Apache/2.2.31 (Unix) mod_wsgi/3.5 Python/2.7.12 PHP/7.0.10 mod_ssl/2.2.31 OpenSSL/1.0.2h DAV/2 mod_fastcgi/2.4.6 mod_perl/2.0.9 Perl/v5.24.0
X-Powered-By: PHP/7.0.10
X-Pagination-Total-Count: 575
X-Pagination-Page-Count: 29
X-Pagination-Current-Page: 3
X-Pagination-Per-Page: 20
Link: <http://localhost:8888/api/items?page=3>; rel=self, <http://localhost:8888/api/items?page=1>; rel=first, <http://localhost:8888/api/items?page=2>; rel=prev, <http://localhost:8888/api/items?page=4>; rel=next, <http://localhost:8888/api/items?page=29>; rel=last
Content-Length: 3999
Content-Type: application/json; charset=UTF-8

[{"id":43,"title":"_jannalynn","path":"_jannalynn",
"detail":"","status":0,"posted_by":1,"image_url":"",
"favorites":0,"stat_1":0,"stat_2":0,"stat_3":0,
...
...
...
{"id":99,"title":"alibrown","path":"alibrown","detail":"",
"status":0,"posted_by":1,"image_url":"","favorites":0,
"stat_1":0,"stat_2":0,"stat_3":0,"created_at":1477277956,
"updated_at":1477277956}]
DELETE Requests
Here's an example of a GET request followed by a DELETE request and then a follow-up failed GET attempt:
$ curl -i -H "Accept: application/json" "http://localhost:8888/api/items/8"
HTTP/1.1 200 OK
Date: Tue, 25 Oct 2016 23:32:17 GMT
Server: Apache/2.2.31 (Unix) mod_wsgi/3.5 Python/2.7.12 PHP/7.0.10 mod_ssl/2.2.31 OpenSSL/1.0.2h DAV/2 mod_fastcgi/2.4.6 mod_perl/2.0.9 Perl/v5.24.0
X-Powered-By: PHP/7.0.10
Content-Length: 186
Content-Type: application/json; charset=UTF-8

{"id":8,"title":"aaker","path":"aaker","detail":"","status":0,"posted_by":1,"image_url":"","favorites":0,"stat_1":0,"stat_2":0,"stat_3":0,"created_at":1477277956,"updated_at":1477277956}

$ curl -i -H "Accept: application/json" -X DELETE "http://localhost:8888/api/items/8"
HTTP/1.1 204 No Content
Date: Tue, 25 Oct 2016 23:32:26 GMT
Server: Apache/2.2.31 (Unix) mod_wsgi/3.5 Python/2.7.12 PHP/7.0.10 mod_ssl/2.2.31 OpenSSL/1.0.2h DAV/2 mod_fastcgi/2.4.6 mod_perl/2.0.9 Perl/v5.24.0
X-Powered-By: PHP/7.0.10
Content-Length: 0
Content-Type: application/json; charset=UTF-8

$ curl -i -H "Accept: application/json" "http://localhost:8888/api/items/8"
HTTP/1.1 404 Not Found
Date: Tue, 25 Oct 2016 23:32:28 GMT
Server: Apache/2.2.31 (Unix) mod_wsgi/3.5 Python/2.7.12 PHP/7.0.10 mod_ssl/2.2.31 OpenSSL/1.0.2h DAV/2 mod_fastcgi/2.4.6 mod_perl/2.0.9 Perl/v5.24.0
X-Powered-By: PHP/7.0.10
Content-Length: 115
Content-Type: application/json; charset=UTF-8

{"name":"Not Found","message":"Object not found: 8","code":0,"status":404,"type":"yii\\web\\NotFoundHttpException"}
Requests for a deleted record return a 404 error.
POST Requests
For my post requests, I switched over to the Chrome Postman app:
Signing up for Postman was easy:
And then I was able to submit requests to my localhost API in a more friendly GUI:
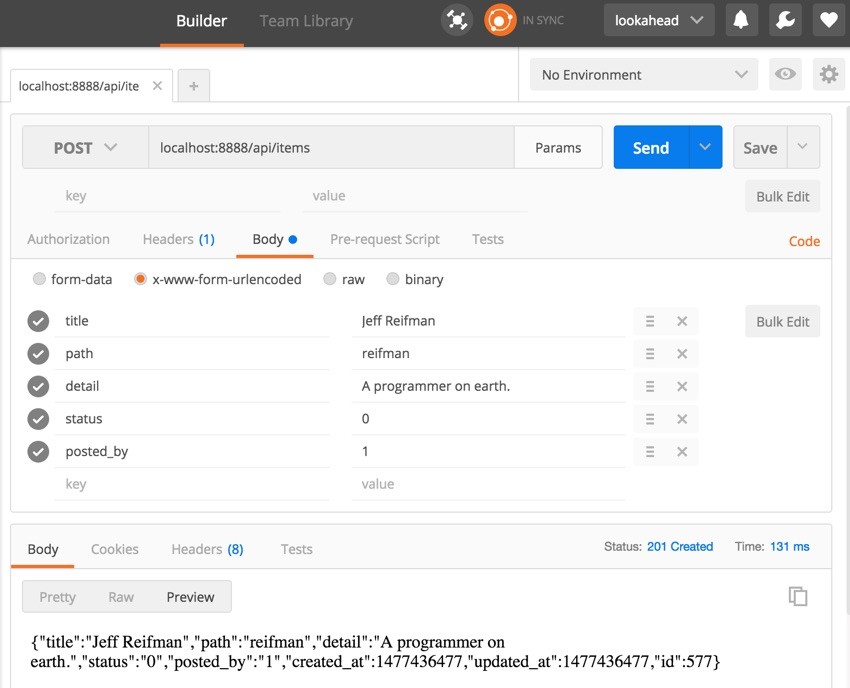
Then, I retrieved the data via curl, record 577:
$ curl -i -H "Accept: application/json" "http://localhost:8888/api/items/577"
HTTP/1.1 200 OK
Date: Tue, 25 Oct 2016 23:40:44 GMT
Server: Apache/2.2.31 (Unix) mod_wsgi/3.5 Python/2.7.12 PHP/7.0.10 mod_ssl/2.2.31 OpenSSL/1.0.2h DAV/2 mod_fastcgi/2.4.6 mod_perl/2.0.9 Perl/v5.24.0
X-Powered-By: PHP/7.0.10
Content-Length: 219
Content-Type: application/json; charset=UTF-8

{"id":577,"title":"Jeff Reifman","path":"reifman",
"detail":"A programmer on earth.","status":0,
"posted_by":1,"image_url":"","favorites":0,
"stat_1":0,"stat_2":0,"stat_3":0,"created_at":1477436477,
"updated_at":1477436477}
Postman proved essential to round out my testing as command line curl was not easy to configure for POST submissions.
Looking Ahead
In addition to its REST quickstart overview, the Yii 2.0 documentation provides detail on an array of other aspects of API creation:
- Resources
- Controllers
- Routing
- Response Formatting
- Authentication
- Rate Limiting
- Versioning
- Error Handling
I hope to have the chance to explore more of these in future episodes. But certainly, one of the next steps is to create an API for Meeting Planner in the startup series.
In closing, building a basic REST API with the Yii MVC framework is quite simple. The Yii team has done a great job standardizing functionality for a very important requirement, REST APIs. I hope you've enjoyed learning about them.
If you have any questions or suggestions, please post them in the comments. If you'd like to keep up on my future Envato Tuts+ tutorials and other series, please visit my instructor page or follow @reifman. Definitely check out my startup series and Meeting Planner.

Comments