ActiveRecord comes with a powerful set of validators and other features for attributes of a persisted data model. On other hand, forms are one of the oldest and most important building blocks of today’s web applications—an essential interface for user input. Of the two form helpers that Rails provides, "form_for" also assumes that you’re working with some kind of persisted object. So it can take full benefit of all active record features, i.e. validations.
This is all great for persisted objects with database-backed representations. But what happens when you need a complex form that does not reflect a persistent record of some sort?
In this tutorial I'll be talking about the possible solutions for this problem and how to implement one in Rails 4 (Active Models).
In this tutorial, we'll build an application with a form where a user can add some feedback which is then saved into a database. This application will also have validations and views, exactly the way you create them for a database-backed model, but then we'll go through some of the changes in the model to make it tableless. And all the features must be working as they are, without making any further changes. There are no Update, Delete or Find actions for feedback.
First Things First
For this tutorial, I assume that you have a basic understating of the Rails framework and can easily create or generate basic controllers, models, and views. I assume you also know a bit about how routes and validations work. At the time of writing this tutorial, I was using Rails 4.2.5 and SQLite 3.8.10.2.
Introduction
There can be many situations when you have a class that you want to function like a typical ActiveRecord model, but you don't want to persist the data into the database. For example, you may have a contact form or something more complex like a complaint or feedback form.
In those situations, to solve this problem one approach would be to use the form_tag helper method, which provides you with custom form fields that do what you need without having to bind them with any model at all.
This works well, but form_tag can quickly become tedious to write and maintain if handling more than a few fields because of the need to handle naming its numerous attributes and their validations on your own. Soon your controller will end up dealing with a lot of logic and tons of form params, which is likely not an ideal solution.
A cleaner, more flexible approach would be if we could somehow use the same form_for with a model and all the validations and other perks they come with, but without needing to have database-backed representations of its attributes.
Rails offers exactly this kind of solution: the Active Model—which is just like a normal Model but without the tables. It provides exactly the same easy way of validation and almost all the other goodies shipped with ActiveRecord. It helps you keep the application structure consistent, because you’re using models to represent objects in your app anyway, routes are available for free, and form building is as easy as it was before with form_for.
Let's Create a New Application First
In this step we'll generate a dummy application to play around with during this tutorial.
Step 1: Building
Start up your terminal and type these commands to create a new application:
# Create a basic Rails App
rails new tableless
cd tableless

# Create a Controller with only new, create & success Actions
rails generate controller feedbacks new create success --skip-routes

# Create a Model
rails generate model feedback name:string email:string address:string message:text suggestion:text
This is how your Directory Structure will look.

Step 2: Editing
Here I'll provide the snippets of code for all the files you need to fill. The code is pretty self-explanatory. You can either download this app from the GitHub repository linked to this post or follow my steps to create one by yourself.
→ /config/routes.rb
resources :feedbacks, :only => [:new, :create]
get 'feedbacks/success' => 'feedbacks#success', as: :success
→ /app/views/feedbacks/success.html.erb
<h1 id="notice"><%= notice %></h1>
<br>
<%= link_to 'Submit New Feedback', new_feedback_path %>
→ /app/views/feedbacks/new.html.erb
<h1>New Feedback</h1>


<%= form_for(@feedback) do |f| %>
 <% if @feedback.errors.any? %>
   <div id="error_explanation">
     <h2><%= pluralize(@feedback.errors.count, "error") %> prohibited this feedback from being saved:</h2>
     <ul>
     <% @feedback.errors.full_messages.each do |message| %>
       <li><%= message %></li>
     <% end %>
     </ul>
   </div>
 <% end %>


 <div class="field">
   <%= f.label :name %><br>
   <%= f.text_field :name %>
 </div>

 <div class="field">
   <%= f.label :email %><br>
   <%= f.text_field :email %>
 </div>

 <div class="field">
   <%= f.label :address %><br>
   <%= f.text_field :address %>
 </div>

 <div class="field">
   <%= f.label :message %><br>
   <%= f.text_area :message %>
 </div>

 <div class="field">
   <%= f.label :suggestion %><br>
   <%= f.text_area :suggestion %>
 </div>

 <div class="actions">
   <%= f.submit %>
 </div>

<% end %>

<%= link_to 'Back', feedbacks_path %>
→ /app/controllers/feedbacks_controller.rb
class FeedbacksController < ApplicationController

def new
    @feedback = Feedback.new
end

def create
	@feedback = Feedback.new(feedback_params)
	respond_to do |format|
		if @feedback.save
			format.html { redirect_to success_path, notice: 'Feedback was successfully submitted.' }
		else
			format.html { render :new }
		end
	end
 end

 def success
 end

private

   def feedback_params
     params.require(:feedback).permit(:name, :email, :address, :message, :suggestion)
   end

end
→ /app/models/feedbacks.rb
class Feedback < ActiveRecord::Base

    # fields validation for the database.
	validates :name, presence: true
	validates :email, presence: true, length: {in:5..255}
	validates :address, presence: true
	validates :message, presence: true
	validates :suggestion, presence: true

end
Step 3: Deploying
To deploy it on your local server, first you need to run the following commands to create the database in your system.
cd tableless/
rake db:migrate
If you have followed the tutorial this far, the command above should create an sqlite3 database by default. To change it, you can jump to database.yml—for the sake of this tutorial, I’ll go with sqlite3.
Now run rails s in your terminal and you should see something similar to this.

And with this you should be successfully running a dummy application.
Step 4: Testing
Now it's time to test what we just created. Hit this route in your browser to check if everything works well: http://localhost:3000/feedbacks/new
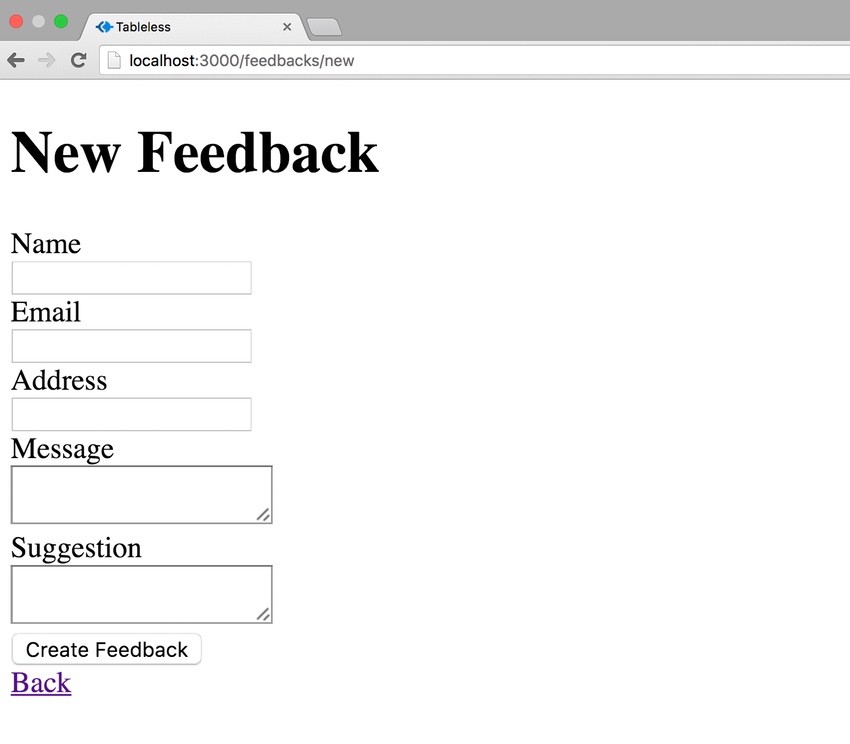
You should see a form like above. Now press the submit button without filling out any field to check if the validations are working fine.
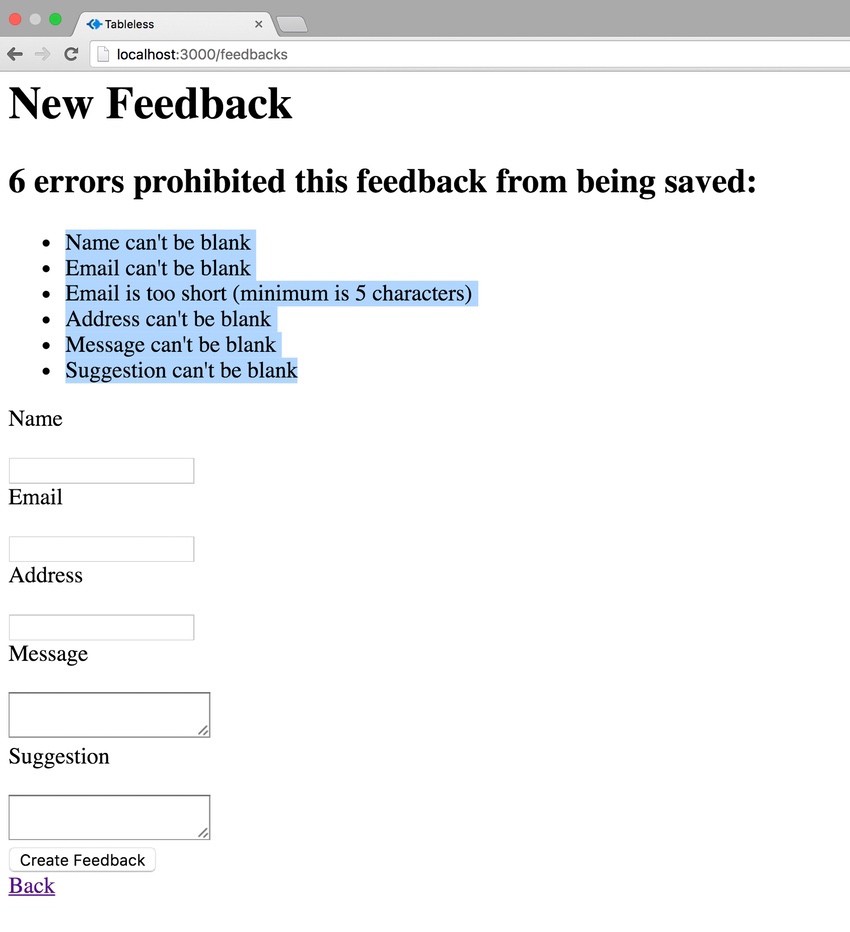
Great. You should see six validation errors, as above. Now we can try filling in proper values and submit the form.
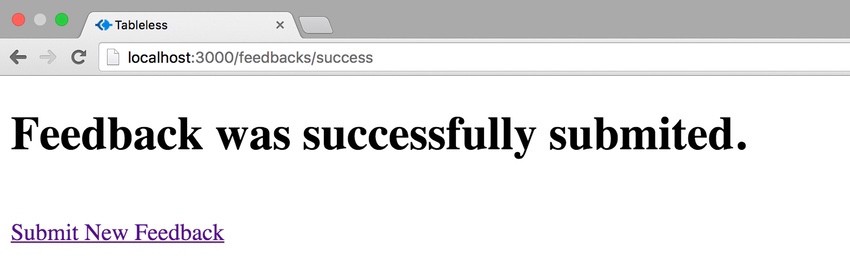
You should see something similar on your screen. Let's check the database for the record we just entered.
Open up your Terminal, go to your project directory, and type the commands below.
-
rails dbto start the database client in your console. -
SQLite> .tablesto list all the tables in your database (DB is selected by default). -
SQLite> .headers onto display the Column Names in your results. -
SQLite> select * from feedbacks;to see all the feedback in the database.

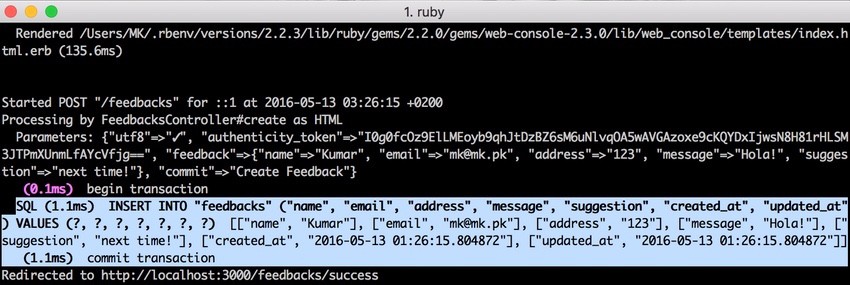
And here we can see the feedback was successfully saved in the database. If you look into the logs, you can also find the INSERT query.
And with this our testing is over. Now that everything seems to be working fine, let's jump in to the solution.
The Solution
Step 1: Implementation
To implement Active Model, the first thing you need to do is remove the feedback model's inheritance to < ActiveRecord::Base as we don’t want this model to have a database back-end anymore.
As soon as we do this, our form will no longer work, as the validators are provided by ActiveRecord. But adding include ActiveModel::Model on the next line should restore everything.
Your model should look like this now.
class Feedback
    include ActiveModel::Model
The second thing is to add attr_accessor to generate the getters and setters for all the attributes, like this.
attr_accessor :name, :email, :address, :message, :suggestion
Now the end result of the model should look like this.
class Feedback

    include ActiveModel::Model
    attr_accessor :name, :email, :address, :message, :suggestion

    # fields validation for the database.
    validates :name, presence: true
    validates :email, presence: true, length: {in:5..255}
	validates :address, presence: true
	validates :message, presence: true
	validates :suggestion, presence: true

end
Fixing the model isn’t enough to get our app to behave as we want. The controller still expects to save the received data object into the database in the create method. @feedback.save won’t work as we don’t have a database back end to save the new feedback anymore.
We can fix this issue by changing @feedback.save into @feedback.valid? since we are only performing the validations in our models now, and based on this success event you can perform any preferred task within this block of code, i.e. send notifications, send email or log events, etc.
class FeedbacksController < ApplicationController

def create
    @feedback = Feedback.new(feedback_params)
	respond_to do |format|
		if @feedback.valid?

            # Something interesting can be done here
            # - send notifications
            # - send email
            # - log events

            format.html { redirect_to success_path, notice: 'Feedback was successfully submitted.' }

        else

            format.html { render :new }

        end
	end
 end
Step 2: Testing
Let's redo the tests we performed earlier.
Hit the route http://localhost:3000/feedbacks/new and submit the form without filling out any fields. All the validations should work like earlier.
Great. Now we can try by submitting the form with valid values.
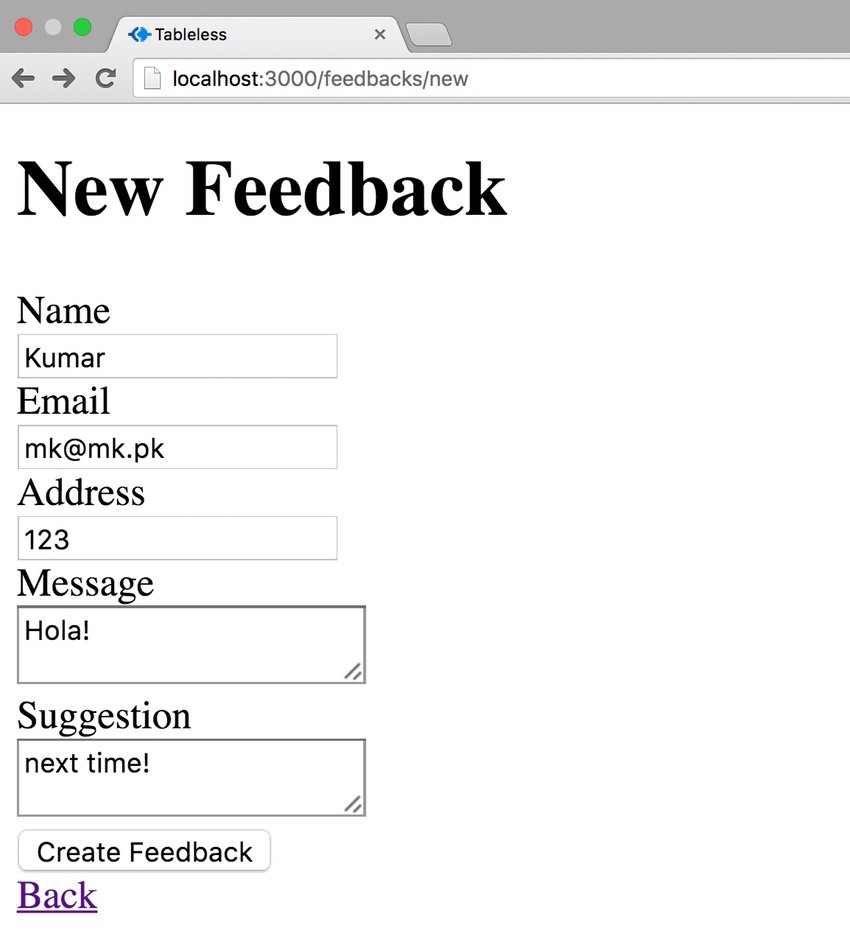
And here you go—the same success message.
Now the one last thing that we need to check is the database.
For that, open up your Terminal, go to your project directory, and type the commands below.
-
rails dbto start the database client in your console. -
SQLite> .tablesto list all the tables in your database (DB is selected by default). -
SQLite> .headers onto display the Column Names in your results. -
SQLite> select * from feedbacksto see all the feedback in the database.
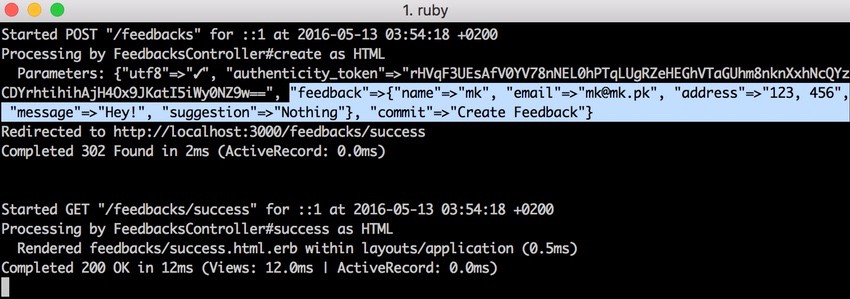
And this time, since our model is not backed with any database table, you won't find the newly submitted values in the table.
If you check your console logs, we also don't see the INSERT query anymore.
Conclusion
So with this we are done with the ActiveModel, and we saw how easy it is to create a table-less model. ActiveModel is into heavy improvements so you can expect some changes in coming versions of Rails.
We just used the validations and attribute assignments in this tutorial in order to keep things simple and clear. But take a look in the directory that contains the code for ActiveModel on GitHub.
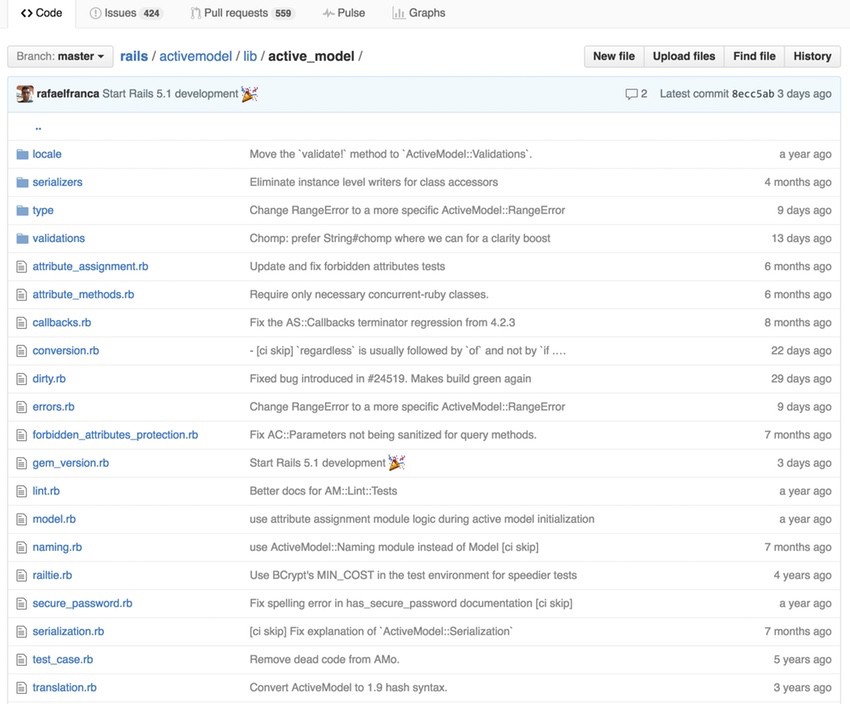
We can see from the list that ActiveModel also includes classes for attribute methods, serialization, callbacks, and dirty tracking, among other things. This way you can keep an eye on upcoming features and also get familiar with others.

Comments