In this article of the Magento Theme Development series, we'll finalize the product page from where we left it in the previous article. We'll edit the phtml files responsible for rendering the media section, related products section, etc.
Now, let’s start adding the dynamic tag of images, price, description, etc., inside the product-detail div which we started editing in the previous article.
We’ll start by adding the dynamic tag of images. If we look at our edited HTML, the code for media extends from lines 19 to 28. We’ll replace all of this with a single line of code:
<?php echo $this->getChildHtml('media') ?>
As we can see from the actual view.phtml file, this one line is fetching all the code for showing the images.
So the new code on line 18 will look like this:
<div class="preview_image">
  <?php echo $this->getChildHtml('media') ?>
</div>
Next we’ll replace the product name on line 22 with this dynamic code:
<?php echo $_helper->productAttribute($_product, $_product->getName(), 'name') ?>
On line 24, we’ll replace the price code with this:
<div class="price pull-left">
    <?php echo $this->getPriceHtml($_product); ?>
    <?php echo $this->getChildHtml('bundle_prices') ?>
    <?php echo $this->getTierPriceHtml() ?>
</div>
Inside the pull-right class on line 29, we’ll add the code for showing the review and product availability. So the new code on line 29 will look like this:
<div class="pull-right">
    <?php echo $this->getReviewsSummaryHtml($_product, 'default', false)?>
    <?php echo $this->getChildHtml('product_type_availability'); ?>
</div>
Next we’ll replace the hard-coded description written on line 33 with this dynamic tag:
<?php echo $_helper->productAttribute($_product, nl2br($_product->getShortDescription()), 'short_description') ?>
If we look at the HTML file which we are editing, the next thing we see is the drop-down boxes for product options selection. We’ll replace that code inside the size-input div with this dynamic code:
<?php echo $this->getChildHtml('other');?>
<?php if ($_product->isSaleable() && $this->hasOptions()):?>
    <?php echo $this->getChildChildHtml('container1', '', true, true) ?>
<?php endif;?>
Now, this code will not automatically generate the options
for the product, but will also display the ‘add to cart’ button and sharing
options. So, we can also delete the following code, which comes after .size-input div:
<hr class="border">
<div class="wided">
<div class="qty">Qty :
<select>
<option>1</option>
</select>
</div>
<div class="button_group">
<button class="button" >Add To Cart</button>
</div>
</div>
<div class="clearfix"></div>
<hr class="border">
<img src="images/share.png" alt="" class="pull-left">
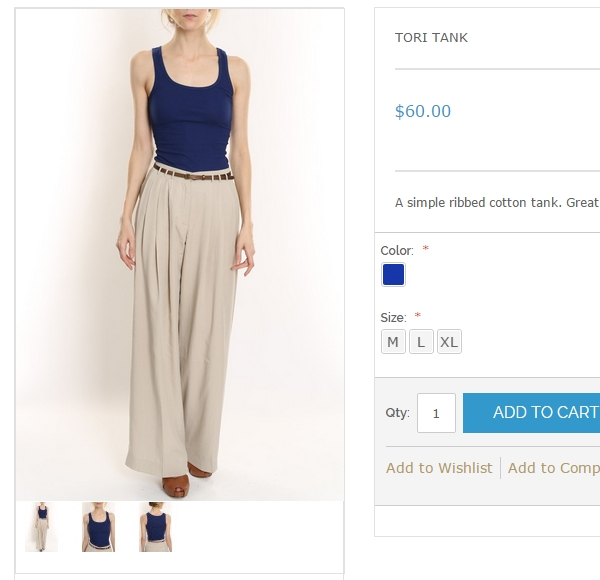
Now if we look at the current page, everything is in place and working fine. We just need to modify the inside code of some elements like images area, related products section, etc. And lastly we just need to brush up the CSS, and our page will be ready.
Without further delay, let’s start editing the code for the
images section. Remember we replaced all the images HTML with just one line of
code: <?php echo $this->getChildHtml('media') ?>. This line of
code is displaying here the code from the file template\catalog\product\view\media.phtml:
You can also verify this, by enabling the template hints and checking from
where the code for the images section is coming.
Now that we have determined the file responsible for generating this code, let’s copy that file from the default rwd theme into our new theme, and start editing it. The code for the media.phtml file looks like this:
<?php
    $_product = $this->getProduct();
    $_helper = $this->helper('catalog/output');
?>
<div class="product-image product-image-zoom">
    <div class="product-image-gallery">
        <img id="image-main"
             class="gallery-image visible"
             src="<?php echo $this->helper('catalog/image')->init($_product, 'image') ?>"
             alt="<?php echo $this->escapeHtml($this->getImageLabel()) ?>"
             title="<?php echo $this->escapeHtml($this->getImageLabel()); ?>" />

        <?php $i=0; foreach ($this->getGalleryImages() as $_image): ?>
            <?php if ($this->isGalleryImageVisible($_image)): ?>
            <img id="image-<?php echo $i; ?>"
                 class="gallery-image"
                 src="<?php echo $this->getGalleryImageUrl($_image); ?>"
                 data-zoom-image="<?php echo  $this->getGalleryImageUrl($_image); ?>" />
            <?php endif; ?>
        <?php $i++; endforeach; ?>
    </div>
</div>

<?php if (count($this->getGalleryImages()) > 0): ?>
<div class="more-views">
    <h2><?php echo $this->__('More Views') ?></h2>
    <ul class="product-image-thumbs">
    <?php $i=0; foreach ($this->getGalleryImages() as $_image): ?>
        <?php if ($this->isGalleryImageVisible($_image)): ?>
        <li>
            <a class="thumb-link" href="#" title="<?php echo $this->escapeHtml($_image->getLabel()) ?>" data-image-index="<?php echo $i; ?>">
                <img src="<?php echo $this->helper('catalog/image')->init($this->getProduct(), 'thumbnail', $_image->getFile())->resize(75); ?>"
                     width="75" height="75" alt="<?php echo $this->escapeHtml($_image->getLabel()) ?>" />
            </a>
        </li>
        <?php endif; ?>
    <?php $i++; endforeach; ?>
    </ul>
</div>
<?php endif; ?>

<?php echo $this->getChildHtml('after'); ?>
First of all, we’ll copy this HTML code of our images section into a newly copied media.phtml file:
<div class="preview_image">
  <div class="preview-small"><img id="zoom_03" src="images/products/medium/products-01.jpg" data-zoom-image="images/products/Large/products-01.jpg" alt=""></div>
  <div class="thum-image">
    <ul id="gallery_01" class="prev-thum">
      <li><a href="#" data-image="images/products/medium/products-01.jpg" data-zoom-image="images/products/Large/products-01.jpg"><img src="images/products/thum/products-01.png" alt=""></a></li>
      <li><a href="#" data-image="images/products/medium/products-02.jpg" data-zoom-image="images/products/Large/products-02.jpg"><img src="images/products/thum/products-02.png" alt=""></a></li>
      <li><a href="#" data-image="images/products/medium/products-03.jpg" data-zoom-image="images/products/Large/products-03.jpg"><img src="images/products/thum/products-03.png" alt=""></a></li>
      <li><a href="#" data-image="images/products/medium/products-04.jpg" data-zoom-image="images/products/Large/products-04.jpg"><img src="images/products/thum/products-04.png" alt=""></a></li>
      <li><a href="#" data-image="images/products/medium/products-05.jpg" data-zoom-image="images/products/Large/products-05.jpg"><img src="images/products/thum/products-05.png" alt=""></a></li>
    </ul>
    <a class="control-left" id="thum-prev" href="javascript:void(0);"><i class="fa fa-chevron-left"></i></a><a class="control-right" id="thum-next" href="javascript:void(0);"><i class="fa fa-chevron-right"></i></a></div>
</div>
Now, we’ll start modifying this code to insert the dynamic code in the appropriate places by comparing it with the actual media.phtml file.
We’ll start by adding these lines at the top of the file:
<?php
    $_product = $this->getProduct();
    $_helper = $this->helper('catalog/output');
?>
We’ll replace the div with class preview-small with this code:
<div class="product-image-gallery">
        <img id="image-main"
             class="gallery-image visible"
             src="<?php echo $this->helper('catalog/image')->init($_product, 'image') ?>"
             alt="<?php echo $this->escapeHtml($this->getImageLabel()) ?>"
             title="<?php echo $this->escapeHtml($this->getImageLabel()); ?>" />

        <?php $i=0; foreach ($this->getGalleryImages() as $_image): ?>
            <?php if ($this->isGalleryImageVisible($_image)): ?>
            <img id="image-<?php echo $i; ?>"
                 class="gallery-image"
                 src="<?php echo $this->getGalleryImageUrl($_image); ?>"
                 data-zoom-image="<?php echo  $this->getGalleryImageUrl($_image); ?>" />
            <?php endif; ?>
        <?php $i++; endforeach; ?>
    </div>
<?php if (count($this->getGalleryImages()) > 0): ?>
<div class="more-views">
    <ul class="product-image-thumbs">
    <?php $i=0; foreach ($this->getGalleryImages() as $_image): ?>
        <?php if ($this->isGalleryImageVisible($_image)): ?>
        <li>
            <a class="thumb-link" href="#" title="<?php echo $this->escapeHtml($_image->getLabel()) ?>" data-image-index="<?php echo $i; ?>">
                <img src="<?php echo $this->helper('catalog/image')->init($this->getProduct(), 'thumbnail', $_image->getFile())->resize(50); ?>"
                     width="50" height="50" alt="<?php echo $this->escapeHtml($_image->getLabel()) ?>" />
            </a>
        </li>
        <?php endif; ?>
    <?php $i++; endforeach; ?>
    </ul>
</div>
<?php endif; ?>
Similarly we’ll replace the div with class thum-image with this code:
And at the end of the code, we’ll add this line:
<?php echo $this->getChildHtml('after'); ?>
So the file's code will look like this at the end:
<?php
    $_product = $this->getProduct();
    $_helper = $this->helper('catalog/output');
?>
<div class="preview_image">
  <div class="product-image-gallery">
        <img id="image-main"
             class="gallery-image visible"
             src="<?php echo $this->helper('catalog/image')->init($_product, 'image') ?>"
             alt="<?php echo $this->escapeHtml($this->getImageLabel()) ?>"
             title="<?php echo $this->escapeHtml($this->getImageLabel()); ?>" />

        <?php $i=0; foreach ($this->getGalleryImages() as $_image): ?>
            <?php if ($this->isGalleryImageVisible($_image)): ?>
            <img id="image-<?php echo $i; ?>"
                 class="gallery-image"
                 src="<?php echo $this->getGalleryImageUrl($_image); ?>"
                 data-zoom-image="<?php echo  $this->getGalleryImageUrl($_image); ?>" />
            <?php endif; ?>
        <?php $i++; endforeach; ?>
    </div>
  <?php if (count($this->getGalleryImages()) > 0): ?>
<div class="more-views">
    <ul class="product-image-thumbs">
    <?php $i=0; foreach ($this->getGalleryImages() as $_image): ?>
        <?php if ($this->isGalleryImageVisible($_image)): ?>
        <li>
            <a class="thumb-link" href="#" title="<?php echo $this->escapeHtml($_image->getLabel()) ?>" data-image-index="<?php echo $i; ?>">
                <img src="<?php echo $this->helper('catalog/image')->init($this->getProduct(), 'thumbnail', $_image->getFile())->resize(50); ?>"
                     width="50" height="50" alt="<?php echo $this->escapeHtml($_image->getLabel()) ?>" />
            </a>
        </li>
        <?php endif; ?>
    <?php $i++; endforeach; ?>
    </ul>
</div>
<?php endif; ?>
</div>
<?php echo $this->getChildHtml('after'); ?>
Now we are almost done with the images part. At the end we’ll fix some CSS issues, and it’ll look quite close to our HTML design.
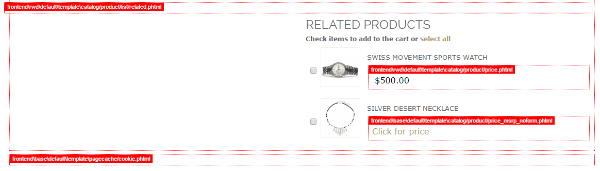
Next is fixing the related section. We can see by enabling template hints that this portion of page is coming from the file: template\catalog\product\list\related.phtml.
As you can probably guess, the next step would be to copy that file to our new theme folder, and then start editing it.
We’ll create a new file, and copy the HTML code of the related product section from our HTML theme. Here we’ll only keep one instance of the product, as we’ll be looping it through in our phtml file. The code we’ll copy will be this:
<div id="productsDetails" class="hot-products">
<h3 class="title"><strong>Hot</strong> Products</h3>
<div class="control"><a id="prev_hot" class="prev" href="#"><</a><a id="next_hot" class="next" href="#">></a></div>
<ul id="hot">
<li>
<div class="row">
<div class="col-md-3 col-sm-4">
<div class="products">
<div class="main">
<div class="view view-eighth">
<img src="images/products/small/products-02.jpg" />
<div class="mask">
<a href="#" class="info">Read More</a>
</div>
<div class="productname">Iphone 5s Gold 32 Gb 2013</div>
<h4 class="price">$451.00</h4>
</div>
</div>
</div>
</li>
</ul>
</div>
Now we’ll start making it dynamic by putting dynamic tags into it while comparing it with the actual related.phtml file.
We’ll put the entire code in this if tag:
<?php if($this->getItems()->getSize()): ?>
Next we’ll place this for loop right after the row div:
<?php foreach($this->getItems() as $_item): ?>
Next we’ll start placing the dynamic tag of product name, price, description, url, etc., in the product div, as we did while editing products on the home page.
The whole code for this file after editing will look like this:
<?php if($this->getItems()->getSize()): ?>
<div id="productsDetails" class="hot-products">
<h3 class="title"><strong>Related</strong> Products</h3>
<div class="control"><a id="prev_hot" class="prev" href="#"><</a><a id="next_hot" class="next" href="#">></a></div>
<ul id="hot">
<li>
<div class="row">
<?php foreach($this->getItems() as $_item): ?>
<div class="col-md-3 col-sm-4">
<div class="products">
<div class="main">
<div class="view view-eighth">
<img src="<?php echo $this->helper('catalog/image')->init($_item, 'thumbnail')->resize(214,323) ?>" width="214" height="323" alt="<?php echo $this->escapeHtml($_item->getName()) ?>" />
<div class="mask">
<a href="<?php echo $_item->getProductUrl() ?>" class="info">View Product</a>
</div>
<div class="productname"><?php echo $this->escapeHtml($_item->getName()) ?></div>
<h4 class="price">
<?php echo $this->getPriceHtml($_item, true, '-related') ?>
</h4>
</div>
</div>
</div>
</div>
<?php endforeach ?>
</div>
</li>
</ul>
</div>
<?php endif ?>
Now we are almost done with the phtml file editing for the product page. We just have to fix some CSS issues, and our page will be ready. Currently the page looks like this:

We are done with most of it. Now we just need to edit the CSS to make the last changes in this page, which we'll do in the next article, which will also be the last article of the series. Along with the CSS changes for this page, I'll explain how you can make changes in the other pages of the theme yourself by using the techniques you have learnt in this series.

Comments