Congratulations on completing the home page of your new theme, and starting with the next page. In this tutorial, we'll start modifying the category page of our Magento theme.
The category page essentially consists of four sections: the toolbar, grid mode, list mode and the sidebar. We'll deal with the first three sections in this article, and then in the next tutorial, we'll modify the sidebar and do some CSS fixes.
If you look at any category page of our theme, it'll currently look something like this:

While we want to make it look like this:

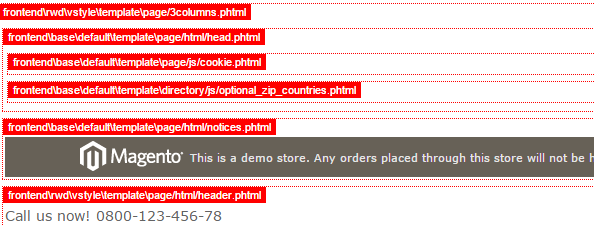
If you notice, our current category page has wide empty spaces on the left and right. We need to figure out why the content area is not taking enough space. Let's first look at which template is responsible for rendering this page. We can do this by enabling template hints from the admin panel, as you have done multiple times before in this series.
Here we found out it had a three-column layout rendering this page, and this is the reason there is empty wide space on the left, as no blocks are assigned to the left sidebar.
To make this page look like our HTML design, we'll change it to two columns. From the admin panel, go to Catalog > Manage Categories > Custom Design > Page Layout and change it to 2 columns with left bar.
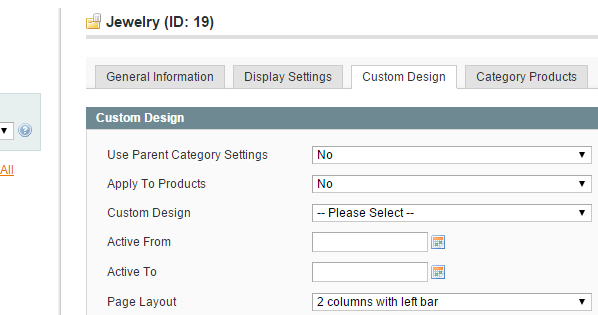
Now our page should have a two-column layout with a sidebar on the left side, as was the requirement of our design.
As in this article we'll only change the right area (not the sidebar), we'll start the editing process from the toolbar. With template hints on, we'll check the phtml files responsible for rendering that by again enabling the template hints.
As we found out it, is this file: \template\catalog/product/list/toolbar.phtml.
We'll copy that in our new theme, compare it with the code of our HTML file, and then start making changes. Our current code of the toolbar.phtml file looks like this:
<?php if($this->getCollection()->getSize()): ?>
<div class="toolbar">
    <?php if( $this->isExpanded() ): ?>
        <div class="sorter">
            <?php if( $this->isEnabledViewSwitcher() ): ?>
                <p class="view-mode">
                    <?php $_modes = $this->getModes(); ?>
                    <?php if($_modes && count($_modes)>1): ?>
                        <label><?php echo $this->__('View as') ?></label>
                        <?php foreach ($this->getModes() as $_code=>$_label): ?>
                            <?php if($this->isModeActive($_code)): ?>
                                <strong title="<?php echo $_label ?>" class="<?php echo strtolower($_code); ?>"><?php echo $_label ?></strong>
                            <?php else: ?>
                                <a href="<?php echo $this->getModeUrl($_code) ?>" title="<?php echo $_label ?>" class="<?php echo strtolower($_code); ?>"><?php echo $_label ?></a>
                            <?php endif; ?>
                        <?php endforeach; ?>
                    <?php endif; ?>
                </p>
            <?php endif; ?>

            <div class="sort-by">
                <label><?php echo $this->__('Sort By') ?></label>
                <select onchange="setLocation(this.value)" title="<?php echo $this->__('Sort By') ?>">
                    <?php foreach($this->getAvailableOrders() as $_key=>$_order): ?>
                        <option value="<?php echo $this->getOrderUrl($_key, 'asc') ?>"<?php if($this->isOrderCurrent($_key)): ?> selected="selected"<?php endif; ?>>
                            <?php echo $this->__($_order) ?>
                        </option>
                    <?php endforeach; ?>
                </select>
                <?php if($this->getCurrentDirection() == 'desc'): ?>
                    <a href="<?php echo $this->getOrderUrl(null, 'asc') ?>" class="sort-by-switcher sort-by-switcher--desc" title="<?php echo $this->__('Set Ascending Direction') ?>"><?php echo $this->__('Set Ascending Direction') ?></a>
                <?php else: ?>
                    <a href="<?php echo $this->getOrderUrl(null, 'desc') ?>" class="sort-by-switcher sort-by-switcher--asc" title="<?php echo $this->__('Set Descending Direction') ?>"><?php echo $this->__('Set Descending Direction') ?></a>
                <?php endif; ?>
            </div>
        </div>
    <?php endif; ?>
    <div class="pager">
        <div class="count-container">
            <?php if($this->getLastPageNum()>1): ?>
                <p class="amount amount--has-pages">
                    <?php echo $this->__('%s-%s of %s', $this->getFirstNum(), $this->getLastNum(), $this->getTotalNum()) ?>
                </p>
            <?php else: ?>
                <p class="amount amount--no-pages">
                    <strong><?php echo $this->__('%s Item(s)', $this->getTotalNum()) ?></strong>
                </p>
            <?php endif; ?>

            <div class="limiter">
                <label><?php echo $this->__('Show') ?></label>
                <select onchange="setLocation(this.value)" title="<?php echo $this->__('Results per page'); ?>">
                <?php foreach ($this->getAvailableLimit() as  $_key=>$_limit): ?>
                    <option value="<?php echo $this->getLimitUrl($_key) ?>"<?php if($this->isLimitCurrent($_key)): ?> selected="selected"<?php endif ?>>
                        <?php echo $_limit ?>
                    </option>
                <?php endforeach; ?>
                </select>
            </div>
        </div>

        <?php echo $this->getPagerHtml() ?>

    </div>
</div>
<?php endif ?>
We have to compare it with the HTML code responsible for the toolbar part, which is this:
<div class="toolbar">
  <div class="sorter">
    <div class="view-mode"><a href="productlitst.html" class="list">List</a><a href="#" class="grid active">Grid</a></div>
    <div class="sort-by">Sort by :
      <select name="" >
        <option value="Default" selected>Default</option>
        <option value="Name">Name</option>
        <option value="Price">Price</option>
      </select>
    </div>
    <div class="limiter">Show :
      <select name="" >
        <option value="3" selected>3</option>
        <option value="6">6</option>
        <option value="9">9</option>
      </select>
    </div>
  </div>
</div>
We'll start modifying this code by putting in the dynamic tags and different for and if statements. For instance, to render the links for grid and list modes for the view mode, we'll add this code:
<?php if($_modes && count($_modes)>1): ?>
<?php foreach ($this->getModes() as $_code=>$_label): ?>
  <?php if($this->isModeActive($_code)): ?>
    <a title="<?php echo $_label ?>" href="#" class="<?php echo strtolower($_label) ?> active"><?php echo $_label ?></a>
    <?php else: ?>
      <a title="<?php echo $_label ?>" href="<?php echo $this->getModeUrl($_code) ?>" class="<?php echo strtolower($_label) ?>"><?php echo $_label ?></a>
     <?php endif ?>
  <?php endforeach; ?>
<?php endif ?>
What this code essentially does is iterate over all the active modes (list and grid), and then list an anchor tag for each one of these. Here, very smartly, we have assigned different classes and titles to them, using the $_label variable, which will be different for each mode.
Similarly you can modify the sort-by and limiter parts yourself by comparing it with the actual toolbar.phtml file. After the modifications, the final code for this file will look something like this:
<?php if($this->getCollection()->getSize()): ?>
    <div class="toolbar">
      <?php if( $this->isExpanded() ): ?>
        <div class="sorter">
          <?php if( $this->isEnabledViewSwitcher() ): ?>
            <div class="view-mode">
              <?php $_modes = $this->getModes(); ?>
              <?php if($_modes && count($_modes)>1): ?>
                <?php foreach ($this->getModes() as $_code=>$_label): ?>
                  <?php if($this->isModeActive($_code)): ?>
                    <a title="<?php echo $_label ?>" href="#" class="<?php echo strtolower($_label) ?> active"><?php echo $_label ?></a>
                    <?php else: ?>
                      <a title="<?php echo $_label ?>" href="<?php echo $this->getModeUrl($_code) ?>" class="<?php echo strtolower($_label) ?>"><?php echo $_label ?></a>
                     <?php endif ?>
                  <?php endforeach; ?>
                <?php endif ?>
            </div>
          <?php endif ?>

          <div class="sort-by">Sort by :
            <select onchange="setLocation(this.value)" title="<?php echo $this->__('Sort By') ?>">
            <?php foreach($this->getAvailableOrders() as $_key=>$_order): ?>
              <option value="<?php echo $this->getOrderUrl($_key, 'asc') ?>"<?php if($this->isOrderCurrent($_key)): ?> selected="selected"<?php endif; ?>>
                          <?php echo $this->__($_order) ?>
                      </option>
            <?php endforeach; ?>
            </select>
            <?php if($this->getCurrentDirection() == 'desc'): ?>
                  <a href="<?php echo $this->getOrderUrl(null, 'asc') ?>" class="sort-by-switcher sort-by-switcher--desc" title="<?php echo $this->__('Set Ascending Direction') ?>"><?php echo $this->__('Set Ascending Direction') ?></a>
              <?php else: ?>
                  <a href="<?php echo $this->getOrderUrl(null, 'desc') ?>" class="sort-by-switcher sort-by-switcher--asc" title="<?php echo $this->__('Set Descending Direction') ?>"><?php echo $this->__('Set Descending Direction') ?></a>
              <?php endif; ?>
          </div>
          <div class="limiter"><?php echo $this->__('Show: ') ?>
            <select onchange="setLocation(this.value)" title="<?php echo $this->__('Results per page'); ?>">
              <?php foreach ($this->getAvailableLimit() as  $_key=>$_limit): ?>
                  <option value="<?php echo $this->getLimitUrl($_key) ?>"<?php if($this->isLimitCurrent($_key)): ?> selected="selected"<?php endif ?>>
                      <?php echo $_limit ?>
                  </option>
              <?php endforeach; ?>
              </select>
          </div>
        </div>
        <?php endif ?>
        <?php echo $this->getPagerHtml() ?>
    </div>
<?php endif ?>
And if we refresh the page now, it'll look something like this. Everything is in place, but the CSS is quite off, which we'll fix in the next article.
Now it's time to change the actual products displayed on this page. Products here can be shown in two different ways, i.e. list mode and grid mode. If we enable template hints to find out the file responsible for this part, we'll see that the code for both grid and list mode are written in the same file, which is frontend\rwd\default\template\catalog/product/list.phtml.
The list code in this file is on lines 44 to 116, which is this:
<?php // List mode ?>
    <?php if($this->getMode()!='grid'): ?>
    <?php $_iterator = 0; ?>
    <ol class="products-list" id="products-list">
    <?php foreach ($_productCollection as $_product): ?>
        <li class="item<?php if( ++$_iterator == sizeof($_productCollection) ): ?> last<?php endif; ?>">
            <?php // Product Image ?>
            <a href="<?php echo $_product->getProductUrl() ?>" title="<?php echo $this->stripTags($this->getImageLabel($_product, 'small_image'), null, true) ?>" class="product-image">
                <?php /* Based on the native RWD styling, product images are displayed at a max of ~400px wide when viewed on a
                        one column page layout with four product columns from a 1280px viewport. For bandwidth reasons,
                        we are going to serve a 300px image, as it will look fine at 400px and most of the times, the image
                        will be displayed at a smaller size (eg, if two column are being used or viewport is smaller than 1280px).
                        This $_imgSize value could even be decreased further, based on the page layout
                        (one column, two column, three column) and number of product columns. */ ?>
                <?php $_imgSize = 300; ?>
                <img id="product-collection-image-<?php echo $_product->getId(); ?>"
                     src="<?php echo $this->helper('catalog/image')->init($_product, 'small_image')->keepFrame(false)->resize($_imgSize); ?>"
                     alt="<?php echo $this->stripTags($this->getImageLabel($_product, 'small_image'), null, true) ?>" />
            </a>
            <?php // Product description ?>
            <div class="product-shop">
                <div class="f-fix">
                    <div class="product-primary">
                        <?php $_productNameStripped = $this->stripTags($_product->getName(), null, true); ?>
                        <h2 class="product-name"><a href="<?php echo $_product->getProductUrl() ?>" title="<?php echo $_productNameStripped; ?>"><?php echo $_helper->productAttribute($_product, $_product->getName() , 'name'); ?></a></h2>
                        <?php if($_product->getRatingSummary()): ?>
                        <?php echo $this->getReviewsSummaryHtml($_product) ?>
                        <?php endif; ?>
                        <?php
                        // Provides extra blocks on which to hang some features for products in the list
                        // Features providing UI elements targeting this block will display directly below the product name
                        if ($this->getChild('name.after')) {
                            $_nameAfterChildren = $this->getChild('name.after')->getSortedChildren();
                            foreach ($_nameAfterChildren as $_nameAfterChildName) {
                                $_nameAfterChild = $this->getChild('name.after')->getChild($_nameAfterChildName);
                                $_nameAfterChild->setProduct($_product);
                                echo $_nameAfterChild->toHtml();
                            }
                        }
                        ?>
                    </div>
                    <div class="product-secondary">
                        <?php echo $this->getPriceHtml($_product, true) ?>
                    </div>
                    <div class="product-secondary">
                        <?php if(!$_product->canConfigure() && $_product->isSaleable()): ?>
                            <p class="action"><button type="button" title="<?php echo $this->__('Add to Cart') ?>" class="button btn-cart" onclick="setLocation('<?php echo $this->getAddToCartUrl($_product) ?>')"><span><span><?php echo $this->__('Add to Cart') ?></span></span></button></p>
                        <?php elseif($_product->getStockItem() && $_product->getStockItem()->getIsInStock()): ?>
                            <p class="action"><a title="<?php echo $this->__('View Details') ?>" class="button" href="<?php echo $_product->getProductUrl() ?>"><?php echo $this->__('View Details') ?></a></p>
                        <?php else: ?>
                            <p class="action availability out-of-stock"><span><?php echo $this->__('Out of stock') ?></span></p>
                        <?php endif; ?>
                        <ul class="add-to-links">
                            <?php if ($this->helper('wishlist')->isAllow()) : ?>
                                <li><a href="<?php echo $this->helper('wishlist')->getAddUrl($_product) ?>" class="link-wishlist"><?php echo $this->__('Add to Wishlist') ?></a></li>
                            <?php endif; ?>
                            <?php if($_compareUrl=$this->getAddToCompareUrl($_product)): ?>
                                <li><span class="separator">|</span> <a href="<?php echo $_compareUrl ?>" class="link-compare"><?php echo $this->__('Add to Compare') ?></a></li>
                            <?php endif; ?>
                        </ul>
                    </div>
                    <div class="desc std">
                        <?php echo $_helper->productAttribute($_product, $_product->getShortDescription(), 'short_description') ?>
                        <a href="<?php echo $_product->getProductUrl() ?>" title="<?php echo $_productNameStripped ?>" class="link-learn"><?php echo $this->__('Learn More') ?></a>
                    </div>
                </div>
            </div>
        </li>
    <?php endforeach; ?>
    </ol>
    <script type="text/javascript">decorateList('products-list', 'none-recursive')</script>
We now have to compare it with the HTML list code in productlist.html in our HTML template.
<ul class="products-listItem">
  <li class="products">
    <div class="offer">New</div>
    <div class="thumbnail"><img src="images/products/small/products-05.png" alt="Product Name"></div>
    <div class="product-list-description">
      <div class="productname">Lincoln Corner Unit Products</div>
      <p><img src="images/star.png" alt=""><a href="#" class="review_num">02 Review(s)</a></p>
      <p>Proin lectus ipsum, gravida et mattis vulputate, tristique ut lectus. Sed et lorem nunc. Vestibulum ante ipsum primis in faucibus orci luctus et ultri ces posuere cubilia curae. Proin lectus ipsum, gravida etds mattis vulputate, tristique ut lectus. Sed et lorem nunc...</p>
      <div class="list_bottom">
        <div class="price"><span class="new_price">450.00<sup>$</sup></span><span class="old_price">450.00<sup>$</sup></span></div>
        <div class="button_group">
          <button class="button">Add To Cart</button>

        </div>
      </div>
    </div>
  </li>
</ul>
Modifying this code is fairly simple. We'll use these initialization lines:
<?php // List mode ?>
<?php if($this->getMode()!='grid'): ?>
<?php $_iterator = 0; ?>
Then we'll place a for loop around the li tag:
<?php foreach ($_productCollection as $_product): ?>
And lastly we'll replace the product name, price, description, image file link and URL with the dynamic tags. The final code will look like this:
<?php // List mode ?>
<?php if($this->getMode()!='grid'): ?>
<?php $_iterator = 0; ?>
<ol class="products-list" id="products-list">
<?php foreach ($_productCollection as $_product): ?>
    <li class="products item<?php if( ++$_iterator == sizeof($_productCollection) ): ?> last<?php endif; ?>">

          <div class="thumbnail">
            <?php $_imgSize = 300; ?>
            <img id="product-collection-image-<?php echo $_product->getId(); ?>"
                 src="<?php echo $this->helper('catalog/image')->init($_product, 'small_image')->keepFrame(false)->resize($_imgSize); ?>"
                 alt="<?php echo $this->stripTags($this->getImageLabel($_product, 'small_image'), null, true) ?>" />
          </div>
          <div class="product-list-description">
            <div class="productname"><?php echo $_helper->productAttribute($_product, $_product->getName() , 'name'); ?></div>
            <p><?php if($_product->getRatingSummary()): ?>
              <?php echo $this->getReviewsSummaryHtml($_product) ?>
              <?php endif; ?>
            </p>
            <p><?php echo $_helper->productAttribute($_product, $_product->getShortDescription(), 'short_description') ?></p>
            <div class="list_bottom">
              <div class="price"><?php echo $this->getPriceHtml($_product, true) ?></div>
              <div class="button_group">
                <button type="button" title="<?php echo $this->__('Add to Cart') ?>" class="button btn-cart" onclick="setLocation('<?php echo $this->getAddToCartUrl($_product) ?>')"><span><span><?php echo $this->__('Add to Cart') ?></span></span></button>
              </div>
            </div>
          </div>
    </li>
<?php endforeach; ?>
</ol>
<script type="text/javascript">decorateList('products-list', 'none-recursive')</script>
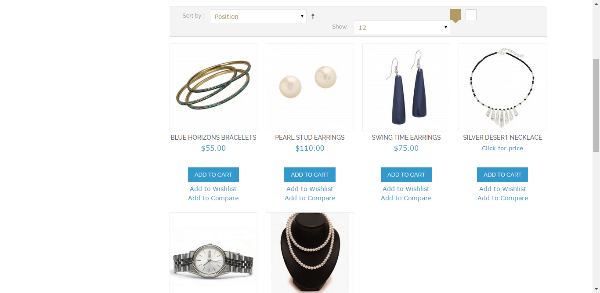
Now, if we refresh the page, we'll see the category page in list mode will look something like this. I know it's not what we want it to look like, but all our HTML is in place, so now we just need to modify its CSS, which we'll do in the next tutorial.

Now coming to grid mode, the code for that is from 118 to 176 in the same list.phtml file.
<?php // Grid Mode ?>

<?php $_collectionSize = $_productCollection->count() ?>
<?php $_columnCount = $this->getColumnCount(); ?>
<ul class="products-grid products-grid--max-<?php echo $_columnCount; ?>-col">
    <?php $i=0; foreach ($_productCollection as $_product): ?>
        <?php /*if ($i++%$_columnCount==0): ?>
        <?php endif*/ ?>
        <li class="item<?php if(($i-1)%$_columnCount==0): ?> first<?php elseif($i%$_columnCount==0): ?> last<?php endif; ?>">
            <a href="<?php echo $_product->getProductUrl() ?>" title="<?php echo $this->stripTags($this->getImageLabel($_product, 'small_image'), null, true) ?>" class="product-image">
                <?php $_imgSize = 210; ?>
                <img id="product-collection-image-<?php echo $_product->getId(); ?>"
                     src="<?php echo $this->helper('catalog/image')->init($_product, 'small_image')->resize($_imgSize); ?>"
                     alt="<?php echo $this->stripTags($this->getImageLabel($_product, 'small_image'), null, true) ?>" />
            </a>
            <div class="product-info">
                <h2 class="product-name"><a href="<?php echo $_product->getProductUrl() ?>" title="<?php echo $this->stripTags($_product->getName(), null, true) ?>"><?php echo $_helper->productAttribute($_product, $_product->getName(), 'name') ?></a></h2>
                <?php
                // Provides extra blocks on which to hang some features for products in the list
                // Features providing UI elements targeting this block will display directly below the product name
                if ($this->getChild('name.after')) {
                    $_nameAfterChildren = $this->getChild('name.after')->getSortedChildren();
                    foreach ($_nameAfterChildren as $_nameAfterChildName) {
                        $_nameAfterChild = $this->getChild('name.after')->getChild($_nameAfterChildName);
                        $_nameAfterChild->setProduct($_product);
                        echo $_nameAfterChild->toHtml();
                    }
                }
                ?>
                <?php echo $this->getPriceHtml($_product, true) ?>
                <?php if($_product->getRatingSummary()): ?>
                <?php echo $this->getReviewsSummaryHtml($_product, 'short') ?>
                <?php endif; ?>
                <div class="actions">
                    <?php if(!$_product->canConfigure() && $_product->isSaleable()): ?>
                        <button type="button" title="<?php echo $this->__('Add to Cart') ?>" class="button btn-cart" onclick="setLocation('<?php echo $this->getAddToCartUrl($_product) ?>')"><span><span><?php echo $this->__('Add to Cart') ?></span></span></button>
                    <?php elseif($_product->getStockItem() && $_product->getStockItem()->getIsInStock()): ?>
                        <a title="<?php echo $this->__('View Details') ?>" class="button" href="<?php echo $_product->getProductUrl() ?>"><?php echo $this->__('View Details') ?></a>
                    <?php else: ?>
                        <p class="availability out-of-stock"><span><?php echo $this->__('Out of stock') ?></span></p>
                    <?php endif; ?>
                    <ul class="add-to-links">
                        <?php if ($this->helper('wishlist')->isAllow()) : ?>
                            <li><a href="<?php echo $this->helper('wishlist')->getAddUrl($_product) ?>" class="link-wishlist"><?php echo $this->__('Add to Wishlist') ?></a></li>
                        <?php endif; ?>
                        <?php if($_compareUrl=$this->getAddToCompareUrl($_product)): ?>
                            <li><span class="separator">|</span> <a href="<?php echo $_compareUrl ?>" class="link-compare"><?php echo $this->__('Add to Compare') ?></a></li>
                        <?php endif; ?>
                    </ul>
                </div>
            </div>
        </li>
        <?php /*if ($i%$_columnCount==0 || $i==$_collectionSize): ?>
        <?php endif*/ ?>
    <?php endforeach ?>
</ul>
<script type="text/javascript">decorateGeneric($$('ul.products-grid'), ['odd','even','first','last'])</script>
<?php endif; ?>
The HTML code looks like this in the productgrid.html file in our HTML template:
<div class="row">
  <div class="col-md-4 col-sm-6">
    <div class="products">
      <div class="main">
        <div class="view view-eighth">
        	<img src="images/products/small/products-02.jpg" />
        	<div class="mask">
            	<a href="#" class="info">Read More</a>
        	</div>
            <div class="productname">Iphone 5s Gold 32 Gb 2013</div>
      		<h4 class="price">$451.00</h4>
    	</div>
		</div>
    </div>
  </div>
</div>
Modifying this part will be quite similar to what we did in the list part. First of all we'll do some initialization, the same as in the default list.phtml file.
<?php // Grid Mode ?>

<?php $_collectionSize = $_productCollection->count() ?>
<?php $_columnCount = $this->getColumnCount(); ?>
Next we'll wrap each li item inside a for loop to iterate over all products.
<?php $i=0; foreach ($_productCollection as $_product): ?>
Lastly we'll replace the product attributes like product name, price, description, etc., with relevant dynamic tags. You can find them quite conveniently from the actual list.phtml file.
The final code will look like this:
<?php // Grid Mode ?>

<?php $_collectionSize = $_productCollection->count() ?>
<?php $_columnCount = $this->getColumnCount(); ?>
<ul class="products-grid products-grid--max-<?php echo $_columnCount; ?>-col">
    <?php $i=0; foreach ($_productCollection as $_product): ?>
        <?php /*if ($i++%$_columnCount==0): ?>
        <?php endif*/ ?>
        <li class="item<?php if(($i-1)%$_columnCount==0): ?> first<?php elseif($i%$_columnCount==0): ?> last<?php endif; ?>">
            <div class="view view-eighth">
<img src="<?php echo $this->helper('catalog/image')->init($_product, 'small_image')->resize($_imgSize); ?>"
                     alt="<?php echo $this->stripTags($this->getImageLabel($_product, 'small_image'), null, true) ?>"/>
<div class="mask">
    <a href="<?php echo $_product->getProductUrl() ?>" class="info">Add to Cart</a>
</div>
  <div class="productname"><?php echo $this->stripTags($_product->getName(), null, true) ?></div>
<h4 class="price"><?php echo $this->getPriceHtml($_product, true) ?>
                </h4>
</div>
        </li>
        <?php /*if ($i%$_columnCount==0 || $i==$_collectionSize): ?>
        <?php endif*/ ?>
    <?php endforeach ?>
</ul>
<script type="text/javascript">decorateGeneric($$('ul.products-grid'), ['odd','even','first','last'])</script>
<?php endif; ?>
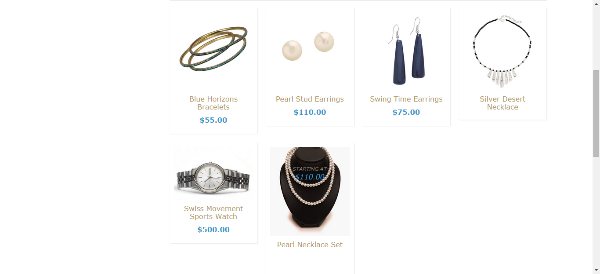
Now if you refresh the page, the grid mode will look like this:
In this article, we have modified the toolbar and list and grid sections of this page. In the next article we'll modify the sidebar, and do some CSS style fixes. By the end of the next article, our category page will look quite similar to the HTML design.

Comments