Magento custom module development is a core part of any Magento development or Magento project, because at any stage you may want to integrate your own functionality/module in your existing Magento project.
In this series, I am going to cover the details of Magento custom module development.
If you want to go further with your Magento development, check out the wide range of useful Magento extensions on Envato Market.
Throughout this series, I'm referring Magento Community Edition 1.7, though custom module structures are the same in all versions of Magento. Before going we're going to start actual module development, let's quickly understand the basic structure of Magento.
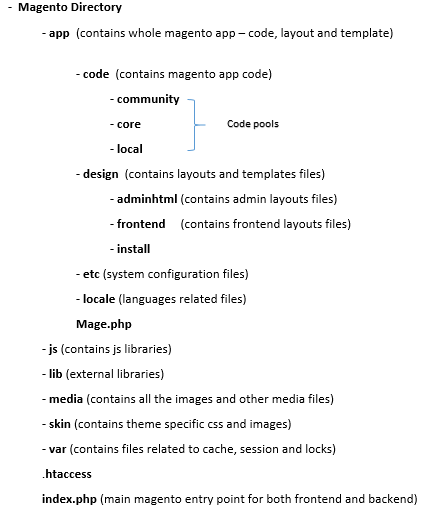
Whenever you install a fresh Magento, you will notice the following Magento directory structure:
Introduction to Magento MVC Structure
Like any other major frameworks such as Joomla, CakePHP, CodeIgniter, etc., Magento also follows the MVC-based architecture though this is little bit different than core PHP MVC architecture. Here, I'll explain the difference in Magento architecture by comparing it with simple PHP MVC architecture.
PHP MVC architecture
In the typical MVC pattern, the flow of the application is something like this:
- There is main entry point -
index.php- from where the entire app routing mechanism is determined. - Based on this routing mechanism and requested URL pattern, the app will call the appropriate controller.
- The controller then calls the appropriate views.
- Finally, the view files collect the data from model files and display the data.
Magento MVC architecture
Magento's MVC architecture adds a few layers to the MVC pattern, but the basic flow of control of an application is like this:
- There is main entry point -
index.php- from where the whole app will be initialized. - Base on the requested URL appropriate controller will be called.
- Controller defines the pages and load the layout files for those pages.
- Layout files tells the controllers which block files to use.
- Block files collect the data from models and helpers files and pass it to templates files.
- Templates files receive data and render html.
Initially, this may be difficult to understand since it contains a few extra layers. To get more familiar with the flow of control, let's develop a custom "Hello World" module.
Before Starting With Modules
- I am assuming that you already have a working copy of Magento with version 1.7 or 1.7+ (or else as version does not matter at this stage)
- Disable the cache. To Disable the cache Go to Magento Admin Panel > System > Cache Management > Select all cache type from left side checkboxes > Select Action: disable from right top drop down > click Submit.
The Structure of a Magento Module
Code Pools
Magento contains three type of code pools where the all custom and core modules of Magento are resides.
- Core pools contain all the core modules which are by default comes with a Magento installation. These modules are written by Magento developers. It's recommended not to modify these modules because whenever you will upgrade your Magento installation, all the core modules will be overwritten and your modifications will be lost.
- Community pools contain all the modules - that is, custom modules - that are developed by third-party programmers to be installed through Magento Connect. These modules generally extend core modules and offer their own functionality that can often be used anywhere in Magento.
- Local pools contain all the custom module that are going to be used for a particular project but are not readled in Magento Connect
Thus, we have two choice of pools: Community or Local. Since we are working on our own project, we are going to use a local pool, though there's no restriction on using the community pool, either.
Structure
Magento modules consist of the following components:
- Blocks contain functions that are used to display data in templates.
-
Models contain the business logic of modules.
- Resource Models contains functions that are used for database interaction.
- Controllers defines page layout and blocks files and are loaded when a URL is requested.
- etc contains configuration files in XML formats which tells Magento how many files modules have and how the module interacts.
-
Helpers contain functions that are used for defining common business logic (such as image resize, validation). These functions can used anywhere across the Magento application
- sql contains SQL scripts to create, modify, or delete SQL tables.
Module Naming
We need to give a name to our module. Generally, Magento module names are made of two parts: <Namespace>_<Module>. The best practice to give a Magento module a name is choose <Namespace> as an author or a company name and <Module> as a actual module name.
Based on these naming convention, I am giving our module the Chiragdodia_Mymodule name. We will reference this name throughout this series.
Code Set Up and Configuration
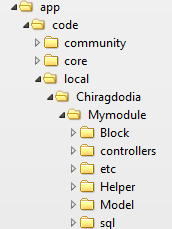
Lets create the directories base on above structure. Go to your Magento installation direction then navigate to app/code/local and create the directories as shown below.
Next, we will configure and activate our module by creating config file Chiragdodia_Mymodule.xml in the app/etc/modules directory. This directory contains config files for all modules.
<?xml version="1.0"?>
<config>
    <modules>
        <Chiragdodia_Mymodule>
        <active>true</active>
        <codePool>local</codePool>
        </Chiragdodia_Mymodule>
    </modules>
</config>
This file will tell Magento about the location of our module. In the active tag, we have specified true to enable our module. If everything is correct thus far, then you will find your module in the Magento Admin Panel > System > Configuration > Advanced > Advanced > Disable Modules Output list. From here you can enable and disable your module.
Getting Started: Development
Next we will create our module configuration file. This file will tell Magento all about our module. This includes how many files our module contains, what type of files (models, helpers, database classes), and so on.
Go to app/code/local/Chiragdodia/Mymodule/etc and create a config.xml file that will contain following content
<?xml version="1.0"?>
<config>
    <modules>
        <Chiragdodia_Mymodule>
            <version>0.1.0</version>    <!-- Version number of your module -->
        </Chiragdodia_Mymodule>
    </modules>
    <frontend>
        <routers>
            <mymodule>
                <use>standard</use>
                <args>
                    <module>Chiragdodia_Mymodule</module>
                    <frontName>mymodule</frontName>
                </args>
            </mymodule>
        </routers>
    </frontend>
</config>
Let's go through line by line to understand each tag. Here, the first tag is <module> that contains the name and version of our module. The version number is very important when it comes to updating your module update your module.
The <frontend> tag will tell Magento about the controller dispatched. Inside the <frontend> tag, we have defined <routers> that tells Magento how to access our controllers via the routing mechanism.
In the <mymodule> tag, we have defined module name in <module> tag and frontend name in <frontName>. By using a frontend name, we can access our module in frontend like yoursitename.com/index.php/mymodule/index.
By calling yoursitename.com/index.php/mymodule or yoursitename.com/index.php/mymodule/index Magento will look for index action of your module's controller file. As such, we need to create our controller file.
Go to app/code/local/Chiragdodia/Mymodule/controllers and create file IndexController.php with following content.
Note that each file's name and class names are case sensitive in Magento It's very important that you are taking care in naming your work when creating files and classes.
<?php
class Chiragdodia_Mymodule_IndexController extends Mage_Core_Controller_Front_Action
{
    public function indexAction()
    {
        echo "Hello tuts+ World";
    }
}
Now open URL yoursite.com/index.php/mymodule/index it will print "Hello tuts+ World". Awesome - we're finally done with our first hello world module.
Controller Dispatch
Here we have extend the class Mage_Core_Controller_Front_Action that contains all the methods which are using in routing of url. The Magento class name reflects the location of class file. So the class Mage_Core_Controller_Front_Action resides in location Mage > Core > Controller > Front > Action.php
See the class name of our controller that is Chiragdodia_Mymodule_IndexController. Magento controller to be named in such a way that it reflects (<module>tag)_(Action Controllername)(keyword Controller).
-
<module>tag =
Chiragdodia_Mymodule(we have defined this tag inconfig.xml) - Action
Controllername= Index - Action controller followed by the
Controllerkeyword
Based on this pattern, the name of our controller is Chiragdodia_Mymodule_IndexController
Now see the URL pattern which is follow the below route patternyoursite.com/index.php/frontendname/actionControllername/actionmethod
- frontendname = mymodule
- actionControllername = Index
- actionmethodname = Index
Based on this URL pattern, our module's URL is yoursite.com/index.php/mymodule/index/index. You can also access it using yoursite.com/index.php/mymodule because whenever you have not specified an actionController or actionmethod name, Magento loads the index controller and index action by default.
Now let's create one more action: testAction .
<?php
class Chiragdodia_Mymodule_IndexController extends Mage_Core_Controller_Front_Action
{
    public function indexAction()
    {
        echo "Hello tuts+ World";
    }
    public function testAction()
    {
        echo "test action";
    }
}
We can access the testAction using URL yoursite.com/index.php/mymodule/index/test. As explained earlier here
- frontendname = mymodule
- actionControllername = Index
- actionmethodname = test
This is how the controller works in Magento.
At first, it can be difficult to understand everything at once so I've included all of the source code to this module so that you can review it and implement your own work while using it as a guide.
What's Next?
In the next part, we are going to fill in some layouts in our module by creating layout and block files. We will understand how the layouts files works in Magento and what role blocks play within the context of Magento.
Until then create your own module and let me know of anything that causes you trouble.
Need Extra Help?
If you're still not sure how to proceed after reading this tutorial, try contacting one of the Magento developers on Envato Studio. They can help you with all sorts of Magento issues, big and small. Here are a few examples:
1. Magento All-in-One (Full Site Development / Customization)

Get a Magento website set up, or request advanced customization such as:
- layout modification
- sliders modification
- custom menu
- fixing responsive issues
- and more
2. Magento Module Development and Site Development

This provider will do any of the following:
- develop a custom module
- install a Magento theme
- customize with your identity design (logo, colour, font, background)
- create your first 20 categories / sub-categories
- set up payments and local currencies
- and more
3. Magento Theme Customization

Get your Magento theme customized at a reasonable price within just a one-day turnaround.
4. Magento Theme Development, Installation, Extensions & Custom Work

This provider offers an array of Magento services, including:
- custom Magento web development
- responsive Magento sites
- custom Magento theme development
- module development
- shopping cart development
- secure payment gateway integration
If these solutions aren't right for you, try one of the dozens of others available on Envato Studio.

Comments