This tutorial will show you how to get started with Metal, a framework introduced in iOS 8 that supports GPU accelerated 3D graphics rendering and data parallel computation workloads. In this tutorial, we’ll take a look at the theoretical concepts that underly Metal. You'll also learn how to create a Metal application that sets the required hardware state for graphics, commits commands for execution in the GPU, and manages buffer, texture objects, and pre-compiled shaders.
1. First Things First
This tutorial assumes that you're familiar with the Objective-C language and have some experience with OpenGL, OpenCL, or a comparable graphics API.
It also requires a physical device with an Apple A7 or A8 processor. This means that you'll need an iPhone 5S, 6, or 6 Plus, or an iPad Air or mini (2nd generation). The iOS Simulator will give you compilation errors.
This tutorial is only focused on Metal and it won't cover the Metal Shading Language. We will create a shader, but we will only cover the basic operations to interact with it.
If you're using Xcode for the first time, then make sure that you add your Apple ID in the Accounts section of Xcode's Preferences. This will ensure that you don't run into problems when deploying an application onto your device.
Xcode 6 includes a project template for Metal, but to help you better understand Metal, we are going to create a project from scratch.
On a final note, we'll use Objective-C in this tutorial and it's important that you have a basic understanding of this programming language.
2. Introduction
For those of you who are familiar with OpenGL or OpenGL ES, Metal is a low-level 3D graphics framework, but with lower overhead. In contrast to Apple's Sprite Kit or Scene Kit frameworks with which you, by default, cannot interact with the rendering pipeline, with Metal you have absolute power to create, control, and modify that pipeline.
Metal has the following features:
- The framework provides extremely low-overhead access to the A7 and A8 GPU, enabling incredibly high performance for sophisticated graphics rendering and computational tasks.
- Metal eliminates many performance bottlenecks, such as costly state validation that is found in traditional graphics APIs.
- It is explicitly designed to move all expensive state translation and compilation operations out of the runtime and rendering environment.
- It provides precompiled shaders, state objects, and explicit command scheduling to ensure your application achieves the highest possible performance and efficiency for graphics rendering and computational tasks.
- The framework was designed to exploit modern architectural considerations, such as multiprocessing and shared memory.
- It is deeply integrated with iOS 8, the A7 and A8 chipsets, and the Apple hardware, creating a unified and independent framework.
Enough with the theory, it's time to understand how a Metal application is built.
3. Creating a Metal Application
A Metal application is characterized by a set of required steps to correctly present data on screen. These steps are usually created in order and some references are passed from one to another. These steps are:
- get the device
- create a command queue
- create resources, such as buffers, textures, and shaders
- create a rendering pipeline
- create a view
Step 1: Get the Device
This step involves the creation of a MTLDevice object, the heart of a Metal application. The MTLDevice class provides a direct way to communicate with the GPU driver and hardware. To get a reference to a MTLDevice instance, you need to call the System Default Device as shown below. With this reference, you have direct access to the device's hardware.
id <MTLDevice> mtlDevice = MTLCreateSystemDefaultDevice();
Step 2: Create a Command Queue
The MTLCommandQueue class provides a way to submit commands or instructions to the GPU. To initialize an instance of the MTLCommandQueue class, you need to use the MTLDevice object we created earlier and call the newCommandQueue method on it.
id <MTLCommandQueue> mtlCommandQueue = [mtlDevice newCommandQueue];
Step 3: Create Resources
This step involves the creation of your buffer objects, textures, and other resources. In this tutorial, you will create vertices. These objects are stored on the server/GPU side and in order to communicate with them you need to create a specific data structure that must contain similar data to those available in the vertex object.
For instance, if you need to pass data for a 2D vertex position, you should declare one data structure containing an object for that 2D position. Then, you must declare it in both client, your iOS application, and server side, the Metal shader. Take a look at the following example for clarification.
typedef struct {
    GLKVector2 position;
}YourDataStruct;
Note that you need to import the GLKMath library from the GLKit framework as shown below.
#import <GLKit/GLKMath.h>
You then declare an object with the correct coordinates.
YourDataStruct triangle[3] = {
    { -.5f, 0.0f },
    { 0.5f, 0.0f },
    { 0.0f, 0.5f }
};
Step 4: Create a Rendering Pipeline
Creating the rendering pipeline is probably the trickiest step, since you must take care of several initializations and configurations, each of which is illustrated in the following diagram.
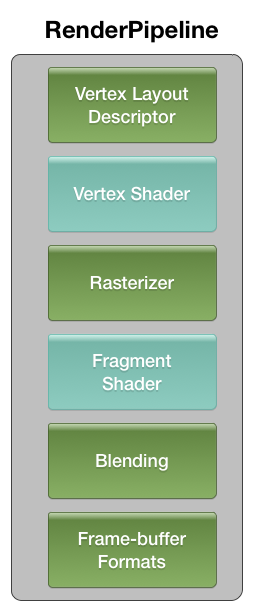
The rendering pipeline is configured using two classes:
-
MTLRenderPipelineDescriptor: provides all of your rendering pipeline states, such as vertex positions, color, depth, and stencil buffers, among others -
MTLRenderPipelineState: the compiled version ofMTLRenderPipelineDescriptorand which will be deployed to the device
Note that you don't need to create all of the rendering pipeline objects. You should just create the ones that meet your needs.
The following code snippet shows you how to create the MTLRenderPipelineDescriptor object.
MTLRenderPipelineDescriptor *mtlRenderPipelineDescriptor = [MTLRenderPipelineDescriptor new];
At this point, you've created the descriptor, but you still need to configure it with at least the pixel format. This is what we do in the following code block.
mtlRenderPipelineDescriptor.colorAttachments[0].pixelFormat = MTLPixelFormatBGRA8Unorm;
For more advanced applications, you also need to set the default vertex and fragment shaders as shown below.
id <MTLLibrary> lib = [mtlDevice newDefaultLibrary];
mtlRenderPipelineDescriptor.vertexFunction = [lib newFunctionWithName:@"SomeVertexMethodName"];
mtlRenderPipelineDescriptor.fragmentFunction = [lib newFunctionWithName:@“SomeFragmentMethodName"];
The newFunctionWithName method searches your Metal source file, looking for the SomeVertexMethodName method. The name of the shader itself is not important since the lookup is done directly through the method names. This means that you should define unique methods for unique shader operations. We'll look deeper into Metal shaders later on.
With the MTLRenderPipelineDescriptor object created and configured, the next step is to create and define the MTLRenderPipelineState by passing in the newly created MTLRenderPipelineDescriptor object.
NSError *error = [[NSError alloc] init];
id <MTLRenderPipelineState> mtlRenderPipelineState = [mtlDevice newRenderPipelineStateWithDescriptor:mtlRenderPipelineDescriptor error:&error];
Step 5: Create a View
To create a Metal view, you need to subclass UIView and override the layerClass method as shown below.
+(id)layerClass{
    return [CAMetalLayer class];
}
In this tutorial, we'll look at another way to create a CAMetalLayer class that gives the developer more control over the layer's characteristics and configuration.
4. Drawing a Metal App
Now that we have initialized the necessary objects, we need to start drawing something onto the screen. Just like the initialization, you need to follow a number of steps:
- get the command buffer
- set a render pass
- draw.
- commit to the command buffer
Step 1: Get the Command Buffer
The initial step is to create an object that stores a serial list of commands for the device to execute. You create a MTLCommandBuffer object and add commands that will be executed sequentially by the GPU. The following code snippet shows how to create a command buffer. We use the MTLCommandQueue object we created earlier.
id <MTLCommandBuffer> mtlCommandBuffer = [mtlCommandQueue commandBuffer];
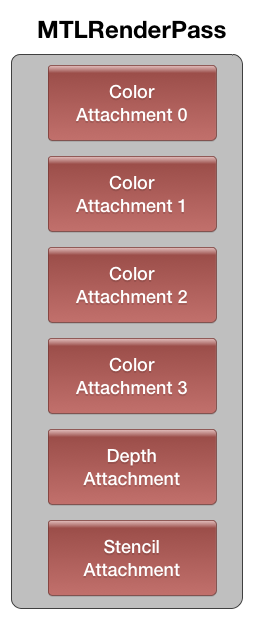
Step 2: Start a Render Pass
In Metal, the rendering configuration is complex and you need to explicitly state when the render pass begins and when it ends. You need to define the framebuffer configurations up front in order for iOS to configure the hardware properly for that specific configuration.
For those familiar with OpenGL and OpenGL ES, this step is similar since the framebuffer has the same properties, Color Attachment (0 to 3), Depth, and Stencil configurations. You can see a visual representation of this step in the diagram below.
You first need to create a texture to render to. The texture is created from the CAMetalDrawable class and uses the nextDrawable method to retrieve the next texture to draw in the list.
id <CAMetalDrawable> frameDrawable;
frameDrawable = [renderLayer nextDrawable];
This nextDrawable call can and would be your application bottleneck since it can easily block your application. The CPU and GPU may be desynchronized and the one must wait for the other, which can cause a block statement. There are synchronous mechanisms that can, and should always, be implemented to solve these issues, but I won't be covering these in this introductory tutorial.
Now that you have a texture to render to, you need to create an MTLRenderPassDescriptor object to store the framebuffer and texture information. Take a look at the following code snippet to see how this works.
MTLRenderPassDescriptor *mtlRenderPassDescriptor;
mtlRenderPassDescriptor = [MTLRenderPassDescriptor new];
mtlRenderPassDescriptor.colorAttachments[0].texture = frameDrawable.texture;
mtlRenderPassDescriptor.colorAttachments[0].loadAction = MTLLoadActionClear;
mtlRenderPassDescriptor.colorAttachments[0].clearColor = MTLClearColorMake(0.75, 0.25, 1.0, 1.0);
The first step sets up the texture to draw. The second defines a specific action to take, in this case clearing the texture and preventing the content of that texture from being loaded into the GPU cache. The final step changes the background color to a specific color.
Step 3: Draw
With the framebuffer and the texture configured, it's time to create a MTLRenderCommandEncoder instance. The MTLRenderCommandEncoder class is responsible for the traditional interactions with the screen and can be seen as a container for a graphics rendering state. It also translates your code into a hardware-specific command format that will be executed by the device.
id <MTLRenderCommandEncoder> renderCommand = [mtlCommandBuffer renderCommandEncoderWithDescriptor: mtlRenderPassDescriptor];
// Set MTLRenderPipelineState
// Draw objects here
[renderCommand endEncoding];
Step 4: Commit to the Command Buffer
We now have a buffer and instructions waiting in memory. The next step is to commit the commands to the command buffer and see the graphics drawn onto the screen. Note that the GPU will only execute code that you specifically commit for the effect. The following lines of code let you schedule your framebuffer and commit the command buffer to the GPU.
[mtlCommandBuffer presentDrawable:frameDrawable];
[mtlCommandBuffer commit];
At this point, you should have a general idea of how a Metal application is structured. However, to properly understand all this, you need to do it yourself. It's now time to code your first Metal application.
5. Creating a Metal Application
Start Xcode 6 and choose New > Project... from the File menu. Select Single View Application from the list of templates and choose a product name. Set Objective-C as the language and select iPhone from the Devices menu.
Open ViewController.m and add the following import statements at the top.
#import <Metal/Metal.h>
#import <QuartzCore/CAMetalLayer.h>
You also need to add the Metal and QuartzCore frameworks in the Linked Frameworks and Libraries section of the target's Build Phases. From now on, your attention should be targeted at the implementation file of the ViewController class.
6. Creating the Metal Structure
As I mentioned earlier, your first task is to set and initialize the core objects used across the whole application. In the following code snippet, we declare a number of instance variables. These should look familiar if you've read the first part of this tutorial.
@implementation ViewController
{
    id <MTLDevice> mtlDevice;
    id <MTLCommandQueue> mtlCommandQueue;
    MTLRenderPassDescriptor *mtlRenderPassDescriptor;
    CAMetalLayer *metalLayer;
    id <CAMetalDrawable> frameDrawable;
    CADisplayLink *displayLink;
}
In the view controller's viewDidLoad method, we initialize the MTLDevice and CommandQueue instances.
mtlDevice = MTLCreateSystemDefaultDevice();
mtlCommandQueue = [mtlDevice newCommandQueue];
You can now interact with your device and create command queues. It's now time to configure the CAMetalLayer object. Your CAMetalLayer layer should have a specific configuration depending on the device, pixel format, and frame size. You should also specify that it'll be using only the framebuffer and that it should be added to the current layer.
If you have a problem configuring the CAMetalLayer object, then the following code snippet will help you with this.
metalLayer = [CAMetalLayer layer];
[metalLayer setDevice:mtlDevice];
[metalLayer setPixelFormat:MTLPixelFormatBGRA8Unorm];
metalLayer.framebufferOnly = YES;
[metalLayer setFrame:self.view.layer.frame];
[self.view.layer addSublayer:metalLayer];
You should also set the view's opacity, background color, and the content scale factor. This is illustrated in the next code snippet.
[self.view setOpaque:YES];
[self.view setBackgroundColor:nil];
[self.view setContentScaleFactor:[UIScreen mainScreen].scale];
The only step left is to render something to the screen. Initialize the CADisplayLink, passing in self as the target and @selector(renderScene) as the selector. Finally, add the CADisplayLink object to the current run loop.
displayLink = [CADisplayLink displayLinkWithTarget: self selector: @selector(renderScene)];
[displayLink addToRunLoop: [NSRunLoop currentRunLoop] forMode: NSDefaultRunLoopMode];
This is what the completed viewDidLoad method should look like.
- (void)viewDidLoad {
    [super viewDidLoad];

    mtlDevice = MTLCreateSystemDefaultDevice();
    mtlCommandQueue = [mtlDevice newCommandQueue];

    metalLayer = [CAMetalLayer layer];
    [metalLayer setDevice:mtlDevice];
    [metalLayer setPixelFormat:MTLPixelFormatBGRA8Unorm];
    metalLayer.framebufferOnly = YES;
    [metalLayer setFrame:self.view.layer.frame];

    [self.view.layer addSublayer:metalLayer];
    [self.view setOpaque:YES];
    [self.view setBackgroundColor:nil];
    [self.view setContentScaleFactor:[UIScreen mainScreen].scale];

    displayLink = [CADisplayLink displayLinkWithTarget: self selector: @selector(renderScene)];
    [displayLink addToRunLoop: [NSRunLoop currentRunLoop] forMode: NSDefaultRunLoopMode];
}
If you build the project, you'll notice that Xcode gives us one warning. We still need to implement the renderScene method.
The renderScene method is executed every frame. There are several objects that need to be initialized for each new frame, such as the MTLCommandBuffer and MTLRenderCommandEncoder objects.
The steps we need to take to render a frame are:
- create a
MTLCommandBufferobject - initialize a
CAMetalDrawableobject - initialize a
MTLRenderPassDescriptorobject - configure the
texture,loadAction,clearColor, andstoreActionproperties of theMTLRenderPassDescriptorobject - create a new
MTLRenderCommandEncoderobject - present the drawable and commit the command buffer
Feel free to revisit what we've seen so far to solve this challenge on your own. If you want to continue with this tutorial, then take a look at the solution shown below.
- (void)renderScene
{
    id <MTLCommandBuffer>mtlCommandBuffer = [mtlCommandQueue commandBuffer];

    while (!frameDrawable){
        frameDrawable = [metalLayer nextDrawable];
    }

    if (!mtlRenderPassDescriptor)
        mtlRenderPassDescriptor = [MTLRenderPassDescriptor new];

    mtlRenderPassDescriptor.colorAttachments[0].texture = frameDrawable.texture;
    mtlRenderPassDescriptor.colorAttachments[0].loadAction = MTLLoadActionClear;
    mtlRenderPassDescriptor.colorAttachments[0].clearColor = MTLClearColorMake(0.75, 0.25, 1.0, 1.0);
    mtlRenderPassDescriptor.colorAttachments[0].storeAction = MTLStoreActionStore;

    id <MTLRenderCommandEncoder> renderCommand = [mtlCommandBuffer renderCommandEncoderWithDescriptor: mtlRenderPassDescriptor];
    // Draw objects here
    // set MTLRenderPipelineState..
    [renderCommand endEncoding];
    [mtlCommandBuffer presentDrawable: frameDrawable];
    [mtlCommandBuffer commit];
    mtlRenderPassDescriptor = nil;
    frameDrawable = nil;
}
We also need to implement the view controller's dealloc method in which we invalidate the displayLink object. We set the mtlDevice and mtlCommandQueue objects to nil.
-(void) dealloc
{
    [displayLink invalidate];
    mtlDevice = nil;
    mtlCommandQueue = nil;
}
7. Drawing a Triangle
You now have a very basic Metal application. It's time to add your first graphical primitive, a triangle. The first step is to create a structure for the triangle.
typedef struct {
    GLKVector2 position;
}Triangle;
Don't forget to add an import statement for the GLKMath library at the top of ViewController.m.
#import <GLKit/GLKMath.h>
To render the triangle, you need to create a MTLRenderPipelineDescriptor object and a MTLRenderPipelineState object. In addition, every object that's drawn onto the screen belongs to the MTLBuffer class.
MTLRenderPipelineDescriptor *renderPipelineDescriptor;
id <MTLRenderPipelineState> renderPipelineState;
id <MTLBuffer> object;
With these instance variables declared, you should now initialize them in the viewDidLoad method as I explained earlier.
renderPipelineDescriptor = [MTLRenderPipelineDescriptor new];
renderPipelineDescriptor.colorAttachments[0].pixelFormat = MTLPixelFormatBGRA8Unorm;
To shade the triangle, we'll need Metal shaders. The Metal shaders should be assigned to the MTLRenderPipelineDescriptor object and encapsulated through a MTLLibrary protocol. It may sound complex, but you only need to use the following lines of code:
id <MTLLibrary> lib = [mtlDevice newDefaultLibrary];
renderPipelineDescriptor.vertexFunction = [lib newFunctionWithName:@"VertexColor"];
renderPipelineDescriptor.fragmentFunction = [lib newFunctionWithName:@"FragmentColor"];
renderPipelineState = [mtlDevice newRenderPipelineStateWithDescriptor:renderPipelineDescriptor error: nil];
The first line creates an object that conforms to the MTLLibrary protocol. In the second line, we tell the library which method needs to be invoked inside the shader to operate the vertex pass inside the rendering pipeline. In the third line, we repeat this step at the pixel level, the fragments. Finally, in the last line we create a MTLRenderPipelineState object.
In Metal, you can define the system coordinates, but in this tutorial you will use the default coordinate system, that is, the coordinates of the screen's center are (0,0).
In the following code block, we create a triangle object with three coordinates, (-.5f, 0.0f), (0.5f, 0.0f), (0.0f, 0.5f).
Triangle triangle[3] = { { -.5f, 0.0f }, { 0.5f, 0.0f }, { 0.0f, 0.5f } };
We then add the triangle to the <MTLBuffer> object, which creates a buffer for the triangle.
object = [mtlDevice newBufferWithBytes:&triangle length:sizeof(Triangle[3]) options:MTLResourceOptionCPUCacheModeDefault];
This is what the completed viewDidLoad method should look like.
- (void)viewDidLoad {
    [super viewDidLoad];

    mtlDevice = MTLCreateSystemDefaultDevice();
    mtlCommandQueue = [mtlDevice newCommandQueue];

    metalLayer = [CAMetalLayer layer];
    [metalLayer setDevice:mtlDevice];
    [metalLayer setPixelFormat:MTLPixelFormatBGRA8Unorm];
    metalLayer.framebufferOnly = YES;
    [metalLayer setFrame:self.view.layer.frame];

    [self.view.layer addSublayer:metalLayer];
    [self.view setOpaque:YES];
    [self.view setBackgroundColor:nil];
    [self.view setContentScaleFactor:[UIScreen mainScreen].scale];

    // Create a reusable pipeline
    renderPipelineDescriptor = [MTLRenderPipelineDescriptor new];
    renderPipelineDescriptor.colorAttachments[0].pixelFormat = MTLPixelFormatBGRA8Unorm;

    id <MTLLibrary> lib = [mtlDevice newDefaultLibrary];
    renderPipelineDescriptor.vertexFunction = [lib newFunctionWithName:@"VertexColor"];
    renderPipelineDescriptor.fragmentFunction = [lib newFunctionWithName:@"FragmentColor"];
    renderPipelineState = [mtlDevice newRenderPipelineStateWithDescriptor:renderPipelineDescriptor error: nil];

    Triangle triangle[3] = { { -.5f, 0.0f }, { 0.5f, 0.0f }, { 0.0f, 0.5f } };

    object = [mtlDevice newBufferWithBytes:&triangle length:sizeof(Triangle[3]) options:MTLResourceOptionCPUCacheModeDefault];

    displayLink = [CADisplayLink displayLinkWithTarget: self selector: @selector(renderScene)];
    [displayLink addToRunLoop: [NSRunLoop currentRunLoop] forMode: NSDefaultRunLoopMode];
}
The viewDidLoad method is complete, but there's one last step missing, creating the shaders.
8. Creating Shaders
To create a Metal shader, select New > File... from the File menu, choose Source > Metal File from the iOS section, and name it MyShader. Xcode will then create a new file for you, MyShader.metal.
At the top, you should see the following two lines of code. The first one includes the Metal Standard Library while the second one uses the metal namespace.
#include <metal_stdlib>
using namespace metal;
The first step is to copy the triangle structure to the shader. Shaders are usually divided into two different operations, vertex and pixel (fragments). The first is related to the position of the vertex while the second is related to the final color of that vertex and all positions of pixels inside the polygon. You can look at it this way, the first will rasterize the polygon, the pixels of the polygon, and the second will shade those same pixels.
Since they need to communicate in a unidirectional way, from vertex to fragment, it's best to create a structure for the data that will be passed. In this case, we only pass the position.
typedef struct {
    float4 position [[position]];
} TriangleOutput;
Now, let's create the vertex and fragment methods. Remember when you programmed the RenderPipelineDescriptor object for both vertex and fragment? You used the newFunctionWithName method, passing in an NSString object. That string is the name of the method that you call inside the shader. This means that you need to declare two methods with those names, VertexColor and FragmentColor.
What does this mean? You can create your shaders and name them as you like, but you need to call the methods exactly as you declare them and they should have unique names.
Inside your shaders, add the following code block.
vertex TriangleOutput VertexColor(const device Triangle *Vertices [[buffer(0)]], const uint index [[vertex_id]])
{
    TriangleOutput out;
    out.position = float4(Vertices[index].position, 0.0, 1.0);
    return out;
}

fragment half4 FragmentColor(void)
{
    return half4(1.0, 0.0, 0.0, 1.0);
}
The VertexColor method will receive data stored in position 0 of the buffer (memory allocated) and the vertex_id of the vertex. Since we declared a three-vertex triangle, the vertex_id will be 0, 1, and 2. It outputs a TriangleOutput object that's automatically received by the FragmentColor. Finally, it will shade each pixel inside those three vertices using a red color.
That's it. Build and run your application and enjoy your first, brand new 60fps Metal application.
9. External Resources
If you want to know more about the Metal framework and how it works, you can check out several other resources:
Conclusion
This concludes our introductory tutorial on the new Metal framework. If you have any questions or comments, feel free to drop a line in the comments.

Comments