iOS provides several options for working with audio. In this chapter, we’ll introduce two frameworks for dealing with different types of sounds. The Audio Toolbox Framework includes a C library for playing simple system sounds, and the AVFoundation Framework provides an object-oriented interface for intermediate-level playback and recording.
For both frameworks, interacting with audio files is conceptually the same as interacting with images. You still use NSBundle to locate the file on disk, and then load its contents with another class dedicated to interpreting the different audio formats.
The system sound API is defined in the Audio Toolbox Framework. This entire framework is written in C instead of Objective-C, so we’ll be working with the C interface in an iOS application for the first half of this chapter. This changes how we’ll be interacting with core iOS objects, but don’t let that scare you. We’re still dealing with the same objects and concepts as we have been throughout this entire book. For example, instead of using the mainBundle method of NSBundle, we’re going to use a C function called CFBundleGetMainBundle() to access the application bundle.
Creating the Example Application
As in the previous chapter, all we’re going to need is a simple Single View Application. Create a new project and call it Audio. As usual, use edu.self for the Company Identifier and iPhone for Devices, and make sure both the Use Storyboards and Use Automatic Reference Counting check boxes are selected.
Unlike the previous chapter, we need to access two audio frameworks, which aren’t included in the template. To add a new framework to the project, click the project icon in the Project Navigator and select the Audio target. In the Summary tab, scroll down to the Linked Frameworks and Libraries section.

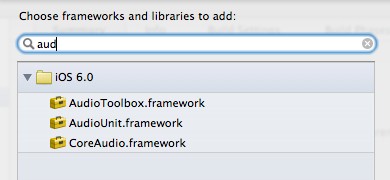
These are the code libraries you have access to from the application code. You need to add the Audio Toolbox Framework in order to work with system sounds, so click the plus sign in the bottom-left corner. The resulting dialog contains a list of all of the available frameworks and libraries. Start typing “audiotoolbox” in the search bar to find our desired framework.
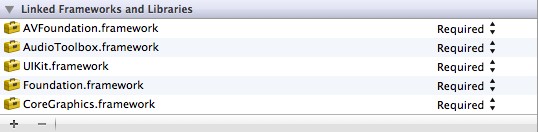
Click AudioToolbox.framework and then click Add to include it in the project. We’ll also need access to the AVFoundation Framework for the AVAudioPlayer portion of this chapter, so repeat the process for this library, too. You should see both AVFoundation.framework and AudioToolbox.framework in the Summary tab before moving on.
We’re now ready to start working with system sounds and AVAudioPlayer.
System Sounds
System sounds are designed to be used for simple things like alerts and UI sound effects (for example, button clicks). They are very easy to use, but the trade off is that they don't provide many options for controlling playback. The major limitations of the system sound API are as follows.
- Sounds cannot be longer than thirty seconds.
- You cannot control the volume of system sounds. They use the current device volume. Only one sound can play at a time.
- Sounds cannot be looped or played after a certain delay.
- They only support .caf, .aif, and .wav files.
- It’s not possible to configure how sounds deal with interruptions like incoming calls.
If you find these are too restricting, you should use the AVAudioPlayer discussed later in this chapter. Again, system sounds are meant for specific use cases. If your application is using sounds for more than UI feedback and alerts, you should probably use AVAudioPlayer.
Accessing the Sound File
The resource package for this book contains a short sound file called blip.wav. Add this to the application bundle by dragging it into the Project Navigator. Remember that system sounds use a C interface, so we’ll be accessing this file using a slightly different method than previous chapters. In ViewController.m, change viewDidLoad to the following.
- (void)viewDidLoad {
    [super viewDidLoad];
    CFURLRef blipURL = CFBundleCopyResourceURL(CFBundleGetMainBundle(),
                                               CFSTR ("blip"),
                                               CFSTR ("wav"),
                                               NULL);
    NSLog(@"%@", blipURL);
}
CFBundleGetMainBundle() is essentially the same as [[NSBundle] mainBundle], except it returns the CoreFoundation object that represents the application bundle instead of the Foundation Framework’s version. The CoreFoundation Framework is a lower-level alternative to the Foundation Framework. We need to use CoreFoundation objects here because that’s what the Audio Toolbox accepts as arguments.
The CFBundleCopyResourceURL() is the CoreFoundation version of NSBundle’s pathForResource:ofType: method. It simply returns the path to the requested resource, and you should see a familiar file path in the NSLog() output.
Once you have a path to the sound file, you need to create a sound object using the AudioServicesCreateSystemSoundID() function. Add the following to viewDidLoad.
AudioServicesCreateSystemSoundID(blipURL, &_blipOne);
This function reads in the content of the sound file, turns it into a sound object that the system sound API knows how to play, and returns an ID you can use to reference it later. AudioServicesCreateSystemSoundID() is defined by the Audio Toolbox Framework, so you need to import it into ViewController.m before you can use it. Add the following to the top of the file.
#import <AudioToolbox/AudioToolbox.h>
You’re storing the sound object’s ID in a private instance variable called _blip, so add that to the implementation declaration, too.
@implementation ViewController {
SystemSoundID _blip;
}
Playing the Sounds
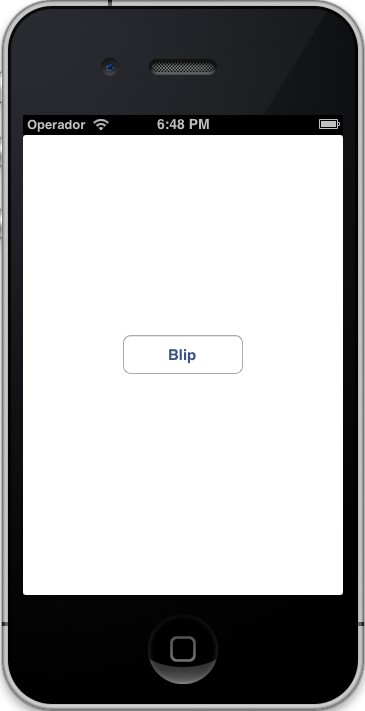
Next, programmatically add a button to the scene; that button will play the sound when clicked.
UIButton *aButton = [UIButton buttonWithType:UIButtonTypeRoundedRect];
[aButton setTitle:@"Blip"
forState:UIControlStateNormal];
[aButton addTarget:self
action:@selector(playBlip:)
forControlEvents:UIControlEventTouchUpInside];
aButton.frame = CGRectMake(100.0, 200.0, 120.0, 40.0);
[[self view] addSubview:aButton];
For the playBlip: action, we’ll call the AudioServicesPlaySystemSound() function to play the sound. It accepts a single argument, which should be the SystemSoundID that refers to the desired sound object (e.g., _blip).
- (void)playBlip:(id)sender {
AudioServicesPlaySystemSound(_blip);
}
When you compile the project, you should be able to click the button and hear a short sound. Make sure your speakers are not muted.
If you click the button while the sound is still playing, you’ll notice that iOS cancels the current sound and begins a new one. Again, system sounds are intended for UI sound effects and other straightforward applications. To play multiple sounds simultaneously, you’ll need to upgrade to the AVAudioPlayer discussed in the following section.
AudioServicesCreateSystemSoundID() and AudioServicesPlaySystemSound() are pretty much all there is to system sounds. You may also find the AudioServicesPlayAlertSound() function useful. It works exactly like AudioServicesPlaySystemSound(), but it makes the phone vibrate if the user has it enabled.
AVAudioPlayer
The AVFoundation Framework provides a higher-level interface for managing audio playback. For games, custom music players, and other apps that require sophisticated audio controls, this is the framework you should use. Some of its capabilities include:
- No limitation on sound duration.
- You can play multiple sounds at the same time.
- Volume can be controlled for individual sounds.
- It’s possible to loop a sound or perform other actions when it finishes playing.
- You can jump to arbitrary points in the sound file.
- It’s easy to configure behavior for handling interruptions through a delegate object.
AVAudioPlayer is the main class you’ll use from the AVFoundation Framework. It provides an object-oriented way to set the volume, play the sound, stop the sound, specify what part of the sound to play, and so on. You can think of it as the audio equivalent of UIImage/UIImageView.
Supported file formats for AVAudioPlayer include .m4a, .aac, .wav, .mp3, .aif, .pcm, .caf, and a few others. See Apple’s Multimedia Programming Guide for a detailed discussion of audio file formats.
Accessing the Song
AVAudioPlayer is designed to be used with longer sound files, like songs, so we’ve distributed a public domain Billie Holiday tune with this book. Drag the good-morning-heartache.mp3 file from the resource package into the Project Navigator to add it to the bundle.
Since AVFoundation is an Objective-C library, we can go back to using NSBundle to access media assets. Go ahead and remove everything in viewDidLoad, and replace it with the following.
NSURL *soundFileURL = [[NSBundle mainBundle]
                        URLForResource:@"good-morning-heartache"
                         withExtension:@"mp3"];
    _player = [[AVAudioPlayer alloc] initWithContentsOfURL:soundFileURL
                                                     error:nil];
The URLForResource:withExtension: method is the NSURL equivalent to pathForResource:ofType:. This was a better option for finding the audio file since you needed an NSURL object to initialize the AVAudioPlayer. The initWithContentsOfURL:error: method loads the content of the sound file into the AVAudioPlayer instance, much like NSString’s stringWithContentsOfURL:encoding:error: method.
AVAudioPlayer resides in the AVFoundation library, so be sure to add the following import statement to ViewController.h. We’ll need to access it from the header file later on.
#import <AVFoundation/AVFoundation.h>
In addition, you’ll need a few private instance variables. Change the implementation declaration to the following.
@implementation ViewController {
AVAudioPlayer *_player;
UIButton *_playButton;
UIButton *_stopButton;
}
Playing the Song
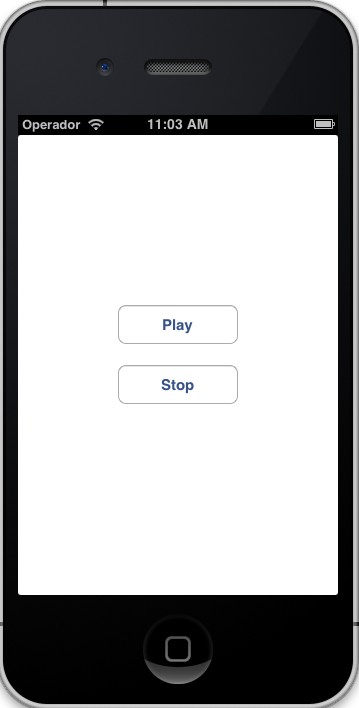
Next, add a Play button to the scene:
_playButton = [UIButton buttonWithType:UIButtonTypeRoundedRect];
[_playButton setTitle:@"Play"
forState:UIControlStateNormal];
[_playButton addTarget:self
action:@selector(playOrPause:)
forControlEvents:UIControlEventTouchUpInside];
_playButton.frame = CGRectMake(100.0, 170.0, 120.0, 40.0);
[[self view] addSubview:_playButton];
The playOrPause: action should be implemented like this:
- (void)playOrPause:(id)sender {
if (_player.playing) {
[_player pause];
[_playButton setTitle:@"Play" forState:UIControlStateNormal];
} else {
[_player play];
[_playButton setTitle:@"Pause" forState:UIControlStateNormal];
}
}
This checks to see if the song is already playing via AVAudioPlayer’s playing property. If it is, it pauses the song using the pause method and changes the button’s title accordingly. If it’s not, it starts the song by calling the play method. You should now be able to compile the app and play or pause a song by tapping the button.
Let’s take this one step further by creating a Stop button. Add the following to the viewDidLoad method.
_stopButton = [UIButton buttonWithType:UIButtonTypeRoundedRect];
[_stopButton setTitle:@"Stop"
             forState:UIControlStateNormal];
[_stopButton addTarget:self
                action:@selector(stop:)
      forControlEvents:UIControlEventTouchUpInside];

_stopButton.frame = CGRectMake(100.0, 230.0, 120.0, 40.0);
[[self view] addSubview:_stopButton];[/sourcecode]
The corresponding action calls the AVAudioPlayer’s stop method. Note that this method does not change current playback position—it differs from the pause method only in that it undoes the preloading performed by the play method. To jump back to the beginning of the song like you would expect from a typical Stop button, you need to manually set the currentTime property of AVAudioPlayer, like so:</p>
[sourcecode]- (void)stop:(id)sender {
    [_player stop];
    _player.currentTime = 0;
    [_playButton setTitle:@"Play" forState:UIControlStateNormal];
}
AVAudioPlayer Delegates
Another advantage of using AVAudioPlayer over the system sounds API is that it allows you to handle interruptions using the familiar delegate pattern. The AVAudioPlayerDelegate protocol defines a number of methods that let you know when certain events occur outside of your application.
When an interruption like an incoming phone call begins, the audioPlayerBeginInterruption: method is called on the delegate object. The sound will pause automatically, but this gives you a chance to write any other custom handling code you may need. Likewise, the audioPlayerEndInterruption:withOptions: method is called when the interruption is over and you can use the audio player again. However, the system does not automatically resume playback. You need to manually call the play method if you want this to happen.
In addition to interruption handling, the delegate object also lets you know when the sound has finished playing. By defining an audioPlayerDidFinishPlaying:successfully: method on the delegate object, you can do custom cleanup work. For example, you can use this to reset the play button and jump back to the beginning of the song, like so.
- (void)audioPlayerDidFinishPlaying:(AVAudioPlayer *)player successfully:(BOOL)flag {
    [self stop:nil];
    NSLog(@"Song finished playing!");
}
For this code to work, you need to make the view controller a formal delegate for the AVAudioPlayer. In ViewController.h, change the interface declaration to the following.
@interface ViewController : UIViewController <AVAudioPlayerDelegate>
Then, the view controller needs to assign itself as the delegate object. In the viewDidLoad method of ViewController.m, add the following line.
_player.delegate = self;
Now if you let the song play through to the end, the Pause button will automatically turn back into a Play button, and clicking it will start the song from the beginning.
Summary
In this chapter, we discussed two ways to play audio from an iOS device, system sounds and AVAudioPlayer. The former should be used only for short, simple sounds that don’t need much custom configuration, and the latter gives you more control over the audio playback.
For the average iOS app, the AVFoundation Framework provides a good balance between a user-friendly API and fine-grained control over your sounds. But, keep in mind that iOS also provides more advanced, low-level audio capabilities like Audio Queue Services, as well as a higher-level API for interacting with the user’s existing iTunes library via the Media Player Framework. For specialized applications, you can even drop down into OpenAL, which is a cross-platform library for simulating a 3-D audio environment.
A lot of work has gone into making iOS a multimedia-friendly platform, so there’s no shortage of options for managing images, sounds, and videos from within your application.
Conclusion
This chapter covered the basics of iOS app development. We started by building a simple user interface, which introduced us to the fundamental design patterns of iOS: model-view-controller, delegate objects, and target-action. Then we dove into multi-scene applications and learned how iOS lets scenes communicate with each other and automatically handles transitions from one scene to another. After that, we discussed the iOS file system, application bundles, and required resources like app icons, launch images, and the information property list. Bundles also happened to be the method for localizing applications to multiple regions in iOS, so we were able to serve translated images and text effortlessly to different language speakers. Finally, we took a brief look at the audio capabilities by creating a simple UI sound effect and music player.
While there are still dozens of frameworks left for you to explore on your own, I hope you feel comfortable navigating an Xcode project. Along with some hands-on experience, what you should take away from this book is a high-level understanding of the iOS architecture—how interfaces are created and laid out using UIKit and storyboards, and what classes and libraries to use for managing media assets. Armed with this knowledge, you should be more than ready to venture into the real world of iOS app development.
This lesson represents a chapter from iOS Succinctly, a free eBook from the team at Syncfusion.

Comments