Introduction
When receiving a notification in an iOS app, you may want to be able to download content in response to it or edit the content before it is shown to the user. In iOS 10, Apple now allows apps to do this through a new Notification Service Extension.
An example of when this could be useful is if you had a messaging app where your back-end server only identified users by some sort of code rather than by name. For a user of your app, the names and other details of their contacts could be stored locally on the device. When sending a notification to a user when they receive a message, the original payload could include the sender's identifier, which your service extension could replace with the contact's name.
In order to use this new extension type, you will need to be developing your app with Xcode 8 or later and the iOS 10 SDK.
Please note the following before continuing with this quick tip:
- This article will not go through the process of how to set up your app for sending/receiving local or push notifications.
- The example code shown will be using APIs introduced in the UserNotifications framework, which is also new in iOS 10.
- If you want to learn how to create custom interfaces for your notifications, these are done through notification content extensions.
If you want to know more about any of these topics, then you can have a read of these other tutorials:
 Push NotificationsSetting Up Push Notifications on iOS
 iOSAn Introduction to the UserNotifications Framework
 iOS SDKiOS 10: Creating Custom Notification Interfaces
1. Extension Setup
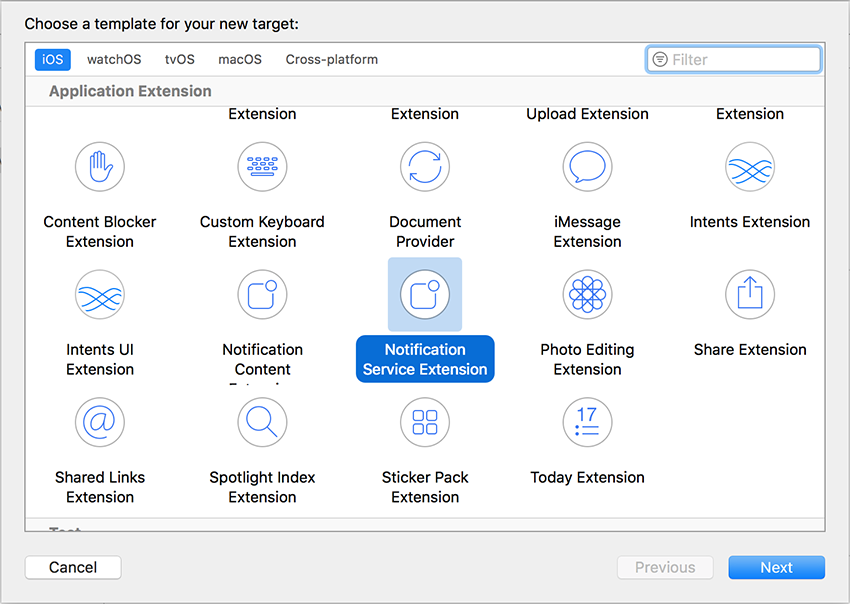
The process of adding a notification service extension to an iOS app is identical to that of other extensions. In the Xcode menu bar, go to File > New > Target... and select the Notification Service Extension template from the menu that appears:
In the next menu, you can fill out application-specific information.
Once your extension has been created, you will see two files (or three if you're using Objective-C) within the extension folder in the Xcode Project navigator:
- NotificationService.swift, which will contain all the code and logic for your extension.
-
Info.plist, which contains configuration details for your extension.
The Info.plist file contains all the information required for your extension, so the only file you should need to change is the NotificationService.swift file.
2. Extension Lifecycle
Once you have configured your app with a notification service extension, the following process will take place for each notification:
- App receives notification.
- System creates an instance of your extension class and launches it in the background.
- Your extension performs content edits and/or downloads some content.
- If your extension takes too long to perform its work, it will be notified and immediately terminated.
- Notification is displayed to the user.
As you can see, when using a notification service extension, you only have a limited amount of time to perform the necessary work. If your extension is taking too long, then it will be stopped by the system, and the notification will be delivered as if you had no extension at all.
3. Extension Code
Your notification service extension exists as a single object which is a subclass of the UNNotificationServiceExtension class. This class defines the following methods:
-
didReceive(_:withContentHandler:)which provides your extension with the originalUNNotificationRequestobject. In this method, you create a newUNNotificationContentobject and pass this in as a parameter to the completion handler when you're done. This notification content can either be created from scratch or from a mutable copy of the original content. The following code shows an example implementation of this method:
override func didReceive(_ request: UNNotificationRequest, withContentHandler contentHandler: @escaping (UNNotificationContent) -> Void) {
    if let copy = request.content.mutableCopy() as? UNMutableNotificationContent {
        // Edit properties of copy

        contentHandler(copy)
    }
}
-
serviceExtensionTimeWillExpirewhich is executed when your extension is about to be terminated by the system. This method does not contain any parameters, so if you want your extension to provide an in-progress version of your modified content, you will need to keep a reference to the completion handler from thedidReceive(_:withContentHandler:)method. The following code shows how this could be achieved in your extension subclass:
// Set this property from the didReceive(_:withContentHandler:) method
var contentHandler: ((UNNotificationContent) -> Void)?

// Modify this property as you manipulate the content
var bestAttemptContent: UNMutableNotificationContent?

override func serviceExtensionTimeWillExpire() {
    if let contentHandler = contentHandler, let bestAttemptContent =  bestAttemptContent {
        contentHandler(bestAttemptContent)
    }
}
4. Extension Limitations
The last important thing to consider when using a notification service extension is the conditions under which the extension will operate.
Firstly, your extension will only be launched for notifications which are configured to show on-screen alerts to the user. This means that any silent notifications (like the ones used to update app badges) will not trigger your extension.
Secondly, the incoming notification's aps dictionary within its payload must include the mutable-content key with a value of 1.
The correct configuration of your notifications will ultimately depend on your app's own setup. To meet the second condition, in particular, some changes may need to be made to your server-side push notification implementation. If you are not using a custom server and are using instead a third-party service for your push notification implementation, then I would suggest researching and reading through their support documentation if you can't get your extension to work.
Conclusion
Through the new UNNotificationServiceExtension class in iOS 10, it is very simple for you to implement a notification service extension for your own applications. Whatever your use case, these APIs allow you to easily modify the content of a notification before it is shown to the user.
As always, please be sure to leave your comments and feedback in the comments section below. And check out some of our other posts on iOS 10 and Swift app development!

Comments