In the last part of this series, we looked at assets in Scratch—backdrops, sprites, costumes and audio. Having created some assets, you need to get them to do something, which is where blocks come in.
Blocks are lines or blocks of code which you drag into your project to create a script. Each asset can have more than one script associated with it, and each script can have as many blocks as you need.
As you get more experienced with Scratch and start building more complex projects, you'll find that your scripts can get quite long and complex, so it's important to find the most efficient way of creating scripts and the most efficient blocks possible. This is a good skill to learn if you're using Scratch as a starting point to teach yourself or others how to code, as writing tidy, efficient code is important.
Later in this series I'll cover each category of block in more detail, and demonstrate their use via projects, but in this post I'll give you a quick overview of the different types of block and what you can do with them.
Using Blocks in Scratch
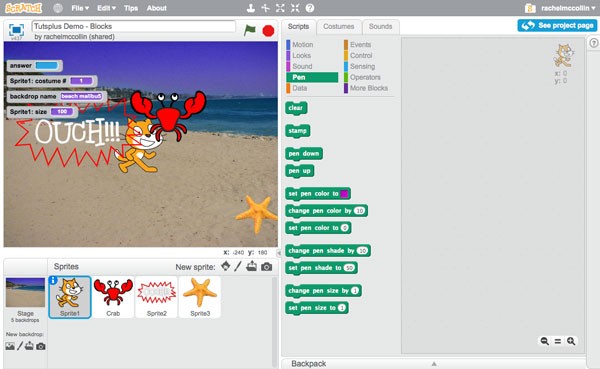
To use a block, simply select the asset it applies to and then drag it onto your scripts pane.
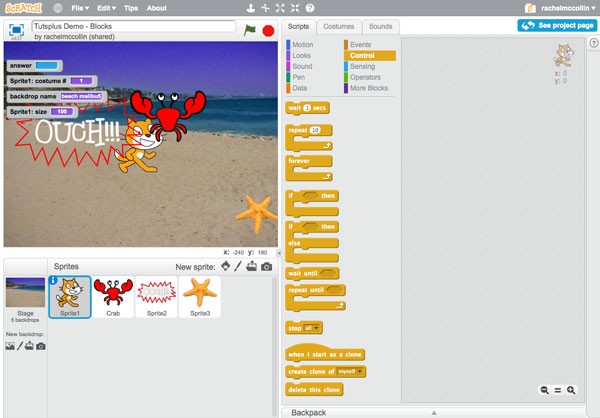
In the screenshot below you can see the project I created in the last part. This project has some sprites but no scripts yet.
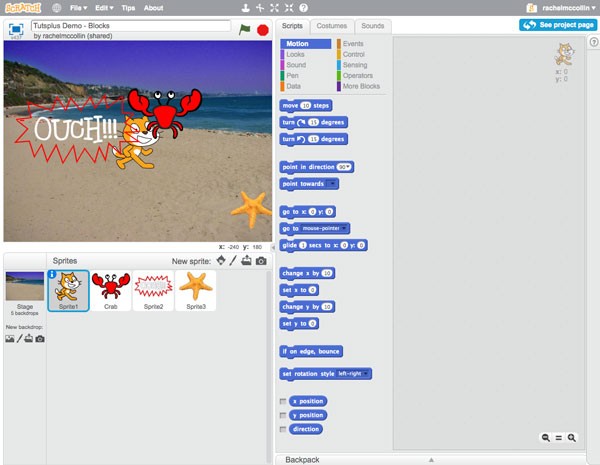
To start creating a script, click on the asset you want it to apply to (either the stage or a sprite), and then drag the relevant blocks onto the scripts pane to the right. To add multiple blocks to a script, drag new blocks into the location in the script where you want them to appear. You can add new blocks above or below existing blocks.
To add multiple scripts, just drag a new block onto the scripts pane but away from the existing script(s).
To remove a block from a script, just drag it to the left, away from the scripts pane. Note that you can only do this for the bottom block in a script or a block that's on its own: if you drag a block away from the scripts pane that has other blocks attached beneath it, all the blocks below it will be deleted as well. If you want to do this, select the block immediately below the one you want to delete, and drag it away from the script. Then drag the block you want to delete (i.e. the bottom one) away from the scripts pane, and drag the blocks you moved away back into place.
You can also delete blocks using the shortcut menu, which you access by right-clicking on a block. The same applies as with dragging blocks away: if you delete a block that has other blocks below it, those blocks will be deleted too.
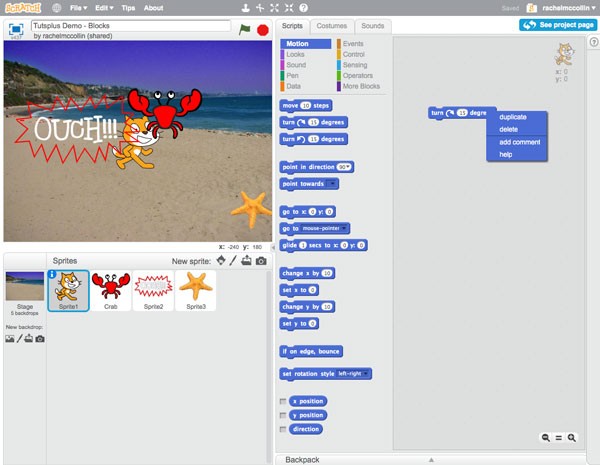
You can also use the shortcut menu to add comments to your scripts, duplicate them, or get help on the block you've right clicked on.
Types of Block in Scratch
Scratch gives you ten categories of block, each of which includes a number of blocks you can use to do similar jobs. These are:
- Motion
- Looks
- Sound
- Pen
- Data
- Events
- Control
- Sensing
- Operator
- User-created blocks (or More Blocks)
Let's take a look at what each of these categories includes.
Motion Blocks
Motion blocks are what you use to place your sprites on the stage or move them. They are dark blue. You can only use motion blocks with sprites, not with the stage.
Motion blocks include the following types of motion:
- Moving sprites.
- Turning sprites.
- Making sprites point in a given direction or towards each other.
- Making sprites move to a given point on the stage, to another sprite or the mouse pointer. This movement can be instant using the
go toblocks, or gradual using theglideblock. - Changing the x and y co-ordinates of the sprite on the stage, either by altering it from its current value (
change x/y by) or by setting it to a fixed amount (set x/y to). - Making the sprite bounce if it hits the edge of the stage.
- Altering the style with which a sprite rotates.
- Setting a sprite's x or y co-ordinates or the direction in which it's traveling to be displayed on the stage.
These sound very simple, but they are the basis for a lot of games and animations. We'll use motion blocks in an example project later in this series.
Looks Blocks
Looks blocks are colored purple, and they control what your sprites and backdrop look like, how big they are, and whether they are displayed in front of or behind other assets. Looks blocks also include blocks that let you display text.
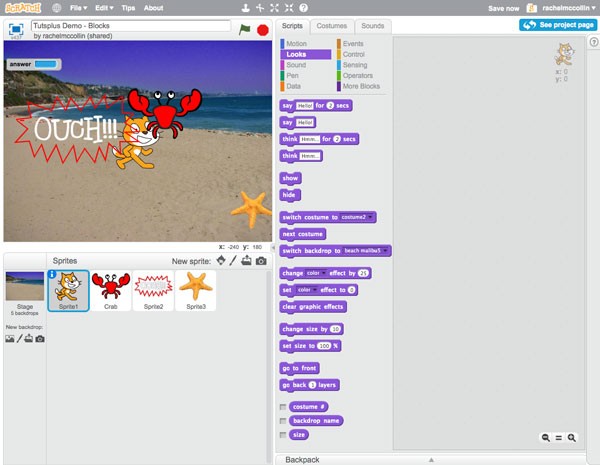
Looks blocks can be used with sprites and the backdrop, although there are some that only apply to sprites. The main types of Looks block are:
- Blocks for displaying text, either for a fixed period of time or indefinitely. The
sayblocks will display text in a speech bubble, while thethinkblocks will display it in a thought bubble. You can combine this with other blocks such as data or sensing blocks to display the values stored by those blocks instead of static text. You can only use these blocks with sprites. - Blocks for showing or hiding sprites, which you can't use with the stage.
- Blocks for switching costumes (sprites) or backdrops (stage). In each case you can switch to a defined costume or backdrop, or to the next costume or backdrop. This can be combined with a loop when you want to repeatedly switch costumes or backdrops, and saves adding lots and lots of blocks.
- Blocks for changing color effects or removing them. You can either change the color by a value or set it to a fixed value. Use these blocks with sprites or backdrops.
- Blocks for changing the size of sprites, useful for a zooming in effect. You can change the size to a fixed amount or by a percentage. You can't use these blocks with the stage.
- Blocks for moving sprites (not the stage, which is always at the back) backwards or forwards, using layers. Use these to create an effect of things moving towards the viewer, maybe combined with size blocks.
- Blocks for displaying the costume number, backdrop name, and/or size of a sprite on the stage.
The looks blocks are really useful for creating animated effects, and can be used to create some powerful effects when combined with control and events blocks.
Sound Blocks
The next set of blocks is the pink Sound blocks. If you're teaching a group of kids to code with Scratch, you'll soon find that these are very popular!
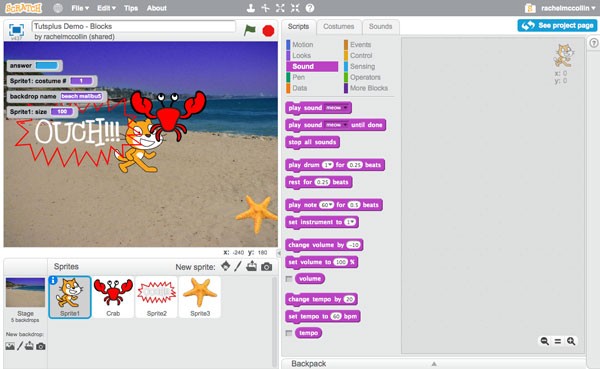
The blocks come under these categories:
- Blocks to play or stop sounds, including sounds from the library and those that you upload or record.
- Blocks to play drum sounds and notes for a specified number of beats, or to rest for a number of beats.
- Blocks to change or set the volume or tempo and to display them on the stage.
Using sound blocks adds another dimension to your animations and games and can help enhance the user experience, for example if you add sound effects that correspond with events in a game.
Pen Blocks
You can use the green Pen blocks to create interactive games where the user can draw on the stage. Combine pen blocks with event and control blocks to create interactive drawing applications, either on their own or as part of a game. You can also use some of the blocks in other ways, for example using the clear block to clear the screen when moving up a level in a game.
Pen blocks include:
- Blocks for clearing the stage.
- Blocks for moving the pen down and up so that it will or won't draw on the stage.
- Blocks for setting and changing the pen color, shade and size.
You'll see how to use pen blocks in a worked example later in this series. Note that only the clear block can be used with the stage: the rest are for sprites only.
Data Blocks
Data blocks let you create and manipulate data in your animations and games. You can create two types of data: variables and lists. These can be used with sprites and with the stage.
Variables let you define values for a variable and then use it in your project. They're great for timing games or keeping score, or for defining how many times a loop needs to run. Data blocks come in orange for variables and an orange brown for lists.
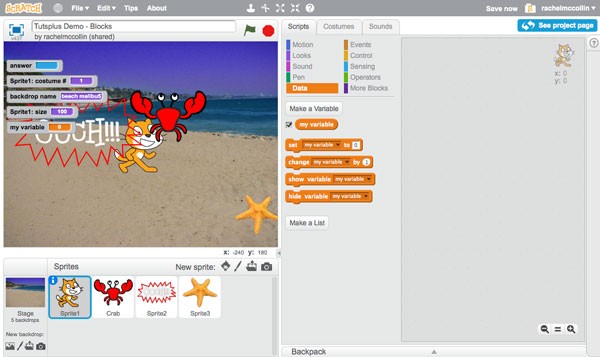
Once you create a variable, you'll see a number of variables blocks:
- Blocks for setting the value of your variable and changing it.
- Blocks for showing and hiding your variable.
Lists can be used to store and manipulate grouped or related data.
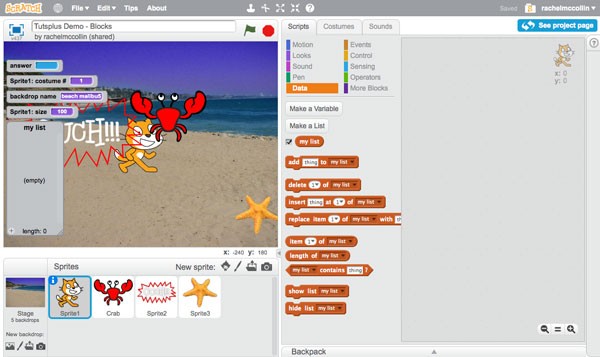
Once you create a list, a number of blocks will be available to you:
- Blocks to add, insert or delete values in your list, either as additional items or replacing existing items.
- Data blocks relating to the length of your list or to a given item in it, which you can then use with other blocks like operator blocks.
- Blocks to show and hide your list.
Data blocks take Scratch to a more advanced level akin to many programming languages and mean your projects can react to events and user inputs in a wide variety of ways. They can be used with sprites and the stage.
Events Blocks
The brown Events blocks are fundamental to Scratch as without them, nothing will happen. Each script will have an event at its start which tells the script to run. This might be the green flag being clicked to start the project, or it might be an event that is triggered while your project is running. Use all of the events blocks with the stage or your sprites: the name of some of them will change slightly depending on which you're working with.
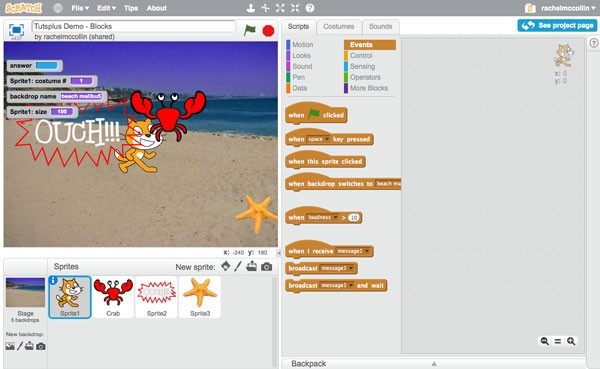
Events blocks include:
- The all important
when green flag clickedblock that starts everything off. You can use this with multiple scripts in your project. - Blocks for other user interactions such as a key being pressed or the stage or a sprite being clicked.
- Events that are triggered by the backdrop or a costume changing (which is available depends on whether your script applies to the stage or a sprite). A block for responding to changes in the volume, motion or timer.
- Blocks relating to messages: you can have one sprite broadcast a message when something happens to it, and then have another sprite respond to that message with an events block. These messages aren't displayed onscreen: they're internal messages in the code.
Events are useful for making scripts start, both when a project is launched and while it's running.
Control Blocks
Control blocks let you control the blocks within your scripts, inserting conditional statements, loops, repeats and pauses. They can make your code much more efficient, and can be very powerful when combined with variables and/or operators.
Control blocks include:
- Blocks for pausing: either waiting for a set period of time or waiting until something happens or the user does something.
- Conditional blocks: wrap these around a set of blocks to make something happen if a condition is met.
- Loops: repeat a set of blocks a given number of times, forever, or until something happens or a condition is met.
- A block to stop all loops.
- Blocks for creating and using clones: these let you duplicate a sprite and use it repeatedly. These are the only control blocks that can't be used with the stage.
Control blocks are great for adding interactivity to your project, as well as for writing more effective code—a useful thing to learn!
Sensing Blocks
Sensing blocks are colored light blue. They let you identify what's happening at a given point and make your sprites or background respond.
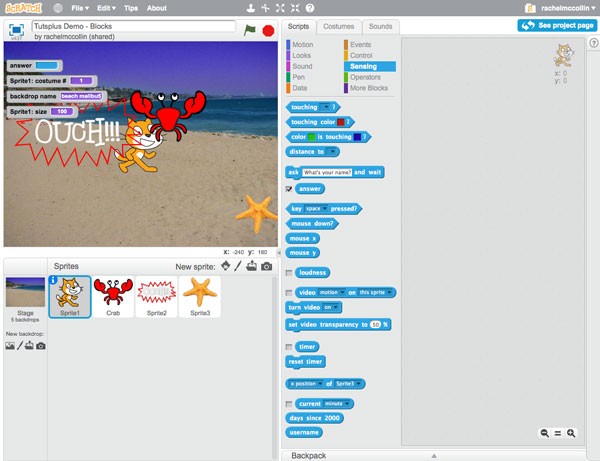
Sensing blocks include:
- Blocks to detect whether items (including spites and colors) are touching each other or at a given distance from each other. You can only use these with sprites, not the stage.
- Blocks to ask the user a question—you can then use the answer in conditional blocks, for example.
- Blocks to detect key presses and mouse clicks.
- Video blocks for detecting and recording motion or direction of sprites.
- Blocks for timing the runtime of a project.
You can use control blocks in games to make the player lose when one object touches another, or to detect if a sprite is moving fast enough to crash through another sprite, for example.
Operator Blocks
Operator blocks let you make comparisons between or perform arithmetic functions on different values and can be used in conjunction with data blocks or sensing blocks among others.
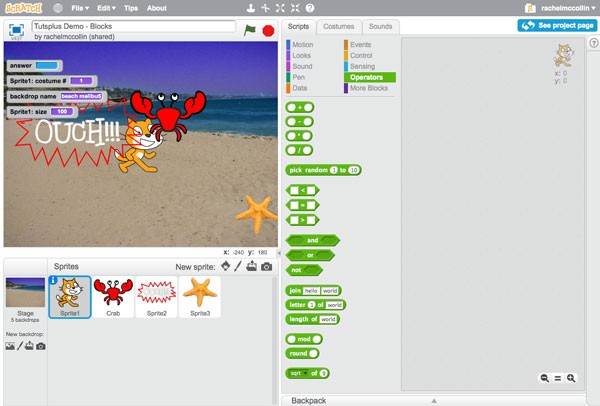
Operators include:
- Blocks for adding, subtracting, multiplying and dividing one value by another. These might be data blocks you've defined or the answer to a question you've asked using a sensing block.
- A block to pick a random number between two numbers you define.
- Blocks for identifying if two values are less than, greater than or equal to each other.
- Boolean blocks:
not,andandor. Use these to combine values in control blocks likeifandrepeatblocks. - Blocks for joining other blocks together or working with just one part of a block's value (such as the first letter).
- Blocks for rounding values and identifying whether the result of a calculation has a remainder.
You can use all of the operator blocks with sprites and the stage.
More Blocks
Use the dark purple 'more' blocks to create your own blocks. These are useful for making your code more efficient. If you have a set of blocks you're using repeatedly in your project, maybe across sprites or scripts for echo sprite, you can define a single block that includes that set of blocks (or routine) and just use that whenever you want to run the whole routine. It's a bit like creating a function or class in other programming languages.
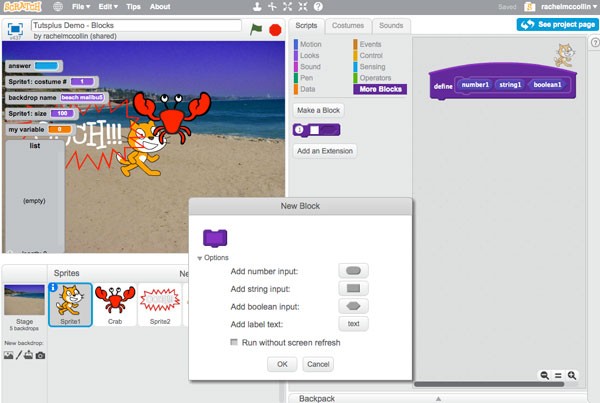
Here you can also add extensions, linking hardware such as a picoboard or Lego WeDo to add physical inputs to your project or control robots that you build.
Summary
Scratch comes with a lot of blocks that you can use in your projects, which can be extended even further when you combine them or create your own. With practice and imagination, there's very little you can't do with these blocks.
As we work through this series, I'll focus on different categories of blocks and show you how to use them in your projects.

Comments