In the first part of this tutorial, we put together a basic example of a list of contacts. The view (the visible representation of the data on the page) was created using a template, along with some other elements bound to methods and properties of the viewModel using data-bind attributes. Some of the values in the viewModel were observable and were monitored for changes which were then propagated to our view automatically.
In this part, we'll continue building on the example to add additional functionality. For example, if there were a lot of contacts in our model, a useful feature to add would be paging, to break the view up into more manageable sections.
Round 1 – Adding Paging to the View
First, we'll update our view to contain the new elements required for our paging. Open up the index.html file from part one of this tutorial and add the following new code to the #people container directly after the 'Add new person' <a> element:
<nav id="paging">
    <a id="all" href="#" data-bind="click: function () { pageSize(ko.utils.unwrapObservable(people).length); currentPage(0); }, css: { disabled: pageSize() === ko.utils.unwrapObservable(people).length }">Show all</a>
    <a id="last" title="Last Page" href="#" data-bind="click: function() { currentPage(totalPages() - 1); }, css: { disabled: currentPage() === totalPages() - 1 }">Last</a>
    <a id="next" title="Next Page" href="#" data-bind="click: function (event) { navigate(event) }, css: { disabled: currentPage() === totalPages() - 1 }">»</a>
    <ul data-bind="template: 'pagingTemplate'"></ul>
    <a id="prev" title="Previous Page" href="#" data-bind="click: function (event) { navigate(event) }, css: { disabled: currentPage() === 0 }">«</a>
    <a id="first" title="First Page" href="#" data-bind="click: function() { currentPage(0); }, css: { disabled: currentPage() === 0 }">First</a>
</nav>
<label id="pageSize">Show <input data-bind="value: pageSize" /> per page</label>
<script id="pagingTemplate" type="text/x-jquery-tmpl">
    {{each(i) ko.utils.range(1, totalPages)}}
        <li>
            <a href="#" title="View page ${ i + 1 }" data-bind="click: function() { currentPage(i) }, css: { on: i === currentPage() }">${ i + 1 }</a>
        </li>
    {{/each}}
<script>
The first of our new elements is a <nav>, which contains some utility links including;
- a link to show all contacts,
- one to show the previous page of contacts,
- one to show the next page of contacts,
- one to show the first page and
- another to show the last page.
We also have an empty <ul> element which will be populated with the number of links corresponding to the number of pages. These elements all have a number of special knockout bindings.
The link, used to display all contacts from the viewModel at once, uses the click and css bindings. We saw the click binding in part one of this mini-series so we know that it executes a function whenever the bound element is clicked. In part 1 we used the names of methods defined within our viewModel, but as you can see, we can also specify inline functions.
The inline function we specify simply updates the observable pageSize property of the viewModel (which we haven't yet defined but will shortly). The value we set is equal to the number of separate items within our people array. We also set another observable property (the currentPage property) to 0 as when all contacts are being shown there is only one page to display.
We use another of knockout's utility functions in this binding – the
unwrapObservablefunction. We need to use this because ourpeoplearray isn't just a regular JavaScript array – it's an observed array. So to get at the underlying actual array and check itslengthproperty we need to unwrap it. We don't need to use this utility to check the value of standard observable properties.
The css binding is especially useful and allows us to set a class on an element if a condition returns true. In this case, the condition we check is whether the pageSize observable property is equal to the number of objects in the people array. If it is, i.e. if all people are being displayed, the class name disabled will be added to the element.
The next, previous, first and last links also have both click and css bindings. Showing the first page is easy: we simply set the currentPage observable property to 0 to show the first page. The css binding applies the disabled class when the currentPage property is equal to 0. The last link shows the last page by setting the currentPage property to the total number of pages. It adds the disabled class when the currentPage is equal to the total number of pages.
The click binding for both of the previous and next links point to the same method of the viewModel – navigate, and an event object is also passed to this method. We'll see how this method works in a little while when we update the viewModel. Both of these elements also use the css binding to determine whether or not to apply the disabled class. The next link will get the class name if the last page is currently being displayed, while the previous link will get the class name if the first page is being displayed.
The
valuebinding is especially useful because we can use it to set the default value of the<input>in our view as well to allow the user to easily modify the corresponding value of the property on theviewModel– it's a two-way binding.
The <ul> element is populated using a jQuery template; unlike the template used in part one however, we don't use the name and foreach knockout properties to specify the template, we just use the name of the template.
After the <nav> element, we also added a <label> containing some text and an <input>. The <input> uses the value binding, which sets the value of the <input> element to a property of our viewModel. The value binding is especially useful because we can use it to set the default value of the <input> in our view as well to allow the user to easily modify the corresponding value of the property on the viewModel – it's a two-way binding.
Lastly, we've added the template that will be used to render the numbered links that point to each page of data. In this template, we use tmpl's native {{each}} template tag to iterate a specified number of times, which is calculated using the range knockout utility function. This function takes the minimum number of the range, which is 1 in this example, and the maximum number which we'll return using a method on our viewModel.
Each page link is made up of an <li> containing an <a>. The <a> is given a hashed href (knockout will automatically stop the browser following this link) and a title that indicates the page number. Each link uses the click binding to set the currentPage property to the number of whichever link was clicked (0-based) and the css binding to add the class name on if the current link is equal to the currentPage property.
We also need to make a slight change to the existing #people container. We need to change the foreach property of the template binding so that it points to a new method on our viewModel called showCurrentPage.
So this gives us all of the elements we need to add full-featured paging to our view. Additional CSS is also required to display the new elements as intended, but in the spirit of the previous part of this mini-series, I won't be boring you with the specifics as it's just basic CSS. The curious among you can take a look at the example files.
Round 2 – Adding Paging to the viewModel
To make our new paging elements function, we need to add the corresponding properties and methods that we used in our bindings to the viewModel. Directly after the addPerson method within the viewModel add the following code:
currentPage: ko.observable(0),
pageSize: ko.observable(5),
navigate: function (e) {
    var el = e.target;

    if (el.id === "next") {
        if (this.currentPage() < ko.utils.unwrapObservable(this.totalPages()) - 1) {
            this.currentPage(this.currentPage() + 1);
        }
    } else {
        if (this.currentPage() > 0) {
            this.currentPage(this.currentPage() - 1);
        }
    }
}
This isn't all of the new code we'll need, but we'll look at these simple additions briefly now before moving on to the remaining code. The first two new properties are observables with simple numeric values. The currentPage property determines which page is currently displayed, and pageSize determines how many contacts are displayed on each page.
Next, we define the navigate method, which is used by our previous and next links to navigate sequentially through each page. In the bind we passed in the event object so within the method we first store the target property of the event object which corresponds with the element that was clicked.
Knockout automatically sets
thisto refer to ourviewModelwhen we are inside any of ourviewModel's methods.
We check the id attribute of the element and if it was the next link that was clicked we first check whether we aren't already on the last page, and if not, increment the value of the currentPage property by one. If the element's id is not next it must be prev, so in this case we check we aren't already on the first page, and if not, we decrement the value of the currentPage property.
One thing that you'll notice is that we use the this keyword within our navigate method. Knockout automatically sets this to refer to our viewModel when we are inside any of our viewModel's methods. Alternatively, we can refer to the viewModel by reference (as we did in part one of this series).
We now need to add three additional methods to the viewModel, but due to their nature we can't add them inline with the other properties and methods we have added so far.
Round 3 – Dependant Observables
Dependant observables are another central pillar of knockout.js, allowing us to create relationships between the items in our
viewModel.
For example, if we have two separate properties on our viewModel, we can add a special method that monitors them both and executes when either of them change. This allows us to create incredibly interactive UIs with just a few lines of code!
Directly after the viewModel (but before the applyBindings method) add the following three methods:
viewModel.totalPages = ko.dependentObservable(function () {
        return Math.ceil(ko.utils.unwrapObservable(this.people).length / this.pageSize());
    }, viewModel);

    viewModel.showCurrentPage = ko.dependentObservable(function () {
        if (this.currentPage() > Math.ceil(ko.utils.unwrapObservable(this.people).length / this.pageSize())) {
            this.currentPage(ko.utils.unwrapObservable(this.totalPages()) - 1);
        }
        var startIndex = this.pageSize() * this.currentPage();
        return this.people.slice(startIndex, startIndex + this.pageSize());
    }, viewModel);

    viewModel.numericPageSize = ko.dependentObservable(function () {
        if (typeof (this.pageSize()) !== "number") {
            this.pageSize(parseInt(this.pageSize()));
        }
    }, viewModel);
We need to define these methods outside of our viewModel because they are dependant observables; when defining the functions, we pass our viewModel into the dependantObservable function so that the this keyword still refers to it.
The first method is totalPages, a utility method that simply returns the number of pages required based on the number of items in the people array divided by the pageSize property. The pageSize will change depending on the value entered into the text input but because this method will monitor the page size, it will always return the correct number of pages.
The second method is showCurrentPage, which is what we switched our main people template to use. Within this method, we first do a quick check that the currentPage property is not greater than the value returned by the totalPages method. Its requirement may not be obvious at first, but it is to prevent an issue where an empty page is shown in some situations, such as if you are on the last page of data when showing just a couple of items per page, and then increase the number of items per page substantially. If currentPage is greater than the totalPages, we simply switch the currentPage to the last page.
Once this check, and possible remedial action, is complete we then determine the index that we should begin selecting items from the people array at by multiplying the pageSize and currentPage properties.
Our last method is another utility that monitors the pageSize property. Whenever this property changes value the method will check that the number value is still a number. If it is no longer a number, the method converts it back to a number. Remember that the text input in our view is bound to the pageSize property, and if the input is used to update the value, the value will become a string, which would cause some of our other functionality to fail.
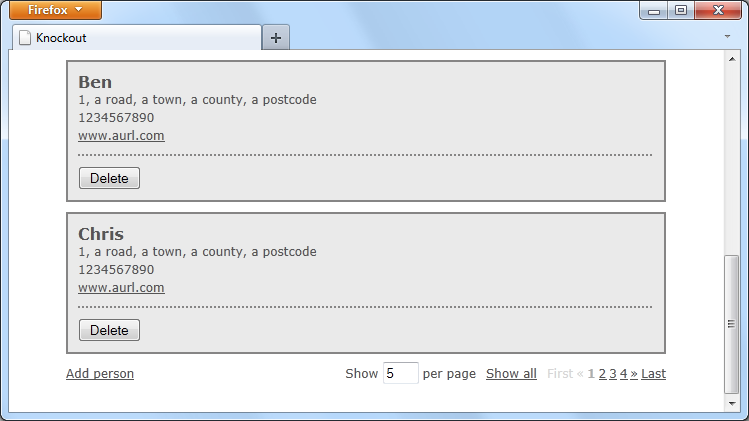
Our demo is now complete; if we run the page in a browser we should that we have fully functional, feature-rich pagination that runs completely on the front-end, all with just 30 lines of code! I've written client-side paging without Knockout before, and it took a good deal more code than that. Here's how it should look:
Post Fight Review
In this part of the knockout mini-series we added paging to the existing application. It was a feature that was added after the creation of the initial app with just one tiny change to the existing code. Adding new features and functionality to an existing code-base really is this easy with Knockout.
Templating is a major Knockout feature.
We first added some new bindings and templating to our view. Although we covered templating in the first part of this series, it is worth noting that templating is a major Knockout feature. We saw that we can use jQuery tmpl's native templating functionality alongside Knockout's templating functions without causing any issue. We also looked at the unwrapObservable function that is used to get at the underlying array when the array is an observable. Knockout comes with a range of these utility functions so you should check out the unminified version of the library so see what other goodies it contains.
We also looked at the final central feature of knockout – creating relationships between our viewModel properties and methods using dependantObservables. DependantObservables are used to update our viewModel whenever one or more properties change and work by monitoring the viewModel for changes. These methods are great for reacting to interactions by our visitors.
It does so much work for us, although we’ve really only scratched the surface of what it is capable of in this basic example. What are your thoughts on knockout.js? Let me know in the comments and thank you so much for reading!

Comments