Enhancing Drupal's built-in functionality with new modules is one of the features that attracted a lot of developers to the platform and made it extremely popular. This tutorial will demonstrate how to create a Drupal module, using techniques recommended by Drupal gurus.
Before getting our hands dirty, let's take a look at what are we going to learn.
Prerequisites
In order to fully understand the information presented in this tutorial, you need to have the following knowledge:
- basic Drupal administration including installing Drupal, enabling a module, adding some content
- basic PHP knowledge
Drupal Hooks
The Drupal codebase is modular and consists of two parts:
- the core modules (the core)
- the contributed modules (the modules)
The core provides all the basic Drupal functionalities, and the modules add more features to the base installation. Interaction between modules and the core is done via "hooks".
According to Drupal's documentation:
"A hook is a PHP function that is named
foo_bar(), wherefoois the name of the module (whose filename is thusfoo.module) andbaris the name of the hook."
So, the hook is a function with a special name that is called by the Drupal system in order to allow modules to include their functionality to the core. The file containing these functions also has a special name which allows the core to find all the installed modules.
The Drupal API provides the developer with a large number of hooks with which to alter almost the whole functionality of the core. For a Drupal developer, the sky is the limit for creating a site based on this powerful CMS.
Separating the basic functionality from the auxiliary features enables an increased flexibility on performing administrative tasks such as upgrading Drupal to a newer version. Since the core is somehow independent on modules, this operation can be done just by overriding the core.
What We're Building Today
We need a realistic goal for implementing our module, and I think Facebook integration is the perfect idea. We will allow the user to "like" our articles by adding a Facebook 'Like' button to each of them. The second task of our module will be to show, in the sidebar, which articles were liked by the users.
Obtaining the Data
Since the main focus of this article is on how to implement a Drupal module, we will use the simplest method to retrieve the data from Facebook: Social Plugins. Social Plugins allow users to add Facebook elements to your site with only a single line of code, which can be taken out with copy/paste from the Facebook site.
Our final product will have an output which should look like so:

Step 1: Setup
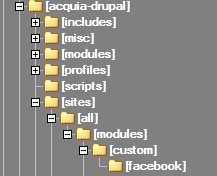
Drupal searches for contributed modules in the sites/all/modules folder of your Drupal installation. In case an administrator decides to have multiple sites driven by one Drupal installation, the path to the contributed module will look like sites/subdomain/modules.
First, let's choose a name for our module. Since its task will be to add Facebook functionality to our site, I assume "facebook" will be a proper name for it. We can start preparing the required directory structure for developing our module.
Inside sites/all create a subfolder, named modules. We will store our contributed modules in a subfolder named custom. The Facebook module will reside in the facebook subdirectory of the custom directory. The final structure will look like so:

Step 2: Inform Drupal about our Module
Drupal presents the user with a list of core and contributed modules based on the content of sites/all/modules. For each module present, Drupal searches for a file named module_name.info. This file should contain information about the specific module and Drupal displays this information to the user.
Let's create the info file for our module. Create a file, named facebook.info in the sites/all/modules/custom/facebook folder, and add the following code to it:
  ; the module's user friendly name, will be displayed in the modules list
  name = Facebook Recent Activity
  ; the module's description, will be displayed in the second column in the modules list
  description = Retrieves and displays in a block the recent activity data from Facebook.
  ; the module's package, will be the name of the module's group on the modules list page
  package = Nettuts+ Drupal Module Tutorial
  ; the Drupal core package
  core = 7.x
  ; the files array indicating which files are part of the module
  files[] = facebook.module
The code above reveals the required information to be placed in an info file. Notice that we've referenced the facebook.module in the files array. This file will contain our module's code. For the moment, go ahead and create an empty file in our folder.
The
.infofile is a standard.inifile; therefore, the lines starting with ";" are comments.
Checkpoint
Now, let's check what we've done so far. Visit your website and select Modules from the upper main menu. The modules list should be displayed, and at the bottom of it, you will find a new module group, named Nettuts+ Tutorial Module containing our module. Check out how the information you've placed in the info file is displayed here.

Step 3: Add the Like Button
We need to add the code provided by Facebook to the Drupal code that processes the node. This can be done by implementing hook_node_view.
As we will find in a moment, implementing hook_node_view requires using the theme function.
A theme function is a Drupal API function that is used to allow desginers to theme the modules as desired. The fact that we will use the function also means that we will have to implement hook_theme too.
Retrieving the Code from Facebook
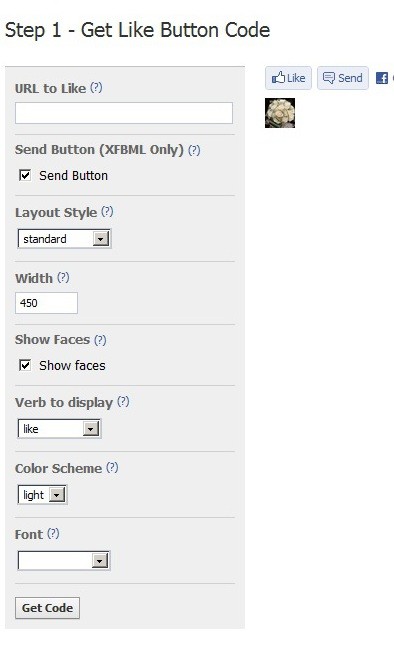
The Facebook code that displays the 'Like' button on the pages can be obtained here. You can customize the look of the button using the controls on the page. Pressing the Get Code button displays the required XFBML code.

Implement hook_node_view
The hook_node_view returns the renderable view of the nodes (articles or pages for instance). Using this hook, we can add custom code to the one generated by Drupal by default. The implementation of this hook looks like so:
  /**
   * Implements hook_node_view().
   *
   * Returns the renderable view of our nodes (pages or articles).
   * We want to moddify the code so that we add the like button
   * to our pages.
   */
  function facebook_node_view($node, $view_mode, $langcode)
  {
    $node->content['facebook'] = array(
      '#markup' => theme('facebook_add_like_button'),
    );
  }
The name of the function is facebook_node_view, so you can deduce that it is composed from the name of our module and the name of the hook.
The parameters are:
-
$node-- contains the node data that will be rendered lately -
$view_mode-- specifies how the node is displayed (can be full mode, teaser etc.) -
$langcode-- to control the language code for rendering
We modify only the $node parameter and the result will be that our 'Like' button will appear also when a node teaser is displayed. I leave it as an exercise for you to modify the code to display the Like button only on full pages.
The code adds a new key to the $node->content array, which says that the markup for the facebook module will be rendered by the facebook_add_like_button function.
Implement hook_theme
This hook should be implemented to register the implementation of the theme function.
  /**
   * Implements hook_theme().
   *
   * Just to let Drupal know about our theme function.
   */
  function facebook_theme()
  {
    return array(
      'facebook_add_like_button' => array('variables' => NULL),
    );
  }
The code returns an array containing the name and parameteres of the function. In our case, we don't require any parameters, so the array of variables is set to NULL.
Implement our theme Function
Finally, we've reached the moment when we can add the code taken from Facebook to our module. This can be done like so:
  /**
   * Function to add the desired code to our page.
   */
  function theme_facebook_add_like_button()
  {
    $output = '<div id="fb-root"></div><script src="http://connect.facebook.net/en_US/all.js#appId=221371084558907&xfbml=1"></script><fb:like href="http://www.facebook.com/profile.php?id=100000782572887" send="true" width="450" show_faces="true" font=""></fb:like>';

    return $output;
  }
Note that the function's name is composed from the name registered by theme hook prefixed with theme_. The function returns a string containing the code taken from Facebook.
Checkpoint
We can now check to see if everything is okay up to this point. You can activate the module by clicking on Modules from the upper menu, scrolling down to the Facebook module and activating the enable check box in front of our module.
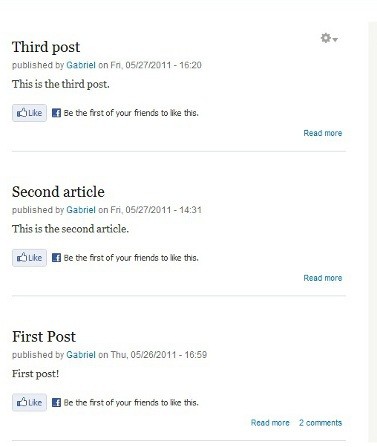
Click on Save configuration button to enable the module. If you do not have any articles added to your site, add some now and check out the spiffy buttons that have been added.
Your posts should look like below:

Step 4: Create the Sidebar Block
Creating the sidebar block consists of two actions:
First, we have to let Drupal know about the existence of a new block and make it appear in the list of available blocks. Second, we have to write the code that displays information in the block.
This assumes implementation of the hooks: the hook_block_info, which will list our block in the block list, and hook_block_view, which contains the necessary code to display the Facebook recent activity inside the block.
Implementing hook_block_info
  /**
   * Implements hook_block_info().
   *
   * Using this hook we declare to Drupal that our module
   * provides one block identified as facebook
   */
  function facebook_block_info()
  {
    $blocks['facebook'] = array(
      'info' => t('Facebook Recent Activity'),
    // leave the other properties of the block default
    );

    return $blocks;
  }
The block_info hook tweaks the $blocks array by adding a new key, named info to it, which contains the text that will be available on the blocks page near our Facebook module.
Implementing hook_block_view
The first thing to do is take the Facebook code, available here. We need to configure the default options: set the width to 170 and the header to false (uncheck the Show header checkbox).
We need a 170px wide block, since this is the standard Drupal block width and we will set up our own text for the header -- therefore, we don't need Facebook's title.
Let's check the code for hook_block_view:
  /**
   * Implements hook_block_view().
   *
   * Returns the renderable view of our block. It takes
   * the configured values of facebook recent activity
   * social plugin
   */
  function facebook_block_view($delta = '')
  {
    switch($delta) {
    case 'facebook' :
      $block['subject'] = t('Facebook recent activity');
      $block['content'] = '<script src="http://connect.facebook.net/en_US/all.js#xfbml=1"></script><fb:activity site="" width="170" height="500" header="false" font="" border_color="#fff" recommendations="false"></fb:activity>';
    }

    return $block;
  }
The block view hook receives a single parameter, which is an indication of which block is rendered. We check to see if the block belongs to our module and, if yes, we add two new items to the $block array:
- a subject string, which will be the title of the block
- a content string, which, in our case, is taken from Facebook.
We're almost ready. Enable the module, then navigate to Structure in the main menu, then choose Blocks and scroll down to the disabled list of blocks, and set our Facebook recent activity block to be displayed in the second sidebar (which will appear on right on the default theme).
Next, press the like button for some of the articles previously created. These will appear listed in the sidebar in our freshly created block.
That's it! We're done. The result should look like so:

Wrapping Up
I hope this tutorial convinced you that creating a Drupal module isn't really as hard as you might think. Of course, this tutorial only scratches the surface of what Drupal modules can accomplish. Nonetheless, this should be an excellent starting point!
Thank you so much for reading and let me know if you have any questions!


Comments