While managed WordPress hosting is suitable for most people, I prefer the flexibility of running my own server. One of the more affordable solutions is Amazon’s cloud-based web service (AWS).
But if you don't have a deep technical background, getting started with AWS can be overwhelming.
When I first installed WordPress on an AWS micro instance, it kept running out of memory and crashing. Then, when I installed a custom, responsive theme on a larger instance, it was still quite slow.
This guide will provide you a detailed, step by step approach to setting up your WordPress blog at AWS in a high performance, economical fashion using an AWS micro (or small) instance running on Apache. A follow up tutorial covers how to optimize its performance with Varnish Cache and the W3 Total Cache plugin. Using these approaches, I've successfully run my own site in the Amazon cloud for the past two years and survived many mentions on Slashdot, BoingBoing and other high traffic sites.
Estimating Costs
AWS can be expensive to use by the hour. For a WordPress blog that operates indefinitely 7 days a week, 24 hours a day, it's best to purchase what's called a "heavy reserved instance". There are up front costs, but big savings over time. It's essentially a volume discount for buying time on their network.
With a three year heavy reserved micro instance, you can run a low traffic blog for $6.44 monthly (with the first year free for new AWS users). If you want a bit more room to grow, purchase a three year reserved small instance for a total monthly rate of $11.81 (what I currently use).
I’m pretty sure a comparable setup at WordPress.com would cost about $99 annually ($8.25 monthly) per blog, $24 monthly at a host like Page.ly and $29 monthly at WPEngine. However, running your own instance allows you to run multiple blogs at no extra cost. The more blogs you plan to run, the more cost effective AWS becomes over WordPress.com. You can also use your server instance for other tasks - I host other websites and run some of my other web apps on mine.
You can learn more about AWS pricing, reserved instance pricing and estimate your costs with their calculator.
Note: The estimates above do not include additional costs for S3 storage and bandwidth used by W3 Total Cache – but these costs are typically comparatively smaller. And, we don’t include Amazon’s scalable Remote Database Service (RDS) in this tutorial specifically to minimize costs.
I suggest waiting until your basic WordPress site is up and running before you make a decision to purchase a reserved instance.
If you purchase a reserved instance and then later regret doing so, Amazon offers a marketplace for selling unused portions of reserved instances (for a small commission). I’ve found it works well and have sold two instances within a few weeks.
However, moving your site from a micro instance to a small instance is non-trivial and it’s not documented here. If you think you’ll have a successful blog, start with a small or medium instance.
Beyond what's described in the performance optimization tutorial, Amazon offers a number of services and techniques for higher levels of flexibility and scalability. So, while not described here, there are a numerous ways at AWS to help you grow your site.
If you don’t yet have an Amazon Web Services (AWS) account, sign up for one. If you already have an account, sign in and let's begin.
Create Your EC2 Instance
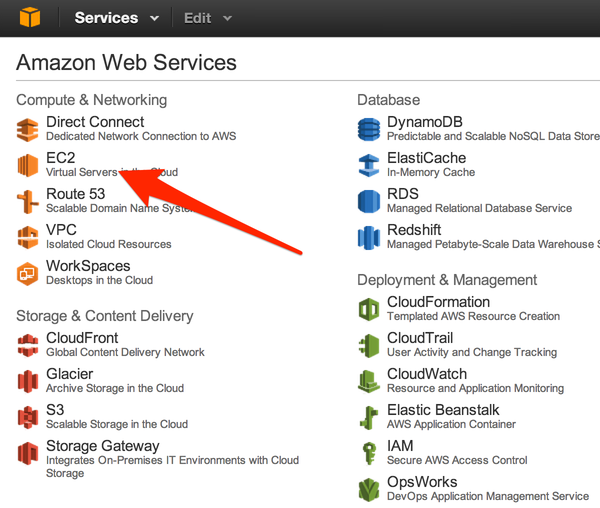
Now that you have an account, you can log in to the AWS Console to create your new virtual server. Click the EC2 link shown in the dashboard below:
If you want to run a lightly trafficked WordPress site, a micro instance will likely work well for you. If you’re new to AWS, you should be able to run your blog in their free usage tier for one year. If you buy a three year reserved micro instance for $100, you can reduce the total monthly fee to $6.44. With a micro instance, you’ll need to set up a swap file (described below) which can generate some minor additional costs and should occasionally be monitored.
If you think your blog’s popularity and complexity will pick up quickly, you may want to start with a small instance. By purchasing a three year reserved small instance for $188, the effective monthly rate is $11.82.
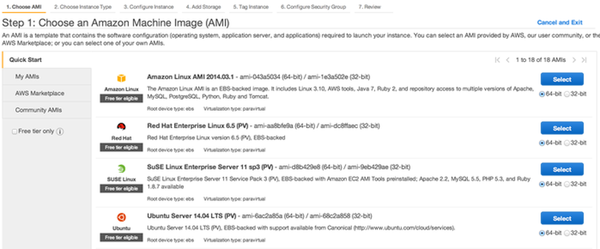
Click the Launch Instance button to start the create instance wizard. If you do not expect significant traffic on your blog, select an Ubuntu 14.xx (64 bit) Micro instance.
You can generally choose the defaults for each step as you move through the wizard.
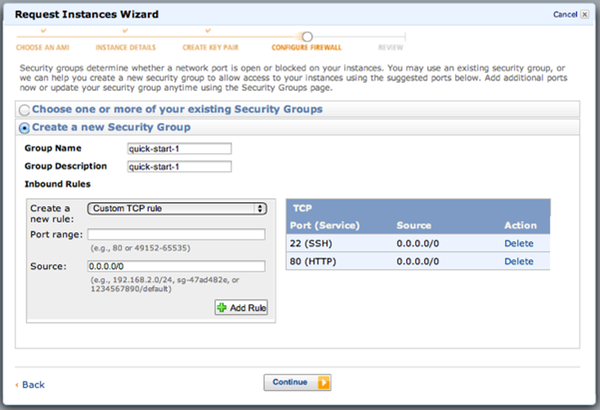
When you reach the page for Configure Firewall, add a security rule to allow HTTP traffic on port 80:

During the process, the wizard will download a private key to your computer’s Downloads directory. Keep a copy of this file in a safe location. If you lose it, you will lose access to your entire instance.
Now, your instance is ready for you to login remotely via SSH. Open Terminal on your computer. Move the downloaded key to your SSH key directory and set the permissions:
mv ~/Downloads/wordpress.pem ~/.ssh
chmod 400 ~/.ssh/wordpress.pem
Copy the URL for the instance from the console e.g. ec2-75-101-173-192.compute-1.amazonaws.com (see below):
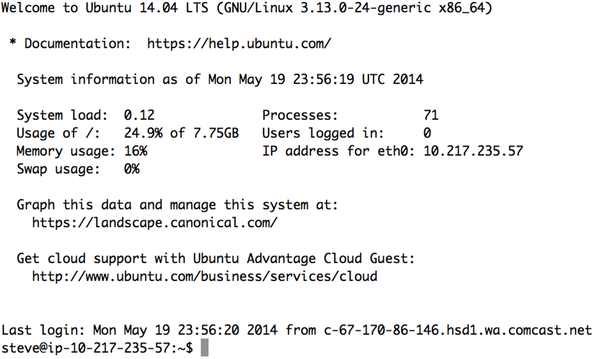
From Terminal, try to connect via SSH:
ssh -i ~/.ssh/wordpress.pem [email protected]
If you’re using Windows, you’ll need to use PUTTY to connect.
If you still have trouble, you can use the Connect button in Amazon’s Console above the EC2 Instance list.
Now, it’s time to associate a public IP address with your instance so that you can map your domain name e.g. yourbrand.com to your WordPress site. These days, AWS allocates a new public IP address with each instance but if it doesn't do this for you automatically, you'll need to allocate a new Elastic IP address.
From the EC2 Dashboard left sidebar, click on Elastic IPs. Then, click Allocate New Address. Amazon provides one free Elastic IP per running instance.
You’ll then have to associate the new elastic address with the instance you created. This allows Amazon to send traffic coming into the elastic IP address over to your instance running WordPress.
The address with which you remotely login via SSH will now have changed to reflect your elastic IP address (replace the x’s with your new elastic IP):
ssh -i ./wordpress.pem [email protected]
This may also work now:
ssh -i ./wordpress.pem [email protected]
Now, you can begin the process of mapping your domain name e.g. yourdomain.com to your future WordPress site. Visit your domain registrar’s DNS settings and change the A record for your yourdomain.com to the new IP address e.g. 59.234.124.118.
Here's one tutorial for configuring DNS A records but your domain registrar likely has a guide as well.
Wait until your DNS changes propagate (sometimes up to 24 hours or more – check them here), try to connect via SSH using your domain:
ssh -i ./wordpress.pem [email protected]
In the meantime, you should be able to continue setting up other parts of your site.
Securing Your Instance
While AWS provides its own firewall, there are still things you can do to minimize security risks. Here are three things I recommend:
- Create an Alternate User Account to the Default root (ubuntu) Login
- Turn off SSH Access for Default root (ubuntu) Account
- Change the Default Port Used for SSH From 22
Warning: Please follow these directions extremely carefully. Deviating slightly from these steps may create problems - including even making your instance inaccessible.
1. Create an Alternate User Account
We’ll add a user named “hal”. Replace “hal” with your preferred username in the examples below:
sudo adduser hal
Add your new user to the admin group:
sudo adduser hal admin
Add your new user to the sudoers group. Edit the sudoers file:
sudo nano /etc/sudoers
Add, this line to the sudoers file, in the user privileges section:
hal ALL=(ALL) NOPASSWD:ALL
Now, we’ll create keys for this user so they can login to AWS. Switch to the new user:
su hal
Change to the home directory for this user:
cd /home/hal
Make an SSH directory and set permissions:
mkdir .ssh
chmod 700 .ssh
Generate a new key pair:
cd .ssh
ssh-keygen -b 1024 -f id_hal -t dsa
Add public key to authorized_keys file:
cat ~/.ssh/id_hal*.pub > ~/.ssh/authorized_keys
Set permissions:
chmod 600 ~/.ssh/*
Move the private key to a temp folder for download to your computer:
cp ~/.ssh/* /tmp
chmod 644 /tmp/*
Edit the SSH config file to add the new user:
sudo nano /etc/ssh/sshd_config
Add the new hal account to the AllowUsers field (or create the line if it’s not there):
AllowUsers ubuntu hal
Restart the service
sudo service ssh restart
Now, switch back to your local computer using Terminal. Download the new key from your computer using your ubuntu account:
scp -i ~/.ssh/wordpress.pem [email protected]:/tmp/* ~/.ssh
Continue these steps on your local computer. Set permissions and test:
cd ~/.ssh
chmod 400 id_hal
ssh -i .ssh/id_hal [email protected]
If you run into any errors, you can try to return to your server instance and look at the log on while you attempt to login:
tail -f /var/log/auth.log
On the remote server instance, remove the key files from the tmp directory:
rm -rf /tmp/*
2. Turn Off SSH Access for Default Root Account
Edit the SSH configuration file again:
sudo nano /etc/ssh/sshd_config
Remove the ubuntu account from the AllowUsers field:
AllowUsers hal
Make sure PermitRootLogin is set to no or without-password, the latter requires logging in with a key:
PermitRootLogin without-password
Restart the ssh service
sudo service ssh restart
If you encounter difficulty, you can also go back to logging in through the AWS console instance list.
3. Change The Default Port Used For SSH From 22
Since hackers regularly look for SSH access on port 22, it's best to use a totally different port number for configuring and maintaining your server.
Edit the SSH configuration file again:
sudo nano /etc/ssh/sshd_config
Change the Port line to a different port number e.g. 33322:
# What ports, IPs and protocols we listen for
Port 33322
Return to the AWS console and edit the security group. Add the port # that you chose e.g. 33322. Remove port 22. Make sure to click the Apply Rules button (not pictured); it’s below the Add Rule box.
Restart the service:
sudo service ssh restart
Going forward, you’ll need to use -p 33322 (or your chosen port) when you connect via SSH:
ssh -p 33322 -i .ssh/id_hal [email protected]
There are even more advanced techniques for concealing your SSH login. e.g. Port knocking. However, be sure you know what you're doing, I've had sad users email me after they locked themselves out of their own server.
Installing WordPress
It’s time for the fun part of installing the open source version of WordPress. Full instructions are supplied in more detail at WordPress’ Codex.
Upgrade to the latest Ubuntu distribution and its packages:
sudo apt-get dist-upgrade
Create a www directory with permissions for the Apache web server:
sudo mkdir /var/www
sudo chown www-data:www-data /var/www
cd /var/www
Download the latest version of WordPress, expand the archive and set permissions:
sudo wget http://wordpress.org/latest.tar.gz
sudo tar -xzvf latest.tar.gz
sudo chown -R www-data:www-data wordpress
Install MySQL Server
Install the MySQL Server package:
sudo apt-get install mysql-server
You’ll be asked to provide a user name and password. Make note of your choices for use during the setup process.
Configure the MySQL Database. Change user name and password below to whatever you selected during the installation:
mysql -u root -p
create database wordpress;
grant all privileges on wordpress.* TO "your-mysql-username"@"localhost" identified by "your-mysql-password";
flush privileges;
exit;
Later, you will want to review securing your MySQL server. I have a short synopsis on my site here.
Setup Your WordPress Apache Site
If you did not choose an Amazon AWS AMI which pre-installed Apache, you may need to install it now:
sudo apt-get install php5 libapache2-mod-php5 libapache2-mod-auth-mysql php5-mysql
Now, it’s time to create a site configuration file for your Apache server to host WordPress:
cd /etc/apache2/sites-available
Let’s create a new file to edit. Note: in new versions of Ubuntu 14.04, the site configuration file should end in .conf. If the file is simply named wordpress as in past versions of this tutorial, a2ensite below will not work.
sudo nano wordpress.conf
Paste in the sample site file below and be sure to replace the naming convention for your domain name:
<VirtualHost *:80>
   ServerName YOURDOMAIN.COM
   DocumentRoot /var/www/wordpress
   DirectoryIndex index.php
   <Directory /var/www/wordpress/>
      AllowOverride All
      Order Deny,Allow
      Allow from all
   </Directory>
</VirtualHost>
Tell Apache to enable the site and reload:
sudo a2ensite wordpress
sudo service apache2 restart
Configure WordPress
Now, we’re ready to tell WordPress about the database and your blog. First, we’ll temporarily change the permissions on your wordpress directory:
cd /var/www
sudo chmod -R 777 wordpress
Open a web browser and navigate to your domain name e.g. http://yourdomain.com.
Fill out the database information that WordPress requests using your choices above. The process will look something like this:

Now, let’s lock down the permissions for the WordPress installation for security:
sudo find /var/www/wordpress/ -type d -exec chmod 755 {} \;
sudo find /var/www/wordpress/ -type f -exec chmod 644 {} \;
Let’s also make manual updates to the wp-config.php file:
sudo nano /var/www/wordpress/wp-config.php
Add the following configuration lines above the stop editing line:
define('FS_METHOD', 'direct'); // for automatic plugin installation
/* That's all, stop editing! Happy blogging. */
Try logging into the WordPress Administration system. Visit http://yourdomain.com/wp-admin and enter the user name and password you chose during the installation process.
You should see the WordPress Dashboard, like below:
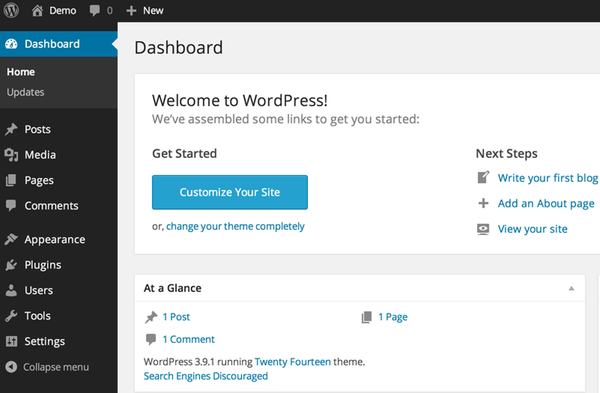
Great job and congratulations on your new WordPress installation!
Keeping WordPress Running in a Micro Instance
WordPress, its plugins and Apache together can bump up close to the AWS Micro instance memory limits. Reboot your instance once after this tutorial and monitor how much memory you’re using. From Terminal, SSH in and do:
sudo reboot
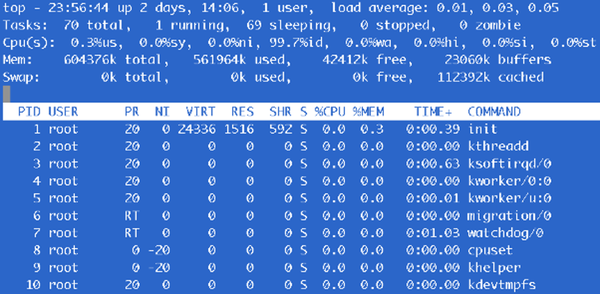
Or, you can reboot from the EC2 Dashboard as shown in the image below. See the Actions menu. Monitor activity on your instance with free or top:
free

Or, use top. Typing ‘q’ will exit top.
top
Try visiting different pages of your WordPress site and see how it impacts memory usage. Try accessing pages from your mobile and tablet devices too. If you are using an Amazon Micro instance, it’s likely you will need to configure a swap file on EBS to prevent your instance from crashing.
Configure a SWAP File
While it’s easy to set up, there are some small risk of incurring unbounded internetwork bandwidth charges – so be sure to monitor your site and set up billing alarms as described on my site here. I've never had any problems with this - but people warn about it.
Once you set up a swap file, your micro instance should be stable.
sudo dd if=/dev/zero of=/swapfile bs=1M count=1024
sudo mkswap /swapfile
sudo swapon /swapfile
Now, to make the swapfile persistant across reboots, edit the fstab file:
sudo nano /etc/fstab
Add this line:
/swapfile swap swap defaults 0 0
Verify the swap file is active by typing:
free
It should show something like:
Swap: 1048572 0 1048572
Other Things to Keep in Mind
You're now a system administrator running your own WordPress site. Awesome. But, you're now responsible for a lot of things that are typically managed by a hosting company.
There's no shaming in returning to managed hosting. If you feel you've gotten in over your head, feel free to retreat to WordPress.com or another host. We all make decisions where we spend our time - and managed hosting is a reasonable one. Once you commit to running your own site - keeping it running will take more of your time as will migrating to managed hosting later. So, be thoughtful about this.
Security
It's important to regularly log in to your instance and update security packages. When you login, Ubuntu will report something like: "35 packages can be updated. 22 updates are security updates." Use the following command to update the system:
sudo apt-get upgrade
The recent heartbleed bug is a cautionary example of the kinds of vulnerabilities that need to be patched from time to time. If you don't keep your Linux system up to date, people may be able to hack your site.
Keeping up with WordPress updates is equally important. The most recent versions of WordPress are configured to alert you to new upgrades.
Backups
No one is backing up your WordPress site. You need to choose how to do this. You can manually remember to create an AWS snapshot of your instance through the AWS interface. If you search online, you can find scripts to customize that do this from your Linux instance. Basically, you need to backup WordPress directory structure (with your themes, plugins and images), the MySQL database stored in the Linux file system as well as your Apache site configuration file.
Another approach that works well is a service such as VaultPress, owned by WordPress' parent company Automattic. There are also WordPress plugins you can purchase to run backups to other storage services, including Amazon's S3 storage system.
Contact Forms
WordPress contact forms require that you run your own mail server in order to email messages submitted to you. Running a Postfix mail server is quite complicated and has its own scaling and security risks. Instead, I like combining something like the Contact Form 7 Plugin with the Mailgun WordPress plugin. There's a bit of set up but it's free for most uses and works flawlessly.
Monitoring Solutions
You're also responsible for managing your server's uptime. So, you need a monitoring service to tell you when Amazon instances go down. And, they do - rarely, but it happens. A paid service like ScoutApp.com or my own self-hosted Simple Monitor are good solutions. If you self-host your monitoring, it's important to run it on a different instance or at least turn on heartbeats at a frequent interval e.g. 2 hrs. If the instance your monitoring is on fails, you won't know until you notice that you didn't receive the last heartbeat.
Search Engine Optimization
This is a long topic we won't address entirely here. I've written more on this topic on my own site. The performance of your site also affects your search engine ranking.
So, it’s time to build the foundation for super fast performance with Varnish Cache and W3 Total Cache.

Comments