If you live in Europe, you've probably heard about the cookie law. The exact law changes from country to country and some of the guidelines are a little unclear about ways it should be implemented.
This article is not to discuss or advise on the law, but to show you the method behind creating a simple cookie law popup plugin.
The code for this simple plugin could go in your theme's functions.php file, but I think it's better left as a plugin as it's not the sort of functionality that you want to lose between changing themes.
The Functionality
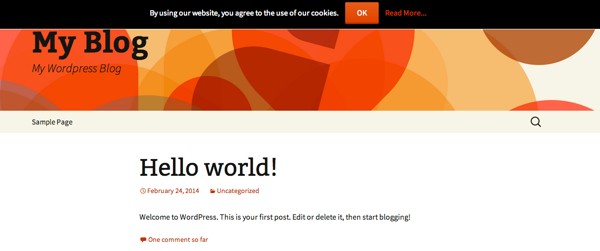
The implementation is going to be as simple as possible. We are going to have a bar across the top of the screen that displays a message, a button to dismiss the message, and a link to read more about the cookies the site uses. Some implementations go as far as having a 'deny' button for cookies, but we won't be using that.
There's plenty of different implementations of this functionality, my personal favorite is what Google uses:

The simple plugin we create during this tutorial will be great for a developer to use on projects but would need a little more work if you wanted to make it a "one size fits all" solution for general public use.
The Tools
We're going to use jQuery, PHP, HTML, and CSS for this simple plugin - let's get started.
First of all, we need to make a new folder - let's say cookie-pop - and within that folder we need to make a new PHP file called cookie-pop.php.
The first thing we need to do within our PHP file is input the standard plugin information as instructed by the WordPress Codex:
<?php
/**
 * Plugin Name: Cookie Pop
 * Plugin URI: https://code.tutsplus.com/tutorials/implementing-the-eu-cookie-law-into-your-wordpress-site--cms-21750
 * Description: A simple cookie law implementation for WordPress.
 * Version: 1.0.0
 * Author: Tutsplus
 * Author URI: http://code.tutsplus.com
 * License: GPL-3.0+
 * License URI: http://www.gnu.org/licenses/gpl-3.0.html
 * Domain Path: /lang
 * Text Domain: cookie-pop
 */
So far, so good. We're going to let jQuery do most of the work here so the amount of PHP we need to use is minimal. We'll come back to the PHP later in the article.
The JavaScript
Let's create some folders for our JavaScript and CSS. This isn't essential but it does help to keep things cleaner and more organized, which is never a bad thing. We'll call these js and css.
In order to capture that the user has agreed to cookies, we need to set a cookie that stops the message appearing on every site visit. For this we are going to use a very popular jQuery plugin. Grab the plugin from GitHub and drop the jquery.cookie.js file in your js folder. We also want a file to drop our custom jQuery for the plugin into, so create a new file in the js folder called cookie-pop.js.
You will notice that I've used unminified JavaScript here - it's always a good idea to include a minified version of your JavaScript along with the original, linted version, especially if you wanted to release this as a publicly available plugin.
Minification and concatenation are topics for another post, but for those who are interested, you can check out CodeKit, Grunt, and Gulp. To read more about minification, take a look at some of these other great Tuts+ tutorials:
- Revisiting JavaScript Minification
- Managing Your Build Tasks With Gulp.js
- Meet Grunt, The Build Tool For JavaScript
Now open up your blank cookie-pop.js file and put in the below code:
/* global cookie_pop_text */
(function ( $ ) {

    'use strict';

    if ( 'set' !== $.cookie( 'cookie-pop' ) ) {

        $( 'body' ).prepend(
            '<div class="cookie-pop">
                By using our website, you agree to the use of our cookies.
                <button id="accept-cookie">OK</button>
                <a href="/cookies/">Read More...</a>
            </div>'
        );

        $( '#accept-cookie' ).click(function () {

            $.cookie( 'cookie-pop', 'set' );
            $( '.cookie-pop' ).remove();

        });

    }

}( jQuery ) );
This jQuery method should be executed within document.ready. Using jQuery with WordPress is slightly different from using the library on it's own.
By default, WordPress uses jQuery in compatibility mode which means instead of using the $ symbol, you have to type jQuery. Luckily, there's a few ways of getting around this issue - in the example above we have passed in the $ so it can be used within our functions.
There's quite a bit going on in this code, so lets break it down a little. The first thing we are doing here is checking if there is a cookie called cookie-pop and that it does not have value of set by using the cookie method (which belongs to the jQuery Cookie script, further explained here).
If the cookie has already been set then we don't need to do anything as the user will have already seen the message and pressed the button. If it doesn't have that value then we are prepending the <body> of the HTML document with a <div>that has a a class of .cookie-pop. The div we have created has a <button> element inside with an ID of #accept-cookie and a simple hyperlink. The hyperlink will need to be edited to a path of your page where you explain about cookies.
We then have a click function, which is saying that when the element with the id #accept-cookie is clicked then use the cookie method to create a cookie called cookie-pop with a value of set that expires in 365 days and works across the entire website.
The .cookie-pop div is then removed and will disappear from the screen. The next time the page is loaded, the .cookie-pop div won't appear as the cookie will have been set.
The CSS
The CSS will ultimately depend on your theme, but there's some good rules of thumb to practice within your CSS here. As you can see in the JavaScript, the popup <div> has a class of cookie-pop - it's wise to use this as the parent selector in any custom CSS that you write for your popup, this way, there's much less chance of your CSS conflicting with styles used in other themes or plugins.
Here's the CSS that I used with the twenty-thirteen WordPress theme:
.cookie-pop {
    background-color: #000;
    border-bottom: 1px solid #fff;
    color: #fff;
    left: 0;
    position: fixed;
    text-align: center;
    top: 0;
    width: 100%;
    z-index: 10;
}

.cookie-pop button {
    margin: 10px;
}
I chose to fix the position of the cookie message so it stays present when the user scrolls. Alternatively, you may use absolute here so it always stays at the top of the page, but doesn't scroll. I've used very minimal styling here as the theme has default styles set for text size, buttons and links.
The PHP
The PHP is pretty simple here as the JavaScript and CSS does pretty much all of the work. All that's left to do with our PHP is tell WordPress about our JavaScript and CSS so that it gets inserted correctly. We're going to write a simple function that registers and enqueues our JavaScript and CSS.
The WordPress coding standards say:
Use lowercase letters in variable, action, and function names (never camelCase). Separate words via underscores. Don’t abbreviate variable names un-necessarily; let the code be unambiguous and self-documenting.
We'll call our function cookie_pop_scripts_and_styles(). Next, we will register and enqueue all of the scripts we need using the wp_register_script() method and the wp_enqueue_script() method. The wp_register_script() method tells WordPress about our script; its handle, location, dependencies, version and whether it should be located in the footer of the document, rather than the header. Whereas the wp_enqueue_script() method can enqueue / load a script registered with wp_register_script() or register and enqueue / load a script all by itself.
We'll start off by enqueueing the jQuery Cookie script:
wp_enqueue_script(
    'jquery-cookie',
    plugins_url( '/lib/jquery.cookie.js', __FILE__ ),
    array( 'jquery' ),
    '1.4.1',
    true
);
In plain English, what we are doing here is telling WordPress that the script is called "jquery-cookie", using the plugins_url() method we tell WordPress where to find the script, we tell WordPress that this script depends on jQuery to work (see a list of default handles here), and finally, we tell WordPress that the version of the script is 1.4.1. An optional last argument to add to this method is true if you want this script to be loaded in the footer, which is a best practice for improving page load time.
We then need to register our custom cookie-pop script in much the same way, except we will not be enqueueing the script right away because of translations, which we will cover in a bit.
wp_register_script(
    'cookie-pop-script',
    plugins_url( '/js/cookie-pop.js', __FILE__ ),
    array( 'jquery', 'jquery-cookie' ),
    '1.0.0',
    true
);
The only major difference here is that this script has two dependencies - jquery and our previously enqueued script, jquery-cookie, as we need both for this script to work correctly.
Next, it's a good idea to internationalize our JavaScript. Earlier on in this article we hard coded some values which isn't very friendly for internationalization. Luckily, WordPress has a great function for this built in called wp_localize_script. This function allows you to pass data from PHP to JavaScript.
In our script, we have just three pieces of distinguishable text - the message, the button text and the read more link. Let's go ahead and hook these up.
wp_localize_script(
    'cookie-pop-script',
    'cookie_pop_text', array(
        'message' => __( 'By using our website, you agree to the use of our cookies.', 'cookie-pop' ),
        'button'  => __( 'OK', 'cookie-pop' ),
        'more'    => __( 'Read More...', 'cookie-pop' )
    )
);
This function accepts three parameters. First, we have the handle of the script we want to localize - cookie-pop-script. We then have the name of the JavaScript object - this can be anything but ideally should be a name related to your script, in this case Ive used cookie_pop_text. The last parameter is an array of the values we want to use within our JavaScript - each of these has their own name and the text that we want to display.
Now, we need to go back to our JavaScript and tell it to use these values. The values are accessed like so: cookie_pop_text.message would display our message. Let's go ahead and make a few changes to our JavaScript; we only need to change the one line:
$('body').prepend(
    '<div class="cookie-pop">' + cookie_pop_text.message + '<button id="accept-cookie">' + cookie_pop_text.button + '</button> <a target="blank" href="/cookies/">' + cookie_pop_text.more + '</a></div>'

    );
The last thing we need to do is tell WordPress to actually use these files - for this we use the wp_enqueue_script() method:
wp_enqueue_script( 'cookie-pop-script' );
You will notice that I've only enqueued the cookie-pop-script script here - this is where those dependency declarations come in to play when we registered our scripts. WordPress will automatically enqueue all dependencies.
Next up, the CSS. This works in much the same way as the JavaScript:
wp_enqueue_style(
    'cookie-pop-style',
    plugins_url( '/css/cookie-pop.css', __FILE__ ),
    array(),
    '1.0.0'
);
The last thing to do is to put this all together in our cookie_pop_scripts_and_styles() function and hook it to the wp_enqueue_scripts action, so the complete package looks like this:
function cookie_pop_scripts_and_styles() {

    wp_enqueue_script(
        'jquery-cookie',
        plugins_url( '/lib/jquery.cookie.js', __FILE__ ),
        array( 'jquery' ),
        '1.4.1',
        true
    );

    wp_register_script(
        'cookie-pop-script',
        plugins_url( '/js/cookie-pop.js', __FILE__ ),
        array( 'jquery', 'jquery-cookie' ),
        '1.0.0',
        true
    );

    wp_localize_script(
        'cookie-pop-script',
        'cookie_pop_text', array(
            'message' => __( 'By using our website, you agree to the use of our cookies.', 'cookie-pop' ),
            'button'  => __( 'OK', 'cookie-pop' ),
            'more'    => __( 'Read More...', 'cookie-pop' )
        )
    );

    wp_enqueue_script( 'cookie-pop-script' );

    wp_enqueue_style(
        'cookie-pop-style',
        plugins_url( '/css/cookie-pop.css', __FILE__ ),
        array(),
        '1.0.0'
    );

}

add_action( 'wp_enqueue_scripts', 'cookie_pop_scripts_and_styles' );

Summing It Up
Now we have a working plugin with a simple message and a button to click that will clear the message and make it not show up again for a specified amount of time.
The example I used here is for the EU cookie law but in reality this sort of functionality could be useful for all sorts of things in WordPress such as showing cut off delivery times at Christmas in an eCommerce store.
The implementation here is very simple and does require some manual editing for the "read more" link - this could easily be extended upon using the WordPress options API.

Comments