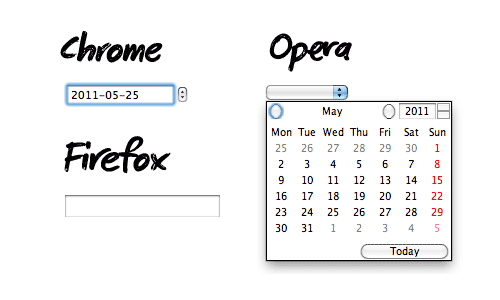
In this quick tip, I'll show you how to use the new HTML5 date input, and then provide a fallback jQuery UI solution for the browsers which don't yet support this new input type.
Prefer a Video Tutorial?
Written Tutorial
We've all been there. You've created a form, and now you need the user to enter a date. But how do you control what format they enter the date in? Wouldn't it be easier if we could use a calendar control, or a datepicker? Absolutely! Unfortunately, though, only a couple browsers support the new HTML5 date input type. That's okay though, we'll use jQuery UI to provide a fallback!
Step 1 - The Native Solution
Let's first plan for the future, and assume that the user is working in a modern browser that supports a datepicker.
<!DOCTYPE html>

<html lang="en">
<head>
   <meta charset="utf-8">
   <title>Date Picker</title>

</head>
<body>

<input type="date" name="date" id="date" value="" />

</body>
</html>
At the time of this writing, only Webkit and Opera support this input type. In Firefox and Internet Explorer, the browser will default to a simple textbox -- not ideal!

Let's use jQuery UI to compensate.
Step 2 - Download jQuery UI
The jQuery UI datepicker tool works wonderfully, and is a cinch to "install." First, we download a customized version of jQuery UI, Visit the download page, and only check the "Core" and "Datepicker" items. Leave everything else unchecked.

Click download, and you'll receive a zip containing the necessary files. Transfer over the jQuery UI file as well as the CSS directory to your project.
Step 3 - Integration
With jQuery UI imported into our directory tree, we next need to include the necessary files - specifically the CSS and JavaScript files.
<!DOCTYPE html>

<html lang="en">
<head>
   <meta charset="utf-8">
   <title>Datepicker</title>
   <link href="css/redmond/jquery-ui-1.8.13.custom.css" rel="stylesheet" />
</head>
<body>

<input type="date" name="date" id="date" value="" />

<script src="https://ajax.googleapis.com/ajax/libs/jquery/1.6.0/jquery.min.js"></script>
<script src="js/jquery-ui.js"></script>

</body>
</html>
Notice how we've included our custom jQuery UI stylesheet, the jQuery library - currently at version 1.6 - and the customized jQuery UI script, which I've renamed to jquery-ui.js.
Step 4 - The datepicker Method
Our base is set; now we need to query the DOM for the desired input element, and call the datepicker() method on it.
<script src="js/jquery-ui.js"></script>
<script>

$('#date').datepicker();

</script>
These few characters alone will do the trick. If we now view the page in Firefox and click on the input element, you'll see the datepicker in effect.

Step 5 - Providing the Fallback
What we have here works, but there's one problem. If we return to an advanced browser like Chrome, we're now on double duty. Both the native and fallback datepickers are in effect, simultaneously. We need a way to specify that, if the browser supports the date input type, don't do anything. That's easy!
<!DOCTYPE html>

<html lang="en">
<head>
   <meta charset="utf-8">
   <title>Datepicker</title>
   <link href="css/redmond/jquery-ui-1.8.13.custom.css" rel="stylesheet" />
</head>
<body>

<input type="date" name="date" id="date" value="" />

<script src="https://ajax.googleapis.com/ajax/libs/jquery/1.6.0/jquery.min.js"></script>
<script src="js/jquery-ui.js"></script>
<script>
   (function() {
      var elem = document.createElement('input');
      elem.setAttribute('type', 'date');

      if ( elem.type === 'text' ) {
         $('#date').datepicker();
      }
   })();

</script>
</body>
</html>
In a real-world project, you'd likely abstract away this testing code to its own method, or use Modernizr, but this will do the trick for testing purposes.
In the code above, we first create an input element, and then attempt to set its type attribute equal to date. Now if the browser fails at doing so -- meaning that it doesn't understand what the date type is -- we can then assume that it's an older browser, and provide the jQuery UI fallback instead. Simple!
Step 6 - Datepicker Options
The datepicker tool comes with a variety of overrides; you can review the entire list here.
Let's examine a couple together. What if want to specify a specific date format. Rather than Y/M/D, we'd rather use Y-M-D. To do so, we use the dateFormat property.
$('#date').datepicker({
   dateFormat: 'yy-mm-dd'
});
Well that was easy. Next, let's say that we only want the user to be able to select a date between now and four days from now. This is a cinch when we use the maxDate option. One handy-dandy feature is that we can use relative terms, such as +4, for four days from now.
$('#date').datepicker({
   maxDate: +4
});
We're only scratching the surface here, but this should get you started! Cross-browser datepickers within minutes!


Comments