Having a local WordPress test environment is essential for developing themes, plugins, and updating sites. The last thing you want to do is update a live site or install a plugin that completely breaks the site. In this tutorial I'm going to take you through the steps that will give you a local WordPress environment that will allow you to safely and efficiently develop for WordPress.
What You Need
- Xampp
- A current version of WordPress
- A web browser
- Your favorite text editor
Xampp is a great web server package made by a group called Apache Friends. Xampp combines Apache, MySQL, PHP 5.3.8(current version), OpenSSL, phpMyAdmin, Webalizer, Mercury Mail Transport System, FileZilla FTP Server, and Tomcat. Xampp is a great tool for developing locally on Windows.
You can download the latest version of Xampp here.
Step 1 Installing Xampp
After you've downloaded Xampp. Go ahead and start the install.
The first screen will look like this.
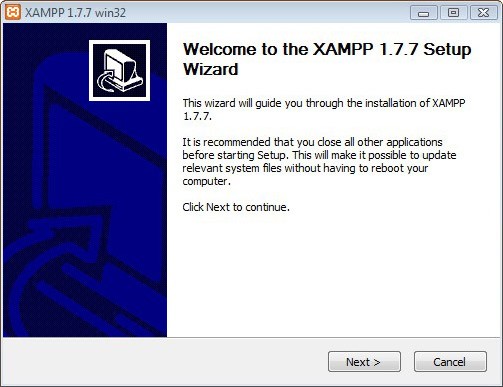
Click Next to start the installation process.

Choose the directory you want to install Xampp. I recommend creating a new directory and naming it something like "localhost" or "Web Server" to keep things organized. If you want to just keep the default install directory.
Click Next.

The next screen is the Xampp options.
Choose whether you want a Xampp icon on you desktop and/or the start menu.
The options you really want to consider is whether to install Apache and MySQL as Windows services. Installing Apache and MySql as services will increase the Windows boot time, but having them as services can come in handy. There have been a few times when I booted up my computer, opened the web site I was working on, and getting a browser error. Then I would spend the next hour trying to figure out why my site isn't loading only to realize that the server wasn't running. The choice is your though.
Don't worry about Filzilla unless you plan on having a FTP service on you computer. I really don't recommend that, so let's just leave that unchecked for now. You can always change it later.
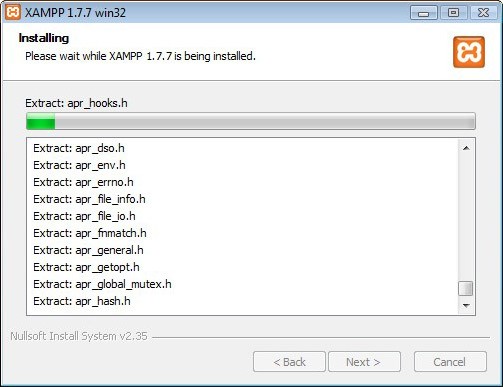
Now, Xampp will install.
That's it click Finish and you're done. Xampp is now installed and ready to go
Step 2 Running Xampp
Now open up the Xampp control panel and turn on Apache and MySQL.
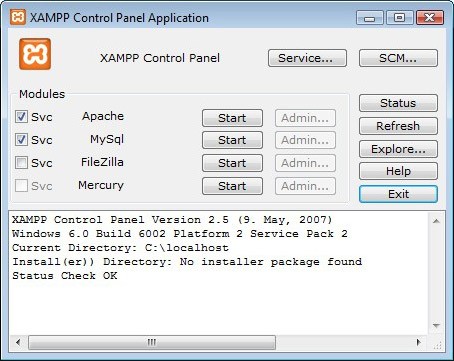
If you didn't choose to install Apache and MySQL as a Windows service you can check the "Scv" checkbox's, and Xampp will install Apache and MySQL as a service.
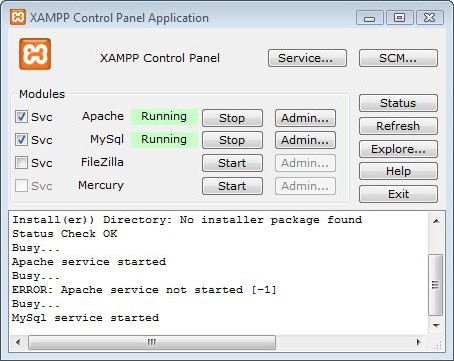
Click the Start buttons for Apache and MySQL. It may take a minute for them to start. Once the Apache and MySQL servers are running the Xampp control panel will look the screenshot above.
Now point your browser to http://127.0.0.1. This are the default URLs for Apache on your computer. You should see a nifty Xampp splash screen. Choose your language and have a look around. There's some stuff here to look at and read. The one part you want to pay attention to is the phpMyAdmin link. You might want to bookmark this link for future use, or you can just go to http://127.0.0.1/phpmyadmin/. phpmyAdmin is a GUI for the MySQL database. With phpmyAdmin you can create and manage your MySQL databases.
Step 3 Setting Up Your WordPress Directory
Why Have Multiple WordPress Versions?
Before we start with the setup and installation of WordPress. I just want to take a moment and explain why you should have multiple versions of WordPress installed. When you're developing a theme or plugin you should be developing it on the latest stable version of WordPress. By developing on the latest stable version it not only keeps you code up to date, but it'll let you take advantage of any new features. You may be asking yourself "Then, why have multiple versions of WordPress?". The answer is assuming.
You can't assume that everyone out there has the latest version of WordPress. Especially if you want to sell you work. If a company spent thousands of dollars for their theme and plugins. They're not going to want to risk upgrading WordPress and have their site break. They will keep the version they have for as long as they can. There are allot of major corporations out there that still have Internet Explorer 6 as their companies main web browser. If they don't want to upgrade a free browser then it's safe to say they won't upgrade WordPress either.
If you don't test your work in older versions then you'll be narrowing you potential sales. It's just a matter of numbers. Why spend the time developing a theme or plugin that can only be sold for a few versions of WordPress? By testing your work on older versions you can market it for all the versions it works on. Making you work available for a larger consumer group. There by you'll make more money and we all like more money.
Setting Up Your WordPress Directory
The files for your WordPress and all other web sites are going to be stored in the htdocs folder of you Xampp install directory.
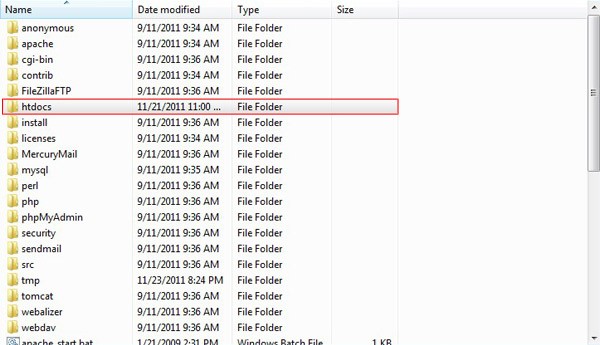
By default Xampp installs the site you just went to at http://127.0.0.1/. This is just an example site and you don't need to keep it. Once you get all the information you need from it you can open up the htdocs directory and delete the files within. These file aren't necessary for you web server to run.
Go ahead and create a directory named wp-vs-version (e.g. wp-vs-321) or whatever you like in the htdocs directory for you WordPress installation. The reason for this naming convention will become clear in Setp 4 when we create the WordPress databse.
Don't install WordPress yet! There are some more steps we're going to go through first, so just copy the WordPress files over to the newly created directory to prepare for the WordPress install.
Step 4 Creating The WordPress Database
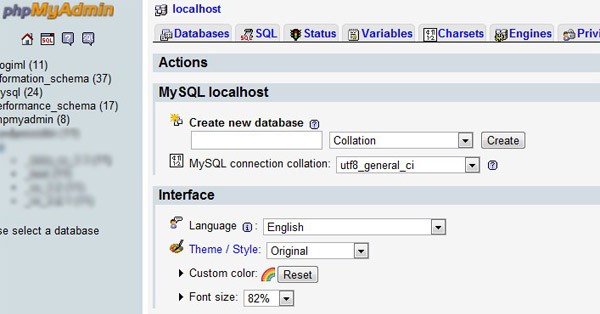
Now point you browser to your phpmyAdmin page at http://127.0.0.1/phpmyadmin/.
The first thing you want to do is set up admin privileges. On the tabs the right, click on the Privileges tab.
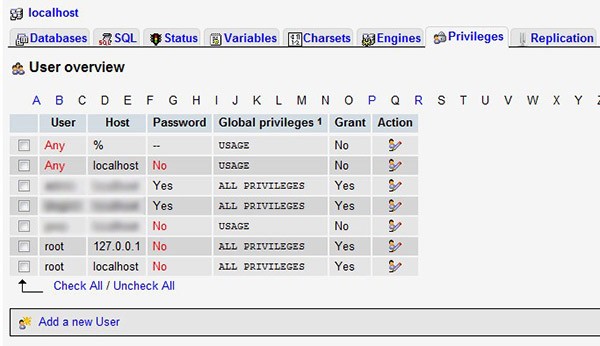
Click Add a new User
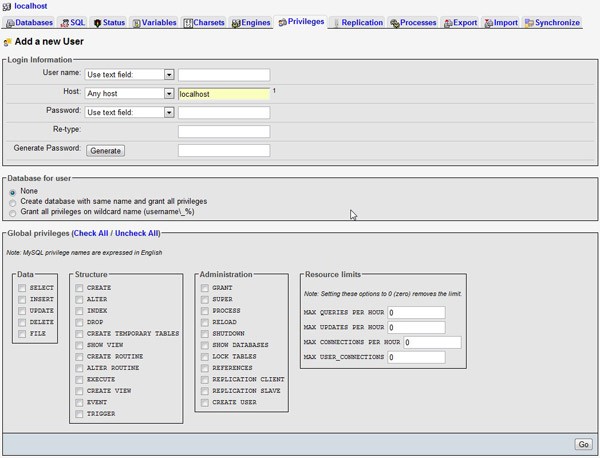
Put your user name and password the their perspective fields. Since this is going to be a local setup. You don't have to be worried about a super secure username and password. Just make sure it's something you're going to remember.
Make sure localhost is in the Host field.
In the Global Privileges area check all the options. The Global Privileges are the actions that the user can can access. Unless you plan on letting others working on your local server make sure you have them all checked.
When everything is the way you want it. Click the GO button.
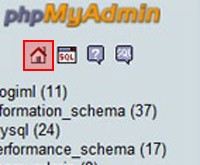
Now, let's create a database for your WordPress install. Click the Home button on the left to return to the phpmyAdmin home page.
Name your database in the Create new database field. You can name it whatever you want, but I recommend naming the database wp_vs_version ( e.g. wp_vs_3.2.1 ) to keep with the naming conventions in Step 3. This will keep your different WordPress versions orginized and easy to work with.
Now, you're all set to install your copy of WordPress.
Step 5 Configuring WordPress
If you've installed WordPress before and know what you're doing. Go ahead and skip to Step 7. For those new to WordPress installing WordPress is easy. I'll take you through the steps to get you going.
First you need to download a version of WordPress you can download version 3.2.1 here. At the time of writing this tutorial version 3.2.1 was still the current stable version.
Create a folder in your htdocs directory and name it wp-vs-321. Unzip you copy of WordPress and copy it to the your WordPress in the wp-vs-321 folder.
The first thing you need to do is rename the wp-config-sample.php file to wp-config.php. This file is a sample file for you WordPress config file. It has everything you need to get you going on your WordPress install.
After renaming the file open the wp-config.php file in your favorite text editor, and look for this bit of code.
// ** MySQL settings - You can get this info from your web host ** //
/** The name of the database for WordPress */
define('DB_NAME', 'database_name_here');

/** MySQL database username */
define('DB_USER', 'username_here');

/** MySQL database password */
define('DB_PASSWORD', 'password_here');

/** MySQL hostname */
define('DB_HOST', 'localhost');

/** Database Charset to use in creating database tables. */
define('DB_CHARSET', 'utf8');

/** The Database Collate type. Don't change this if in doubt. */
define('DB_COLLATE', '');
This part of wp-cofig.php are the configuration settings that allow WordPress to connect to your mySQL database.
- define('DB_USER', 'username_here'): Is the username you set up for the database privileges in phpmyAdmin in Part One. The username is case sensitive.
- define('DB_PASSWORD', 'password_here'): Is the password you set up for the database privileges in phpmyAdmin in Part One. The password is case sensitive.
- define('DB_HOST', 'localhost'): This is the web server host name. Unless you changed the host in the database privileges is should be the default localhost.
- define('DB_CHARSET', 'utf8'): This is where you define the the character set. Leave this one alone. You shouldn't have to change this.
- define('DB_COLLATE', ''): This is the database's collate type. Unless you know what you're doing leave this alone, too.
The code right below that is the authentication unique keys and salts. This is just some addition security WordPress has by default. It looks like this.
define('AUTH_KEY',         'put your unique phrase here');
define('SECURE_AUTH_KEY',  'put your unique phrase here');
define('LOGGED_IN_KEY',    'put your unique phrase here');
define('NONCE_KEY',        'put your unique phrase here');
define('AUTH_SALT',        'put your unique phrase here');
define('SECURE_AUTH_SALT', 'put your unique phrase here');
define('LOGGED_IN_SALT',   'put your unique phrase here');
define('NONCE_SALT',       'put your unique phrase here');
This is easy to setup. Just go to https://api.wordpress.org/secret-key/1.1/salt/ copy the text there and paste it over the sample text in the wp-config.php file. This link will generate a random set of keys for you to use.
It should look something like this.
define('AUTH_KEY',         'Nsd-]$o7h4 &Y@N345+h@Jn`M#an^|+0]kGtkPqyu|ZI%G|PWoX+&:j{&/_v89-{');
define('SECURE_AUTH_KEY',  'Rf+[4(O5LZ#i&??*n9wIyh^rS4- +3c[DarlPCh[7E&wPE|dY,dZ(mU66uP-FIq,');
define('LOGGED_IN_KEY',    '>48!V^Pc}/uX95r>]ym)ZiA gP7f8}q!H=p-!TA#5M5.]sqm;SqM+`+9qfO_r/y(');
define('NONCE_KEY',        '+8UC!2pD~x/=:d)k;eset5(aP0UYb4B[@Ta UG~C`!IRVDtrGJ3XI2D;QsE#eZ}(');
define('AUTH_SALT',        '0;K-fHe)RpH7_h|KJ1b0jxr#`ke:*GMx|X$ll-z|!;ENt],-y:sUW-D,;-xX )3K');
define('SECURE_AUTH_SALT', 'R6X${@qi/ f|GX**3qp@{Z}_yJ(iB{CFmV%a(:xny!hpM.R*|-53ybq7ILgZCTFH');
define('LOGGED_IN_SALT',   'NcO%Wa|3RHu!-.%(w6YqTc/Rc,S&THdDDA1@Whp4;WUdiCytA{sL0-a} |6MZ1]O');
define('NONCE_SALT',       '0QB9`~!X$X]2#B)ma[KsLtiK#-%{!VoM f-q%eJ%tO+3O]tTrqhC-%rI|.pFPQ[P');
Next, you want to change the database prefix
$table_prefix = 'wp_';
The default is wp_. I like to keep the the naming convention of wp_vs_version_ (e.g. wp_vs_3.2.1). You can name it anything you want or just keep the default. If you notice there is an underscore at the end of the prefix. This isn't required, but it does make you database look cleaner.
$table_prefix = 'wp_vs_3.2.1';
Note - When you install a live version of WordPress you want to change the prefix to something unique. Using random letters and numbers is a good method. This will add another layer of security for your WordPress site. On a local development environment it shouldn't be necessary.
The last part of the wp-config.php file we'll configure is the debug mode. This will either be true for debug on, or false for debug off. On a live site this should always be set to false, so your visitor don't see any errors, but for your local development environment you should have it set to true.
This will help you in your development. Even if your code is working the way you want. You could still have some errors. Especially with depreciated code. Your project will still work with depreciated code, but you want to keep your code up to date. That way if WordPress stops supporting the depreciated code your projects will still work.
Change this code.
define('WP_DEBUG', false);
To This.
define('WP_DEBUG', true);
That's all we need to configure for your WordPress install. Make sure you save the wp-config.php file and move on to Step 6 to install WordPress.
Step 6 Installing WordPress
Now, point your browser to http://localhost/wp-vs-321/ .
If everything was configured correctly you should see the WordPress install page.
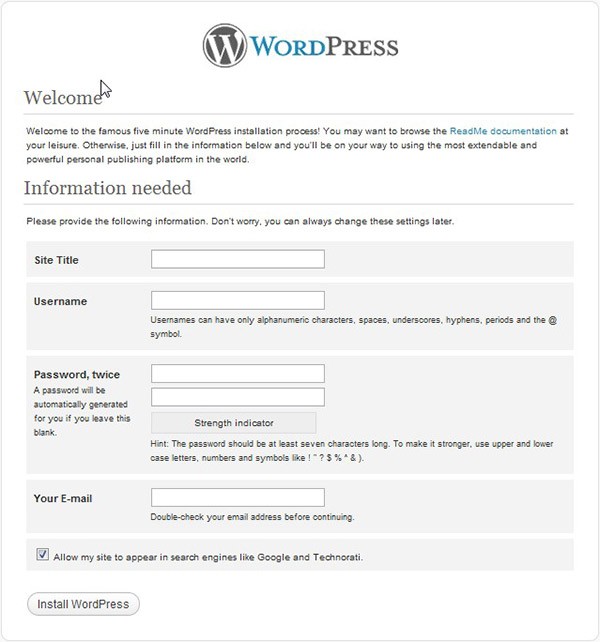
Enter the Title. Keeping with the naming convention let's name it WordPress Development Version 3.2.1.
The Username and Password isn't the same as the username and password you set up for the database. This is what you will use to log into the WordPress admin page. Make sure you use something you'll remember. If you forget your username or password you'll have to go into the database to change it or do a fresh install of WordPress. Also, WordPress doesn't give you an option to change your admin username and password, so make sure it's something you want to keep.
Finally enter Your email address, uncheck Allow my site to appear in search engines like Google and Technorati, and click Install WordPress.
There you go. WordPress is now installed. To install more versions of WordPress just repeat the instruction above. Remember to change the names for your directory, database, prefix, and site title.
Step 7 Setting Up Apache Virtual Hosts
Now, on to the fun stuff. I'm going to show you how to set up Apache Virtual Hosts.
Apache has a great system in place with Virtual Hosts. Virtual Host allows you to use a unique URL for your web sites on your local web server. That means if you're developing a site for a client called Big Bob's Candy. You can set up a URL for your development site like http://wp.bigbobscandy.com. Instead of http://localhost/big-bobs-candy/index.php.
Why would you want to do this? Well, just to make it look good and to keep your projects organized. If you noticed there was wp. before the bigbobscandy.com URL. Using a sub domain like this will keep your site from interfering with a real URL also, it can help you organize your projects. For example you can use wp. for WordPress sites and sws. for static web sites.
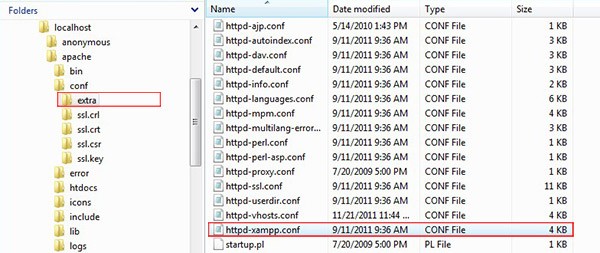
First, we're going to setup the httpd-vhost.conf file. This file is located in your Xampp directory -> apache -> conf -> extra.
Open up the httpd-vhost.conf file in notepad and you'll see this.
#
# Virtual Hosts
#
# If you want to maintain multiple domains/hostnames on your
# machine you can setup VirtualHost containers for them. Most configurations
# use only name-based virtual hosts so the server doesn't need to worry about
# IP addresses. This is indicated by the asterisks in the directives below.
#
# Please see the documentation at
# <URL:http://httpd.apache.org/docs/2.2/vhosts/>
# for further details before you try to setup virtual hosts.
#
# You may use the command line option '-S' to verify your virtual host
# configuration.

#
# Use name-based virtual hosting.
#
##NameVirtualHost *:80

#
# VirtualHost example:
# Almost any Apache directive may go into a VirtualHost container.
# The first VirtualHost section is used for all requests that do not
# match a ServerName or ServerAlias in any <VirtualHost> block.
#
##<VirtualHost *:80>
    ##ServerAdmin [email protected]
    ##DocumentRoot "/xampp/htdocs/dummy-host.localhost"
    ##ServerName dummy-host.localhost
    ##ServerAlias www.dummy-host.localhost
    ##ErrorLog "logs/dummy-host.localhost-error.log"
    ##CustomLog "logs/dummy-host.localhost-access.log" combined
##</VirtualHost>

##<VirtualHost *:80>
    ##ServerAdmin [email protected]
    ##DocumentRoot "/xampp/htdocs/dummy-host2.localhost"
    ##ServerName dummy-host2.localhost
    ##ServerAlias www.dummy-host2.localhost
    ##ErrorLog "logs/dummy-host2.localhost-error.log"
    ##CustomLog "logs/dummy-host2.localhost-access.log" combined
##</VirtualHost>
Go ahead and delete all this. We're going to build the Virtual Host file from scratch.
When working with this file. If you want to leave notes you just put a hash symbol at the beginning of any line you leave a not on.
# This line is a note that will be ignored because of the #
This line will be read by Apache because there is no # at the beginning of the line
Here is the code we'll be using in the httpd-vhost.conf file.
# Main Virtual Host IP Address
NameVirtualHost *

#Main Virtual Host
<VirtualHost *>
    ServerName localhost
    DocumentRoot "C:/localhost/htdocs"
</VirtualHost>

#WordPress vs 3.2.1
<VirtualHost *:80>
    ServerName wp.devsite-321.com
    DocumentRoot "C:/localhost/htdocs/wp-vs-321"
    <Directory "C:/localhost/htdocs/wp-vs-321">
      Order allow,deny
      Allow from all
    </Directory>
</VirtualHost>
The NameVirtualHost * you specify the IP address on which the server will receive requests for the name-based virtual hosts. The * will default to 127.0.0.1.
In the next section, #Main Virtual Host. The ServerName is localhost, and the DocumentRoot is the absolute path to your htdocs folder in the web server's directory.
ServerName localhost is the URL you'll use in your browser web server, so if you ever want to go to your root directory in you browser you can just use http://localhost/.
The #WordPress vs 3.2.1 is the Virtual Host configuration for your WordPress install. Again, the ServerName wp.devsite-321.com will be the URL for Your WordPress site. This can be anything you want. If you want your site to have a URL of http://the.evilbunnysquad.com. The ServerName would be the.evilbunnysquad.com
The DocumentRoot and the path in the <Directory> tag, are going to be absolute path to your WordPress's install.
The Order allow,deny and Allow from all just sets up some basic permissions for viewing your WordPress Virtual Host.
When you start adding other versions of WordPress just copy and paste the #WordPress vs 3.2.1 Virtual Host configuration and change the ServerName, DocumentRoot, and <Directory> to reflect the new install.
When you install additional versions of WordPress just follow the instructions above. Just change it to reflect the newly installed version.
There's allot more you can do with the virtual hosts like setting up server logs, but all we want to do right now is setup the URL's. If you'd like to read more on Apache Virtual Host visit the Apache Virtual Host Examples and unix-girl.com.
Step 8 Configuring Your Windows Host File
Now let's view the WordPress site with the URL we just set up in the previous section. Go ahead and put http://wp.devsite-321.com in your browser. Oh, what happened? The site didn't come up. Well, that's because your computer doesn't recognize the URL yet. That's what we're going to do in this last step.
What we need to do is configure your Windows Host file. This file is located in Windows -> System32 -> drives -> etc directory.

Now, this file can be a little tricky to work with. If you're still running Windows XP. You won't have a problem. Just open it in any text editor. If your running Windows Vista or Windows 7 you need to be on a Windows User Account that has administration rights. If you can open the hosts file in a text editor but can't save it, because you get an error stating you need administration rights. You'll need to open this in notepad. You need to right click on notepad and click Run as Administrator. Once you do that, you shouldn't have any problems editing or saving the host file.
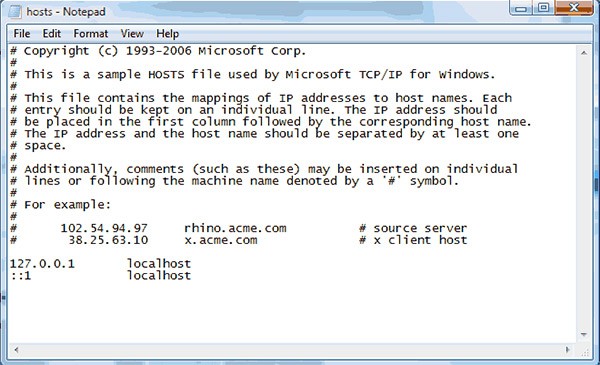
When you open the hots file you going to see a bunch of IP addresses and URLs. I'll look like this.
Now, add the IP addresses and URLs we just made in the Virtual Host file. Like this.
127.0.0.1    localhost (if it's not already there)
127.0.0.1    wp.devsite-321.com
Finally, open you Xampp control panel turn off Apache and MySql. Then start them back up, and point your browser to http://wp.devsite-321.com . If Everything went right you should be seeing your WordPress site. You'll need to do this for every URL you set up in the
httpd-vhost.conf file.
Conclusion
With this tutorial you'll have everything you need to build a WordPress development environment. Once everything is set up, it'll only take you minutes to setup URLs for your WordPress and static web sites. Keeping you workspace organized and accessible.
If you want to read more about Xampp, Apache, phpmyadmin, or Virtual Hosts. Check out these links.

Comments