prettyPhoto is a lightbox plugin made by Stéphane Caron. Today we're going to learn how to ship the plugin with your WordPress themes.
Introduction
Giving a built-in lightbox option instead of making users download a plugin has many benefits for theme authors. For me it's being able to theme the lightbox to suit my WordPress themes. It's also a nice feature to have available to your theme's users, of course you should also give them an option to disable the functionality. With that said let's get to it.
Step 1 Download prettyPhoto and set up directory structure
Head over to margins for-errors.com and download the plugin. Once you've got it we're going to create a new directory structure for the plugin to make things easier for ourselves.
First let's delete a few things we don't need. In the images folder delete everything apart from the prettyPhoto folder and it's contents. In the root folder, delete the file xhr_response.html and index.html. Now move jquery.prettyPhoto.js from the js folder to the root plugin folder and delete the js folder.
Finally, rename the folder to prettyPhoto and upload the folder to your theme's directory, you probably already have a js or scripts directory so upload to that, for this tutorial let's presume it's in your-theme/js
Step 2 Add the scripts to your theme (Updated: See comments below)
Before we load up the plugin files in our theme we need to load jQuery. We're going use the Google hosted version of jQuery using the method shared on Digging into Wordpress, so let's add the snippet to our functions.php.
if (!is_admin()) {
	add_action("wp_enqueue_scripts", "register_scripts", 11);
}
function register_scripts() {
	wp_deregister_script('jquery');
	wp_register_script('jquery', "http" . ($_SERVER['SERVER_PORT'] == 443 ? "s" : "") . "://ajax.googleapis.com/ajax/libs/jquery/1.7.1/jquery.min.js", false, null);
	wp_enqueue_script('jquery');

	wp_register_script('prettyPhoto_script', (get_bloginfo('stylesheet_directory')."/js/prettyPhoto/jquery.prettyPhoto.js"));
	wp_enqueue_script('prettyPhoto_script');
	wp_register_script('customprettyPhoto_script', (get_bloginfo('stylesheet_directory')."/js/prettyPhoto/customprettyPhoto.js"));
	wp_enqueue_script('customprettyPhoto_script');
}
You might want to consider the advantages and disadvantages of using a CDN to serve jQuery. WordPress does ship with a copy of jQuery but using Google's hosted version may benefit your site's performance. If you're a theme author I would stick with using the shipped version. Check out the discussion on another tutorial to help you make up your own mind.
You'll notice we've added another file called customprettyPhoto.js. This is where we'll be making the plugin play nice with our post images and initialising it. So let's create that file and put it in your prettyPhoto directory. OK, let's initialise prettyPhoto.
<script>
  $(document).ready(function(){
    $("a[class^='prettyPhoto']").prettyPhoto();
  });
</script>
We need to add a line of jQuery to add the required prettyPhoto class prettyPhoto to the anchor tags that surround our post images. Since we're talking jQuery let's use it to accomplish this. Add the following right after $(document).ready(function(){ where we make sure the page is loaded.
$('.entry-content a').has('img').addClass('prettyPhoto');
Replace .entry-content with whatever class name or ID you've wrapped your post content with and you should have successfully added the class to all links that wrap your post images. If you had a look at the documentation for prettyPhoto you will see it says to use a rel attribute but instead we've used a class. Doing so prevents validation errors in our HTML because rel attributes can only have certain allowed values according to the HTML5 spec.
Next we want to enable prettyPhoto's description option. We have to overcome one small hurdle which is that prettyPhoto wants us to add title attributes to our anchor tags that will be used for the descriptions but WordPress adds titles to image tags. To solve this we'll write a couple lines of jQuery that will take the image title tag and set the same title on the anchor tag that wraps the image.
$('.entry-content a img').click(function () {
	var desc = $(this).attr('title');
	$('.entry-content a').has('img').attr('title', desc);
});
Here we fire a function when the user clicks on a post image. We grab the image's title tag and attach it to the anchor. This step makes it a lot easier for your theme's users to add descriptions. If you want to disable the functionality altogether just make sure to set each anchors title to be empty, if it's totally missing, as in there isn't even an empty title, prettyPhoto will just display “undefined” instead.
Step 3 Add the prettyPhoto CSS to your theme
We need to add the CSS for prettyPhoto to the theme. Back to your functions.php file and add the following line to the top:
wp_enqueue_style('prettyPhoto', get_bloginfo('stylesheet_directory').'/js/prettyPhoto/css/prettyPhoto.css');
Since we kept the images and CSS in their original folders and relative to each other as they were originally we don't need to worry about broken images.
Step 4 Captions and Titles
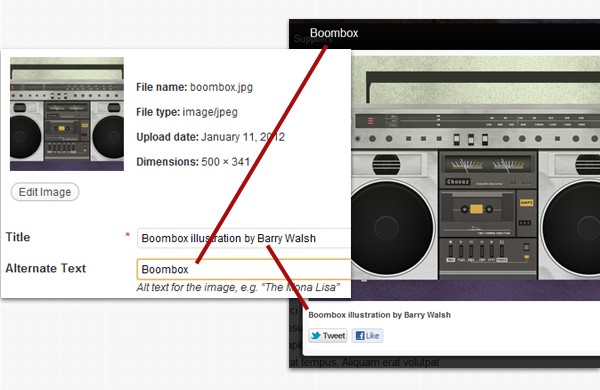
Let's look at how to add captions and titles that our prettyPhoto will use. Looking at the image above we can see the relationship between the post image alt tag and link title tag we can set when adding an image to a post or page.
Finishing Up
And that's it, we've successfully added prettyPhoto to our theme. Make sure to read the plugin documentation for more uses and options. PrettyPhoto can handle more than just images, it works with videos, ajax and more. It also ships with a handful of themes that may suit your theme out of the box or at least give you a good starting point.

Comments