WooCommerce is the most popular and “most customizable eCommerce platform for building your online business.” You can download WooCommerce for free, but you really begin to see its power when you start using WordPress WooCommerce plugins and themes.
But do you really need to use a WooCommerce theme?
While it's not required, I highly recommend it.
Not only are WooCommerce themes eCommerce-centric by design, the entire theme is centered around WooCommerce styles. The CSS that WooCommerce uses to define how products are displayed is then used by the WordPress WooCommerce theme to really pull everything together—making for some of the most beautifully designed eCommerce storefronts.
Not to mention the fact that installing and setting up a new WordPress WooCommerce theme isn't any more difficult than setting up any other WordPress theme.
Let me show you how to do it.
How to Install and Set Up a New WordPress WooCommerce Theme
If you already have WooCommerce installed, that's great! If not, I highly recommend Rachel McCollin's Beginner's Guide to Using WooCommerce. This will introduce you to WooCommerce and take you through all the steps needed to get your online storefront up and running.
Now let's get started with how to install and set up a new WordPress WooCommerce theme.
Step 1: Install Dummy Data
If you've already added your products to WooCommerce, I recommend skipping this step and starting with step 2.
Installing dummy data adds fictional products to your storefront to help you visualize your store with products. After you've completed installation and set up your new WordPress WooCommerce theme, you'll want to delete all the dummy data before adding your products. Otherwise you risk accidentally deleting your own product data.
The dummy data is included with your WooCommerce plugin. If you've installed WooCommerce within the WordPress Admin, go ahead and download the plugin from the WordPress Plugin Directory to your computer. This will be easier than logging into your FTP, going into your plugin directory, and downloading the dummy data from there.
Once your download is complete, unzip the file so you're ready to import your dummy-data.xml file.
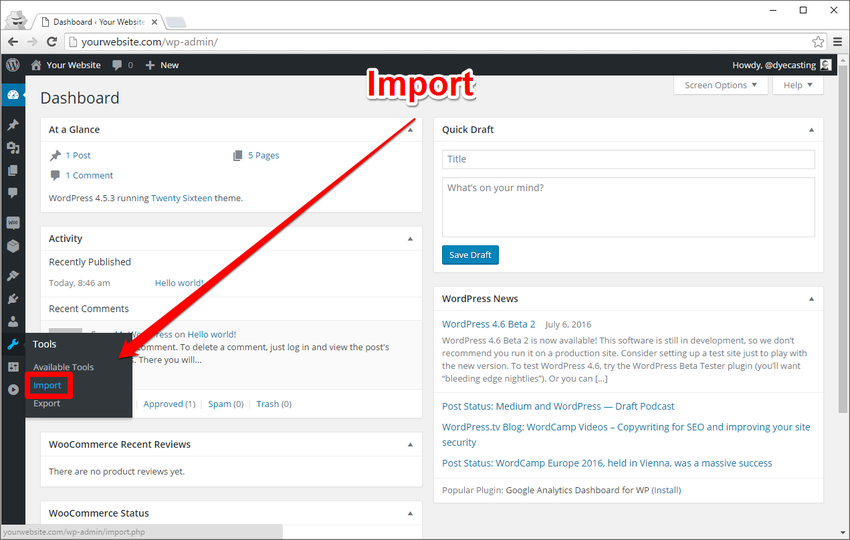
Go to your Tools and click on Import:
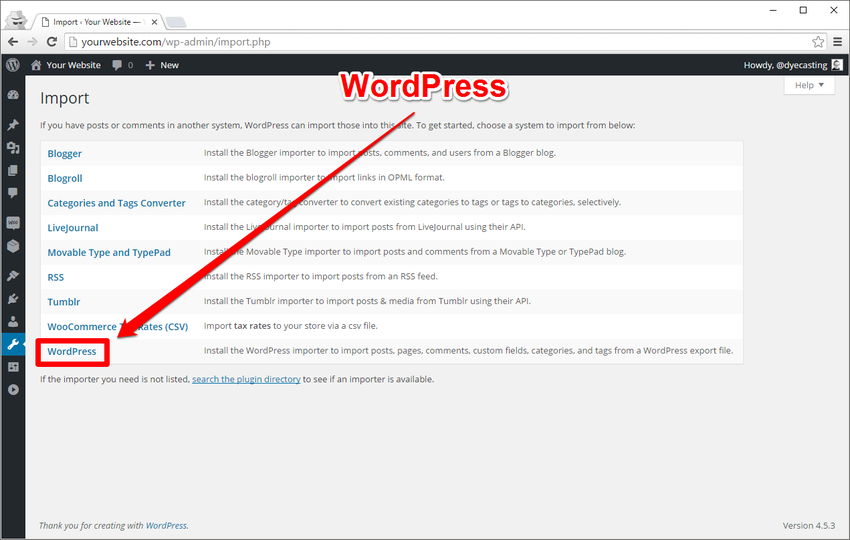
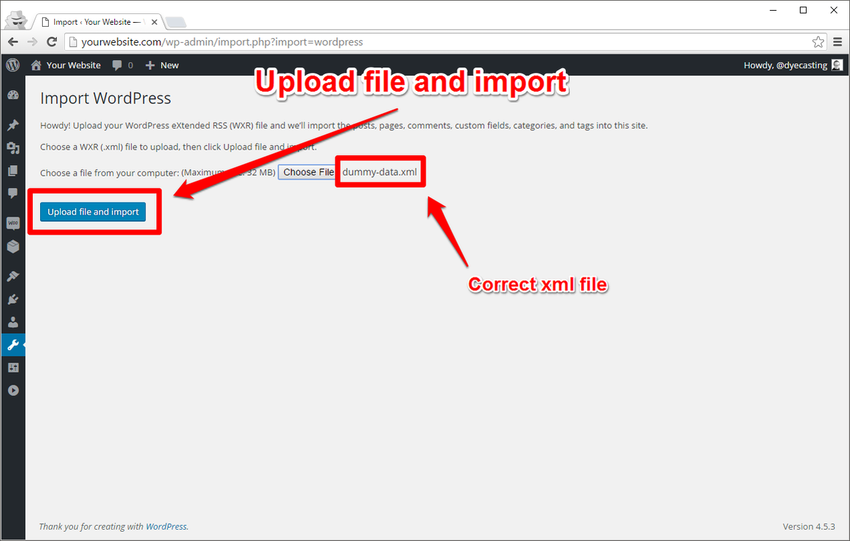
Don't let the “WooCommerce Tax Rates (CSV)” confuse you. This can be done later if you like. For the WooCommerce Dummy Data, you'll want to choose WordPress.
More than likely you won't have the WordPress Importer plugin installed, so go ahead and Install Now.
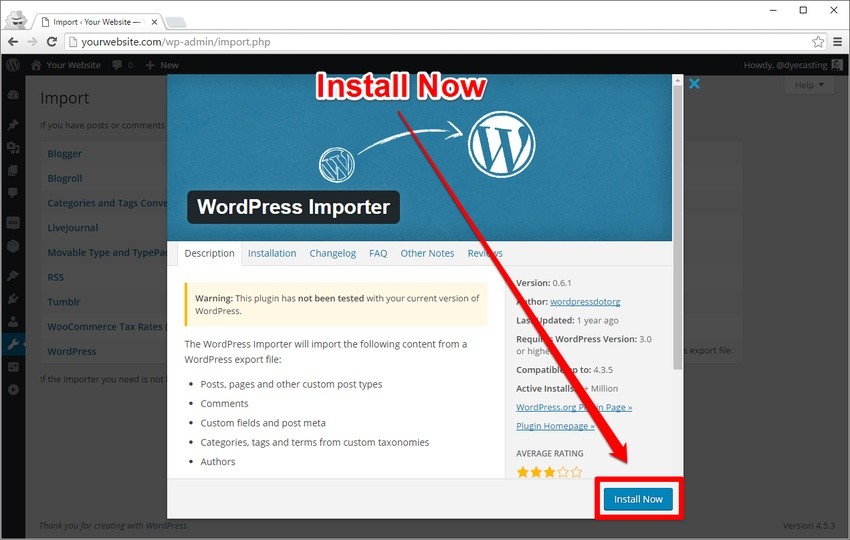
Once installed, go ahead and Activate Plugin & Run Importer.
Do you remember where you downloaded and unzipped the WooCommerce plugin? Great! Now you need to click Choose File and make your way to it.
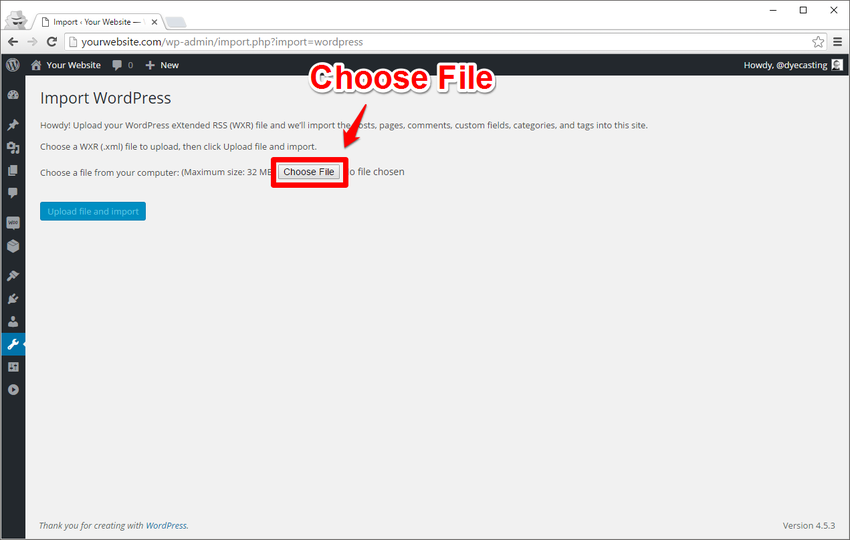
Your dummy data should be in your unzipped folder: (woocommerce.version.number) > woocommerce > dummy-data.
Open the dummy-data folder, select dummy-data.xml, and you're ready to upload the file and import.
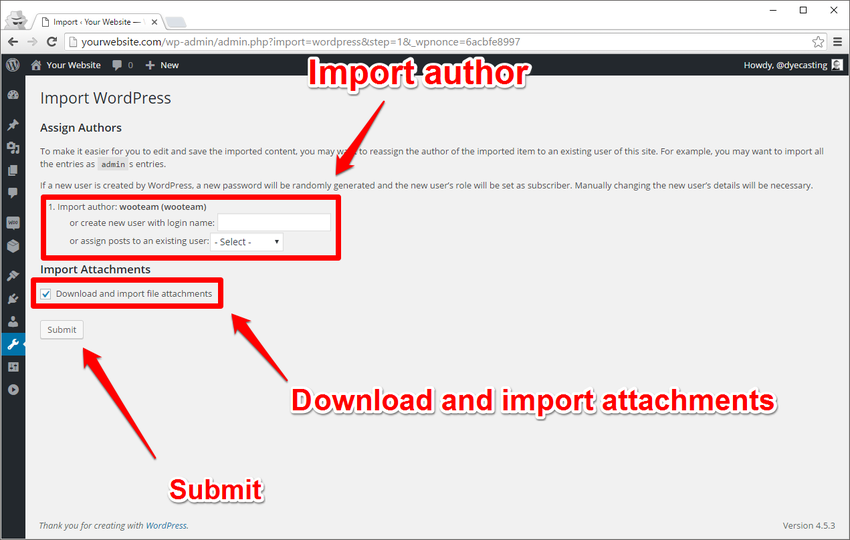
This is the last thing you'll need to do before importing all the dummy data.
Some of this is personal preference, but here's what I do (screenshot further below):
Import the default author “wooteam” instead of creating a new author or using a preexisting author. This way you know what content was imported/created in this process based on the author name (I recommend deleting the author when you remove the dummy data after you've finished installing and setting up your new WordPress WooCommerce theme).
I also recommend that you Download and import attachments so that you have images associated with each product (again, you'll want to make sure the media is removed when you're finished with the dummy data).
Once you've made these selections, submit:
Visit yourwebsite.com/shop/ and you should see a fully imported test store:
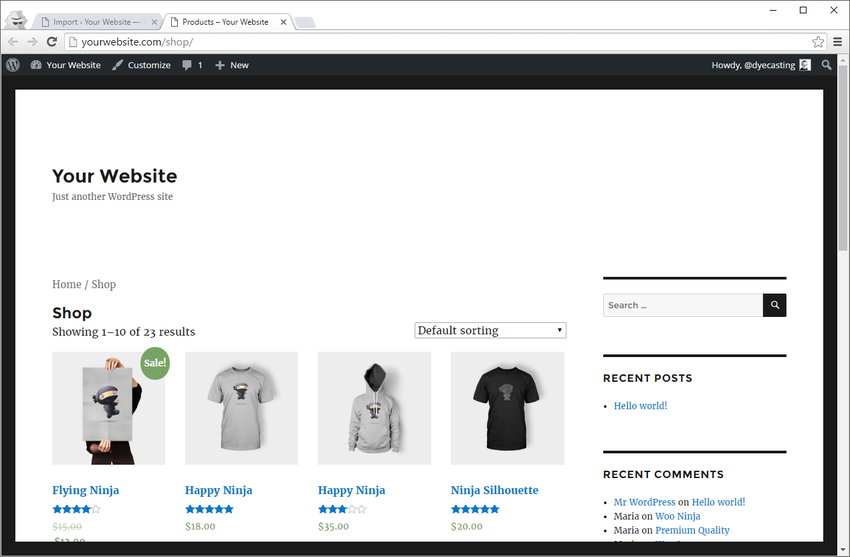
Yeah! You did it!
It's not very well designed, is it? Good thing we're going to install a great-looking WordPress WooCommerce theme like Savoy.
(NOTE: After you're done installing and setting up your theme, don't forget to delete the products and images from the dummy data import before you start adding your own products.)
Step 2: Install a WordPress WooCommerce Theme
Now, let's look at how to install WooCommerce theme. If you haven't downloaded your WordPress Commerce theme already, go ahead and download it to your computer (make sure you know where you're downloading it, so you can access it).
There are two different ways you can install your theme:
- Access your website using FTP
- From the WordPress Admin
FTP Your Theme
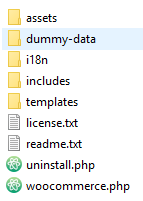
If you're comfortable using FTP, go ahead and connect to your server and make your way to the wp-content > themes directory. This is where you'll want to send your theme. Before you send your unzipped folder to your server, however, make sure you're sending your theme. Let's take a closer look by using our example WordPress theme from ThemeForest.
After unzipping your download, you'll see there are a number of different folders:
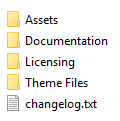
Not every theme you download will be packaged like this. Sometimes the zipped folder you download is the actual theme folder. It's always a good idea to double-check, since this varies from place to place.
The Savoy - Minimalist AJAX WooCommerce Theme includes some extra things like documentation, assets, etc. If you look in the Theme Files folder for Savoy, you'll find your theme (savoy.zip).
If you're installing via FTP, go ahead and upload your unzipped theme folder (for example: “savoy”) into the themes directory. If you're not sure about using FTP or would prefer to install from the WordPress Admin, that's fine. I prefer using the WordPress Admin, too.
From the WordPress Admin
Installing a WordPress theme from the Admin requires that the theme folder be zipped (themefolder.zip). As we discussed previously, you'll want to make sure you're working with the actual theme folder and not the folder your theme may be packaged in.
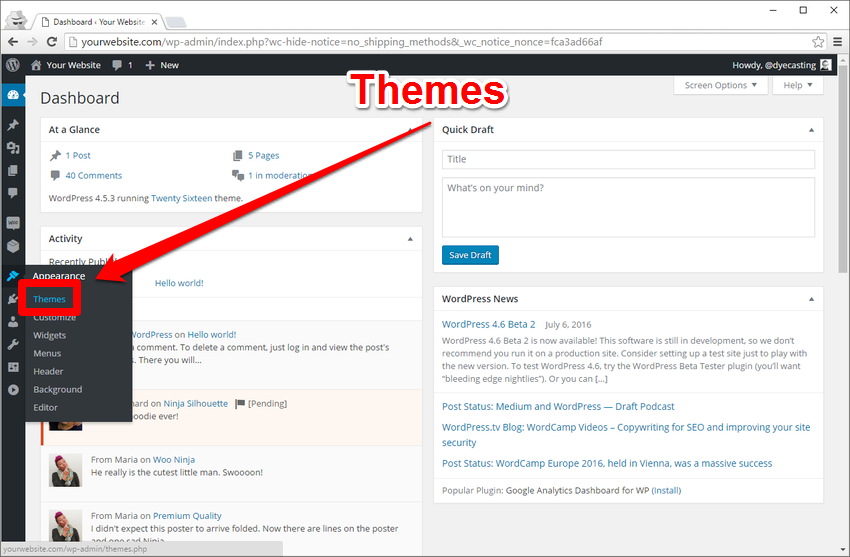
From the WordPress Admin, under Appearance, click Themes:
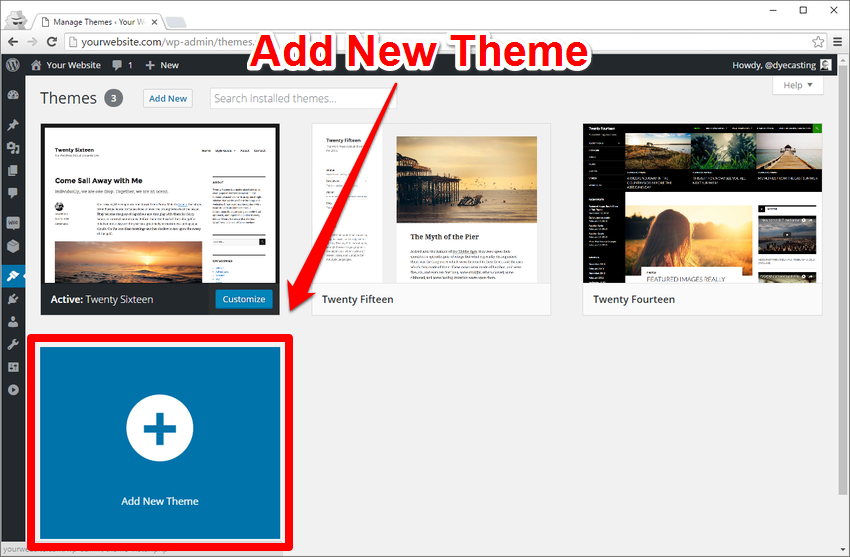
Add new theme:
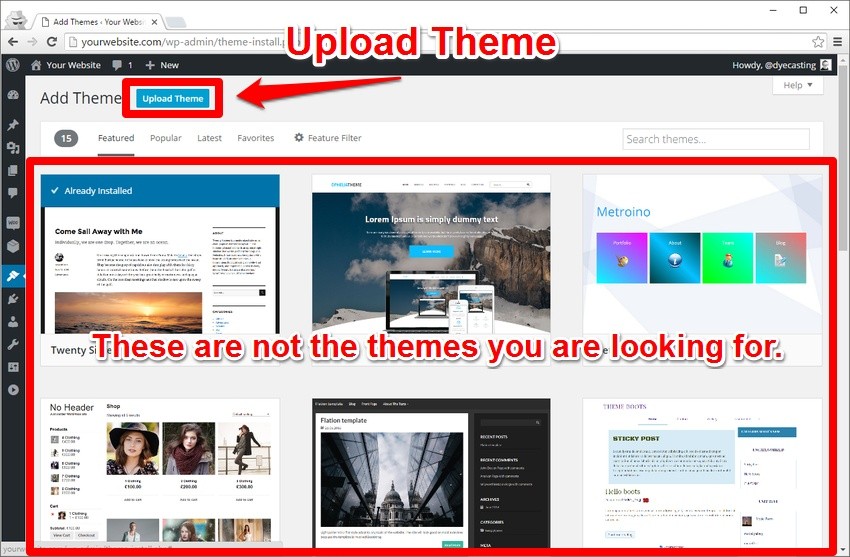
Upload theme:
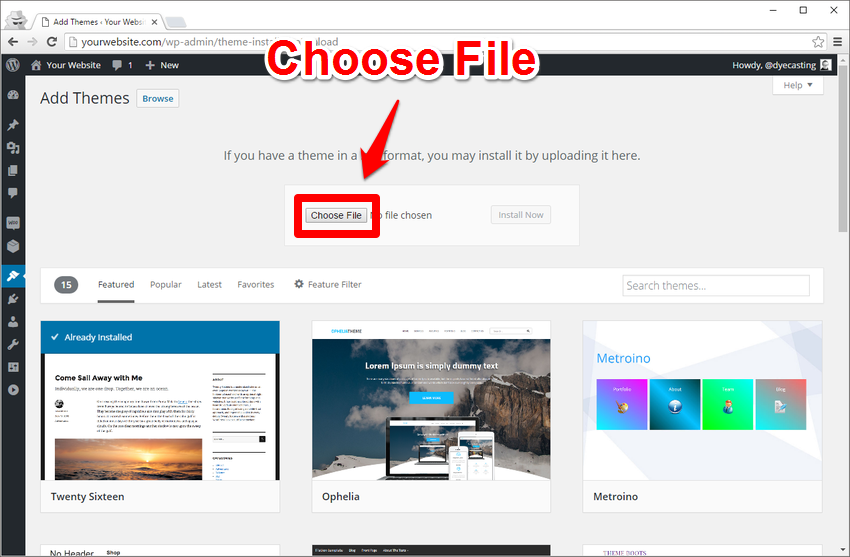
Do you remember where your theme zip file is located?
(Our example theme is titled: savoy.zip)
Click Choose File and make your way to it:
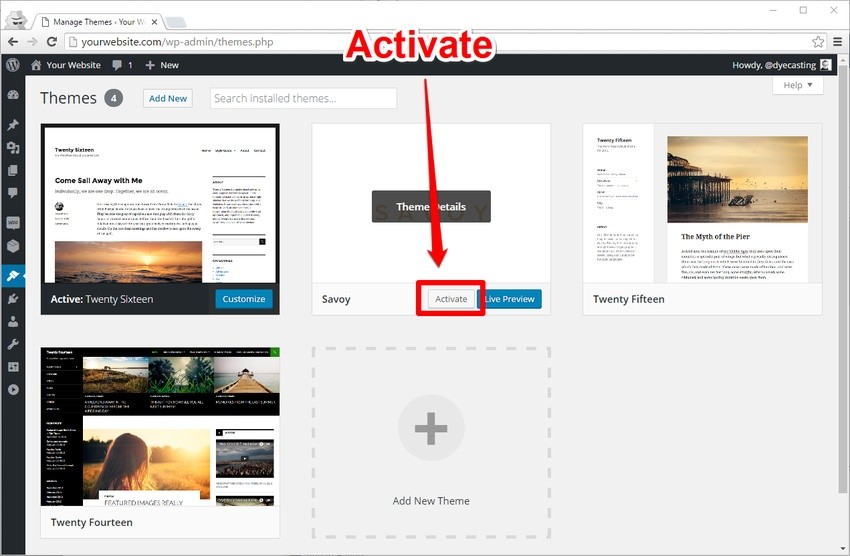
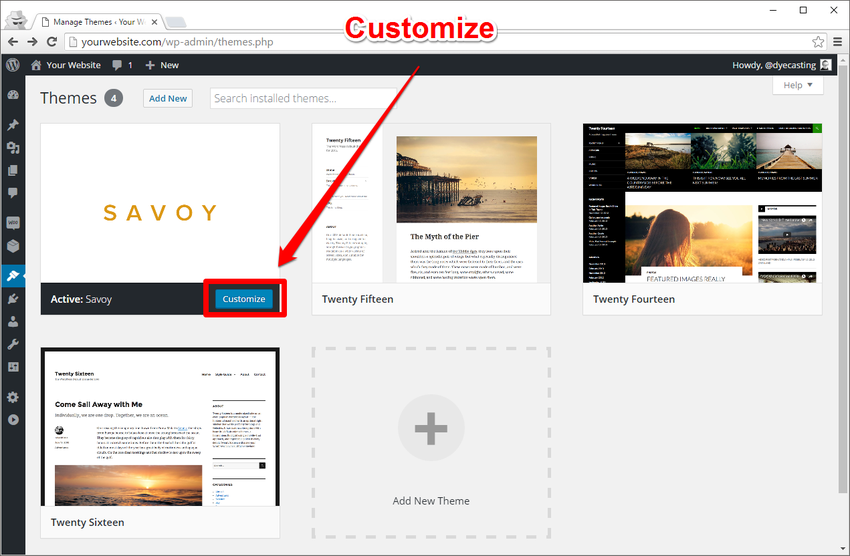
Once installed, you can visit Appearance > Themes in your WordPress Admin to see if it's installed or click to activate it straight away.
As you can see (below), the Savoy theme has installed successfully, so mouse over and Activate:
Now that your WordPress WooCommerce theme is successfully installed and activated, let's set it up.
Step 3: Set Up a WordPress WooCommerce Theme
Not every theme is customized exactly the same. How a theme is designed and developed is a large factor, so there may be some differences between this tutorial and what you may be facing. Generally speaking, however, this should help you get your WordPress WooCommerce theme set up—no matter what WooCommerce theme you're using from ThemeForest or anywhere else.
Recommended/Required Plugins
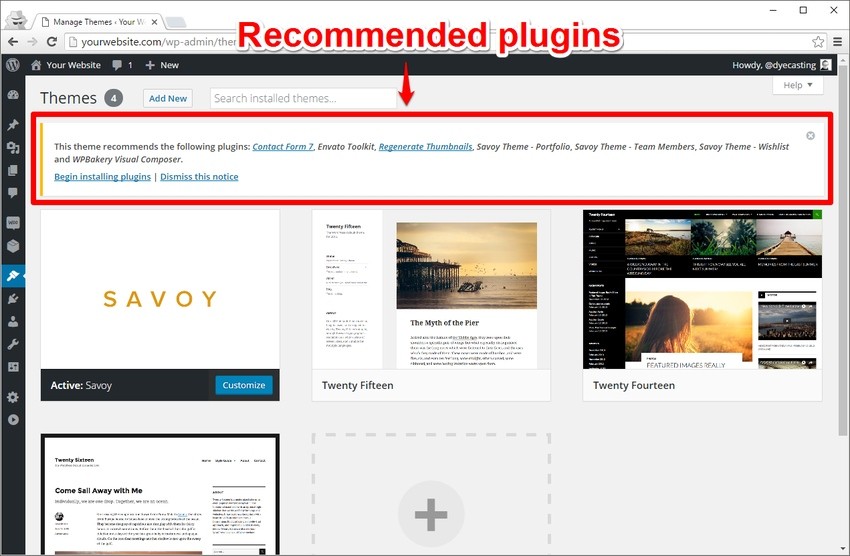
After installing and activating the Savoy theme, you'll be notified of recommended plugins:
Sometimes your theme notifies you of recommended plugins while others include recommendations in their documentation. There can be theme design functions—such as optional sliders—that are not coded into the theme, but are accommodated for.
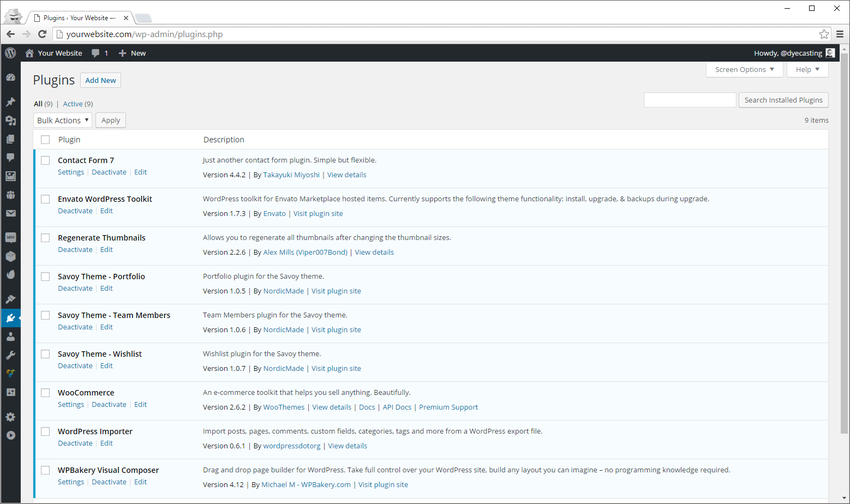
Click on Begin installing plugins in the Savoy theme to see the list of recommended plugins:

Again, this will vary from theme to theme, but in this case, you may or may not want to install all of these.
For example, while Savoy recommends Contact Form 7 and includes styling for it, you may not want to use this plugin for your contact form. You may want to use something like Gravity Forms or Ninja Forms.
A plugin like Regenerate Thumbnails is an excellent plugin to use for those who have an existing store set up and have their images configured for a previous theme. This plugin will go through your WordPress Media Library and resize all your images to work with your new theme. You may or may not want to do this with the dummy data, and you may want to skip this plugin altogether (but I recommend doing it anyway, so that all the media is sized correctly for testing purposes).
A plugin like the Envato Toolkit, however, is very important for themes purchased through ThemeForest, ensuring that you are notified of theme updates.
I would recommend installing all of the recommended plugins when you get started. You can always remove a plugin later if you don't need it, whereas if you don't install a plugin that's needed, you could get frustrated because the theme isn't “working” or doing something you liked on the demo.
Once you've installed all, some, or none of the recommended and/or required plugins, don't forget to activate them:
If you're using a theme purchased from ThemeForest, such as our example theme Savoy, don't forget to enter your Marketplace Username and Secret API Key in the Envato WordPress Toolkit to ensure proper theme updates.
Customize
This is the part of installing and setting up your WordPress WooCommerce theme when it gets really fun and you start to see your website come to life.
You can access the WordPress Customizer from the menu in WordPress: Appearance > Customize. Or go to the Themes page under Appearance > Themes and then click the Customize button:
Welcome to the WordPress Customizer:
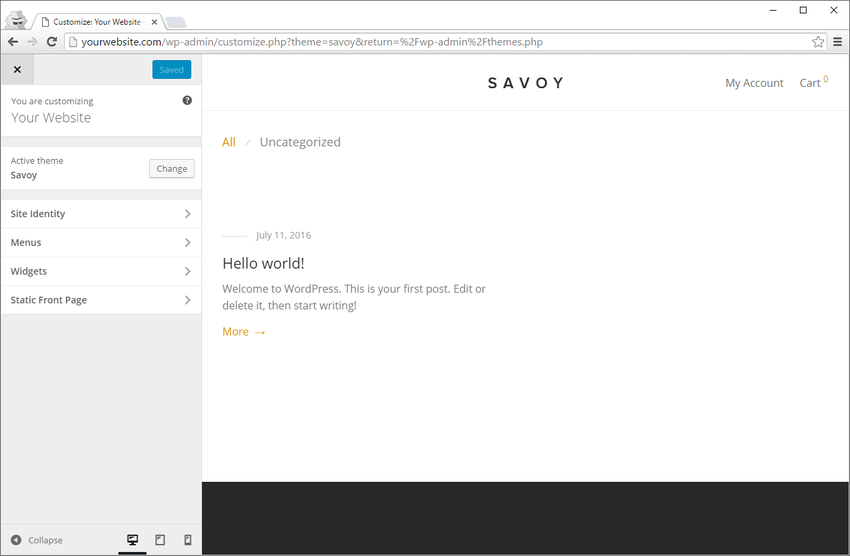
Here's where we will make a few tweaks before getting into deeper configuration.
The first thing you'll see is Site Identity. This is where you can change your Site Title and Tagline.

Sometimes this is where you can add a custom header image and/or Site Icon as well (this will vary from theme to theme).
Next up, configure your menus:
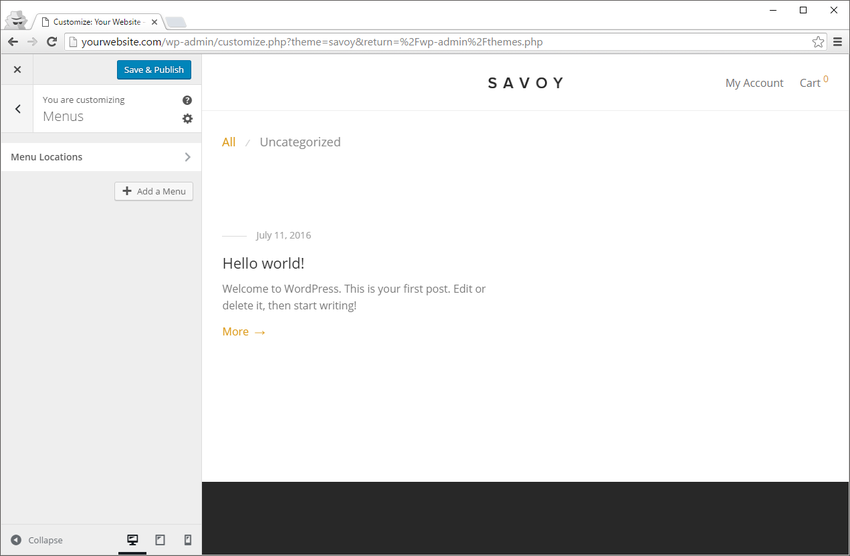
If this is a new WooCommerce setup or you haven't created any pages, there may not be much for you to "customize" yet. With WooCommerce installed, however, it automatically added some pages that I'm sure you'll want to have added to your menu right away.
You can easily add and create a new menu:
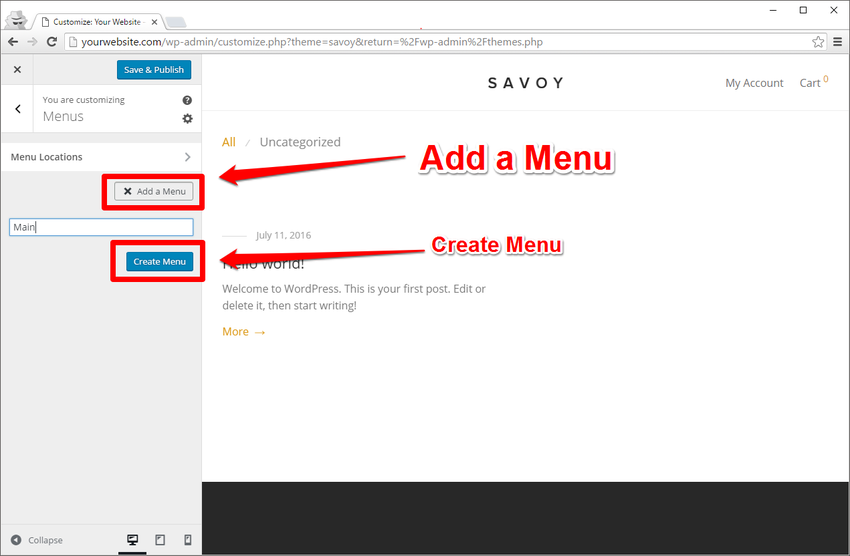
Once you've added a menu (or several), you can select where you would like the menu to appear as well as the different menu items (such as custom links, posts, pages, products, etc.).
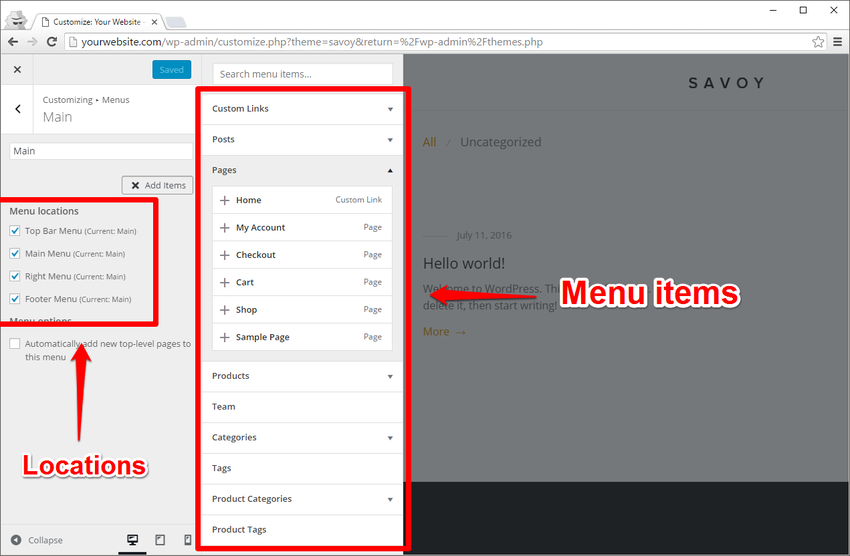
This gives you a lot of flexibility with how you would like your WooCommerce site to function. Don't be afraid to play around with it or change it later.
Before we leave the WordPress Customizer, you'll want to tell WordPress to make the front page your store:
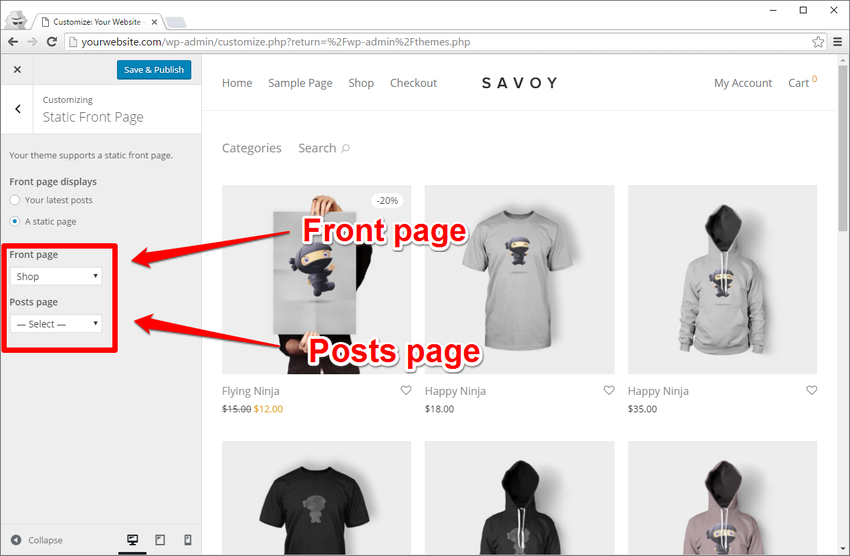
Mark Front page displays as A static page and select the Front page to be your Shop page. The Shop page was automatically created when you installed the WooCommerce plugin.
As for the Posts page, this depends on where or not you want a blog on your WooCommerce site. If so, you'll need to create a blog page and select that on this page of the WordPress Customizer or in the WordPress Admin Settings > Reading.
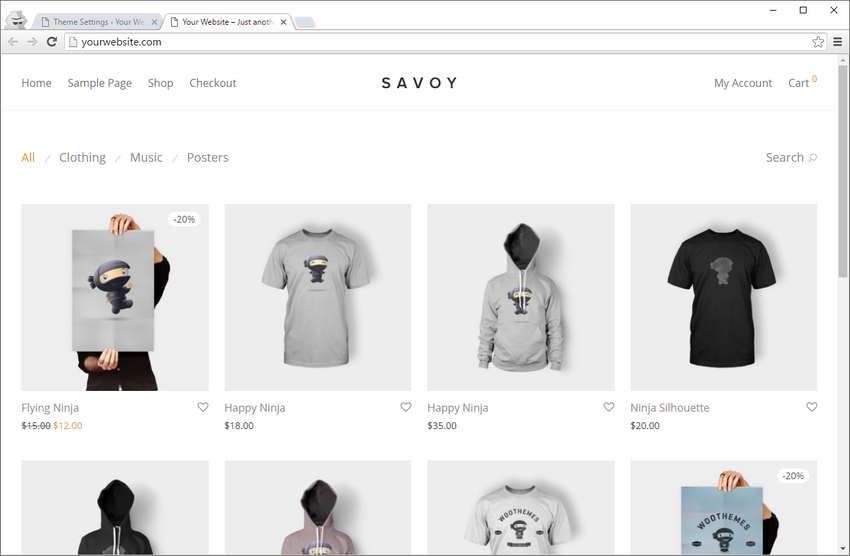
The Results
With some basic configuration, you can see how great your online store can look using a WordPress WooCommerce theme:
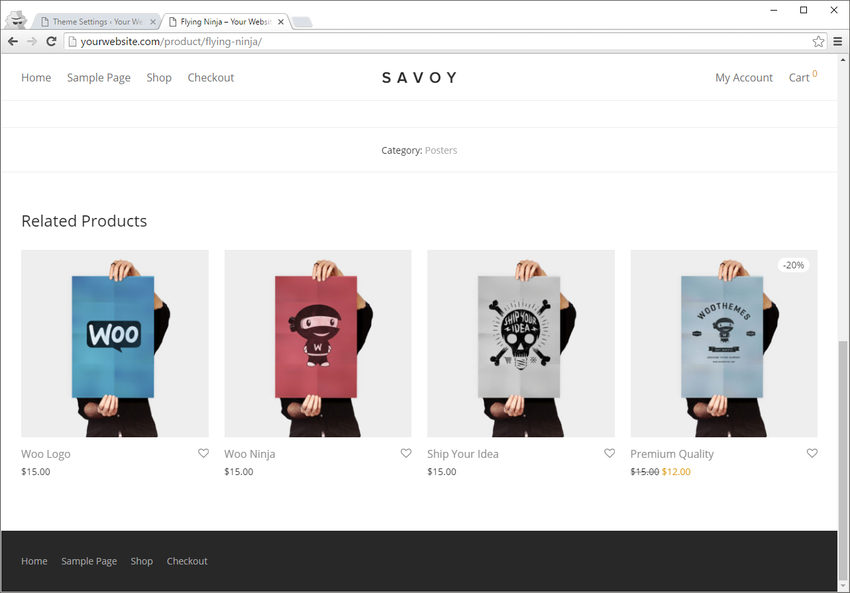
The individual product pages look amazing:
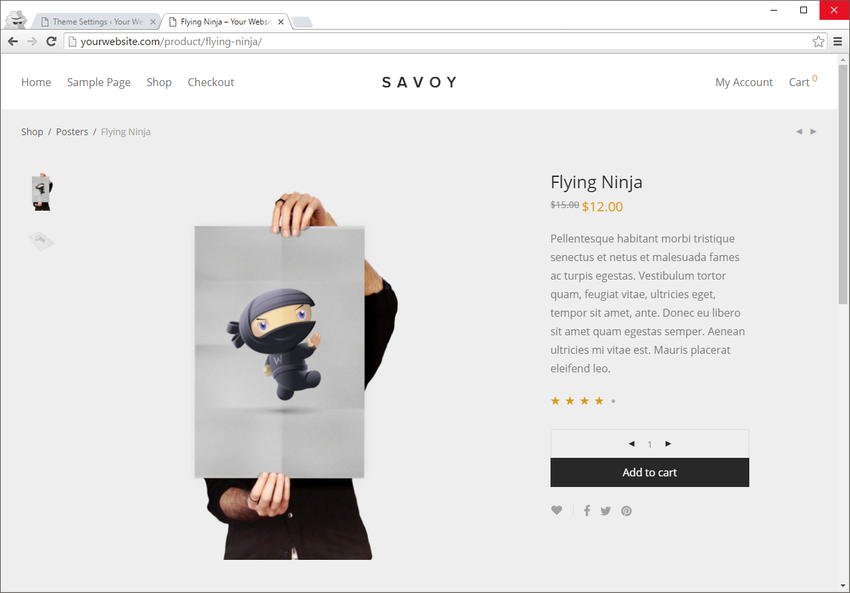
It even includes related products:
The Savoy - Minimalist AJAX WooCommerce Theme allows you to easily fine-tune many elements within your site and can go far behind anything I've covered in this tutorial (be sure to read through your theme's documentation to learn more about your theme specifically). I only showed you changes that could be made within the WordPress Customizer and can usually be made on just about any theme you might be using.
Conclusion
You can clearly see how easy these initial first steps in configuring your new WordPress WooCommerce theme can be and how good it looks—simply by using a WordPress theme designed specifically for WooCommerce.
There are many useful WordPress WooCommerce plugins available on CodeCanyon and some beautifully designed and effective WordPress WooCommerce themes on ThemeForest.
Looking at some of the best-selling ThemeForest WooCommerce themes might be a good place to start (Savoy is still my favorite). I am sure you'll find something that fits your eCommerce store perfectly. Or browse through our featured showcase to find just the right one for your store:
What are you using WooCommerce to sell?

Comments