Introduction
Back in the early days of Android, when good user interface frameworks were non-existent and most Android devices were underpowered, creating hybrid apps—apps developed using web technologies, such as HTML5, CSS, and JavaScript—was a really bad idea.
Compared to native apps, they looked markedly different and performed poorly. Those days, however, are long gone. Today, most mobile devices can run hybrid apps effortlessly and there are lots of frameworks that allow you to perfectly mock Android’s native look and feel. Therefore, if you are facing a short deadline or you are working on a small budget, going the hybrid way isn’t such a bad idea anymore.
In this tutorial, I will be showing you how to create a simple, hybrid to-do list app for Android. The interface of the app will conform to Google’s material design specification, the native look and feel of Android Lollipop and Marshmallow. To accomplish this, we’ll use Polymer, Polymer paper elements, and Apache Cordova.
Prerequisites
To follow along, you will need:
- the latest version of the Android SDK
- the latest version of Node.js
- an Android device or emulator running Android 5.0 or higher
- a basic understanding of HTML5, CSS, and JavaScript
If you are new to Cordova, then take a moment to read this introduction by Wernher-Bel Ancheta. This introduction should get you up to speed.
1. Why Use Polymer?
Polymer is a framework that lets you quickly create custom web components, Polymer elements. By using Polymer elements, you can make your web apps more modular and your code more reusable. Once created, an element can be used just like other HTML tags in HTML pages. For example, if you created a custom element called my-element, you can use it in any HTML page using the following code:
<my-element></my-element>
What’s more, by using the Polymer framework, you can leverage the data-binding features it provides to make your JavaScript code simpler and less error-prone.
2. What Are Polymer Paper Elements?
Paper elements are Polymer elements that were created by following the material design guidelines. They can be used as alternatives to the usual HTML elements. For example, if you want to add a material design button to your page, you can use a paper-button element. The code to do so looks like this:
<paper-button> Click Me! </paper-button>
Similarly, if you want to add a card or a floating action button, you can use the paper-card or paper-fab elements. I am sure you are beginning to understand the usefulness of Polymer and Paper elements now.
3. What Is Apache Cordova?
An app created using Polymer and Polymer elements is fundamentally just a collection of HTML, CSS, and JavaScript files. This means that it needs a browser to run. However, it can run inside a web view, a native user interface element that behaves like a chromeless browser.
Apache Cordova is a framework that lets you generate a native app containing a web view and specify the HTML pages you want it to display. In this tutorial, we’ll be using Apache Cordova to run the to-do list app on Android devices.
4. Web Project Setup
To speed up development and make debugging easier, most developers start building their hybrid apps as web apps. We’ll be doing the same. Let’s start by creating the to-do list app as an ordinary web project that can run in the browser.
Create a new directory for the project and name it todoWebApp.
mkdir ~/todoWebApp
To manage the dependencies of the project, we’ll be using Bower. If you don’t have Bower installed, then use npm to install it globally.
sudo npm install -g bower
Once Bower is installed, navigate to the project directory and use the bower command to install Polymer paper elements as well as the necessary dependencies.
cd ~/todoWebApp
bower install PolymerElements/paper-elements
This completes the web project setup.
5. Creating a Custom Polymer Element
Let’s now create a custom Polymer element containing code for both the layout and functionality of the to-do list web app. Start by creating a new file and name it tasks-list.html.
Step 1: Importing Paper Elements
Each paper element used in the layout of a custom element has to be imported individually. To build the interface of the web app, we’ll be using the following elements:
-
paper-toolbarto create the toolbar -
paper-buttonto create various buttons -
paper-fabto create a floating action button -
paper-listboxto create the list containing the tasks -
paper-itemto create the individual tasks inside the list -
paper-checkboxto create checkboxes the user can check to mark tasks as completed -
paper-icon-buttonto draw buttons having icons -
paper-inputto draw a text field the user can use to enter the name of the task -
paper-dialogto create a modal dialog -
iron-iconsto draw icons
Additionally, to use the data binding functionality provided by Polymer, we’ll have to import the Polymer framework itself. Add the following code to the file:
<link rel='import' href='bower_components/polymer/polymer.html'/>

<link rel='import' href='bower_components/paper-toolbar/paper-toolbar.html'/>
<link rel='import' href='bower_components/paper-button/paper-button.html'/>
<link rel='import' href='bower_components/paper-fab/paper-fab.html'/>
<link rel='import' href='bower_components/paper-listbox/paper-listbox.html'/>
<link rel='import' href='bower_components/paper-item/paper-item.html'/>
<link rel='import' href='bower_components/paper-checkbox/paper-checkbox.html'/>
<link rel='import' href='bower_components/paper-icon-button/paper-icon-button.html'/>
<link rel='import' href='bower_components/paper-input/paper-input.html'/>
<link rel='import' href='bower_components/paper-dialog/paper-dialog.html'/>
<link rel='import' href='bower_components/iron-icons/iron-icons.html'/>
Step 2: Creating the DOM
You can think of Polymer elements as HTML pages. Just like HTML pages, Polymer elements have their own DOM tree containing various tags for user interface elements, style tags for styling, and script tags for JavaScript code.
To create the DOM, we must use the dom-module tag and set its id attribute to the name of the element. Let’s call the custom element tasks-list. Note that the name must contain a hyphen.
<dom-module id='tasks-list'>

</dom-module>
Step 3: Creating the Layout
Creating a layout using Polymer elements is as simple as creating one using HTML elements, only the tags are different. However, you must make sure that all the layout details are inside a template tag.
Here’s the code you can add to the dom-module to create the layout of the to-do list app:
<template>
		<!-- Create a toolbar/actionbar -->
        <paper-toolbar>
            <div class="title"> My Tasks </div>
        </paper-toolbar>

        <div>
			<!-- Create a list of tasks -->
            <paper-listbox>
                <template is='dom-repeat' items='{{ tasks }}'>
					<!-- Create an individual task -->
                    <paper-item>
                        <paper-checkbox checked='{{ item.isComplete }}'
                            class='flex-11 taskBox' on-change='toggleTask'>
                                {{ item.taskName }}
                        </paper-checkbox>
                        <paper-icon-button
                            icon='delete'
                            class='flex-1'
                            style='color: gray'
                            on-click='deleteTask'>
                        </paper-icon-button>
                    </paper-item>
                </template>
            </paper-listbox>

			<!-- Create a floating action button -->
            <paper-fab icon='add'
                       style='position:absolute; bottom: 30px; right:24px'
                       on-click='showAddTaskDialog'>
            </paper-fab>

			<!-- Create a modal dialog -->
            <paper-dialog id='addTaskDialog' modal>
                <paper-input label='What do you have to do?' value='{{ latestTaskName }}'>
				</paper-input>
                <div class='buttons'>
                    <paper-button dialog-dismiss>Cancel</paper-button>
                    <paper-button on-click='addTask'>Add</paper-button>
                </div>
            </paper-dialog>
        </div>
</template>
That might seem like a lot of code, but if you are familiar with HTML and handlebars expressions, you’re going to find that it is fairly intuitive.
As you can see, Polymer element tags can be freely used alongside HTML tags and inline styles can be used to customize their looks.
Adding an event listener to a Polymer element tag is similar to adding one to an HTML tag. In the code above, we’ve used two types of event listeners, on-click listeners to detect buttons being clicked and on-change listeners to detect changes in the states of checkboxes.
You also may have noticed that, in addition to Polymer elements and HTML tags, we’ve used a dom-repeat helper template tag. If you haven’t guessed it already, it works like a for statement and can be used to loop through all the items of an array. In our layout, it’s being used to draw the individual tasks that belong to an array of tasks.
Step 4: Registering the Element
Before we can use the custom Polymer element in HTML pages, we must register it by using the Polymer function. This function expects a single JavaScript object that contains the functions and properties of the element. At the very least, the object must have an is property specifying the name of the custom element.
Add a script tag after the template tag and add the following code to it:
Polymer({
    is: 'tasks-list',
	// more code goes here
});
Step 5: Initializing the Element
In the layout of our element, we’ve used two properties inside handlebar expressions, tasks and latestTaskName. However, the element doesn’t have those properties yet. To add and initialize them, we must use the ready method. For now, we can simply initialize tasks to an empty array and latestTaskName to an empty string.
Add the following code after the is property:
ready: function() {
    this.tasks = [];
	this.latestTaskName = "";
},
Step 6: Storing, Updating, and Deleting Data
To permanently store the tasks the user adds to the to-do list, we’ll be using local storage through the localStorage object. Let’s now write some code to add a task to local storage.
The layout already contains a paper-dialog that has an input field in which the user can enter the name of a task. The dialog is closed by default, though, which is not what we want. In the on-click listener of the floating action button, call the open method of the dialog to open it.
showAddTaskDialog: function() {
    this.$.addTaskDialog.open();
},
Thanks to Polymer’s two-way data binding, anything the user enter into the dialog’s paper-input is available immediately in the latestTaskName property. Therefore, inside the on-click listener of the dialog’s Add button, we can simply add latestTaskName to localStorage using the setItem method.
localStorage stores data in the form of key-value pairs. To store the task, we will be using the name of the task as the key and whether it is completed or not as the value. Because localStorage only works with strings (booleans are currently not supported), we will be storing yes if the task has been completed and no otherwise.
Once the task has been added, we can close the dialog using its close method.
addTask: function() {
	// Store the new task as not completed
    localStorage.setItem(this.latestTaskName, 'no');

	// Reset latestTaskName
	this.latestTaskName="";

	// Close the dialog
    this.$.addTaskDialog.close();

	// Update the list of tasks
    this.updateTasks();
},
Similarly, when the user checks or unchecks the checkbox associated with a task, we can update the value stored in the localStorage object by invoking the setItem method. Because we used the dom-repeat helper template to draw the individual items of the paper-listbox, we can use the model object present in the on-change event to get the name of the task associated with the checkbox. Additionally, we need to convert the boolean value of the checkbox’s checked status to ‘yes’ or ‘no’ before storing it in localStorage.
toggleTask: function(e) {
	// Get the name of the task
    var taskName = e.model.item.taskName;

	// Convert true/false to yes/no
    if(e.model.item.isComplete)
        localStorage.setItem(taskName, 'yes');
    else
        localStorage.setItem(taskName, 'no');
},
If a user chooses to delete a task, they can click the paper-icon-button associated with the task. To delete the task permanently, call the removeItem method of the localStorage object in the on-click listener of the paper-icon-button.
deleteTask: function(e) {
    var taskName = e.model.item.taskName;
    localStorage.removeItem(taskName);

	// Update the list of tasks
    this.updateTasks();
},
Step 7: Displaying the Tasks
You may have noticed the calls to updateTasks in both the addTask and deleteTask methods. In the updateTasks method, we update the tasks array, the one we initialized in the ready method, to reflect the contents of the localStorage object. This is necessary, because the dom-repeat helper template, used to display the list of tasks, works only with an array.
In the tasks array, we use JSON objects to represent the tasks. Each JSON object has two fields, taskName and isComplete. taskName is a string containing the name of the task and isComplete is a boolean indicating whether the task is complete.
To allow Polymer to detect changes in the tasks array, instead of using the standard array functions, we must use the array manipulation methods present in the Polymer element. For now, we’ll be using the splice method to remove all elements from the array at once and the push method to add elements to the array.
The following code creates the updateTasks method, which loops through all the items in the localStorage object and adds them to the tasks array.
updateTasks: function() {
	// Empty the array
    this.splice('tasks', 0);

	// Add items from localStorage
    for(var taskName in localStorage) {
        var task = {
            taskName: taskName,
            isComplete: localStorage.getItem(taskName) == 'yes'
        };
        this.push('tasks', task);
    }
},
Right now, the tasks array gets updated only when the user adds or deletes a task. To display the tasks as soon as the app is opened, we must add a call to the updateTasks method inside the ready method.
Our custom Polymer element is ready to be used.
6. Using the Custom Polymer Element
Let’s now create an HTML page and add the custom element to it. Create a new file, name it index.html, and add the HTML head and body tags to it.
Before we use the element, we must add a link tag to import tasks-list.html. Additionally, to remove paddings and margins, and to use the flex layout, add the fullbleed, layout, and vertical CSS classes to the body tag. Because these CSS classes are defined by the iron-flex-layout element, we must add a link tag to import it.
With the above imports in place, we can add the tasks-list tag inside the body tag. Your file should now look like this:
<html>
    <head>
        <link rel="import" href="bower_components/iron-flex-layout/iron-flex-layout.html"/>
        <link rel="import" href="./tasks-list.html"/>
    </head>
    <body class="fullbleed layout vertical">

		<!-- Use the custom Polymer element -->
        <tasks-list></tasks-list>

    </body>
</html>
7. Running the App in the Browser
Our to-do list web app is ready. Because the Polymer framework needs an HTTP server to run, start one using Python’s SimpleHTTPServer module inside the project directory.
python -m SimpleHTTPServer
You can now visit http://localhost:8000/ to use your app.

8. Cordova Project Setup
Now that we’ve managed to successfully run the app in the browser, it’s time to convert it into an Android app by embedding it inside a Cordova project.
This means that we first need to install Cordova’s CLI (Command Line Interface) globally using npm:
sudo npm install -g cordova
To create a new Cordova project, we can use the cordova create command. As its arguments, it expects the name of the directory where the Cordova project should be created, the reverse domain name identifier of the app, and the name of the app.
To embed our web project inside the Cordova project, we also need to include a copy-from option and specify the location of the web project.
The following command creates a Cordova project for an app called To-do inside a directory called todo, and containing the web project located in todoWebApp:
cordova create todo com.tutsplus.code.hathi.todoapp "To-do" --copy-from=/home/me/todoWebApp
The Cordova project we just created doesn’t support any platform yet. To add support for the Android platform, navigate to the todo directory and use the cordova platform command.
cd todo
cordova platform add android
9. Running the Hybrid App
Without having to write a single line of code, our Cordova project is already ready to go. Let’s build it using the cordova build command. Before you proceed, make sure that the value of the ANDROID_HOME environment variable is set to the location of the Android SDK.
export ANDROID_HOME=/home/me/Android/Sdk/
cordova build android
If the build fails saying a file named web-animations.min.js.gz cannot be added to the APK, try deleting the file and building the project again.
rm -f ./www/bower_components/web-animations-js/web-animations.min.js.gz
cordova build android
Once the build succeeds, deploy the app to your Android device using the cordova run command.
cordova run android
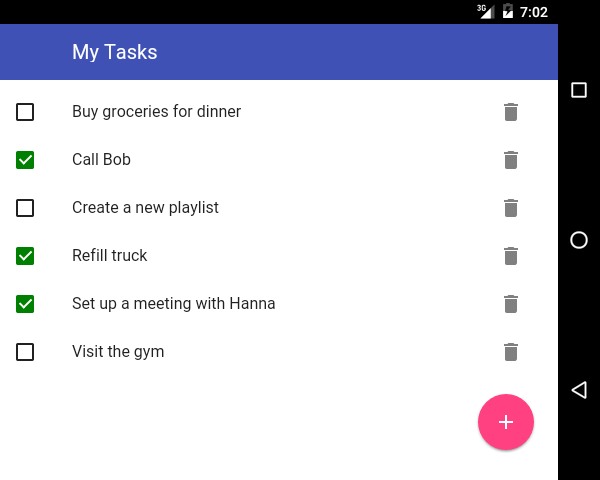
You should now be able to see the app running on your device.

Conclusion
In this tutorial, you learned how to use Polymer and Polymer paper elements to create a to-do list web app. You also learned how to embed the web app inside a Cordova project so that it runs as a hybrid app on Android devices. Even though we focused only on the Android platform, you can also run the app on an iOS device without any code changes. To make this work, you need to use the cordova platform command again to add support for the iOS platform.
To learn how to build more complex interfaces using Polymer, I’d like to refer you to the Polymer documentation.

Comments