Writing a nifty Chrome Extension honestly isn't as difficult as you might think. In this tutorial, I'm going to walk you through how I took an API offered by a great domain-name search service, Domai.nr, and created a Chrome extension for them, simply using their API.
Step 00: What We'll be Creating Today
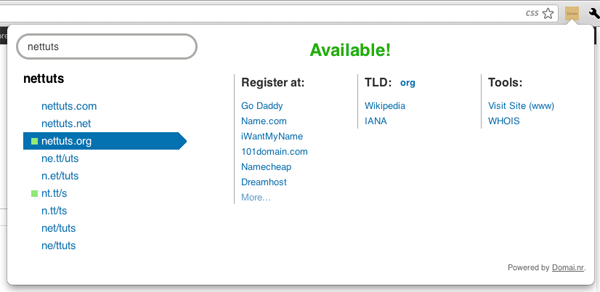
In this tutorial, I'll walk you through how I made the Domai.nr Chrome Extension, using simple HTML, CSS, and jQuery. The typical workflow of this extension can be broken down like so:
- Click the icon
- Search for a domain
- Find one that's available, and click it
- Purchase it using one of the links on the extension
So, it's not revolutionary or ground-breaking, but when you're looking for domains fairly frequently (as I'm sure many of you are), it does actually serve a purpose. I wanted to take this opportunity to not only show you how I made this specific extension, but also, more generally, how to make an extension for the Chrome web browser.
Step 01: What's in a Chrome Extension
There are a few different kinds of chrome extensions, but we'll be making a browser action extension that shows a popup when clicked. Google has a great overview of what is in each extension. Essentially, what you need to know is that each extension is a directory of files, much like a website. I'll be discussing more about each of these files later on in the tutorial, but every extension's directory contains the following files, and this is taken directly from Google:
- A
manifest.json file - One or more
HTML files(unless the extension is a theme) - Optional: One or more
Javascript files - Optional: Any other files your extension needs, i.e. image files
More on the JSON File
The manifest file provides mostly meta information about the extension. This is where you define things like the name, version, icon, and even permissions.
Step 02: Taking a Look at Domai.nr's API
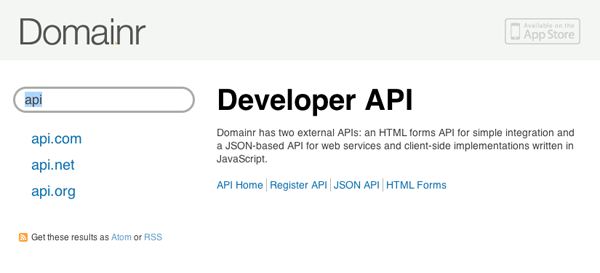
Domai.nr's API can be found here. We're using the JSON API, which has two methods: Search and Info. It's called the JSON API because, well, it returns JSON. Both methods respond to a GET request, so we can just concatenate whatever we need to in our request URL, and the rest will fall into place.
Step 03: Digging into the manifest.json File
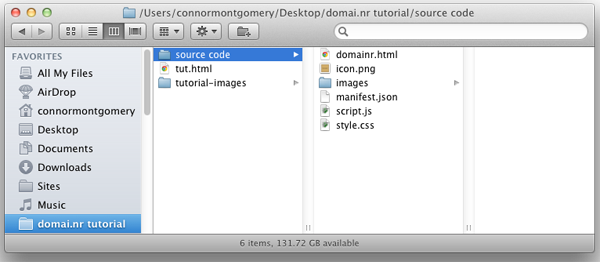
As you can see, a Chrome extension really isn't much more than a basic website. The structure we'll be using is as follows:
-
domainr.html- this is equivalent to theindex.htmlpage in most websites. I prefer to name the main HTML file the same as the extension itself - that's just a personal preference. -
icon.png- this128px by 128pxicon is what the user sees in the toolbar. When they click on this icon, it will fire our extension. -
images/- this directory holds all of the images we will be using, just like a traditional website. I contacted the creators of Domai.nr and got permission to use all of the images they have on their website, just scaled down. So, I just used Chrome's Web Inspector and downloaded copies of them, and scaled them accordingly. -
manifest.json- themanifest.jsonfile, like explained above, is where we define many properties about our extension. It's required, but is pretty simple to create. -
script.js- this JavaScript file is where all of our jQuery is held. We will reference it in thedomainr.htmlfile, and it will control all of the logic in our extension. -
style.css- finally, here is our stylesheet file. We'll obviously also reference this in thedomainr.htmlfile.
Our manifest.json File
Time to dig into our code and get started! Our manifest.json file is fairly simple. To see a more detailed summary of all of the fields supported in a manifest file, check this out. You can find all of the code used in our manifest.json file below:
{
  "name"            :  "Domai.nr Search",  // the name of the extension
  "version"         :  "1.0"   			   ,   // version number
  "description"     :  "Give your domains a happy ending.", // description used in the Chrome Webstore
  "browser_action"  :  {
      "default_icon"   :  "icon.png",      // specifies the default icon
      "popup"          :  "domainr.html"   // the page to show when the icon is clicked
  },
  "permissions": [
      "http://domai.nr",   // we give the extension permission to access data on these sites.
      "http://domai.nr/*"  // we suffix it with a *, so /api is accessible
  ]
}
As you can tell by the comments, it is fairly straightforward. The permissions section is extremely important in our case. Otherwise we'll get an XHR error because the extension can't access domains you don't give it permission to. Hence, the importance of the "permissions" section.
Step 04: Getting Started
For our extension, there will basically be three parts:
- The
<form>element, with an<input>, which is where the user types in the query they're looking for. This is what this step of the tutorial will focus on. - A
<ul>with several<li>elements inside of it, that gets populated based on their request in part 1. - Information regarding the option they select, based on the list items presented to them in part 2.
So, I think it's fair to say that the extension gains complexity as the user progresses through those parts, or stages described above. With that being said, let's dig into the HTML I used to structure this.
<!DOCTYPE html>
<html lang="en">
  <head>
      <meta charset="utf-8">
      <title>Domai.nr Chrome Extension</title>
      <link rel="stylesheet" href="style.css" />
  </head>
  <body id="container">
    <div id="left">
      <form>
      <div class="input-wrapper">
        <input type="text" id="query" />
        <img id="loader" src="images/loading.gif" />
      </div>
        <input type="submit" id="button" value="Search" alt="Loading" />
    </form>
    <!-- rest of the code will follow this -->
  </body>
  <script src="https://ajax.googleapis.com/ajax/libs/jquery/1.6.2/jquery.min.js"></script>
  <script src="script.js"></script>
</html>
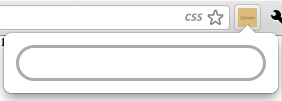
Alright - that's it, as far as getting the input from the user is concerned (well, on the HTML side, at least). To be a bit more descriptive, that code is what the user will see when they click on the icon to trigger the extension. It's just an input box that we'll style to look like domai.nr's site has it. You'll notice that I merely have a <form> element - no method or action has been defined. I didn't need to use those, as jQuery's $.getJson method takes care of that for us. This would be a great time to test out the extension, wouldn't it?
How to Test Local Extensions
To test an extension in development that is on your local machine, simply follow these steps, and then you'll be up and running with it in no time:
- Click
Windowand selectExtensions. - On the right, towards the top of the page, you'll see a link that toggles the
Developer Mode. Click that. - Select
Load unpacked extension..., and navigate to the directory the extension is in. Select that directory, and that's all!
You'll want to keep the extensions page up in a tab, though, because every time you make a change to the extension and want to test it, you'll need to click "Reload" in the extensions page for that specific one.
We've got it installed locally, but let's be honest – it's looking pretty hideous. Let's pretty it up so the Domai.nr guys would be proud to have an extension like this. You'll want to download the images I use here, and place them in an /images directory inside of your extension folder, because I reference some of them eventually in the CSS (and in the HTML above, too).
body{overflow-x:hidden;font: normal 14px/18px helvetica, arial, sans-serif; color: #414240;}
  .input-wrapper{overflow: hidden; display: block; position: relative;}
    #query{height: 19px; float:left; display: inline-block; border: 3px solid #A9ADA8; width:220px; padding: 6px 12px 5px 12px; font: normal 14px/18px helvetica, arial, sans-serif; color: #414240; text-rendering: optimizeLegibility; -webkit-font-smoothing: antialiased; border-radius: 18px; }
    #query:focus{outline: none;}
    #loader{width:16px; height:16px; position: absolute; right:18px; top: 10px; visibility: hidden;}
  #button{display: none;}
Okay - we've got the first part all coded up and looking good. In the next section, we'll focus on taking the user's query and pulling some data from Domai.nr's API.
Step 05: Show the User Some Domains!
In this section, we'll take what the user typed in the <input>, and query it against Domai.nr's API. Based on those results, we'll display a list of all the results returned, as well as an icon indicating the status of that domain. So, let's jump right in!
Before we get into some of the jQuery behind the extension, I think this would be a good time to bring up how to inspect an extension, just like a regular website. Instead of right-clicking somewhere on the page and selecting "Inspect Element", you'll simply right-click on the extension, and select "Inspect popup". That's all there is to it!
This section is a bit more interactive, so it's the starting point for our Javascript. I'll be using jQuery for simplicity's sake.
$(document).ready(function(){
  $("#query").focus();  // focuses the input when the extension is triggered
  var url     = "http://domai.nr/api/json/search?q=",  // base URL for search request
      infoURL = "http://domai.nr/api/json/info?q=",    // base URL for info request
      query;  // will use this later
  $("form").submit(function(){
    if ($("#query").val() != ""){
      // execute the code below if the user typed something in...
      $("body").width(250);
      $("#loader").css("visibility", "visible");
      $("#results-list li").remove();  // removes any previous results, if there are any...
      $("#search-query").remove();  // more on this in a few lines...
      $(".extension a").remove();
      $("#results-info").hide();  // hides the larger panel if it's shown...
      query = $("#query").val();
      // ... code below ...
In the chunk above, we do a number of things:
- First, we focus the input box by default
- Next, we set some variables (as per the Domai.nr API)
- Then, on the form submit, we do the following:
- Check to make sure the query is not blank
- Assuming that passes, we then set the body width, and show an AJAX loader icon
- We then clear out the previous (if there is one) list of domains, and remove the previous search query from the view
- Finally, we remove some information that we'll get to more below
So, it's a good start. Some of the code above won't make sense because it's not in our HTML yet. It will be shortly, just go with it for now.
// ... code above ...
$.getJSON(url + query, null, function(json){
$('<p id="search-query">' + json.query + '</p>').insertBefore("#results");
$.each(json.results, function(i, result){
if (result.availability === "available")
$("#results-list").append('<li class="available"><a href="#"><span class="bg"> </span><span class="domain">' + result.domain + '</span><span class="path">' + result.path + '</span></a><img class="loader-sub" src="images/loading-blue.gif" style="visibility:hidden;" /></li>');
else if (result.availability === "maybe")
$("#results-list").append('<li class="maybe"><a href="#"><span class="bg"> </span><span class="domain">' + result.domain + '</span><span class="path">' + result.path + '</span></a><img class="loader-sub" src="images/loading-blue.gif" style="visibility:hidden;" /></li>');
else
$("#results-list").append('<li class="nothing"><a href="#"><span class="bg"> </span><span class="domain">' + result.domain + '</span><span class="path">' + result.path + '</span></a><img class="loader-sub" src="images/loading-blue.gif" style="visibility:hidden;" /></li>');
}); // end $.each
$("#loader").css('visibility', 'hidden');
}); // end $.getJSON
$(this).find('#query').focus();
return false;
} else {
// will describe these later...
$(".extension a").first().remove();
$(".registrars ul li").remove();
$("body").width(250);
}
}); // end of .submit
// ...and more to come in the next section!
});
That section above, while only a few dozen lines, gets quite a bit done:
- We utilize jQuery's getJSON method, and use it against the Domai.nr's API.
- Within that function, we simply iterate over all of the results it returns.
- On each result, we check its availability status, and return the correct <li> based on that conditional.
- Once we've gone through all of the results, we hide the AJAX loader.
- That else statement in there – that's used when the query is blank. It just resets a few things that may not be blank, or may need to be reset to their default state.
And we're not quite ready to test it just yet. You'll see that in the jQuery code above, we're targeting a list element with an id of results-list that's not yet in the DOM. So, let's go ahead and add that just after the <form> element in domainr.html.
<!-- other code above -->
  <div id="results">
    <ul id="results-list">
      <!-- this gets populated -->
    </ul>
  </div>
</div> <!-- end #left -->
And now it's time to test. Don't get your hopes up though, becase it's going to look pretty ugly...
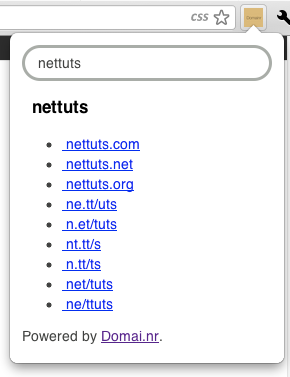
Assuming all's well, you should now see a list of all the domains related to a query the user types in (like above). While it is indeed pretty ugly-looking, we have our extension now correctly hooked into the Domai.nr API's search method, and are retreiving the results correctly. Congrats!
Before we move on to the final section of the tutorial, though, we've got some cleaning up to do. We need to display the icon that shows whether the domain is available, maybe available, or taken, and also just clean up the look of the list. Some simple CSS will take care of that with no problem.
ul{display: block; clear:both; margin:0; padding:0;}
  ul li{font-size:15px; color:#333333; display: block; width:100%; line-height:24px; margin-left:10px; width:100%; position:relative;}
  ul li .bg{width:15px; height:15px; display: block; float:left;}
  ul .available .bg{background: url("images/available.png")  0 7px no-repeat; width: 15px; height:19px; display: block; float:left; margin-left:10px;}
  ul .nothing .bg{width: 15px; height:19px; display: block; float:left; margin-left:10px;}
  ul .maybe .bg{background: url("images/maybe.png") 0 7px no-repeat; width: 15px; height:19px; display: block; float: left; margin-left:10px;}
    ul li a{color:#2870B0; text-decoration: none; width:100%; display: block;}
    .loader-sub{position:absolute; right: 38px; top:4px;}
    ul li a:hover{background: url("images/grey.png") no-repeat left top; cursor: pointer;}
    #results-info a:hover{background: none; text-decoration: underline; cursor: pointer;}
    #results-info h3{margin-top: 11px; text-align: center; display: block; width: 340px;}
      #results-info .available{color:#23B000 !important; text-shadow: rgba(100%, 100%, 100%, 1.0) 0 1px 2px; font-size: 24px;}
    ul li a.active{background: url("images/blue.png") no-repeat left top; color:#ffffff;}
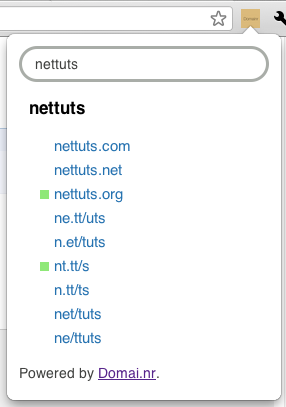
Great - now it's looking all nice and clean – just like the real Domai.nr site! Finally, it's time to get to the good stuff.
Step 06: They've Selected a Domain
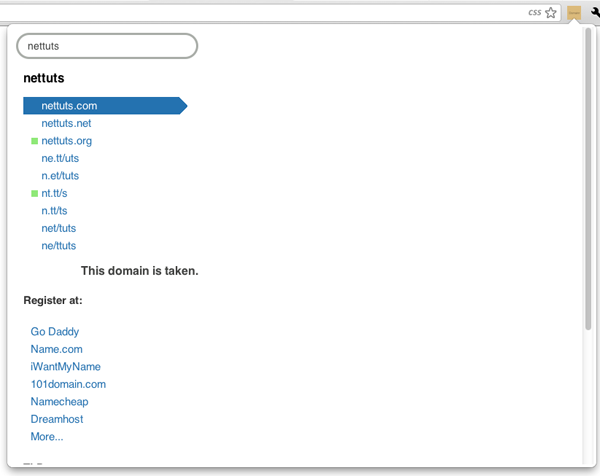
This last section changes the extension's UI the most, but if we break it down into steps, it really isn't too bad at all.
Okay - let's think this through. First, when the user clicks on a doamain, we want the popup to get wider, and display information regarding that specific domain. No problem at all. However, we'll need to add a bit more structure to our code to get it just right.
<div id="results-info">
  <p id="availability"><!-- Text depends on whether the domain is available or not --></p>
  <div class="register-stuff">
    <ul class="sections">
      <li class="registrars">
        <h4>Register at:</h4>
        <ul>
          <!-- populated with all of the available registrars -->
        </ul>
      </li>


      <li class="tld">
        <h4>
            TLD:<span class="extension"></span>
        </h4>
        <ul>
          <!-- the hrefs here are generated dynamically by the jQuery -->
          <li><a href="#" target="_blank" id="wikipedia">Wikipedia</a></li>
          <li><a href="#" target="_blank" title="Internet Assigned Numbers Authority" id="iana">IANA</a></li>
        </ul>
      </li>


      <li class="right">
        <h4>Tools:</h4>
        <ul>
          <!-- like above, the links here are generated dynamically -->
          <li class="www"><a href="#" target="_blank" rel="nofollow" data-track-event="Clicked WWW Link">Visit Site (www)</a></li>
          <li class="whois last"><a href="#" target="_blank" rel="nofollow" data-track-event="Clicked WHOIS Link">WHOIS</a></li>
        </ul>
      </li>
    </ul>
  </div>
</div>

<div id="footer">
  <p>Powered by <a href="http://www.domai.nr" target="_blank" alt="Domai.nr">Domai.nr</a>.</p>
</div>
So, the comments should be explanatory enough for that HTML structure, however, we won't really notice much until we give our extension some more interactivity. Now that we've got the structure down, let's go ahead and do that by adding some jQuery.
$("#results-list a").live('click', function(){ // 'live' is required, because the elements populate the DOM after the user searches for something; not onLoad.
$(this).siblings('.loader-sub').css('visibility', 'visible'); // hide the secondary loader
$(".extension a").first().remove(); // remove the previous extension (link next to 'TLD').
$(".registrars ul li").remove(); // hide the previous egistrar's <li> elements.
$.getJSON(infoURL + $(this).find('.domain').text(), null, function(json){ // ...do some JSON magic again.
// the $.getJSON line above searches for the currently selected domain
$("#wikipedia").attr('href', (json.tld['wikipedia_url'])); // adds the correct wikipedia link
$("#iana").attr('href', (json.tld['iana_url'])); // adds the correct iana link
$(".whois a").attr('href', (json.whois_url)); // adds the correct whois link
$(".www a").attr('href', 'http://' + (json.domain)); // adds the correct URL
$(".extension").append('<a href="http://www.domai.nr/' + (json.domain.split('.')[1]) + '" target="_blank">' + (json.domain.split('.')[1]) + '</a>').show(); // this line adds the correct domain extension to be next to the "TLD" part.
$('.loader-sub').css('visibility', 'hidden'); // hide the domain-specific loader, because all of the information has been loaded.
// and the code below goes here...
That code above loaded in all of the information we need for the Wikipedia URL, IANA URL, Whois information, site link, and extension information. Below, we'll look into how I loaded the registrar information, among other things!
    // the code above...

    if (json.registrars.length < 1){  // if there are no registrars available
      $(".registrars ul").append('<li>(not available)</li>');
      $("#availability h3").text('Not Available. :(');  // sad face.
    }

    else { // there are registrars available
       for (var i = 0; i <= 5; i++){ // load the first five
           $(".registrars ul").append('<li><a href="' + json.registrars[i].register_url + '" target="_blank">' + json.registrars[i].name + '</a></li>');
       }

       // show the "More..." link
       $(".registrars ul").append("<li><a href='#' id='load-more'>More...</a></li>");
    }

     // when the user clicks on "more"...
     $("#load-more").click(function(){
       $(this).remove();
       for (var i = 6; i <= json.registrars.length - 1; i++){
         $(".registrars ul").append('<li><a href="' + json.registrars[i].register_url + '" target="_blank">' + json.registrars[i].name + '</a></li>');
       }
     });
     return false;
   });


   $('body').width(800);  // make the dropdown bigger.
   $('#results-list a').removeClass('active');  // remove the siblings' possibility of being .active
   $(this).addClass('active');  // give the clicked item .active
   $("#results-info").show();   // show the cool results stuff
   if ($(this).parent().hasClass('available')){  // ...and some conditionals, based on availability
     $("#availability").html("<h3 class='available'>Available!</h3>");
   } else if ($(this).parent().hasClass('maybe')){
     $("#availability").html("<h3 class='possibly'>Possibly Available</h3>");
   } else {
     $("#availability").html("<h3 class='taken'>This domain is <span>taken</span>.</h3>");
   }

   // populate the Register at link
   $("#results-info").show();
   return false;  // don't link to anything in the dropdown list
 });
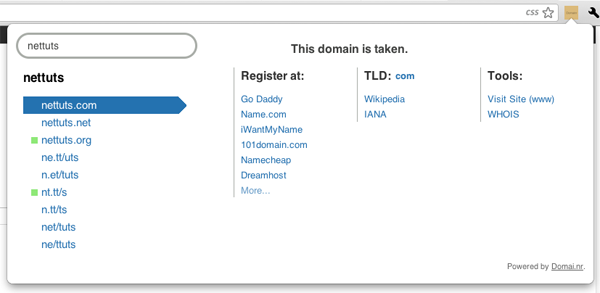
Fantastic! The information is now loading, but it's looking pretty messed up. No worries, just add the following CSS to make it look all pretty and bring an end to today's exercise.
#left{float:left; width:250px; padding-bottom: 10px;}
  #results-info{float:right; width:510px; display: none;}
    .register-stuff{overflow: hidden;}
    .right{float:right;}
    .extension{float:right; font-size:13px; margin-right: 70px;}
    #load-more{color:#6C9DC9; font-size:12px; line-height: 18px;}
    abbr{float:left;}
    #results-info h4{margin-bottom: 9px; font-size: 16px; font-weight: bold; vertical-align: top; margin-top: 0;}
    #results-info .sections > li{position: relative; float: left; width: 140px; border-left: 1px solid #A9ADA8; padding-left: 9px; margin-right: 10px;}
      #results-info .sections li ul li{margin-left:0; line-height: 20px;}
        #results-info .sections li ul li a{font-size:13px; display: inline;}
  #footer{overflow: hidden; font-size: 11px; color: #666; height:20px; clear:both; margin-right:15px;}
    #footer p{margin:0; padding:0; text-align:right;}
      #footer p a{color:#666;}
      #footer p a:hover{color:#333333;}
All Done!
And there you have it! Congratulations, you just made a nifty Chrome extension using a great service's API! I built this out while I was in an airport waiting for a layover; that helps to prove how simple and quick making one of these can be. Honestly, a Chrome extension is no more difficult than a regular web page. If you have any questions at all, please leave them in the comments below!

Comments