Google Cloud Storage (GCS) is a very simple and powerful object storage offering from Google as a part of its Google Cloud Platform (GCP). It provides a highly durable, scalable, consistent and available storage solution to developers and is the same technology that Google uses to power its own object storage.
It is billable with a pay for what you use model, and GCP comes with a 60-day trial period, so it is free to try out to see if it fits the needs of your organization. GCS has different service levels (also called storage classes) which can be chosen as needed (detailed discussion on these is out of the scope of this tutorial). GCS can be used for a variety of purposes, such as serving static/dynamic website content, storing user-specific application files, disaster recovery, or making large data objects downloadable to users.
Those who have worked on GCP will know that everything in GCP revolves around projects. Each project can have many buckets around which the architecture of Google Cloud Storage is structured. Buckets are the basic containers on GCS that contain the data stored. These are used as basic blocks to organize your data and look like folders on an operating system, but they cannot be nested.
Each bucket can contain any number of objects, which can be folders and/or files. A bucket is assigned a storage class and geographic location when being created. These settings can be specified while creating the bucket but cannot be changed later.
Buckets have specific naming conventions which need to be followed strictly, otherwise GCP will not allow you to create a bucket. Bucket names are globally unique, so they need to chosen in a way that prevents conflicts. However, a name used by a deleted bucket can be reused.
Also, the name cannot be changed once it's been assigned to a bucket. The only solution if you want to change it is to create a new bucket with the desired name, move the contents from the previous bucket to the new one, and then delete the previous bucket.
In this tutorial, I will cover how to manage buckets from the Google Cloud Console. This is followed by a Python script where I will demonstrate performing the same operations programmatically.
Using Google Cloud Console
First, let's see how to manage buckets using the web user interface provided by GCP known as Google Cloud Console.
Open Storage Browser in a web browser of your choice. If you are a first-time user, you will be prompted to create a project first. Also, an option will be shown to sign up for a free trial. Go ahead with the free trial signup, otherwise you will not be allowed to create a new bucket by yourself. By default, GCP only provides one free bucket per App Engine instance.
Once done with all these formal processes, navigating to this page should open up the page shown below.

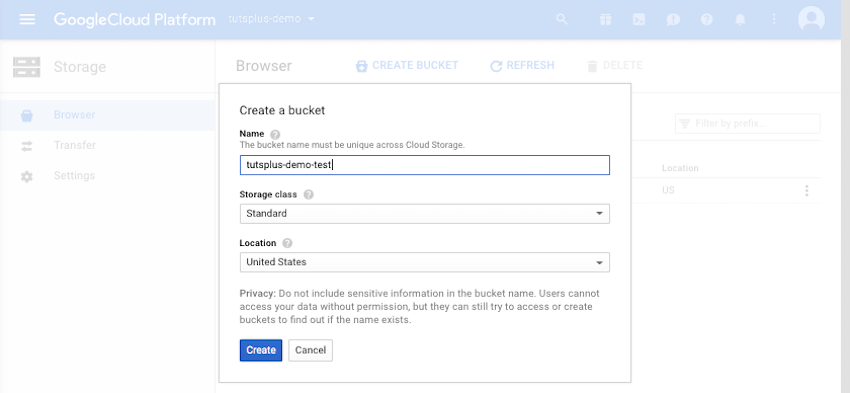
To create a new bucket, click on the Create Bucket button highlighted above. Create a bucket by filling in a desired name as shown below. The name should follow the bucket naming conventions.
After you've created a bucket, the GCS browser will list it. Buckets can be deleted by selecting them from the list and clicking on the delete button.
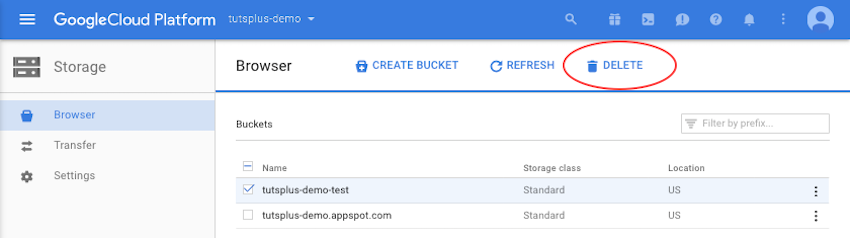
Clicking on the refresh button will populate the UI with any changes to the list of buckets without refreshing the whole page.
Managing Buckets Programmatically
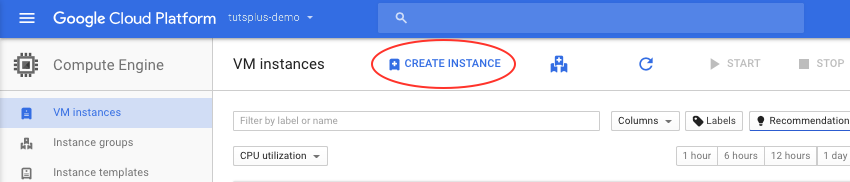
First, let's create a Google Compute Engine instance as that will allow quick demonstration of the targeted concepts rather than dealing with extra authentication steps on local machines. To create a GCE instance, open the link and click on the Create Instance button as shown below.
A form will come up asking for relevant details, which can be filled in at your convenience. Once the GCE instance is created, open up the SSH client as shown below, which by default opens in a new browser window.

The SSH client screen will look something like as shown below. All the further operations in this tutorial will be done directly on the SSH client itself.

Writing a Python Script
Below are the commands you need to run to set up the newly created server for a Python development environment.
$ sudo apt-get update
$ sudo apt-get install python-dev python-setuptools
$ sudo easy_install pip
Below is the dependency that needs to be installed for writing this script.
$ sudo pip install google-api-python-client
On production systems, it is not advisable to install libraries using "sudo". Please follow Python virtualenv best practices for this.
gcs_bucket.py
import sys
from pprint import pprint

from googleapiclient import discovery
from googleapiclient import http
from oauth2client.client import GoogleCredentials


def create_service():
    credentials = GoogleCredentials.get_application_default()
    return discovery.build('storage', 'v1', credentials=credentials)


def list_buckets(project):
    service = create_service()
    res = service.buckets().list(project=project).execute()
    pprint(res)


def create_bucket(project, bucket_name):
    service = create_service()
    res = service.buckets().insert(
        project=project, body={
            "name": bucket_name
        }
    ).execute()
    pprint(res)


def delete_bucket(bucket_name):
    service = create_service()
    res = service.buckets().delete(bucket=bucket_name).execute()
    pprint(res)


def get_bucket(bucket_name):
    service = create_service()
    res = service.buckets().get(bucket=bucket_name).execute()
    pprint(res)


def print_help():
        print """Usage: python gcs_bucket.py <command>
Command can be:
    help: Prints this help
    list: Lists all the buckets in specified project
    create: Create the provided bucket name in specified project
    delete: Delete the provided bucket name
    get: Get details of the provided bucket name
"""


if __name__ == "__main__":
    if len(sys.argv) < 2 or sys.argv[1] == "help" or \
        sys.argv[1] not in ['list', 'create', 'delete', 'get']:
        print_help()
        sys.exit()
    if sys.argv[1] == 'list':
        if len(sys.argv) == 3:
            list_buckets(sys.argv[2])
            sys.exit()
        else:
            print_help()
            sys.exit()
    if sys.argv[1] == 'create':
        if len(sys.argv) == 4:
            create_bucket(sys.argv[2], sys.argv[3])
            sys.exit()
        else:
            print_help()
            sys.exit()
    if sys.argv[1] == 'delete':
        if len(sys.argv) == 3:
            delete_bucket(sys.argv[2])
            sys.exit()
        else:
            print_help()
            sys.exit()
    if sys.argv[1] == 'get':
        if len(sys.argv) == 3:
            get_bucket(sys.argv[2])
            sys.exit()
        else:
            print_help()
            sys.exit()
The above Python script demonstrates the major operations that can be performed on a bucket. These include:
- creation of a new bucket in a project
- listing of all buckets in a project
- getting details of a specific bucket
- deleting a specific bucket
Let's see what these operations look like when the script is run.
$ python gcs_bucket.py
Usage: python gcs_bucket.py <command>
Command can be:
    help: Prints this help
    list: Lists all the buckets in specified project
    create: Create the provided bucket name in specified project
    delete: Delete the provided bucket name
    get: Get details of the provided bucket name

$ python gcs_bucket.py list tutsplus-demo
{u'items': [{u'etag': u'CAE=',
             u'id': u'tutsplus-demo.appspot.com',
             u'kind': u'storage#bucket',
             u'location': u'US',
             u'metageneration': u'1',
             u'name': u'tutsplus-demo.appspot.com',
             u'projectNumber': u'1234567890',
             u'selfLink': u'https://www.googleapis.com/storage/v1/b/tutsplus-demo.appspot.com',
             u'storageClass': u'STANDARD',
             u'timeCreated': u'2016-10-05T15:30:52.237Z',
             u'updated': u'2016-10-05T15:30:52.237Z'}],
 u'kind': u'storage#buckets'}

 $ python gcs_bucket.py create tutsplus-demo tutsplus-demo-test
{u'etag': u'CAE=',
 u'id': u'tutsplus-demo-test',
 u'kind': u'storage#bucket',
 u'location': u'US',
 u'metageneration': u'1',
 u'name': u'tutsplus-demo-test',
 u'projectNumber': u'1234567890',
 u'selfLink': u'https://www.googleapis.com/storage/v1/b/tutsplus-demo-test',
 u'storageClass': u'STANDARD',
 u'timeCreated': u'2016-10-07T05:55:29.638Z',
 u'updated': u'2016-10-07T05:55:29.638Z'}

 $ python gcs_bucket.py get tutsplus-demo-test
{u'etag': u'CAE=',
 u'id': u'tutsplus-demo-test',
 u'kind': u'storage#bucket',
 u'location': u'US',
 u'metageneration': u'1',
 u'name': u'tutsplus-demo-test',
 u'projectNumber': u'1234567890',
 u'selfLink': u'https://www.googleapis.com/storage/v1/b/tutsplus-demo-test',
 u'storageClass': u'STANDARD',
 u'timeCreated': u'2016-10-07T05:55:29.638Z',
 u'updated': u'2016-10-07T05:55:29.638Z'}

 $ python gcs_bucket.py delete tutsplus-demo-test
''
Conclusion
In this tutorial, you saw how to manage buckets on Google Cloud Storage. This was also accompanied by a small introduction to creating a Google Compute Engine instance and using it via an SSH client.
In the next tutorial, I will cover how to manage objects, i.e. folders and files inside a bucket.

Comments