Introduction
With the basics of C still fresh in your memory, it is time to become familiar with Objective-C. The key difference with C is that Objective-C is an object oriented programming language, whereas C is a procedural programming language. This means that we first need to understand objects and how they relate to classes. Other key concepts that we will explore in this article are object messaging, encapsulation, and inheritance.
The Origins of Objective-C
Objective-C and Cocoa are two key components of the iOS platform. Despite the fact that the iOS platform is still relatively young, Objective-C was created in the early 1980's at StepStone by Brad Cox and Tom Love. The language was created in an effort to combine the robust and agile C programming language with the elegant Smalltalk language. Objective-C is a strict superset of C and, in contrast to C, it is a high level programming language. The key difference between C and Objective-C is that the latter is an object oriented programming language, whereas C is a procedural programming language.
How did iOS end up using a language that was developed in the 1980's? Shortly after NeXT was founded by Steve Jobs, it licensed Objective-C from StepStone. NeXT created NeXTSTEP, a user interface toolkit for the NeXT operating system developed in Objective-C. Even though NeXTSTEP provided a revolutionary set of tools, the NeXT operating system gained only little traction in the market. In 1996, Apple acquired NeXT and NeXTSTEP became Cocoa. The latter went mainstream with the introduction of OS X in March 2001 and later with the release of the iPhone and the iOS operating system.
Object Oriented Programming
In procedural programming, a program consists of a series of procedures or routines that are executed to reach a particular state. In object oriented programming, however, a collection of objects interact and work together to complete a task. Even though the end result can be identical, the methodology and underlying paradigms are substantially different. Modularity and code reusability are two of the primary advantages of object oriented programming languages as we will soon see.
Objective-C, Cocoa, and Cocoa Touch
Developers new to the iOS and OS X ecosystems often get confused by the relationship between Objective-C, Cocoa (OS X), and Cocoa Touch (iOS). What is Cocoa Touch and how does it relate to Objective-C? Cocoa is Apple's native application programming interface (API) for the iOS and OS X platforms. Objective-C is the language that powers Cocoa. While this article focuses primarily on the Objective-C programming language, we will take a closer look at the Cocoa and Cocoa Touch API's later in this series.
Classes, Objects, and Instances
Another stumbling block for developers new to object oriented programming is the distinction between classes, objects, and instances. A class is a cast or blueprint for creating objects, whereas instances are unique occurrences of a class. An object is a data structure that has a state and behavior. In spite of the subtle difference between objects and instances, both terms are often used interchangeably.
Let's take a look at an example: toasters. Before a toaster is manufactured, engineers create a blueprint, which is the equivalent of a class. Each toaster created from the blueprint is an instance or a unique occurrence of the class. Even though each toaster is created from the same blueprint (class), they each have their own state (color, number of slots, etc.) and behavior.
Instance Variables and Encapsulation
The state of an instance is stored in and defined by its instance variables, or the object's attributes if you will. This brings us to another key pattern of object oriented programming: encapsulation. Encapsulation means that the internal representation of an object is private and only known to the object itself. This might seem like a severe restriction at first glance. However, the result is modular and loosely coupled code.
Let's illustrate encapsulation with another example. The speed of a car is measured by the car's internals, yet the driver knows the speed of the car by looking at the speedometer. The driver doesn't need to know about or understand the car's internals to know the speed of the car. Similarly, the car's driver doesn't need to understand how engines work to be able to drive the car. The details of how a car works are hidden from the driver. The state and behavior of the car is hidden from the driver and is accessible through the car's interface (steering wheel, brake pedal, dashboard, etc.).
Inheritance
Another powerful paradigm of object oriented programming is class inheritance. When class A is a subclass of class B, class A inherits the attributes and behavior of class B. Class B is said to be the parent class or superclass of class A. Inheritance also promotes code reusability and modularity.
Methods and Properties
Methods are subroutines associated with a class and they define the behavior of a class and its instances. The methods of a class have access to the internals of an instance and can thereby modify the state of the instance. In other words, the state of an instance (i.e. the instance variables) is controlled by the methods of an instance (i.e. the instance methods).
Due to the encapsulation pattern, the instance variables of a class instance cannot be accessed freely. Instead, they are accessed through getters and setters, methods with the sole purpose of getting and setting instance variables. Properties are a feature of Objective-C that make the creation of accessors (getters and setters) trivial. Despite the usefulness of accessors, it quickly becomes cumbersome to write accessor methods for every instance variable. We will explore properties in more detail later in this article. For now, consider properties as wrappers around instance variables that make it easier to work with instance variables through getters and setters.
Learning by Example
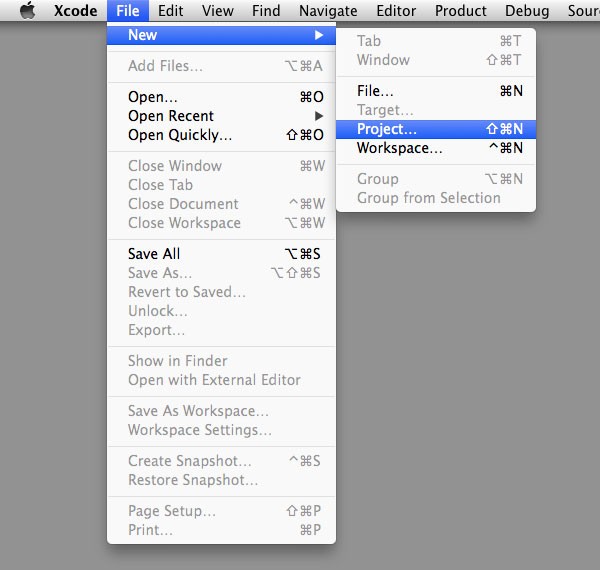
Let's put our knowledge into practice by creating a new Xcode project to work with. Create a new project in Xcode by selecting New > Project... from the File menu.
As we did in the previous article, select the Command Line Tool project template in the Application category under the OS X section.

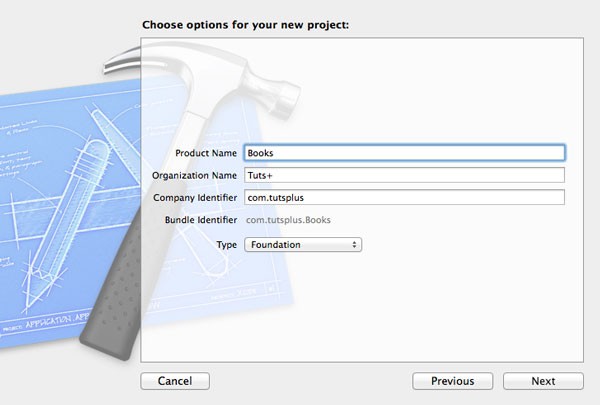
Set the Product Name to Books and give the project an organization name and company identifier. For this project, it is important to set the project type to Foundation. The reason behind this choice will become clear later in this article.
Tell Xcode where you want to save the project and click the Create button. You may notice that the project looks different than the project we created for learning C. Let's take a moment to see what the differences are.
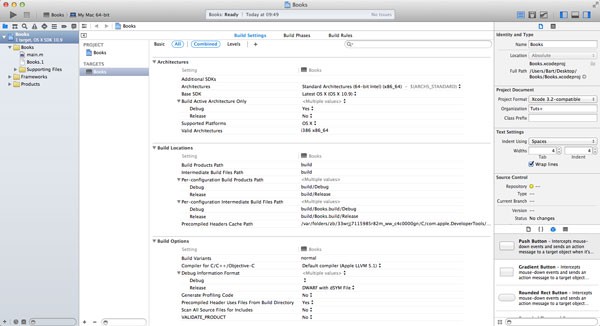
Project Overview
The project contains a few more files and folders than the command line tool we created in the previous article. In addition to main.m and Books.1, there are two new folders, Supporting Files and Frameworks, each containing one item.
Supporting Files contains a file named Books-Prefix.pch. The .pch file extension tells us that this is a precompiled header file. Its purpose will become clear later in this series.
The Frameworks folder contains the frameworks that the project is linked against. What is a framework? A framework is a bundle or directory that contains a library including its resources, such as images and header files. The concept of a header file will become clear in just a minute. The Frameworks folder currently contains one item, Foundation.framework.
While creating the project, you set the project type to Foundation, which means that the project is linked against the Foundation framework. The Foundation framework is a fundamental set of Objective-C classes. Later in this series, we will take a closer look at the Foundation framework.
Create a Class
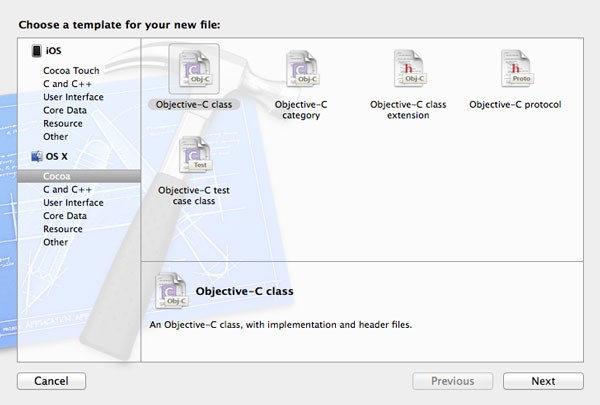
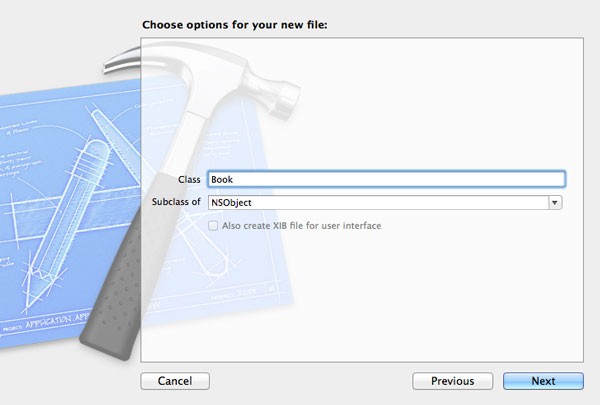
It is time to create your first class. Whenever you create a new file (File > New > File...), you are presented with a list of file templates. Choose Cocoa from the OS X section and select the Objective-C class template to create a new Objective-C class. Click Next to continue.
Give the new class a name of Book and set its subclass to NSObject. As we saw earlier, by making the new class a subclass of NSObject, the new class will inherit the attributes and behavior of NSObject. This means that the new Book class gets some functionality for free.
Click Next to continue and tell Xcode where you want to save the new class. Make sure to save the new class somewhere in your Xcode project.
Xcode has added two new files to the project, Book.h and Book.m. Book.h is the header file of the Book class and exposes the class interface as we saw earlier. A class interface contains the properties and methods of the class, and it also specifies the class's superclass. Book.m is the implementation file of the class and defines its behavior by implementing the methods declared in class header file.
Header File
Open Book.h and explore its contents. Apart from some comments at the top, the header file contains only three lines of code. The first line imports the header file of the Foundation framework. This ensures that the Book class has access to the classes and protocols declared in the Foundation framework.
#import <Foundation/Foundation.h>
The second and third line form a pair. In Objective-C, every class interface begins with @interface and ends with @end, which are both compiler directives, that is, commands or instructions for the compiler. The @interface directive is followed by the name of the class, a colon, and the class's superclass—if applicable. As we saw earlier, the parent class or superclass is the class from which it inherits attributes and behavior.
@interface Book : NSObject
@end
NSObject is the root class of the majority of Objective-C classes. The first two letters, NS, refer to its origins, NeXTSTEP, as we saw earlier in this article. By inheriting from NSObject, classes behave like Objective-C classes and inherit a basic interface to the runtime system.
Implementation File
Before we make modifications to the Book class, let's take a quick peak at Book.m, the class's implementation file. Instead of importing the Foundation framework, the implementation file imports the header file of the Book class. Why is this necessary? The implementation file needs to know what properties and methods are declared in the header file before it can implement the behavior (i.e. methods) of the class. The import statement is followed by the implementation of the class, indicated by @implementation and @end.
Adding Properties and Methods
The Book class isn't very useful in its current implementation. Head over to the header file and add three properties year, title, and author, and add a method named bookInfo.
Properties are declared with the @property keyword and can be declared anywhere in the class's @interface block. The @property keyword is followed by the type and the name of the property. Don't forget the asterisk in front of the title and author properties, because a Cocoa object is always referenced as a pointer.
#import <Foundation/Foundation.h>

@interface Book : NSObject

@property int year;
@property NSString *title;
@property NSString *author;

- (NSString *)bookInfo;

@end
The method declaration slightly resembles a function prototype, but there are a number of key differences. The method declaration starts with a minus sign indicating that this is an instance method. Class methods are prefixed with a plus sign. The minus sign is followed by the return type of the method between parentheses, an instance of NSString, and the name of the method. The method declaration ends with a semicolon.
I'm sure you're wondering what NSString is and why it needs to be referenced as a pointer. The NSString class is a member of the Foundation framework. It declares the interface for an object that manages an immutable string. In the previous article, we saw that a string in C can be represented by an array of characters and that is exactly what the NSString class does, it manages an array of characters under the hood. The advantage of using NSString is that it make working with strings much easier.
Implementing bookInfo
Now that we have declared the bookInfo method in the class's header file, it is time to implement it in the class's implementation file. Open Book.m and add the following code snippet somewhere in the @implementation block. Before we break the implementation of bookInfo down, we first need to talk about object messaging.
- (NSString *)bookInfo {
    NSString *bookInfo = [NSString stringWithFormat:@"%@ was written by %@ and published in %i", self.title, self.author, self.year];
    return bookInfo;
}
Object Messaging
We already know that the behavior of a class is defined through its methods. To call a method on an object, a message is sent to the object. Inspect the following code snippet to understand this concept. Let's break it down line by line. In the first line, we declare a new string and assign it a constant string by wrapping the string in double quotes and preceding it with an @ sign.
NSString *string = @"This is a string of characters.";
int length = [string length];
NSLog(@"The length of the string is %i.\n" length);
In the second line, we send a message of length to the string instance. In other words, we call the method length on the string instance and the method returns an integer. The integer is assigned to the length variable of type int. In the last line, we log the length variable to the console by calling the NSLog function as we saw in the previous article.
Sending messages to objects is something you will do a lot, so it's important to understand the syntax. Even though the syntax looks odd if you're new to Objective-C, it's not that hard to understand. Between square brackets is the object on the left and the message or method name on the right.
[object message];
Methods that accept arguments look a bit different, but the general syntax is identical. The NSString class, for example, has another method named substringFromIndex:. The colon at the end of the name indicates that this method accepts an argument. Calling this method on a string looks like this:
NSString *substring = [string substringFromIndex:5];
Objective-C is known for its long and verbose method names. Take a look at the following example, which includes a method name with multiple arguments. You have to admit that the name of the method clearly states what the method does. The method name is split into chunks with each chunk accepting an argument. Object messaging will really sink in once we start working with the iOS SDK.
NSString *anotherString = [string stringByPaddingToLength:5 withString:@"some string" startingAtIndex:2];
Before we move on, we need to revisit the implementation of bookInfo. The method implementation starts by repeating the method declaration. The trailing semicolon is replaced with a pair of curly braces, which wrap around the implementation of the method. We first declare a new string, bookInfo, and assign to it a new string, created with the attributes of our book instance (title, author, and year). At the end of the bookInfo method, we return the new string, bookInfo, because that is what the method expects, a string as the return type.
Three things require some clarification. First, the method stringWithFormat: is a class method and not an instance method. We know this because the method is called on the class itself, NSString, not on an instance of the class. Class methods are common in object oriented programming languages. Second, the format specifier for an object is represented by the @ symbol (preceded by the percent sign). Both title and author are objects—strings to be precise. Third, the self keyword always references the class instance. In this case, self refers to the Book instance to which the method bookInfo belongs.
Accessors Revisited
If you've worked with other object oriented languages, accessing instance variables in Objective-C might be confusing. We do not directly access an instance variable when we write self.title. This is nothing more than a shortcut for [self title]. The latter means that we use the getter method to ask the instance for the instance variable named title. The same is true for setting an instance variable. Take a look at the following code snippet. As you can see, the use of self.title is nothing more than syntactic sugar.
// This assignment ...
self.title = @"The Hobbit";
// ... is equivalent to ...
[self setTitle:@"The Hobbit"];
id, nil, and NULL
id
Before we start using the Book class, I want to talk about a few keywords that confuse people from time to time. Whenever you want to store an object without explicitly defining the type of that object, you use the id data type, which is also the default type for return and argument declarations for Objective-C methods.
The power and usefulness of the id data type goes much further, though. The id data type is a key component of Objective-C's dynamic typing and dynamic binding. It is important to understand that the id data type does not hold any information about the object itself other than that it's an object.
In Objective-C, every object knows what class it belongs to (through an isa variable) and this is critical. Why is that? One of the strengths of Objective-C is its dynamic typing, which means that type checking is performed at runtime instead of compile time.
However, since the id data type does not tell the compiler anything about the class the object belongs to, the object itself needs to provide this information to the compiler.
Keep in mind that it's perfectly acceptable to statically type an object in Objective-C by explicitly specifying an object's class instead of using the id data type.
Dynamic Binding
This brings us to another vital component of the Objective-C runtime, dynamic binding. In Objective-C, an important difference between functions and messages is that a message and the receiving object aren't joined together until runtime.
What does this mean and why is this important? This means that the method invoked in response to a message sent to an object is determined at runtime when both the message and the object are known. This is what is known as dynamic binding.
nil and NULL
In Objective-C, the keyword nil is defined as a null object, that is, an id with a value of 0. Under the hood, there is no difference between nil, Nil, and NULL, and it is possible to send messages to each of them without an exception being thrown.
The convention is to use nil for objects, Nil for classes, and NULL otherwise. Being able to send messages to nil, Nil, and NULL has benefits but it also has downsides. For more information about nil, Nil, and NULL, take a look at this question on Stack Overflow.
Creating Objects
Open main.m and add an import statement to import the header file of the Book class. Instead of using angle brackets, we use double quotes to import the header file of the Book class. Double quotes are used for local files, whereas angle brackets are used for global includes, using the project's include path.
#import <Foundation/Foundation.h>
#import "Book.h"
Immediately below the NSLog call, add the following snippet to create an instance of the Book class.
Book *book1 = [[Book alloc] init];
book1.title = @"The Hobbit";
book1.author = @"JRR Tolkien";
book1.year = 1937;
In the first line, we declare a variable of type Book and initialize it. This is a good example to illustrate nested method calls. The first method called on the Book class is alloc. The details of this call are not important. The gist is that memory is allocated for the new object and the object is created.
Due to the nesting of the calls, the init method is called on the new object that was created by the alloc method. The init method initializes the new object, setting up the object and making it ready for use. The init method returns the instance and, in our example, assigns it to the book1 variable.
The next three lines should be familiar by now, we set the title, author, and publication year of the new book.
Let's create another book and add both books to an Objective-C array. The creation of the second book isn't new. The only difference is that we've made explicit use of the class's setters to set the instance variables of the new instance.
Book *book2 = [[Book alloc] init];
[book2 setTitle:@"The Fellowship of the Ring"];
[book2 setAuthor:@"JRR Tolkien"];
[book2 setYear:1954];

NSArray *books = [[NSArray alloc] initWithObjects:book1, book2, nil];
In the last line, we create an instance of NSArray, another class of the Foundation framework. The NSArray class is an array that can store an ordered list of objects. Just like we did with the book instances, we allocate memory and initialize the new array.
Instead of calling init, however, we call initWithObjects:. initWithObjects: is a designated initializer, which means that it's an init method with some extra bells and whistles to facilitate object initialization.
initWithObjects: accepts any number of objects that you wish to store in the array. The list of objects should always end with nil.
Mixing C and Objective-C
I've already mentioned several times that Objective-C is a strict superset of C and that we can freely combine C and Objective-C. Let's see how this works. We start by using a simple if/else statement to check if the array contains any objects. By sending the array a message of count, it will return the number of objects it contains.
If the array contains objects, we use a for loop to iterate over the objects in the array. During each iteration, we ask the array for the object at index i and send the object—an instance of the Book class—a message of bookInfo. As we saw earlier, bookInfo returns an instance of NSString, which we log to the console.
if ([books count] > 0) {
    for (int i = 0; i < [books count]; i++) {
        Book *aBook = [books objectAtIndex:i];
        NSLog(@"%@", [aBook bookInfo]);
    }
}
Conclusion
I'm sure that you are a little overwhelmed by Objective-C. This is normal. Even though Objective-C is nothing more than a thin layer on top of the C language, there's quite a lot going on.
While there's more to Objective-C than discussed in this article, you now know the basics and are ready to start working with the iOS SDK. In the next article, we will take a look at the iOS SDK and explore its various components.

Comments