In this tutorial, we are going to build our first Ionic app together and learn the basics of Ionic's JavaScript components. These components provide your app easy access to features, such as navigation and navigation bars, infinite scroll, and lists. If you haven’t set up Ionic yet or need to refresh how to use the Ionic CLI, you can review the first tutorial of this series.
What Is a Component?
The term components is somewhat abused in frontend development as many frameworks have their own notion that describes a component. In fact, Web Components as an official HTML standard can further complicate the concept, so let’s clearly define what a component is in Ionic.
In a general sense, a component is an implementation of a set of features that are encapsulated by some form of coding convention. In other words, you can think of a component as a way to isolate a particular feature from the rest of the application. You can think about how in HTML there are different types of form inputs and each of them is a type of component that has specific features.
In Ionic, there are two types of components, CSS and JavaScript. CSS components are implemented as a set of CSS classes that modify an element to give it a specific appearance, such as a header bar.
JavaScript components are technically implemented as Angular directives and they are used as HTML elements in the application. They provide a richer set of features. This usually includes the ability for users to interact with it or the application to otherwise manage the component. Tabs, for example, allow content to be shown or hidden based on the user selecting a tab.
In this tutorial
we are going to focus on some of the JavaScript components. Later in this series, we take a closer look at CSS
components.
Sometimes, Ionic implements a component as both a CSS and a JavaScript component, such as the tabs component. This means you decide which one to use. I generally recommend opting for the JavaScript implementation. In most cases, the overhead of using the JavaScript component is negligible and I believe they make your code easier to work with.
Source Files
In this tutorial, we are going to create an app from scratch and we will continue enhancing the app in the rest of this series. The premise of this app is to create a civic informational app that provides users with information about their local facilities, such as libraries and parks.
In this tutorial, we start by building an app that displays a list of parks in Chicago and uses infinite scroll to keep loading results as long as they are available. We will expand the feature set of the app in the next tutorials.
I have created an API that provides the information the app needs. The API is based on the Google Maps APIs. You can run the API yourself, but it requires getting a custom API key from Google and instructions can be found on the API project. If there are any issues using the provided API, such as someone abuses the API and exceeding the API usage limits, running your own version should help.
You can preview the running app on Heroku and view the completed project on GitHub. However, I encourage you to follow along and build the app with me.
1. Setting Up the Project
First, you need to start a new project. We can do this by running the following command:
ionic start civinfo https://github.com/ionic-in-action/starter
This downloads a starter bundle that includes an empty
Ionic template to get us started (built for use with my book Ionic in Action). Enter the directory, cd civinfo, and run ionic
serve.
You can now preview a blank app loading at http://localhost:8100 (or on the port set by Ionic). I recommend opening the developer tools of your browser to confirm that you see a blank screen. Yes, it should be a white screen. I also suggest using Chrome’s Device Emulation while previewing your app.
2. Setting Up Base Navigation Components
Navigation is so crucial that we should start here with
designing our app. The primary navigation components are ionNavBar and ionNavView. The majority of apps
have a design feature where there is a navigation bar with various titles and action
buttons, and then the rest of the area is devoted to the content for the
current view.
The ionNavBar and ionNavView components provide that functionality with some built-in intelligence to help us out. Our app is going to have several routes in the
end, but we build only one in this tutorial.
Ionic uses the UI Router under the hood to manage navigation and routing. If you are familiar with it, then you recognize the implementation in Ionic. There are a lot of nuances, but we keep it simple in this tutorial. The most common and simple use is to define each of the various pages of your app as a state, which is the Ionic/UI Router way to define a particular view.
To get us started, we first include the two navigation components into www/index.html like you see below, placing it inside the body.
<body ng-app="App">
  <ion-nav-bar class="bar-balanced"></ion-nav-bar>
  <ion-nav-view></ion-nav-view>
</body>
Once you’ve added the code to index.html, you can reload the app and should see a green bar appear along the top of the app.

You have defined the ionNavBar component, which automatically appears at the top of the screen. Later, when we create individual
views, those views will be able to pass a title and additional buttons to
display. It is smart enough to know how tall the navigation bar should be for different
devices. This is not consistent across platforms so this is very helpful. The navigation bar is
given a class of bar-balanced to give it a green color.
Then there is the ionNavView, which is the
placeholder that renders the content for each of the views. Once we define
a view, it will render the resulting markup here and it automatically adjusts
to take up the available space left over after the navigation bar is positioned.
The navigation components are examples of JavaScript components (also known as Angular directives). They look like custom HTML tags and, when used together, they are smart enough to keep the title bar in sync with the current view and render the correct content based on the user’s navigation choices. To see this in action, though, we need to add some states. Let’s start by making our first state that displays a list of parks.
3. Adding the Parks List View
The primary purpose of the app is to display a list of civic related resources. Initially, this will be a list of parks, but we will expand it to include other types of resources like libraries. We want to include a few features into this view:
- update the navigation bar with a title
- load a list of parks from the API
- display the list of items in a mobile friendly format
- allow more items to load if the bottom is reached, using infinite scroll
- display an image with each item
Step 1: Setting Up the Places State, Controller, and Template
Now that we have a few goals for this view, let’s start with adding our JavaScript file that will register this view. Create a new file places.js at www/views/places/ and add the following to it:
angular.module('App')
.config(function($stateProvider) {
  $stateProvider.state('places', {
    url: '/places',
    controller: 'PlacesController as vm',
    templateUrl: 'views/places/places.html'
  });
})
.controller('PlacesController', function() {
});
We declare a new state for the UI Router using
the $stateProvider.state() method. This is only available to be configured inside Angular's angular.config() method. When you declare a state, you first pass a
string to name the route, in this case places. You then pass an object with
various properties that defines the state, such as a URL, a controller, and a template. You can look at the UI Router documentation for all possible configuration
options.
We have declared a new state, named it places,
assigned it a URL of /places, named a controller using controller as syntax, and
listed a templateUrl to load. This is a fairly common state definition and
you see it used in mostly the same way with other states. The controller
declared here is empty, but we will add to it soon.
This template is an essential part of the view and describes the visual aspects of that view. Most of the view logic and behavior will be managed in the controller and the template. Our state declares we want to load an HTML file for the template, but we haven’t made one yet. Let’s fix that by creating a new file places.html at www/views/places/ and adding the code below.
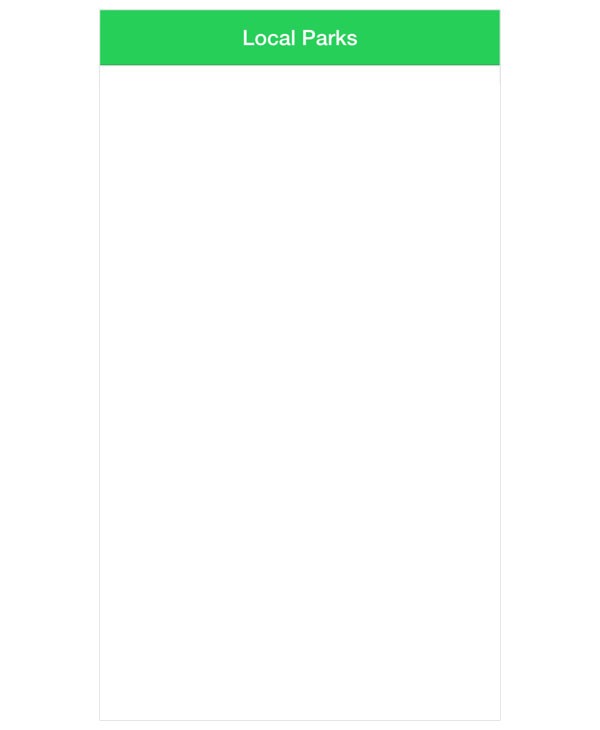
<ion-view view-title="Local Parks">
  <ion-content>
  </ion-content>
</ion-view>
So far in this template, we have declared ionView and
ionContent components. The ionView component is a wrapper that you place around
a template that is intended to be loaded into the ionNavView component we
declared earlier. The view-title attribute is also used to pass the title the navigation bar should display.
The ionContent component is a useful content wrapper,
which helps to ensure that the content space is sized to the available screen
space, helps manage scrolling, and can expose other less commonly used
behaviors. When this view is loaded, you will see the navigation bar title appear as "Local Parks".
Now we need to make sure the app loads the script to execute
by adding places.js to index.html like you see below. I recommend
adding this right before the </head> tag.
<script src="views/places/places.js"></script>
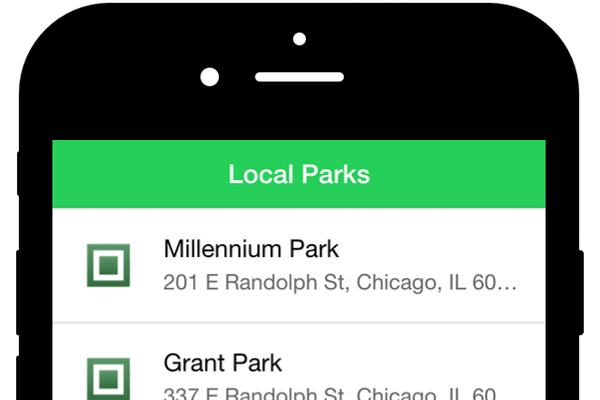
You can view the app, but you still won’t see the view appear. To see the view, navigate to http://localhost:8100/#/places. The URL mapped in the state definition can be used to navigate to a route. It should then appear as in the following image with the title set to "Local Parks".
This isn’t too exciting yet, but this represents the most basic view that you’ll probably set up most of the time. Now let’s work on loading data and showing it on the screen.
Step 2: Loading Data
Before we can do much else, we need to load some data. To do this, we need to add an Angular service to help us manage geolocation. In a future tutorial, the location of a user will be detected by the device. Until then, we are going to manually set it to Chicago, one of my favorite cities.
Open www/js/app.js and add the
following service to the end of the file. It should chain with the existing
methods from angular.module.
.factory('Geolocation', function() {
  return {
    "formatted_address": "Chicago, IL, USA",
    "geometry": {
      "location": {
        "lat": 41.8781136,
        "lng": -87.6297982
      }
    },
    "place_id": "ChIJ7cv00DwsDogRAMDACa2m4K8"
  };
})
This is an Angular service that returns an object that matches what the Google Maps API returns for Chicago. We now have details for the location so we can load parks there.
Next, we are going to update the controller to load the list
from the API. For simplicity, I’m loading the data using the
$http service in the controller. The best practice would be to abstract that out
into a service. Open www/views/places/places.js again and update the
controller like this:
.controller('PlacesController', function($http, Geolocation) {
  var vm = this;
  var base = 'https://civinfo-apis.herokuapp.com/civic/places?type=park&location=' + Geolocation.geometry.location.lat + ',' + Geolocation.geometry.location.lng;
  vm.places = [];

  vm.load = function load() {
    $http.get(base).then(function handleResponse(response) {
      vm.places = response.data.results;
    });
  };

  vm.load();
});
The controller has a vm.load() method to execute the HTTP
request and stores the results in vm.places. When you save this, you are to see the HTTP request firing in the developer tools of your browser. Even if
you are familiar with Angular, you may not recognize this exact approach for storing data on the vm variable. I recommend reviewing John Papa’s post on why this is a recommended approach if you need some clarity.
To display the data, we need to update the template as well and loop over the list of parks to display them. Open www/views/places/places.html and update it as shown below.
<ion-view view-title="Local Parks">
  <ion-content>
    <ion-list>
      <ion-item ng-repeat="place in vm.places" class="item-avatar">
        <img ng-src="{{place.icon}}" />
        <h2>{{place.name}}</h2>
        <p>{{place.formatted_address}}</p>
      </ion-item>
    </ion-list>
  </ion-content>
</ion-view>
In the template, we are using the ionList and ionItem components.
The ionList component is one of the most useful components because lists are a very
common design choice in mobile due to smaller screens and typical use in
portrait orientation. Much like a list using ul and li, ionList wraps any
number of ionItem elements.
Lists can adopt a number of different appearances and in
this example the list item displays an image to the left by declaring the
item-avatar class on the ionItem. The same approach could be used in a messaging app where you have a list of chats with an avatar of each person.
Inside the ionItem, you display the name and address. The default styling is to automatically truncate (using CSS) any text that overflows to keep items
the same height.

We have loaded a list of parks and displayed them as a
list using ionList and ionItem. We can take this one step further and add
infinite scrolling to load additional results as the user scrolls near the end
of the list (if they are available).
Step 3: Adding Infinite Scroll to a List
To make the list automatically load additional items based
on the user scrolling to the bottom, we can make use of the ionInfiniteScroll
component. This component is placed at the end of a list, watches for when the
user has scrolled to the end, and then calls a method that can load additional
items. It also has a built-in loading spinner to indicate that more items are
loading. The spinner is hidden when the response resolves.
Our API also has to support some form of pagination for this to work. In this case, the Google Maps API provides a token that must be passed to load the next set of results. We need to update the controller to manage this logic so let’s start with updating www/views/places/places.js as shown below.
.controller('PlacesController', function($http, $scope, Geolocation) {
  var vm = this;
  var base = 'https://civinfo-apis.herokuapp.com/civic/places?type=park&location=' + Geolocation.geometry.location.lat + ',' + Geolocation.geometry.location.lng;
  var token = '';
  vm.canLoad = true;
  vm.places = [];

  vm.load = function load() {
    var url = base;
    if (token) {
      url += '&token=' + token;
    }

    $http.get(url).then(function handleResponse(response) {
      vm.places = vm.places.concat(response.data.results);
      token = response.data.next_page_token;

      if (!response.data.next_page_token) {
        vm.canLoad = false;
      }
      $scope.$broadcast('scroll.infiniteScrollComplete');
    });
  };
});
We have added a new property, vm.canLoad, which is a boolean that indicates if there are additional items to load. This
is true by default. Until a request is returned, we don't know if there
are additional items available.
The vm.load() method is updated to append the token if
available. The response handler now concatenates the results onto the
array. This means the second page of results is added after the first page. The
Google Maps API will return a next_page_token anytime there are more results
that can be loaded. If that property is missing, we can assume there are no
more items to load and vm.canLoad is set to false. The infinite scroll component uses this value to determine when to stop loading more items.
The final change is the addition of $scope.$broadcast('scroll.infiniteScrollComplete').
The infinite scroll component has no knowledge of when the HTTP request has
completed or exactly when it is save to disable the loading symbol. Therefore,
the component listens for events to update itself. In
this case, the scroll.infiniteScrollComplete event tells the component to
stop the spinner and continue watching for the user scrolling to the bottom.
The final piece is to enable this in the template. Open www/views/places/places.html and add the line between the end of the ionList
and ionContent components.
      </ion-item>
    </ion-list>
    <ion-infinite-scroll on-infinite="vm.load()" ng-if="vm.canLoad"></ion-infinite-scroll>
  </ion-content>
</ion-view>
The infinite scroll component is now enabled in your
template. It starts to watch for when the component is visible, which is also triggered on load because no places are visible then and the
infinite scroll component is visible. It calls the method declared in
on-infinite once when it becomes visible (here it is vm.load()) and waits until the scroll
complete event has been triggered.
The ngIf is used to disable the
infinite scroll once the API has returned all possible results. In that case, scrolling to
the bottom no longer triggers the load of more resources.
When using infinite scroll, it is important to use an ngIf
to disable it. It can be easy to implement the component in such a way that the
component tries to load and load and never stops.
This completes the places view. Looking back, there is quite a bit of functionality enabled by 12 lines of HTML in the template and about 20 lines of JavaScript in the controller.
Summary
We have taken a look at a number of components, which you will frequently use in your Ionic apps.
- Ionic JavaScript components are used as HTML elements and can work in a coordinated manner.
- Ionic has
ionNavViewandionNavBarto support coordinated navigation with different views. - The
ionListandionItemcomponents make it easy to build mobile friendly lists. - The
ionInfiniteScrollcomponent automatically triggers a call to load additional items and append them to the list.
The next tutorial will take a look at some of the useful services that Ionic provides, such as loading indicators and popovers.
Create an Ionic Template and Win $1000
If you're already comfortable with the Ionic framework, then you may want to consider entering Envato's Most Wanted contest for Ionic templates. How? Create a unique Ionic template and submit it to Envato Market by 27 April 2016.
The five best templates receive $1000. Interested? Read more on the contest's website for details about the contest's requirements and guidelines.

Comments