Introduction
One of the most useful features for users is maps integration. In the previous installment of this series, we discussed how to set up Google Maps for Android using the Google Developer Console and how to create a basic Google Maps fragment. We then went over adding different kinds of markers and how to draw on the map.
In this tutorial, you will expand on what you learned in the last article in order to lay views on top of a map, override the indoor level selector controls, and add a Street View component to your applications. The source code for this article can be found on GitHub.
1. Getting Set Up
To start, follow the steps listed in the previous article of this series in order to create a basic project using a MapFragment, attach it to an Activity, and activate the Google Maps API through the Google Developers Console. For this tutorial, you don't need to use the locations Play Services classes, but you do need to import maps Play Services library into your build.gradle dependencies node.
dependencies {
    compile fileTree(dir: 'libs', include: ['*.jar'])
    compile 'com.android.support:appcompat-v7:23.0.0'
    compile 'com.google.android.gms:play-services-maps:7.8.0'
}
Once that's done, you end up with a screen that looks like the following:
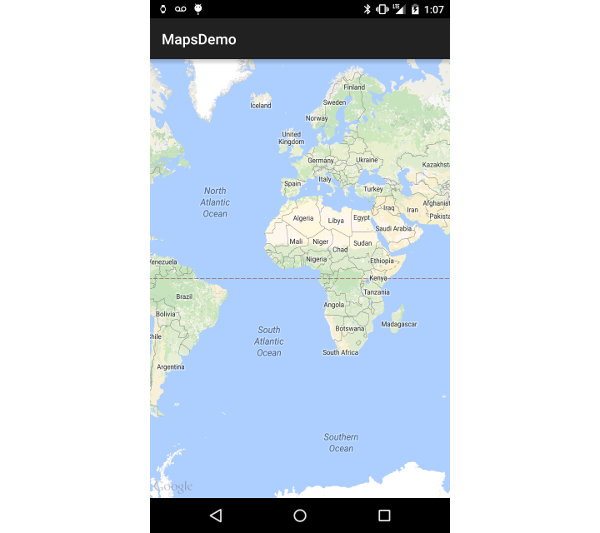
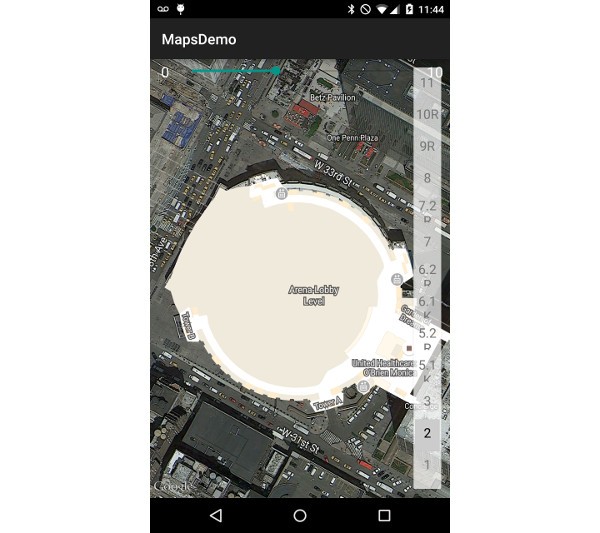
Next, you need to set up your camera. For this tutorial, we will focus on Madison Square Garden in New York City, because it's a great example of a building using the indoor level maps.
In onViewCreated, you can add a call to the the following helper method initCamera. You may remember that we need to wait until onViewCreated to work with Google Maps, because this is when we know the map object is ready for use.
private void initCamera() {
    CameraPosition position = CameraPosition.builder()
            .target( new LatLng( 40.7506, -73.9936 ) )
            .zoom( 18f )
            .bearing( 0.0f )
            .tilt( 0.0f )
            .build();

    getMap().animateCamera(
        CameraUpdateFactory.newCameraPosition( position ), null );
    getMap().setMapType( GoogleMap.MAP_TYPE_HYBRID );
}
The above method moves the camera to our target and zooms in close enough that the indoor selector becomes visible. You'll notice that there's a strip of numbers on the right side of the screen and an overlay on the map for each floor. When you select a different level on the right, the current floor plan animates into the new one. This is the feature that you will work with later in order to have your own view control level selection.

Next, you need to implement the three interfaces that will be used in this tutorial.
-
GoogleMap.OnIndoorStateChangeListeneris used for determining when an indoor level selector has changed visibility. -
SeekBar.OnSeekBarChangeListeneris used with one of our view overlays to control level selection, rather than using the default set of buttons on the right. -
GoogleMap.OnMapLongClickListeneris used in this example for changing the displayed location of your Street View component.
public class MapFragment extends SupportMapFragment implements
        GoogleMap.OnIndoorStateChangeListener,
        GoogleMap.OnMapLongClickListener,
        SeekBar.OnSeekBarChangeListener {
Once you have added the required methods for those three interfaces, you can begin adding views on top of the map.
2. Overlaying Views
While the base features of Google Maps fit most needs, there will be times that you want to add additional views over the map in order to perform actions. For this tutorial, we will add a SeekBar and some TextView objects in order to customize the controls for the indoor level selector.
Start by creating a new XML layout file, view_map_overlay.xml. Add the following code to create the base layout that will be used on the screen.
<?xml version="1.0" encoding="utf-8"?>
<RelativeLayout xmlns:android="http://schemas.android.com/apk/res/android"
    android:layout_width="match_parent"
    android:layout_height="match_parent">

    <LinearLayout
        android:layout_width="match_parent"
        android:layout_height="wrap_content">

        <TextView
            android:id="@+id/indoor_min_level"
            android:text="0"
            android:layout_width="0dp"
            android:layout_height="wrap_content"
            android:layout_weight="1"
            android:padding="4dp"
            android:textSize="20sp"
            android:gravity="center"
            android:textColor="@android:color/white" />

        <SeekBar
            android:id="@+id/indoor_level_selector"
            android:layout_width="0dp"
            android:layout_height="wrap_content"
            android:layout_weight="8" />

       <TextView
            android:id="@+id/indoor_max_level"
            android:text="10"
            android:layout_width="0dp"
            android:layout_height="wrap_content"
            android:layout_weight="1"
            android:padding="4dp"
            android:textSize="20sp"
            android:textColor="@android:color/white"
            android:gravity="center" />

    </LinearLayout>

</RelativeLayout>
Once your layout file is complete, you can add it as an overlay to your maps fragment. In onCreateView, you need to access the ViewGroup parent, inflate your new layout overlay, and attach it to the parent. This is also where you save references to each of the views in your overlay so that they can be changed later in your app.
@Override
public View onCreateView(LayoutInflater inflater, ViewGroup container, Bundle savedInstanceState) {
    ViewGroup parent = (ViewGroup) super.onCreateView( inflater, container, savedInstanceState );
    View overlay = inflater.inflate( R.layout.view_map_overlay, parent, false );

    mIndoorSelector = (SeekBar) overlay.findViewById( R.id.indoor_level_selector );
    mIndoorMinLevel = (TextView) overlay.findViewById( R.id.indoor_min_level );
    mIndoorMaxLevel = (TextView) overlay.findViewById( R.id.indoor_max_level );

    parent.addView( overlay );

    return parent;
}
When you run the application, you should see your views on top of the map. You will, however, also still see the default level selector, which clutters up the view.
In order to fix this, create a new method named initMapIndoorSelector and call it from onViewCreated. All it needs to do, is set your listeners for the SeekBar and indoor level changes, as well as disable the default indoor level picker.
private void initMapIndoorSelector() {
    mIndoorSelector.setOnSeekBarChangeListener( this );

    getMap().getUiSettings().setIndoorLevelPickerEnabled( false );
    getMap().setOnIndoorStateChangeListener( this );
}
Now that you have your view overlaying the map, you have to hide it until it's needed. In onViewCreated, call a new helper method named hideFloorLevelSelector that hides all of your overlaid views.
private void hideFloorLevelSelector() {
    mIndoorSelector.setVisibility( View.GONE );
    mIndoorMaxLevel.setVisibility( View.GONE );
    mIndoorMinLevel.setVisibility( View.GONE );
}
3. Using the Indoor Level Selector
With your views created and hidden, you can start adding in the logic to make your views appear when needed and interact with the map. Earlier, you created the onIndoorBuildingFocused method as a part of the GoogleMap.OnIndoorStateChangeListener. In that method, you need to save a reference to whichever building is in focus and then hide or show the SeekBar controls when necessary.
@Override
public void onIndoorBuildingFocused() {
    mIndoorBuilding = getMap().getFocusedBuilding();

    if( mIndoorBuilding == null || mIndoorBuilding.getLevels() == null || mIndoorBuilding.getLevels().size() <= 1 ) {
        hideFloorLevelSelector();
    } else {
        showFloorLevelSelector();
    }

}
An indoor building will gain focus when the building is visible to the map camera and the map is zoomed in enough. If those conditions are no longer met, this method will be called again and getMap().getFocusedBuilding will return a null value.
showFloorLevelSelector makes all of the overlaid views visible, moves the SeekBar to the proper selected value, and sets the text labels to values representing the short name of the top and bottom floors for that building. When you retrieve the levels from an IndoorBuilding object, the bottom floor is the last item in the list and the top floor is at position 0.
private void showFloorLevelSelector() {
    if( mIndoorBuilding == null )
        return;

    int numOfLevels = mIndoorBuilding.getLevels().size();

    mIndoorSelector.setMax( numOfLevels - 1 );

    //Bottom floor is the last item in the list, top floor is the first
    mIndoorMaxLevel.setText( mIndoorBuilding.getLevels().get( 0 ).getShortName() );
    mIndoorMinLevel.setText( mIndoorBuilding.getLevels().get( numOfLevels - 1 ).getShortName() );

    mIndoorSelector.setProgress( mIndoorBuilding.getActiveLevelIndex() );

    mIndoorSelector.setVisibility( View.VISIBLE );
    mIndoorMaxLevel.setVisibility( View.VISIBLE );
    mIndoorMinLevel.setVisibility( View.VISIBLE );

}
The final method you need to implement for your indoor level selector is onProgressChanged(SeekBar seekBar, int progress, boolean fromUser). When the SeekBar position is changed, you need to activate a new level on the current building. Since the levels are ordered from top to bottom, you need to activate the level at position numOfLevels - 1 - progress in order to correlate with the position of the SeekBar.
@Override
public void onProgressChanged(SeekBar seekBar, int progress, boolean b) {
    if( mIndoorBuilding == null )
        return;

    int numOfLevels = mIndoorBuilding.getLevels().size();
    mIndoorBuilding.getLevels().get( numOfLevels - 1 - progress ).activate();
}
4. Adding Street View
Now that you know how to overlay views on your a map and how to work with the indoor level selector, let's jump into how to work with Street View in your apps. Just like Google Maps, Street View allows you to either use a fragment or a view. For this example, you will use a StreetViewPanoramaView and overlay it onto your MapFragment.
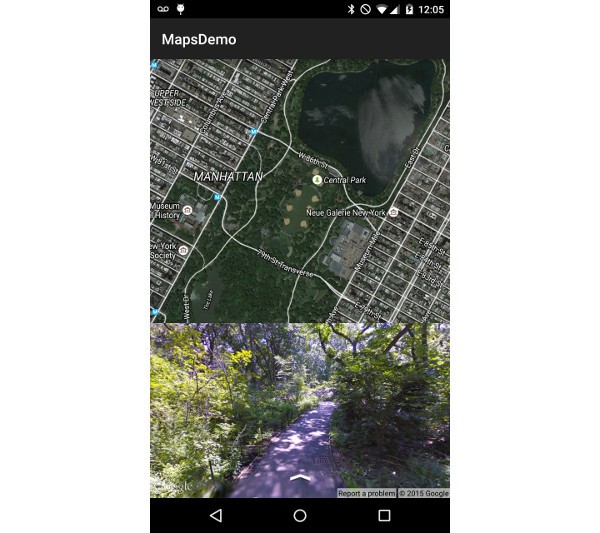
This view will be initialized to show the street next to Madison Square Garden and when you long-press on a different area of the map, Street View will display images associated with the selected position. If you select to display an area that isn't directly connected to a Street View image, Google will pick the nearest to display if it's within a set distance. If no Street View images are nearby (say you select a location in the middle of the ocean), then Street View will show a black screen.
Something else to be aware of is that you can only have one StreetViewPanoramaView or fragment visible to the user at a time.
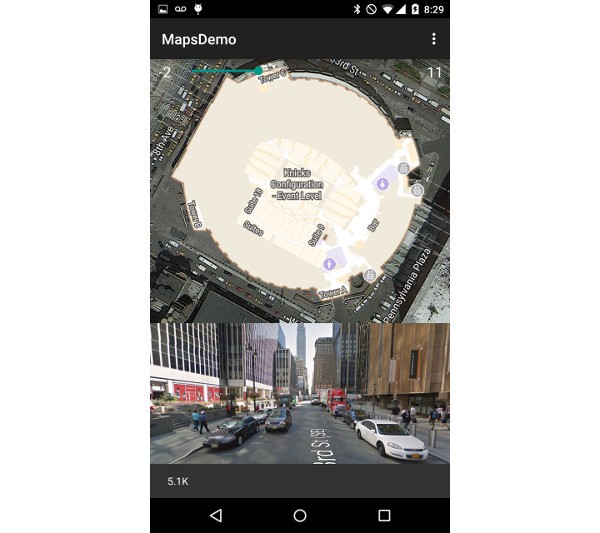
To start, update view_map_overlay.xml in order to add a StreetViewPanoramaView.
<com.google.android.gms.maps.StreetViewPanoramaView
    android:id="@+id/steet_view_panorama"
    android:layout_width="match_parent"
    android:layout_height="240dp"
    android:layout_alignParentBottom="true"/>
When your layout file is ready, go into onCreateView in your MapFragment, save a reference to your new view, and call the onCreate method for the view. It's important that you call onCreate, because the current fragment's onCreate has already been called before this view was attached, and the Street View component performs actions in onCreate that are necessary for initialization.
@Override
public View onCreateView(LayoutInflater inflater, ViewGroup container, Bundle savedInstanceState) {
    ViewGroup parent = (ViewGroup) super.onCreateView( inflater, container, savedInstanceState );
    View overlay = inflater.inflate( R.layout.view_map_overlay, parent, false );

    mIndoorSelector = (SeekBar) overlay.findViewById( R.id.indoor_level_selector );
    mIndoorMinLevel = (TextView) overlay.findViewById( R.id.indoor_min_level );
    mIndoorMaxLevel = (TextView) overlay.findViewById( R.id.indoor_max_level );

    mStreetViewPanoramaView = (StreetViewPanoramaView) overlay.findViewById(R.id.steet_view_panorama);
    mStreetViewPanoramaView.onCreate(savedInstanceState);

    parent.addView(overlay);

    return parent;
}
Next, in onViewCreated, add a new method called initStreetView. This new method will asynchronously get the StreetViewPanorama object when it's ready and handle showing your initial Street View position. It's important to note that getStreetViewPanoramaAsync( OnStreetViewPanoramaReadyCallback callback ) can only be called from the main thread.
private void initStreetView() {
    getMap().setOnMapLongClickListener( this );

    mStreetViewPanoramaView.getStreetViewPanoramaAsync(new OnStreetViewPanoramaReadyCallback() {
        @Override
        public void onStreetViewPanoramaReady(StreetViewPanorama panorama) {
            mPanorama = panorama;
            showStreetView( new LatLng( 40.7506, -73.9936 ) );
        }
    });
}
Finally, you need to define the showStreetView( LatLng latlng ) helper method shown above. This method creates a StreetViewPanoramaCamera object that allows you to change the tilt, zoom, and bearing of the Street View camera. For this example, the camera is set to the default values.
Next, you need to set the camera position. In this example, we also turn on an optional setting to show street names.
private void showStreetView( LatLng latLng ) {
    if( mPanorama == null )
        return;

    StreetViewPanoramaCamera.Builder builder = new StreetViewPanoramaCamera.Builder( mPanorama.getPanoramaCamera() );
    builder.tilt( 0.0f );
    builder.zoom( 0.0f );
    builder.bearing( 0.0f );
    mPanorama.animateTo( builder.build(), 0 );

    mPanorama.setPosition( latLng, 300 );
    mPanorama.setStreetNamesEnabled( true );
}
Once your showStreetView( LatLng latlng ) method is complete, it can also be called from onMapLongClick(LatLng latLng) so you can easily change what area is being shown.
@Override
public void onMapLongClick(LatLng latLng) {
    showStreetView( latLng );
}
Conclusion
In this tutorial, you learned about some advanced ways you can interact with Google Maps by adding additional views to the MapFragment and you learned how to control the indoor building level selector. We also covered the basics of adding Street View functionality to your application in order to display a different point of view for your users.
In the next installment of this series, you will learn about the Google Maps Utilities library and how to use it to add marker clusters, heat maps, and other useful features for your applications.

Comments