In this tutorial, I'm going to show you the basics of using the Advanced Custom Fields (ACF) plugin. ACF is a pretty big plugin, so this article won't explain absolutely everything it offers, but it should be enough to get you started with adding your own meta data and displaying it within your theme.
At time of writing, there are two versions of ACF: 4 and 5. This article is based on version 4, but should also apply if you are using version 5.
What Is Advanced Custom Fields?
Advanced Custom Fields is a user interface for adding custom fields, or meta data, to WordPress. Custom fields allow you to extend your posts or pages with more data. Let's look at a common scenario:
You have a post type called movie and you want to attach a score out of ten to the bottom of each of your reviews, along with other data. Now, you could just put this data within your post, but what if you later want to use this data in another way? Perhaps you want to move the score above your review; in this case, you would have to manually edit every review and manually move this score—not great.
WordPress does have built-in functions for creating custom fields, but they only include basic functionality and require fields to be created programatically. ACF has many built-in field types, some of which include:
- text
- WYSIWYG editor
- image
- file
- select box
- date picker
- color picker
In addition to having built-in fields, ACF provides you with a selection of rules that can be used to determine where fields are shown within your WordPress admin. This is really useful for keeping your admin area as clean as possible. For example, you can show a group of custom fields only if your post type is reviews and your page template is featured review.
Getting Started
Before we start adding some fields, you need to install the ACF plugin. To do so, from the WordPress dashboard go to Plugins > Add New. From the Add Plugin screen, search for Advanced Custom Fields and click Install. Be sure to activate the plugin—if it has been installed correctly then you should now see a Custom Fields menu within your WordPress admin.
Sticking with the theme of a movie review website, we are going to create some relevant fields. To follow along with this tutorial, you will need a custom post type called movie. To learn how to create post types, head over to this other great Tuts+ article. That said, the methods shown here will work for many other types of custom field, and the logic for creating and displaying fields will remain the same.
Creating Field Groups
Field groups are exactly what they say: groups of fields. Using the example of having a post type called movie, we may want to include the following data:
- year of release
- director
- rating out of ten
- IMDb link
These fields logically belong in a group, as they are all related to the same post type. Using the above fields, we can start to think about what field types we might need for this data.
- year of release: number
- director: text
- rating out of ten: number
- IMDb link: text (there is no url field type)
To start adding a field group, click the Custom Fields menu within your WordPress dashboard. Now, click the Add New button. You will now be presented with the Add New Field Group screen. Before we do anything else, let's give our field group a name by typing in the title box—I've called mine Movie Data.
Next, we can add all of our fields. Click the Add Field button to get started. You will now see a form which has the following fields:
-
Field Label is the name which appears when editing. I find it useful to start with the same prefix on each of my fields, e.g.
Movie Year,Movie Director, etc. -
Field Name is the name which you will use in your code to display the field. After typing in the field label, this should automatically be populated. This is a single word with no spaces, but dashes and hyphens are allowed. For example,
Movie Yearas a field label would turn intomovie_yearas a field name. - Field Type is a basic text field (although ACF offers more advanced options as well).
- Field Instructions are instructions that authors can see when adding the data on the edit screen, e.g. "The movie year should always be the US release date".
- Required is a radio box where you choose yes or no. Choosing "yes" means that the field must be filled out in order to save on the post edit screen.
- Default Value is the value that will automatically appear when creating a new post.
- Placeholder Text appears within your input on the edit screen.
- Prepend defines what appears before the input on the edit screen.
- Append defines what appears after the input on the edit screen.
- Formatting gives you two choices: "Convert HTML into tags" (the default) or "no formatting". Convert HTML into tags means that any HTML within your input will be rendered on the screen; no formatting means that any HTML will be ignored.
-
Character Limit allows us to limit the amount of characters for an input. For example, on our
yearinput we should limit the characters to four. - Conditional Logic is a more advanced feature that we won't be looking at in this article.
These fields all show up for the text field type—on some other field types some of these options may not show, or there may be some additional options. As we are also going to be using the number field type, there are some additional options available to us:
- Minimum Value is the minimum number value to allow in the field. For our score out of ten field it would be reasonable to set this to one, as we aren't going to score anything as zero.
- Maximum Value is the maximum number value to allow in the field. Again, we could use this for our score out of ten field and have the value as ten, as we don't want this value exceeded.
- Step Size defines the value by which a number increases when an arrow is pressed. In the case of the movie score, it would be a good idea to set this as one.
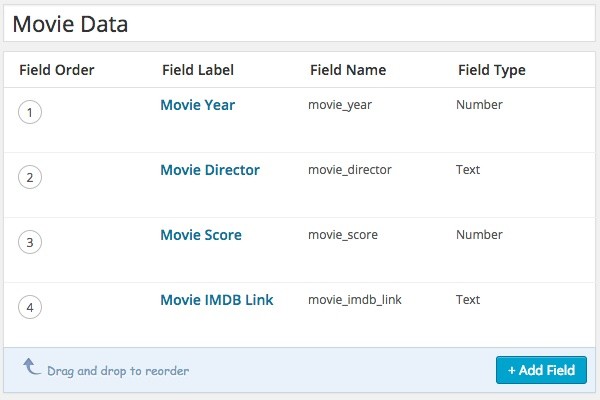
This is how I set up my fields:
- Field Label: Movie Year
- Field Name: movie_year
- Field Type: Number
- Required: Yes
- Minimum Value: 1900
- Maximum Value: 2050
Note the minimum and maximum values here—I set these to add some very basic validation, as it's unlikely we will have a movie older than 1900 and one newer than 2050 in the lifetime of the website.
- Field Label: Movie Director
- Field Name: movie_director
- Field Type: Text
- Required: Yes
- Formatting: No formatting
Since we are going to be formatting our output in our HTML, we don't want editors to be able to add HTML here that may interfere with our layout. Therefore, "no formatting" was chosen here.
- Field Label: Movie Score
- Field Name: movie_score
- Field Type: Number
- Required: Yes
- Minimum Value: 1
- Maximum Value: 10
- Step Size: 1
Again, we have a minimum and a maximum value set here to add some validation; our scores are out of ten, so we don't want editors to be able to insert a higher score than this. Likewise, we don't want any scores inserted that are lower than one.
- Field Label: Movie IMDb Link
- Field Name: movie_imdb_link
- Field Type: Text
- Field Instructions: Paste the full IMDb URL in here. e.g. http://www.imdb.com/title/tt2015381/
- Required: Yes
- Formatting: No formatting
I added some field instructions to this input, because there is no URL field type so it's hard to validate. The instructions should make it easier for editors to understand how to use the field.
Once you have added all of your fields, be sure to click the Update button. Once you have clicked this you will be back at the Edit Field Group page. There are just a few more things we need to do on this screen to get your fields working correctly.
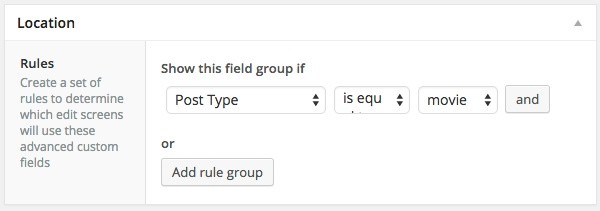
Below the field area is a box called Location—this allows us to control where our custom fields are showing. We only want our custom fields to show if the post type is movie. In the first drop-down, select Post Type, in the second drop-down select is equal to, and in the third select movie.
The last thing we need to do here is set where our custom field will appear on the edit screen. To do this, scroll down a little further to the Options section. This allows us to choose where the custom field metabox will appear and what type it is, and it gives us the option to hide other things from our edit screen.
The options are as follows:
- Order No: if you have multiple field groups then they are created in order from lowest to highest.
- Position has three options:
- Side
- High (after title)
- Normal (after content)
- Style: standard or seamless (see image below for the difference between these).
- Hide on screen: this is a list of checkboxes allowing you to hide things you may not need, such as tags, categories, or comments.
The options I used are:
- Position: Side
- Style: Normal
The rest were left as their defaults.
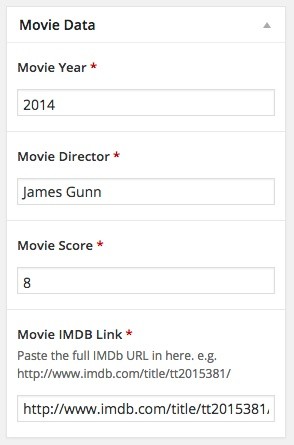
You can check that your fields are showing correctly by going to make a new post (in this case in the movie post type). If all has worked well then you will see your metabox. Now is a good time to add some test data.
Adding Fields to Your Theme
Now that you've created your field groups and have some test data, you can start to show the data within your theme or child theme.
You can use the standard WordPress get_post_meta() function with ACF, but it's recommended that you use ACF's own functions, as ACF will format the values depending on what field type you've created. We're going to use ACF's the_field() function. This function displays your custom field and takes a parameter of the field name, for example:
<?php the_field('field_name'); ?>
Let's tackle our meta data. We're going to have all of this information in a single div.
<div class="reviews-meta">
    <ul>
		<li><?php _e('Year of release', 'movie'); ?>: <?php the_field('movie_year'); ?></li>
		<li><?php _e('Director', 'movie'); ?>: <?php the_field('movie_director'); ?></li>
		<li><?php _e('Rating', 'movie'); ?>: <?php the_field('movie_score'); ?>/10</li>
		<li><a href="<?php the_field('movie_imdb'); ?>" target="_blank"><?php _e('View on IMDb', 'movie'); ?></a></li>
	</ul>
</div>
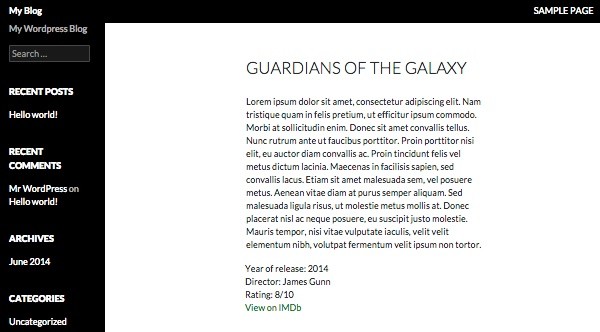
This code is fairly simple—we are using the _e function to internationalize our strings and echo them, and then using the ACF the_field() method to echo the value of the field we created. All of this has been put into an unordered list, inside a div element with a class of reviews-meta, so we can target it with our CSS.
So where does this code go? In this case, it's best to create a new template for your post type. To do this, make a copy of your theme's single.php file and name it single-postname.php—in our case single-movie.php. Every single.php will look different but they should all have one thing in common: a WordPress loop. Your WordPress loop should look something like this:
<?php while ( have_posts() ) : the_post(); ?>
    <?php get_template_part( 'content', 'single' ); ?>
<?php endwhile; ?>
Your custom fields can go outside the loop, and exactly where you place them depends on how you want the page to look. In my case (using the default Twenty Fourteen theme), I've put them just below the loop and applied some basic styling to the .reviews-meta CSS class.
Conclusion
We've covered the basics of the Advanced Custom Fields plugin. That is, we've added some fields and are now displaying them on our site. There's much more to ACF, though, and we've just scratched the surface. There are many more field types you can use, as well as more advanced features such as conditional logic.
Please feel free to leave questions, comments, and general feedback in the form below!

Comments