If you're just now catching up to this particular series, we're in the process of building our own custom messaging system that hooks into WordPress, allowing us to take advantage of some of the existing APIs, but also allowing us a bit more control.
From the previous tutorial:
But just as we looked at how to create custom administration pages, it's also possible to implement a system that allows us to programmatically set our own custom messages, their type, and when and where to display them on the administration page.
Though it's not required to read the series preceding this one, I do highly recommend reading the preceding tutorial. Each of these builds on the foundation of the previous tutorial (and we'll continue to do that for the remainder of the series).
With that said, the whole purpose of this series is to give an introduction as to how we can leverage the WordPress API and object-oriented programming to create a custom messaging system we can use throughout work that we may be doing for a client.
But before we get started, there are a few prerequisites that you should have in place.
Before You Get Started
- Read the previous article.
- Install PHP 5.6.25 and MySQL 5.6.28.
- Install Apache or Nginx.
- Set up WordPress 4.6.1.
- Have your favorite IDE or editor at the ready.
If you're looking for an all-in-one solution, check out MAMP, and if you're interested in how all of this fits together, then review these articles.
Our Roadmap
On the off chance you haven't read the previous tutorial, the roadmap we have set out for this tutorial is as follows:
- In this tutorial, we're going to lay the groundwork for the bare minimum of our plugin and what we need to get started.
- In the second piece, we're going to take the plugin a bit further by adding a very basic WordPress administration page. We'll also be making a call to the custom hook that we'll use, and we'll wire that up on the server-side. We'll also start the groundwork for our Settings Messenger.
- In this tutorial, we'll begin implementing our Settings Messenger by adding support for errors and success messages as well as covering some points on security.
- We'll end by tying everything together, seeing it in action, and making the final plugin publicly available for you to download.
Obviously, we've accomplished number one. So in this tutorial, we're going to be focused specifically on adding a basic administration page and setting up a custom hook that will allow us to take advantage of our custom messenger.
Getting Back to Work
With all of that covered, let's get back into development. Recall that, at this point, we should have the foundation of this plugin set up so that we're able to activate it and navigate to Settings and then Tuts+ Custom Message Example to see a generic administration page.
If you've been following along thus far, the code for the page is extremely simple (and we'll see a shot of it later in the tutorial), as well:
<div class="wrap">

    <h1><?php echo esc_html( get_admin_page_title() ); ?></h1>

    <p class="description">
        We aren't actually going to display options on this page. Instead, we're going
        to use this page to demonstration how to hook into our custom messenger.
    </p><!-- .description -->
</div><!-- .wrap -->
I'm reiterating this because this is where we're going to begin implementing our own custom messenger.
To do this, we're going to need to introduce the following:
- a hook that we define
- a function that is registered with that hook
- displaying something when that function is fired
Defining a Custom Hook
Defining a custom hook sounds much more intimidating than it really is. Most of us are familiar with making calls to add_action and add_filter, but how can we use these functions to make a call to our own hooks?
Easy: We use do_action and define our action that we'll register with WordPress. For example, take the code above and, just below the h1 tag, let's do the following:
<div class="wrap">

    <h1><?php echo esc_html( get_admin_page_title() ); ?></h1>
	<?php do_action( 'tutsplus_settings_messages' ); ?>

	<p class="description">
		We aren't actually going to display options on this page. Instead, we're going
		to use this page to demonstration how to hook into our custom messenger.
	</p><!-- .description -->
</div><!-- .wrap -->
Not bad, right? Now we need to register a function that will fire whenever that hook is called. Before we do that, though, I want to make sure we're all on the same page as to what do_action really does.
Here's what the developer document says about do_action:
This function invokes all functions attached to action hook$tag. It is possible to create new action hooks by simply calling this function, specifying the name of the new hook using the$tagparameter.
If the definition isn't clear, perhaps its implementation will help. So let's take a look at that now.
2. Register a Function
Just as we do with any other type of function, we need to register a function that will fire whenever our tutsplus_settings_messages hook is fired. But since we're working with object-oriented programming, we're going to need to design a class that defines this function.
And this is where our custom settings messenger will first come into play. Granted, we won't be doing a lot of work in terms of adding custom messages, but we will be using our custom hook, and we will be rendering something on the page.
Furthermore, we'll be laying the foundation of the class we'll be improving in the coming lessons. From here, add the file class-settings-messenger.php to the admin directory in your plugin (and don't worry, all of this will be available for download).
<?php

class Settings_Messenger {

    public function init() {

    }
}
Remember that we aren't using namespaces or autoloaders in this tutorial (though we've covered them before). Note that I'll be providing code for the init method momentarily.
For now, return to the plugin's bootstrap file, tutsplus-custom-message.php, and add the following code to the main function:
<?php

function tutsplus_custom_messaging_start() {

    $plugin = new Submenu(
        new Submenu_Page()
    );
    $plugin->init();

    $messenger = new Settings_Messenger();
    $messenger->init();
}
Now let's revisit the init function in the Settings_Messenger and hook it up to our custom action.
<?php

public function init() {
    add_action( 'tutsplus_settings_messages', array( $this, 'display_message' ) );
}
Notice in the code above, the first argument we're passing to add_action is the name of our custom hook. The second is going to be a method that will render a message on the administration page. We just haven't written it yet (so if you attempt to run this code, you'll get an error).
But let's change that.
3. Displaying a Custom Message
First, create a function in the Settings_Messenger class called display_message, and let's simply echo a statement to see if it's showing up in the custom page that we've created:
<?php

public function display_message() {
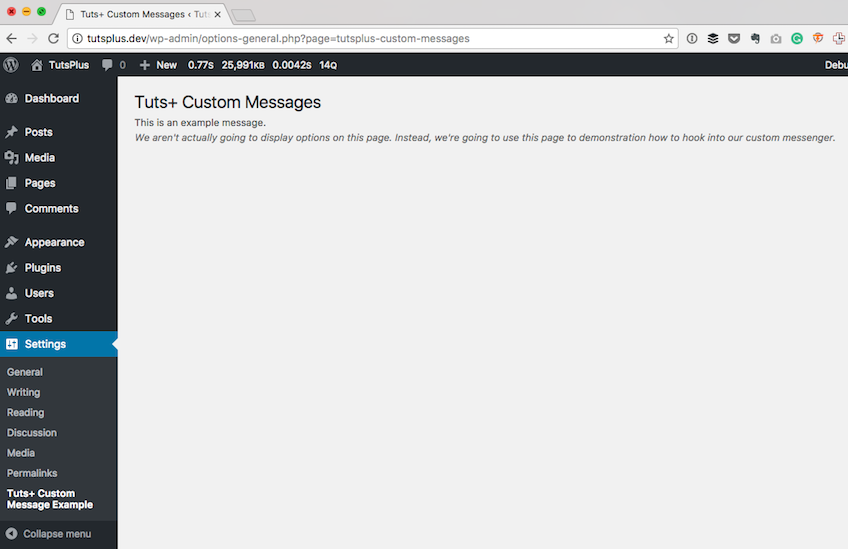
    echo 'This is an example message.';
}
And when you execute the code, you should see something like this. Look closely under the h1 tag and you should see the sentence we've included above.

Here's the problem, though: The message that we're displaying doesn't match any of the markup that WordPress uses to show success messages, warnings, or errors.
We'll be covering this in detail later in the series, but let's go ahead and display a success message. After all, we've come this far, right? We're displaying our own message through a custom hook using a messenger class we've created.
There are a number of ways in which we can do this: We can use a template file, we can use markup in the function and sanitize it there, or we can include the file in the function. For the purposes of this tutorial, I'm going to create the markup in the function and use wp_kses to sanitize the code.
This isn't normally how I would recommend doing this, but it is one way that it can be accomplished, and it also exposes us to wp_kses, which is a function we should all be using when rendering information to the browser.
Use this code:
<?php

public function display_message() {

    $html = "
        <div class='notice notice-success'>
            <p>You have successfully displayed a custom success message.</p>
        </div><!-- .notice-success -->
    ";

    $allowed_html = array(
        'div' => array(
            'class' => array(),
        ),
        'p' => array(),
    );

    echo wp_kses( $html, $allowed_html );
}
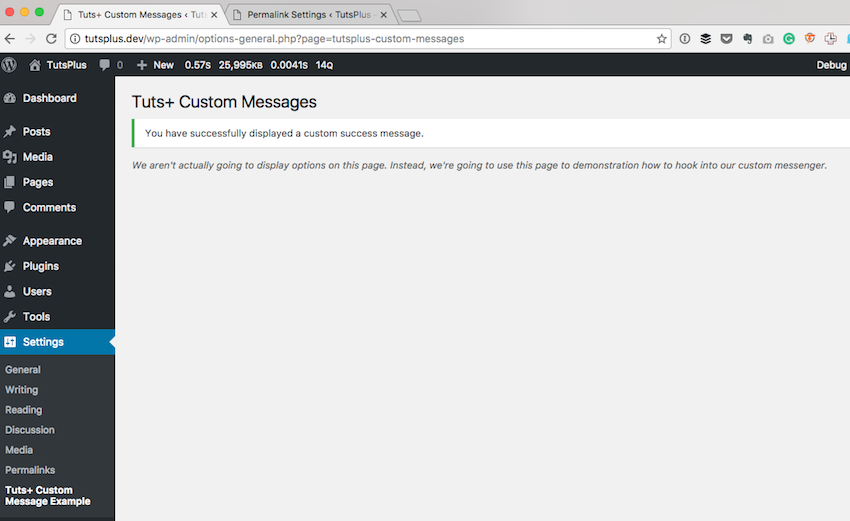
And this should result in the following screenshot:

Notice here that the message persists. There's no save button, there's no way to hide this message, and there's no way to change this message outside of the code. But that's okay, because that's not the point of this exercise.
A few things I want to mention, though:
- The class attributes on the div element that you see are borrowed directly from WordPress. This is so we can inherit those styles.
- Some messages can be dismissed. We will cover this in a future tutorial.
- The
$allowed_htmlarray passed towp_ksesis what makes sure that nothing other than the specified elements and attributes are rendered. It's a very good, strong, and clean way to sanitize data.
And that's all there is to cover in this particular tutorial; however, we're just getting started.
Conclusion
As we progress throughout this series, we're going to take a look at how to handle success messages, error messages, and warning messages, and how to introduce the ability to dismiss messages.
Furthermore, we'll be able to see how to use input from the user to control the type of message that's displayed.
Note that I'm also always happy to answer questions via the comments, and you can also check out my blog and follow me on Twitter. I usually talk all about software development within WordPress and tangential topics, as well.
Until the next tutorial, download the files, study the code, and see how this runs on your local machine. In the next part, we'll pick up exactly where we left off.


Comments