Gaming technologies are constantly evolving. Nevertheless, a lot of core gameplay elements have remained unchanged for decades. High scores, leaderboards, quests, achievements, and multiplayer support are examples. If you are developing a game for the Android platform, you don't have to implement any of those elements manually. You can simply use the Google Play games services APIs instead.
In this tutorial, I'll show you how to create a simple Android game, add Google Play games services to it, and use the leaderboards and achievements APIs.
Prerequisites
To be able to follow this tutorial, you'll need the following:
- The latest version of Android Studio.
- An Android device that has the latest version of the Google Play services app installed.
1. Create a Simple Game
There's no fun in adding the Play games services APIs to a blank Android Studio project. Therefore, let us now create a game where the user gains points by simply clicking on a button. More precisely, the objective of the game will be to click on a button as often as possible within 60 seconds.
Step 1: Create the Game Layout
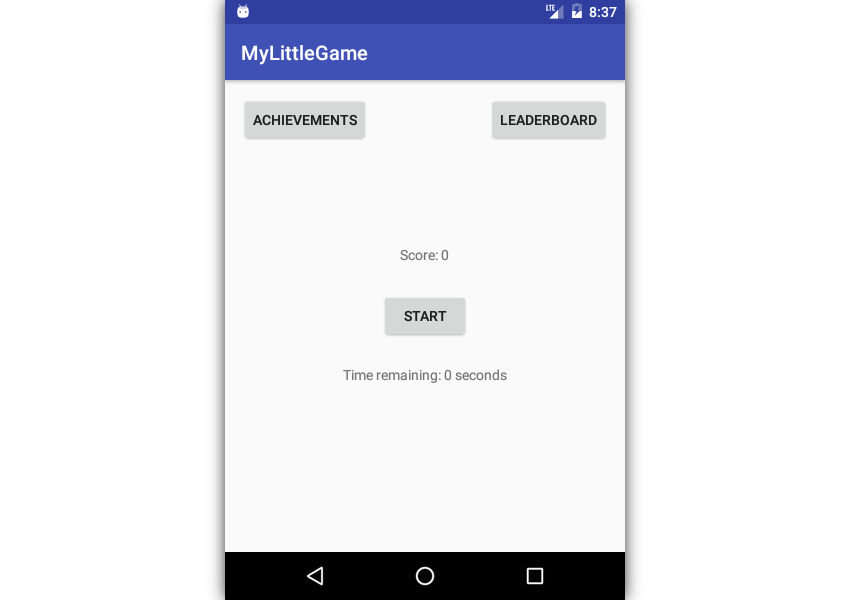
The layout of the game will have one Button widget, which the user will click to gain points, and two TextView widgets to display the score and the time left. If you put all of them inside a RelativeLayout and center them both horizontally and vertically, you should have a layout file that looks like this:
<?xml version="1.0" encoding="utf-8"?>
<RelativeLayout xmlns:android="http://schemas.android.com/apk/res/android"
    xmlns:tools="http://schemas.android.com/tools"
    android:id="@+id/activity_main"
    android:layout_width="match_parent"
    android:layout_height="match_parent"
    android:paddingBottom="@dimen/activity_vertical_margin"
    android:paddingLeft="@dimen/activity_horizontal_margin"
    android:paddingRight="@dimen/activity_horizontal_margin"
    android:paddingTop="@dimen/activity_vertical_margin"
    tools:context="com.tutsplus.mylittlegame.MainActivity">

    <Button
        android:text="Start"
        android:layout_width="wrap_content"
        android:layout_height="wrap_content"
        android:layout_centerVertical="true"
        android:layout_centerHorizontal="true"
        android:id="@+id/main_button" />

    <TextView
        android:text="Time remaining: 0 seconds"
        android:layout_width="wrap_content"
        android:layout_height="wrap_content"
        android:layout_below="@+id/main_button"
        android:layout_centerHorizontal="true"
        android:layout_marginTop="25dp"
        android:id="@+id/time_view" />

    <TextView
        android:text="Score: 0"
        android:layout_width="wrap_content"
        android:layout_height="wrap_content"
        android:layout_above="@+id/main_button"
        android:layout_marginBottom="28dp"
        android:layout_centerHorizontal="true"
        android:id="@+id/score_view" />

</RelativeLayout>
Our game will have a leaderboard screen and an achievements screen. To allow the user to navigate to those screens, add two more Button widgets at the end of the layout file.
<Button
    android:text="Achievements"
    android:layout_width="wrap_content"
    android:layout_height="wrap_content"
    android:layout_alignParentTop="true"
    android:layout_alignParentLeft="true"
    android:id="@+id/achievements_button"
    android:onClick="showAchievements"
    />

<Button
    android:text="Leaderboard"
    android:layout_width="wrap_content"
    android:layout_height="wrap_content"
    android:layout_alignParentTop="true"
    android:layout_alignParentRight="true"
    android:id="@+id/leaderboard_button"
    android:onClick="showLeaderboard"/>
Note that both the buttons have onClick attributes. We will create the Java methods they refer to in later steps.
Step 2: Implement the Game Logic
Inside the activity, create member variables for the gameplay widgets we defined in the layout XML file. Additionally, create an int variable for the score and a boolean variable for the game's state.
private Button mainButton;
private TextView scoreView;
private TextView timeView;

private int score = 0;
private boolean playing = false;
Initialize the widgets inside the activity's onCreate() method using the findViewById() method.
mainButton = (Button)findViewById(R.id.main_button);
scoreView = (TextView)findViewById(R.id.score_view);
timeView = (TextView)findViewById(R.id.time_view);
To listen for clicks on the Button widget, create and add an OnClickListener to it.
mainButton.setOnClickListener(new View.OnClickListener() {
    @Override
    public void onClick(View v) {
        // More code goes here
    }
});
We must now implement the following requirements:
- The first time the user clicks on the button, the game must start.
- Each subsequent click should increment the
scorevariable.
- The game must end when 60 seconds have elapsed.
We can use the playing variable to differentiate between the first click and all the subsequent clicks. To keep track of the time, we can use the abstract CountDownTimer class, which is ideal for our requirements. It has an onTick() method inside, which can accurately update timeView to display the number of seconds remaining. It also has an onFinish() method, which is called when the countdown is over.
Accordingly, add the following code to the onClick() method:
if(!playing) {
    // The first click
    playing = true;
    mainButton.setText("Keep Clicking");

    // Initialize CountDownTimer to 60 seconds
    new CountDownTimer(60000, 1000) {
        @Override
        public void onTick(long millisUntilFinished) {
            timeView.setText("Time remaining: " + millisUntilFinished/1000);
        }

        @Override
        public void onFinish() {
            playing = false;
            timeView.setText("Game over");
            mainButton.setVisibility(View.GONE);
        }
    }.start();  // Start the timer
} else {
    // Subsequent clicks
    score++;
    scoreView.setText("Score: " + score + " points");
}
At this point, you can run the project to play the game.
2. Add Games Services Dependencies
Configuring a project to use the Play games services APIs involves a lot of steps. By using Android Studio's Firebase Assistant, you can automate some of them.
Open the assistant window by going to Tools > Firebase. Next, in the Analytics section, click on the Log an Analytics event link. You can now connect your Android Studio project to a Firebase project by clicking on the Connect to Firebase button. Make sure that you choose the Create new Firebase project option in the dialog that pops up.
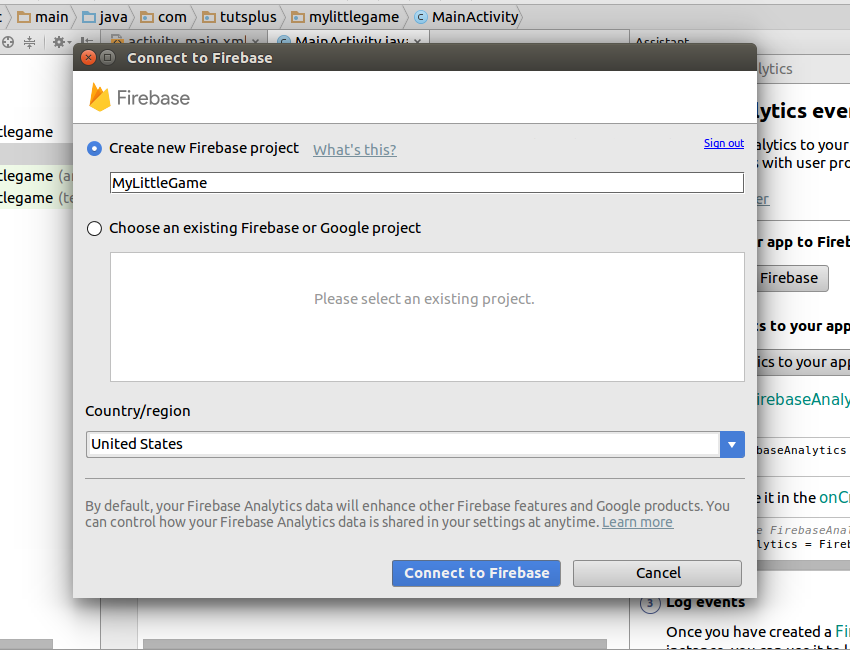
Once the connection has been established, press the Add Analytics to your app button to add all the required changes to the build.gradle files.
You must add the dependency for Play games services manually. Therefore, go to the build.gradle file of the app module and add the following compile dependency:
compile 'com.google.android.gms:play-services-games:9.8.0'
Furthermore, the games services APIs need an XML configuration file. Create one called games-ids.xml inside the res/values folder. We'll add content to it in a later step.
3. Register the Game
All games that use Google Play games services must be registered on the Play developer console. You'll have to pay a one-time registration fee of $25 to be able to access the console.
In the console, click on the gamepad icon to open the Game Services screen.

Next, click on the Set up Google Play game services button to start registering the game.
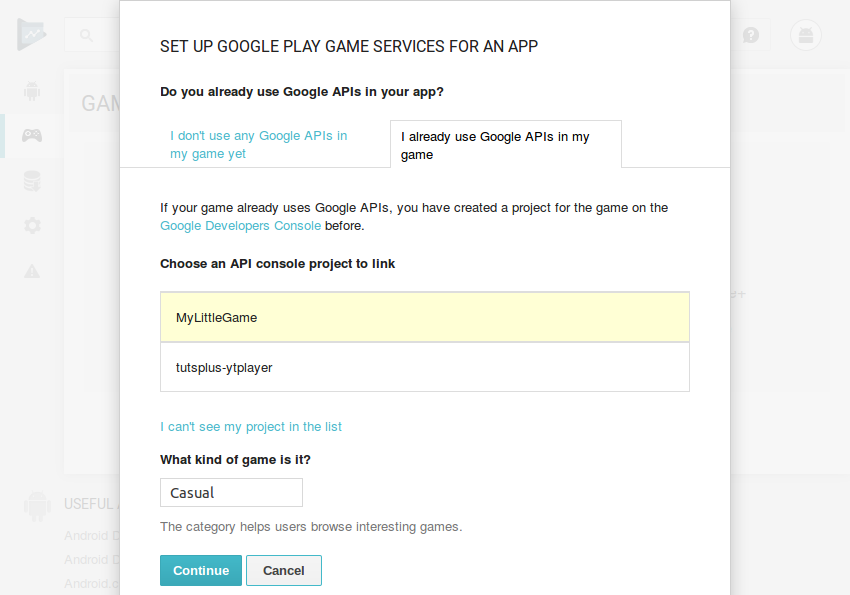
In the dialog that pops up, choose the second tab because our game is already using Google APIs. You must now be able to see your Firebase project's name in the list of available projects. After selecting it, choose a category for the game. For now, you can go with the Casual category.
After you press Continue, you can link Firebase Analytics and Play games services by clicking on the Link Firebase button.
Next, go to the Linked apps section to link your Android Studio project to the Play developer console. In the dialog that pops up, press the Android button and type in your project's package name in the Package name field.
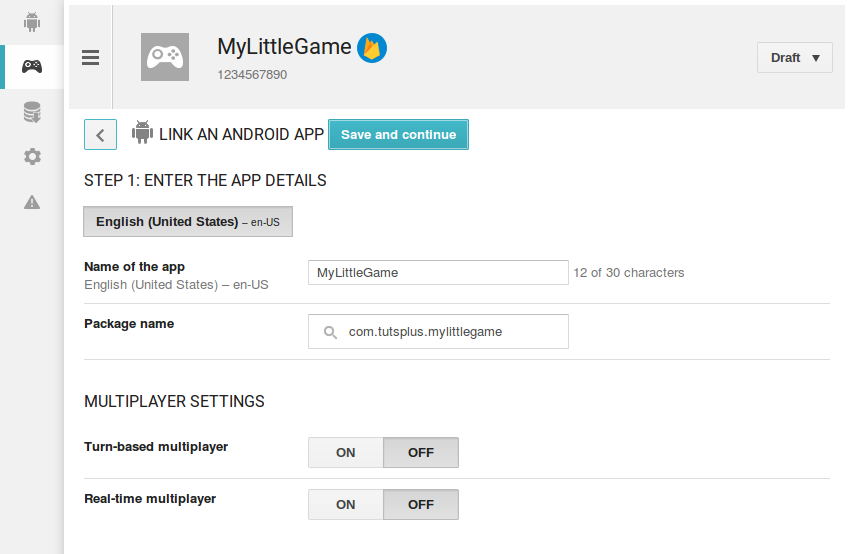
Press the Save and continue button to generate a client ID for your game.
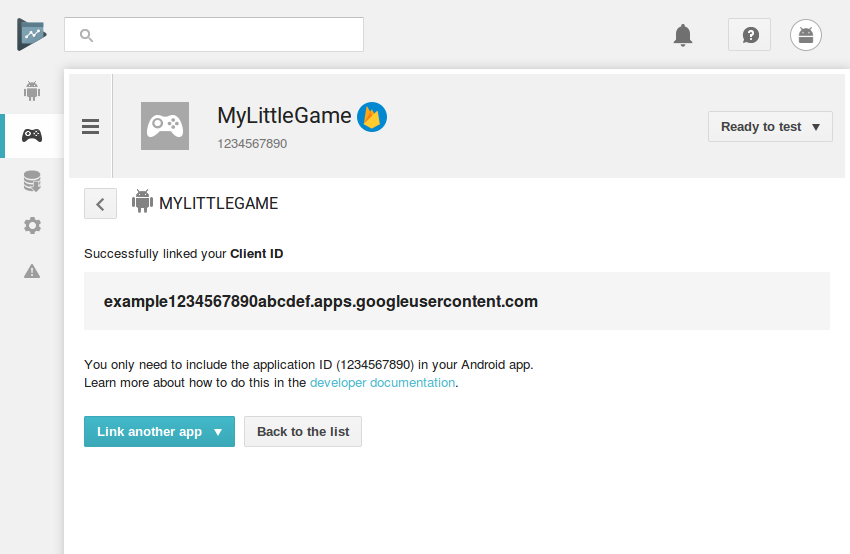
Our game has now been successfully registered with the Google Play developer console.
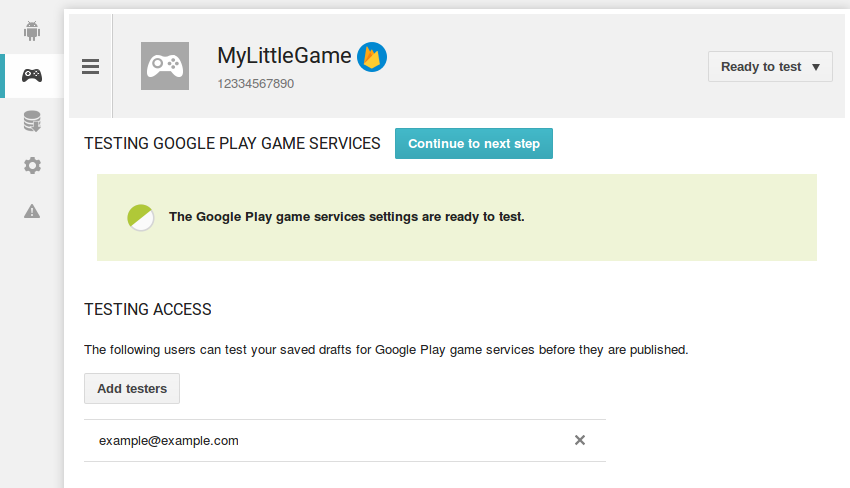
4. Add a Test User
The Play games services APIs will work only if your game is published on Google Play. However, to allow you to test your game, the developer console lets you associate a few test user accounts. By going to the Testing section, you can add or remove test user accounts. Make sure that you add the Google account you use on your phone or emulator here.
5. Create a Leaderboard
A leaderboard is nothing but a screen that displays the users' high scores. Play games services leaderboards allow users to see their daily, weekly and all-time high scores.
Creating a leaderboard on the Play developer console takes just a few clicks. Go to the Leaderboards section and press the Add leaderboard button. In the next screen, give a meaningful name to the leaderboard and press the Save button.
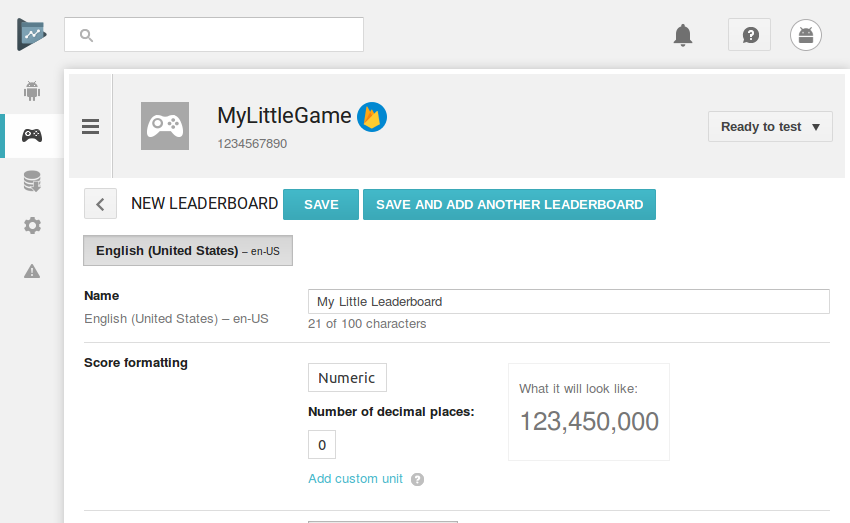
Our leaderboard is now ready.
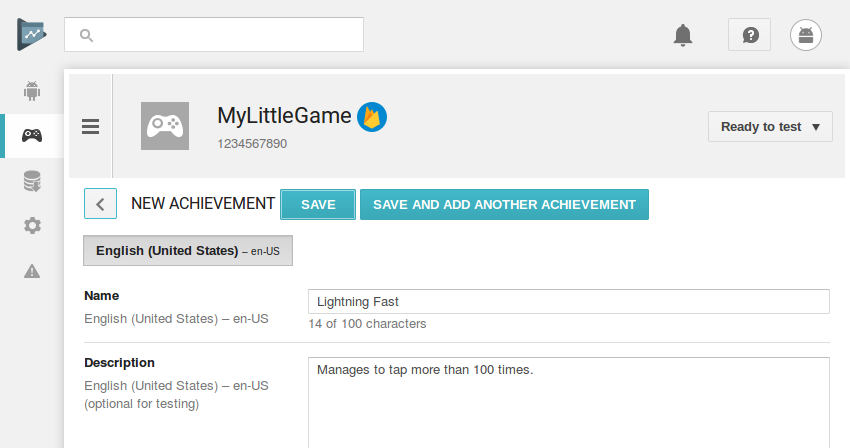
6. Create an Achievement
Achievements are in-game awards users get for managing to do something special. A game that has a lot of achievements to unlock is usually more fun than one that doesn't. Consequently, most of the popular games on Google Play today have dozens, if not hundreds of achievements.
In this tutorial, we'll add just one achievement to our game. Its name will be Lightning Fast, and it will be unlocked when the user manages to tap the button more than 100 times in a minute. To create the achievement, go to the Achievements section and press the Add achievement button. After you type in the name and the description of the achievement, press the Save button.
7. Update the Game Configuration XML
Both the leaderboard and the achievement have unique identifiers. We must now add those identifiers to our Android Studio project, along with the application ID that was generated during the registration. You can do so by manually updating the games-ids.xml file we created earlier. However, I suggest that you use the automatically generated configuration code available in the developer console.
To get the auto-generated configuration code, you can go to either the Achievements section or the Leaderboards section, and press the Get resources link. You will see XML code that looks like this:
<?xml version="1.0" encoding="utf-8"?>
<!--
Google Play game services IDs.
Save this file as res/values/games-ids.xml in your project.
-->
<resources>
    <string name="app_id">1234567890</string>
    <string name="package_name">com.tutsplus.mylittlegame</string>
    <string name="achievement_lightning_fast">HzkA4Kz04F8MRYIAze</string>
    <string name="leaderboard_my_little_leaderboard">HzkA4Kz04F8MRYIBVU</string>
</resources>
Copy all the code and paste it in your project's games-ids.xml file.
8. Connect to Play Games Services
Before using the leaderboards and achievements APIs, we must create a GoogleApiClient instance and connect it to Play games services. Therefore, add a GoogleApiClient object as a member variable of your activity.
We must use the GoogleApiClient.Builder class to build the GoogleApiClient instance. While building the client, we can specify the API and API scope we are interested in by using the addApi() and addScope() methods.
Additionally, I suggest that you call the enableAutoManage() method to make sure that the client automatically manages the connection to the games services. The method, however, needs an OnConnectionFailedListener, which will be called when the connection fails. For now, we'll simply call the finish() method to close the app in case of a connection failure.
Accordingly, add the following code at the beginning of the onCreate() method:
apiClient = new GoogleApiClient.Builder(this)
        .addApi(Games.API)
        .addScope(Games.SCOPE_GAMES)
        .enableAutoManage(this, new GoogleApiClient.OnConnectionFailedListener() {
    @Override
    public void onConnectionFailed(@NonNull ConnectionResult connectionResult) {
        Log.e(TAG, "Could not connect to Play games services");
        finish();
    }
}).build();
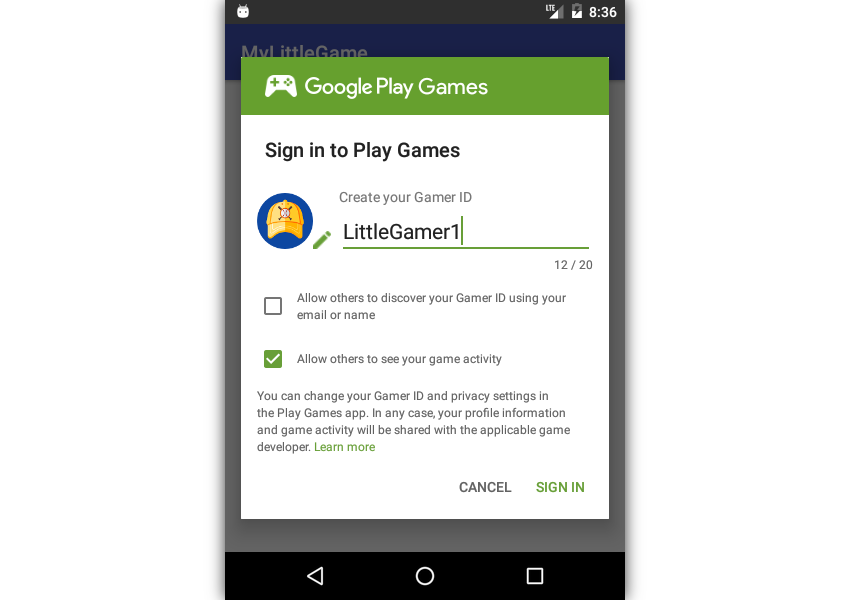
If you run the app now, you will be prompted to create a Gamer ID for yourself. Type in a Gamer ID of your choice and press the Sign in button.
9. Use the Leaderboard
Submitting a score to the leaderboard takes just one line of code. All you need to do is call the submitScore() method of the Games.Leaderboards class. As its arguments, it expects the GoogleApiClient instance, the ID of the leaderboard, and the score.
In our game, we must submit the score at the end of the 60 seconds. Therefore, add the following code to the onFinish() method:
Games.Leaderboards.submitScore(apiClient,
        getString(R.string.leaderboard_my_little_leaderboard),
        score);
To view the leaderboard, we must start a new activity with a leaderboard intent. To fetch the leaderboard intent, call the getLeaderboardIntent() method of the Games.Leaderboards class and pass the GoogleApiClient instance and leaderboard ID to it.
Our game's layout already has a button that can be pressed to open the leaderboard. The value of its onClick attribute is showLeaderboard. Therefore, add the following code to your activity:
public void showLeaderboard(View v) {
    startActivityForResult(
      Games.Leaderboards.getLeaderboardIntent(apiClient,
        getString(R.string.leaderboard_my_little_leaderboard)), 0);
}
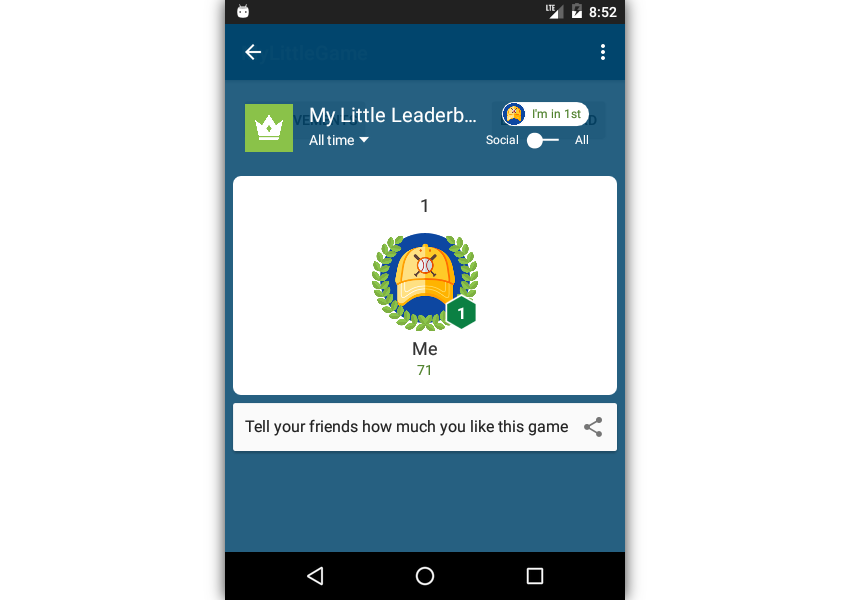
You can run the app now and play the game again. This time, when the game's over, your score will be submitted to the leaderboard. Here's what the default leaderboard looks like:
10. Use the Achievement
By calling the unlock() method of the Games.Achievements class, you can unlock any achievement. The method expects the GoogleApiClient instance and the ID of the achievement as its only arguments.
The Lightning Fast achievement we defined in the console must be unlocked when the user's score crosses 100 points. Therefore, right after the code to increment the score, add the following code:
if(score>100) {
    Games.Achievements
         .unlock(apiClient,
            getString(R.string.achievement_lightning_fast));
}
The code needed to display the achievements screens is very similar to the one we wrote to display the leaderboard screen. All you need to do is pass the return value of the getAchievementsIntent() method to the startActivityForResult() method.
public void showAchievements(View v) {
    startActivityForResult(
        Games.Achievements
             .getAchievementsIntent(apiClient),
        1
    );
}
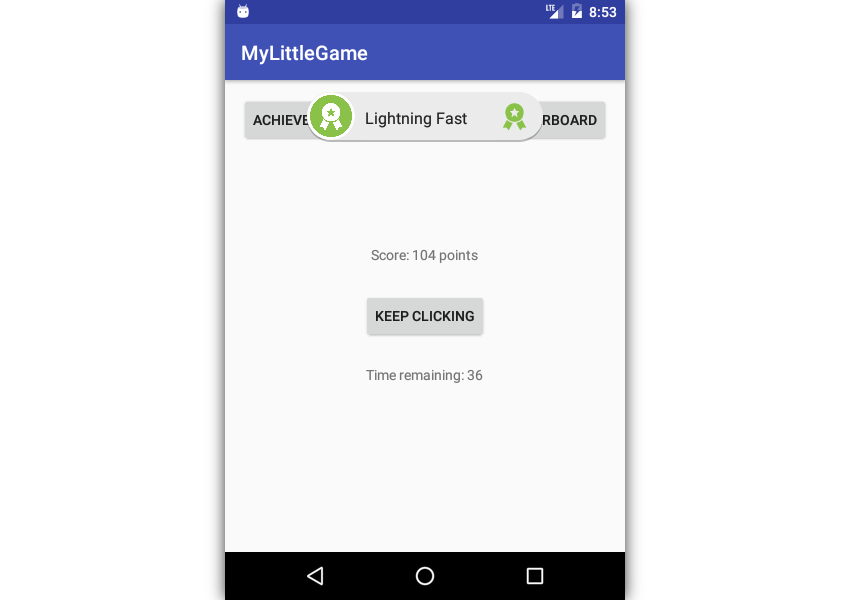
If you run your app and play the game again, you will see an achievement pop up when your score crosses 100 points for the first time.
Conclusion
You now know how to use the Google Play games services APIs in your Android Studio project. Play games services are not limited to the Android platform alone. They can be used just as easily on both the web and iOS platforms too. So Play games services allow you to create cross-platform games and offer consistent gaming experiences to users on multiple platforms.
To learn more about the Google Play games services APIs, you can refer to their official guides or, even better, check out some of our tutorials here on Envato Tuts+!
 Android SDKAndroid From Scratch: Google Play Services
 AndroidHow to Grow Your Audience With Google App Invites
 Android SDKGoogle Play Services: Using the Places API
 Android SDKGoogle Play Services: Google Cast v3 and Media

Comments