No matter what persistence framework an application uses, the developer decides what is stored in the application's persistent store. This also means that the developer is in charge of validating the data before it is inserted into the persistent store.
If your application uses Core Data for persisting data, then you are in luck. The framework has a number of APIs for validating objects before they are persisted to disk. In this tutorial, I show you what options Core Data offers developers for validating objects.
1. Project Setup
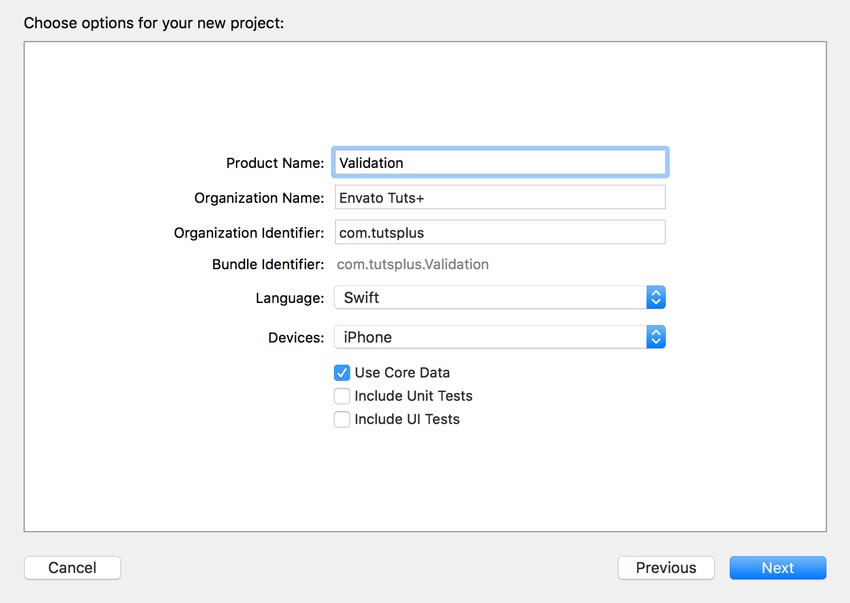
The best way to learn is by doing. Open Xcode and create a new project based on the Single View Application template.

Name the project Validation and set Language to Swift. Check Use Core Data at the bottom and click Next.
2. Populate Data Model
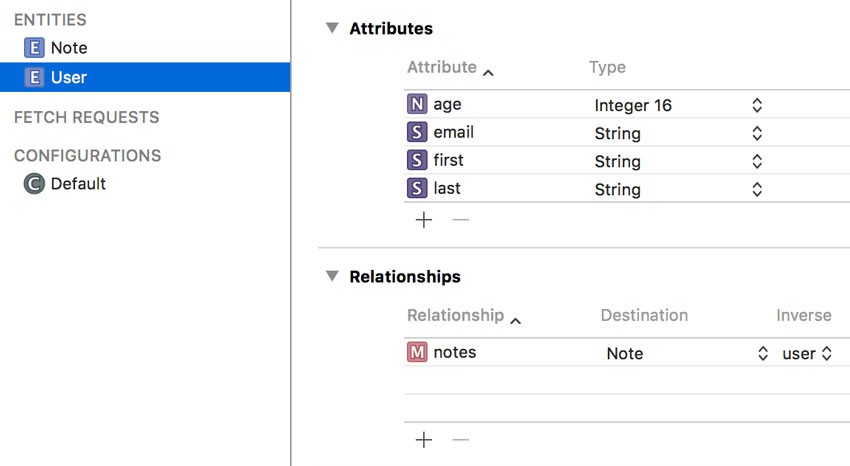
Open Validation.xcdatamodeld, create a new entity, and name it User. Add the following attributes to the User entity:
- first of type String
- last of type String
- email of type String
- age of type Integer 16
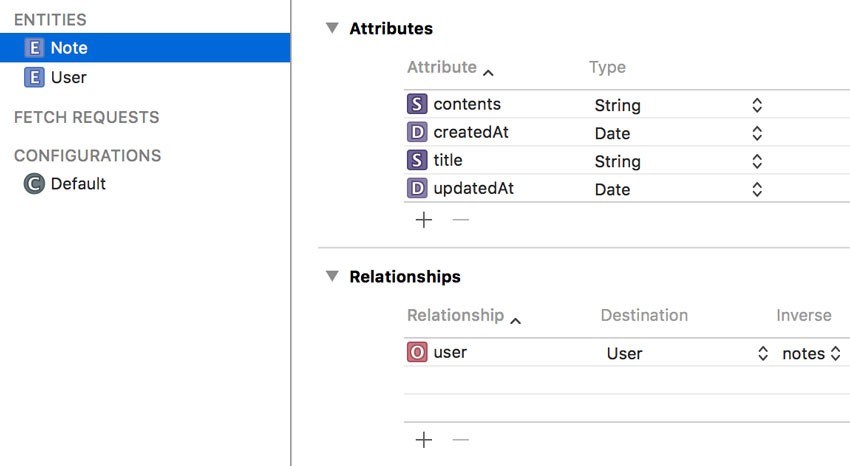
Create another entity, name it Note, and add the following attributes to the entity:
- title of type String
- contents of type String
- createdAt of type Date
A user can have many notes and a note can belong to only one user. This means that we need to add a To Many relationship to the User entity with the Note entity as the destination. We also need to add a To One relationship to the Note entity with the User entity as the destination and notes as the inverse relationship. This is what that looks like in Xcode's data model editor.
3. Constraining Attributes
Common constraints can be defined in the data model. Let me show you how this works. Open Validation.xcdatamodeld and select the User entity. Select the email attribute and open the Data Model Inspector on the right.
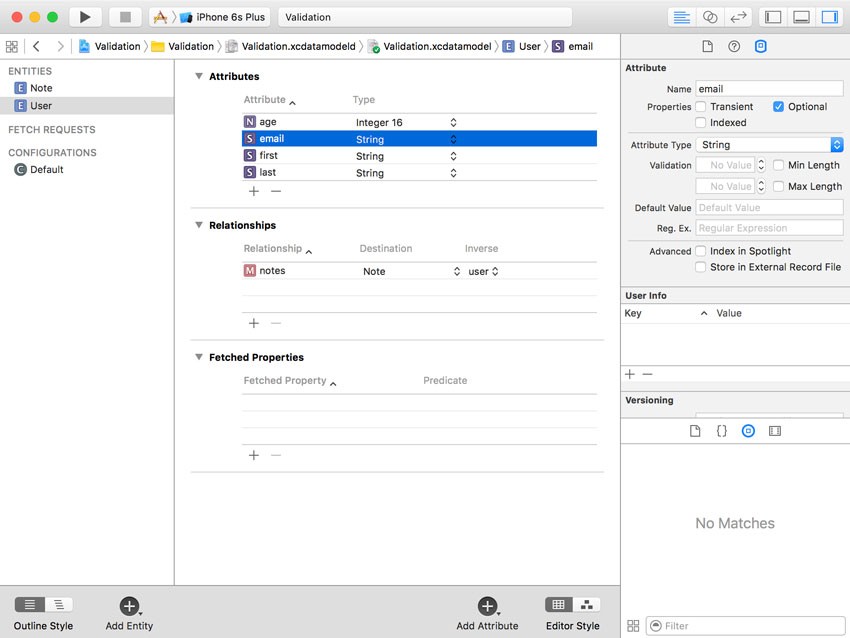
In the Validation section, you can set the minimum and maximum length of the attribute. You can even enter a regular expression the value of the attribute must match in order to be valid. The Data Model Inspector also adds the ability to set a default value, which is convenient for required attributes.
This brings us to the most obvious constraint for attributes, their optionality. By unchecking the Optional checkbox at the top, you tell Core Data that the attribute must have a value for it to be valid.
If an object doesn't pass validation, Core Data throws an error if a save operation is performed. It goes without saying that Core Data doesn't allow invalid objects to be pushed to the application's persistent store.
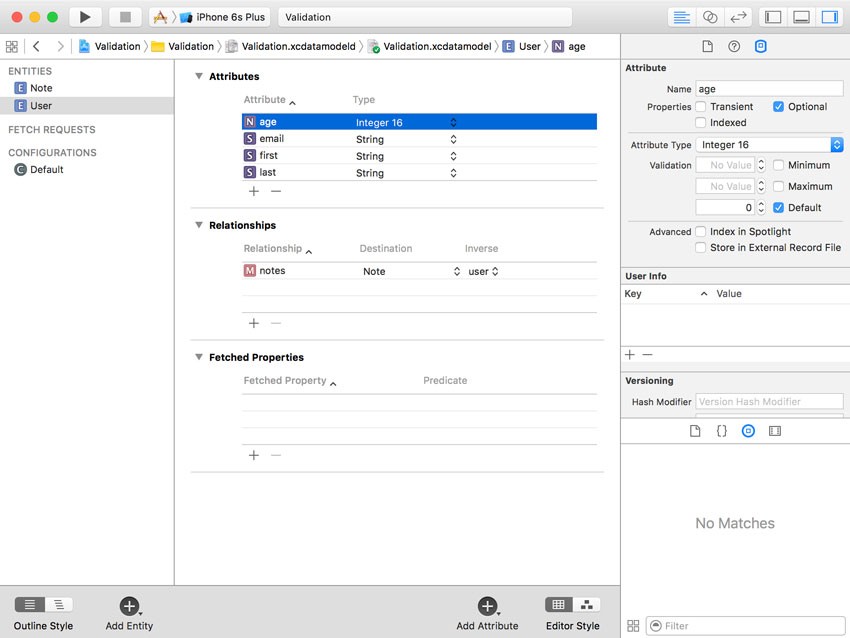
If you select the age attribute of the User entity, you will notice that the Validation section looks slightly different. Because the age attribute is of type Integer 16, you can set a minimum and a maximum value for the attribute. You can also define a default value.
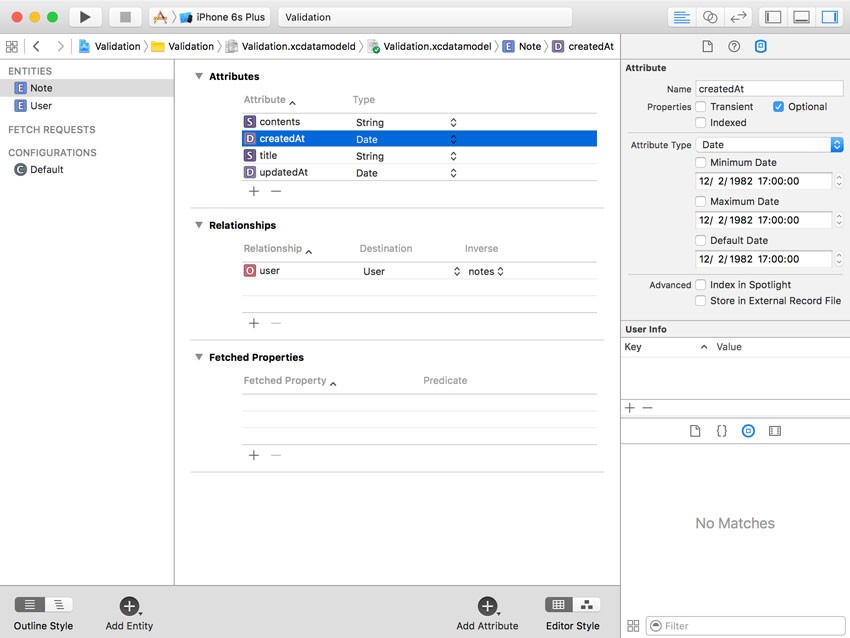
Select the createdAt attribute of the Note entity and open the Data Model Inspector. Note that you can specify a minimum and a maximum date as well as a default date.
The most important downside of constraints defined in the data model is the lack of dynamism. For example, if you want to constrain an attribute of type Date to values based on the current date, then you need to implement custom validation in code. We take a look at how that works later.
4. Constraining Relationships
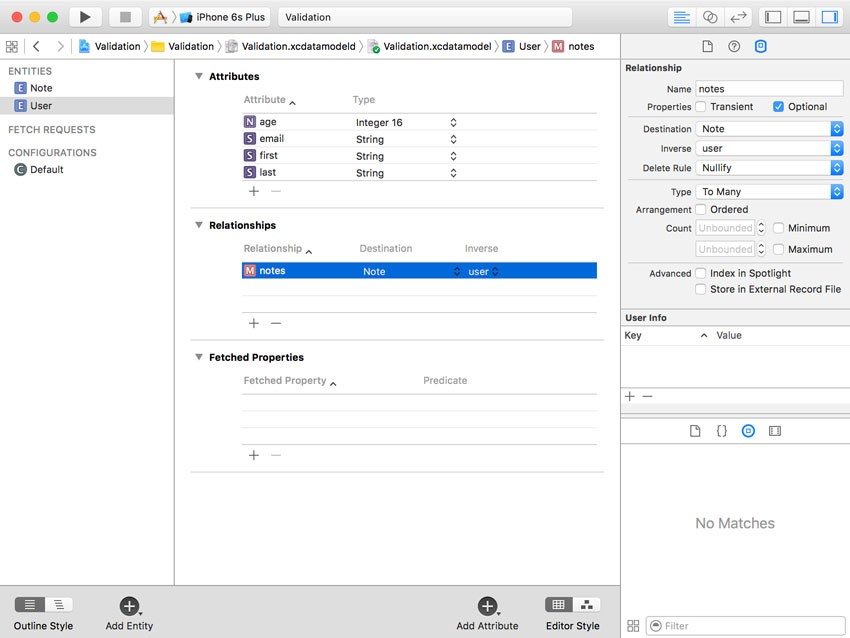
Relationships are not very different from attributes. They too can be constrained. A relationship can be optional or required. The count of a To Many relationship can be constrained to a minimum and a maximum value. Select the notes attribute of the User entity and open the Data Model Inspector. The count of the notes relationship can have a minimum and a maximum value.
Having the ability to add constraints to a data model is a powerful concept and it is nice to know that this is built into the Core Data framework.
5. Validating Objects
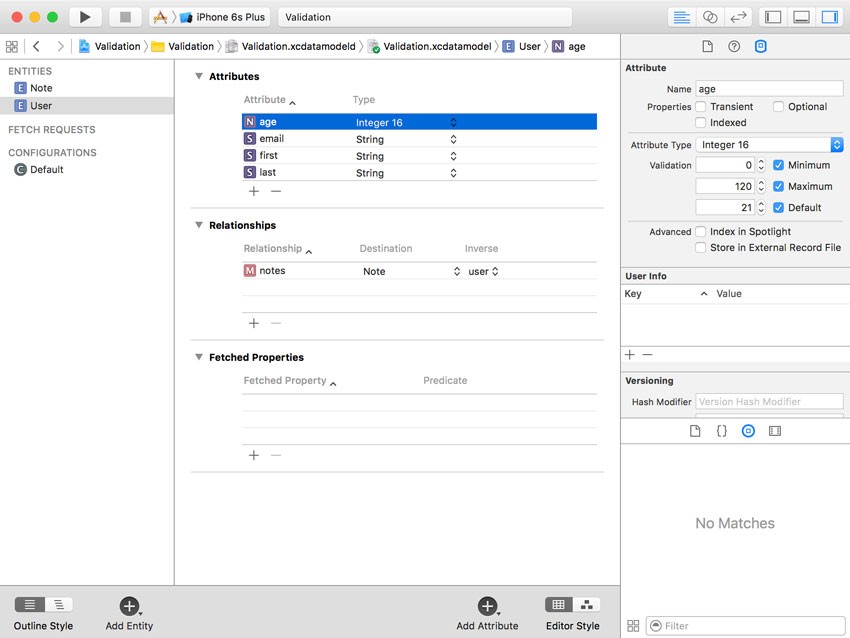
Select the User entity and mark every attribute as required by unchecking the Optional checkbox in the Data Model Inspector. Select the age attribute and set the minimum value to 0 and the maximum value to 120. Set the attribute's default value to 21.
Open AppDelegate.swift and update application(_:didFinishLaunchingWithOptions:) as shown below. We create an instance of the User entity and populate its attributes. Note that we set the age attribute to a value that exceeds the maximum value we specified in the data model. We can ask the managed object whether it is valid for insertion into the persistent store by invoking validateForInsert(). Because this method is throwing, we wrap it in a do-catch statement.
func application(application: UIApplication, didFinishLaunchingWithOptions launchOptions: [NSObject: AnyObject]?) -> Bool {
    if let entity = NSEntityDescription.entityForName("User", inManagedObjectContext: self.managedObjectContext) {
        // Create Managed Object
        let user = NSManagedObject(entity: entity, insertIntoManagedObjectContext: self.managedObjectContext)

        // Populate Managed Object
        user.setValue(140, forKey: "age")
        user.setValue("Bart", forKey: "first")
        user.setValue("Jacobs", forKey: "last")
        user.setValue("[email protected]", forKey: "email")

        do {
            try user.validateForInsert()

        } catch {
            let validationError = error as NSError

            print(validationError)
        }

    }

    return true
}
If you run the application in the simulator or on a physical device, you should see the following error in the console.
Error Domain=NSCocoaErrorDomain Code=1610 "The operation couldn’t be completed. (Cocoa error 1610.)" UserInfo={NSValidationErrorObject=<NSManagedObject: 0x7fef63611dd0> (entity: User; id: 0x7fef63613eb0 <x-coredata:///User/t8C45E95D-D8C3-4900-82FA-BC313D53D5882> ; data: {
    age = 140;
    email = "[email protected]";
    first = Bart;
    last = Jacobs;
    notes =     (
    );
}), NSValidationErrorValue=140, NSValidationErrorKey=age, NSLocalizedDescription=The operation couldn’t be completed. (Cocoa error 1610.)}
The error is pretty clear about what is wrong with the managed object. Even though the localized description is a bit vague, the error indicates the value of the age attribute isn't meeting the constraints we defined in the data model.
It is possible that multiple validation errors were thrown during validation. Let me show you what that looks like. To avoid migration issue, delete the application from simulator. Revisit the data model and select the last attribute of the User entity. Open the Data Model Inspector on the right and uncheck Optional to make the attribute required.
Open AppDelegate.swift and remove the line in which we set the last name of the User record.
user.setValue("Jacobs", forKey: "last")
Run the application again and inspect to output in the console.
Error Domain=NSCocoaErrorDomain Code=1560 "(null)" UserInfo={NSDetailedErrors=(
    "Error Domain=NSCocoaErrorDomain Code=1610 \"The operation couldn\U2019t be completed. (Cocoa error 1610.)\" UserInfo={NSValidationErrorObject=<NSManagedObject: 0x7feab8419690> (entity: User; id: 0x7feab84196f0 <x-coredata:///User/tD1D0A3BA-7F23-41A7-9567-5C1A30D6A0132> ; data: {\n    age = 140;\n    email = \"[email protected]\";\n    first = Bart;\n    last = nil;\n    notes =     (\n    );\n}), NSValidationErrorValue=140, NSValidationErrorKey=age, NSLocalizedDescription=The operation couldn\U2019t be completed. (Cocoa error 1610.)}",
    "Error Domain=NSCocoaErrorDomain Code=1570 \"The operation couldn\U2019t be completed. (Cocoa error 1570.)\" UserInfo={NSValidationErrorKey=last, NSLocalizedDescription=The operation couldn\U2019t be completed. (Cocoa error 1570.), NSValidationErrorObject=<NSManagedObject: 0x7feab8419690> (entity: User; id: 0x7feab84196f0 <x-coredata:///User/tD1D0A3BA-7F23-41A7-9567-5C1A30D6A0132> ; data: {\n    age = 140;\n    email = \"[email protected]\";\n    first = Bart;\n    last = nil;\n    notes =     (\n    );\n})}"
)}
The userInfo dictionary of the error object contains an array of errors that inform us what went wrong during validation. Understand that the same errors are thrown if you try to save a managed object that doesn't pass validation.
Conclusion
Data validation is a key aspect of data persistence. You need to make sure that the data you insert into the persistent store is valid. In other words, the data you insert needs to conform to the requirements you define in the data model and your application code.
Next week, I show you how you can create more complex validation rules in code. Even though this approach requires a bit more work, validation rules in code are more flexible and powerful.

Comments