This tutorial will teach you how to use the iOS 6 SDK and the Social Framework to load dynamic content from Twitter. To do so, I'll teach you how to build a Twitter profile generating application. Read on!
Step 1: Creating the Project
Open Xcode and select “Create a new Xcode project”. Select “Empty Application” and click “next”. Enter a name for your project (I called mine “Twitter Profile”), make sure you select iPhone for the Device, and then select all the checkboxes, except the Use Core Data checkbox. After that, click “next” and choose a place to save your project before clicking “create”.

Step 2: Setting Supported Orientations
We only want to use this application in portrait mode, so go to the Supported Interface Orientations section and deselect the landscape orientations.

Step 3: Import the Necessary Frameworks
We will need to add three Frameworks to our project: the Social Framework to make the request, the Accounts Framework to use the user's Twitter account, and the QuartzCore Framework to customize our interface a little.
Go to the “Build Phases” tab and expend the “Link Binary With Libraries” option. Click the “+” button to add a new Framework. Type “Social” into the search box and select the Social.framework option that appears in the list. Click “Add” to include this framework in the linking phase of your project. Do the same for the Accounts and QuartzCore frameworks by typing “Accounts” and “QuartzCore” into the search box.

Step 4: Create a Storyboard
Go to “File” > “New” > “File...” or press ⌘N to create a new file. Go to the “Use Interface” section, select “Storyboard" and click “Next”. Make sure that the Device Family is set to iPhone and click “Next” again. Name your storyboard MainStoryboard and click “Create”.

Now we have to link the Storyboard to our project. Select the project name in the navigator menu of Xcode and select the current target (in our case “Twitter Profile”). Next, select the “Summery” tab and go to the “iPhone / iPad Deployment Info” section. Once there, select our Storyboard called “MainStoryboard” for the Main Storyboard.

The last thing we need to do to make our storyboard work is changing the application: didFinishLaunchWithOptions: method, so open AppDelegate.m and modify the method as follows:
- (BOOL)application:(UIApplication *)application didFinishLaunchingWithOptions:(NSDictionary *)launchOptions
{
    return YES;
}
Step 5: Creating the Interface
Open the Storyboard and drag a Navigation Controller from the Object Library to the canvas. Select the Table View controller connected to the Navigation Controller and delete it. Now drag a View Controller from the Object Library to the canvas. CTRL-drag from the Navigation Controller to the View Controller and select "root view controller" from the pop-up menu. Select the Navigation Controller, open the File Inspector, and then deselect “Use Autolayout” since we won’t use this new feature for our app. At last, double-click on the navigation bar of the View Controller we just created and enter “Username” as title.
Now select a Text Field from the Object Library and add it to the View Controller. Select the Text Field and open the Attributes Inspector. Enter “Username” as the Placeholder and make sure to select the “Clear when editing begins” option. Next, grab a Button from the Object Library, add it to the View Controller, and change the title to “Show Info”.
At last, make sure to arrange the Text Field and Button as follows:

We also need a screen to show the Twitter profile, so drag a new View Controller from the Object Library into the canvas. CTRL-drag from the “Show Info” button to the View Controller and select “push” from the pop-up menu. Next, double-click on the navigation bar of the second View Controller and enter “Profile” as title.
We will need a lot of labels and some imageviews on this screen to show the profile information. First, add an Image View to the Profile View Controller and make sure to align it to the top. Next, open the Size Inspector and give it a size of 320 x 160 pixels. Also, modify the autoresizing as follows:

Add another Image View on top of the previous one. Go to the Size Inspector and modify the size, coordinates, and autoresizing as follows:

Now we will add some labels to show the name and username. Drag a label on top of the largest image view for the banner. Open the Size Inspector and modify the size, coordinates, and autoresizing as follows:

Next open the Attributes Inspector and Enter “Name” for the label text. Change the color to white, make the font Bold and set the alignment to center. At last we will add a shadow to this label. Set the vertical shadow offset to 1, so the shadow will appear under the text. Click on Shadow color and make the color black with 75% opacity.

This label was for the name, but we also need a label for the username, so select the label we just created and press ⌘C ⌘V to copy and paste it. Change the text to “@username”, and change the X and Y coordinates to 20 and 120. We also want to make this font a little bit smaller, so open the Attributes Inspector and change the font size to 14.
We also need six more labels to show the amount of tweets, followers, and people following. Luckily for us, we only need to add two and can copy and paste the other four. Add a new label to the View Controller, make it 74 pixels wide, change the X and Y coordinates to 20 and 168. Enter “0” as text for this label. Next, add a new label, also make it 74 pixels wide, but this time change the X and Y coordinates to 20 and 190. Open the Attributes Inspector and give the label a light gray color. Also change the text to “Tweets”.
Select both labels we just created and ALT drag them to the center. This way we create a copy of the two labels. ALT drag again, but this time align the labels to the right. Now we created these six labels pretty fast. Change the text of the center label to “Following” and the text of the right label to “Followers”.
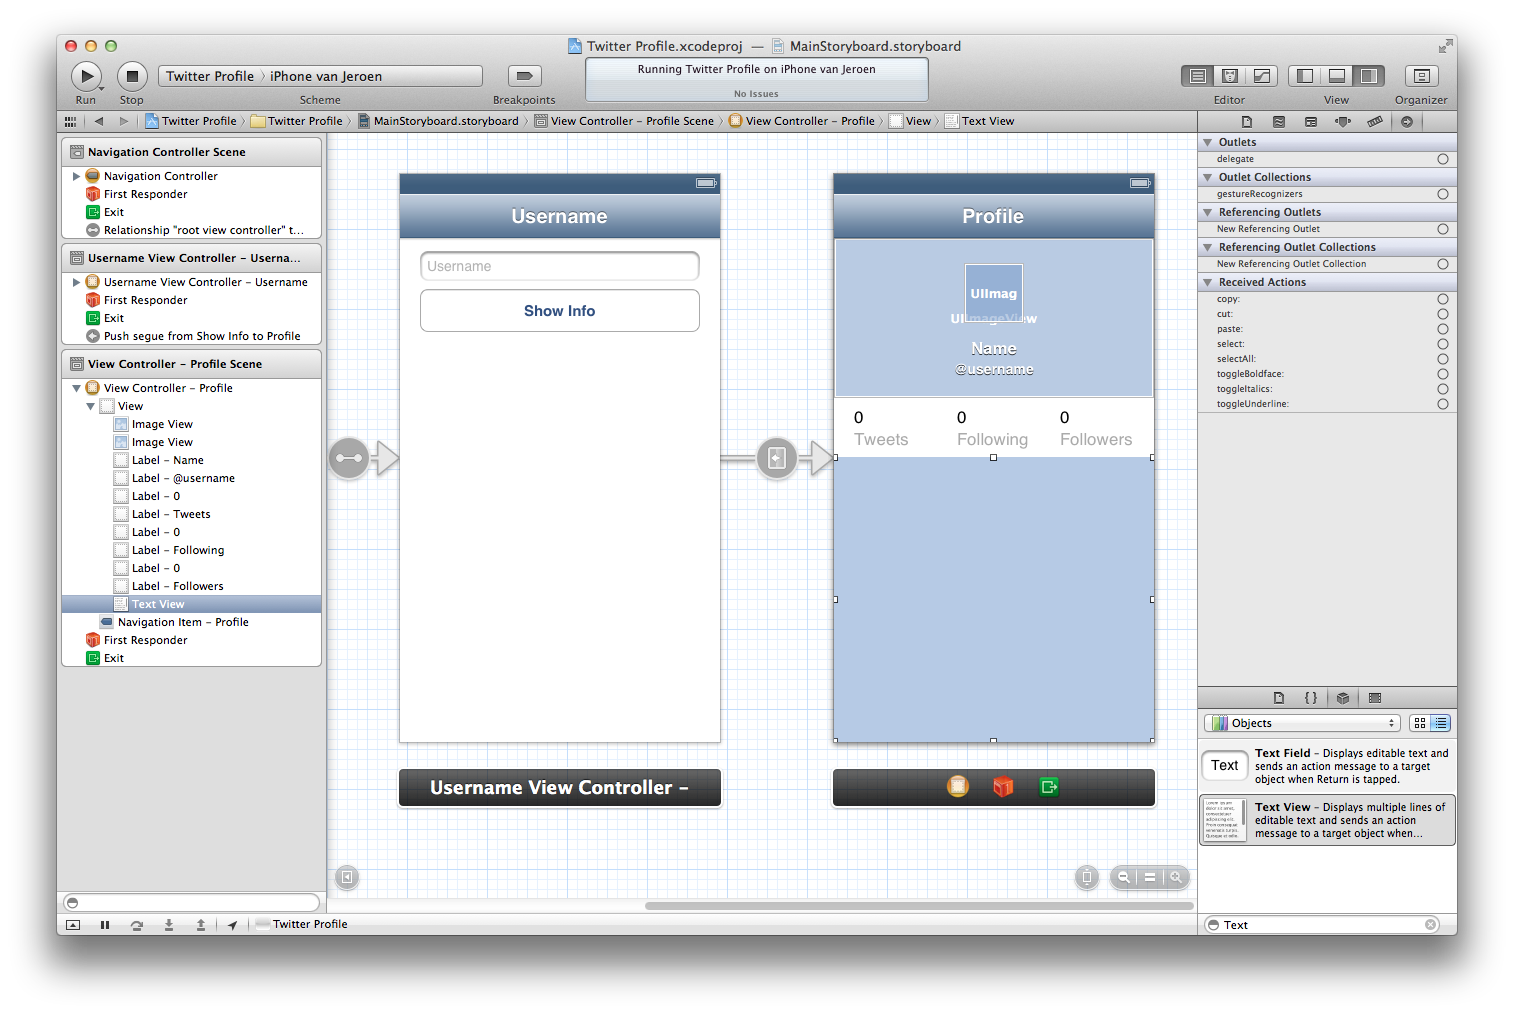
The last thing we will need to add to our interface is a Text View to show the last tweet of a user, so drag a Text View from the Object Library to the bottom of the View Controller. Open the Size Inspector and modify the size, coordinates, and autoresizing as follows:

With these options our app will look good on an iPhone 5, but also on an older iPhone 4. You can preview the Storyboard in a 3.5” screen setup by pressing this button at the bottom right:

Now open the Attributes Inspector and remove the text of the Text View. Also make sure to deselect the Editable option.
The interface should now look as follows:
Now that we have finished our interface, I think it’s a good time to test our app. Click Build and Run or press ⌘R to test the application. The app should show a simple navigation controller with a textfield and a button. If you tap the button, you should see the profile page we just created. The name and username aren’t easy to read, but we will take care of that later.
Step 6: Passing the Username to the Profile Page
Go to “File” > “New” > “File...” to create a new file. Select “Objective-C class” and click “Next”. Enter “UsernameViewController” for the class and make sure that it’s a subclass of UIViewController and that both the checkboxes are not selected. Click “Next” again and than click “Create”.
Open UsernameViewController.h and modify the code to read as follows:
#import <UIKit/UIKit.h>

@interface UsernameViewController : UIViewController
{
    IBOutlet UITextField *usernameTextfield;
}

@end
Here we just create a simple outlet for our textfield, which we will use to pass the entered username to the profile page.
Next open the Storyboard again and select the username View Controler. Open the Identity Inspector and change the Class to the UsernameViewController we just created. After that, open the Connections Inspector and connect the usernameTextfield outlet with the text field.
Now open UsernameViewController.m and add the following line under #import "UsernameViewController.h":
#import "ProfileViewController.h"
Here we already import ProfileViewController, which we will create later in this tutorial. Next add the following method under the didReceiveMemoryWarning method:
- (void) prepareForSegue:(UIStoryboardSegue *)segue sender:(id)sender
{
    ProfileViewController *profileViewController = [segue destinationViewController];
    [profileViewController setUsername:usernameTextfield.text];
}
Here we pass the username to the ProfileViewController, which we will create in a minute.
Step 7: Making the Profile Page Outlets
To make these outlets we first need to create some new files, so go to “File” > “New” > “File...”. Select “Objective-C class” and click “Next”. Enter “ProfileViewController” for the class and make sure that it’s a subclass of UIViewController and that both the checkboxes are not selected. Click “Next” again and than click “Create”.
Open ProfileViewController.h and modify the code to read as follows:
#import <UIKit/UIKit.h>
#import <Accounts/Accounts.h>
#import <Social/Social.h>
#import <QuartzCore/QuartzCore.h>

@interface ProfileViewController : UIViewController
{
    IBOutlet UIImageView *profileImageView;
    IBOutlet UIImageView *bannerImageView;

    IBOutlet UILabel *nameLabel;
    IBOutlet UILabel *usernameLabel;

    IBOutlet UILabel *tweetsLabel;
    IBOutlet UILabel *followingLabel;
    IBOutlet UILabel *followersLabel;

    IBOutlet UITextView *lastTweetTextView;

    NSString *username;
}

@property (nonatomic, retain) NSString *username;

@end
Here we first import the frameworks we added earlier to our project. After that, we create some outlets for the elements which will show the profile image, and at last we create a string which will contain the entered username. We set this string in the prepareForSegue:sender: method, we created in the previous step.
Open the Storyboard and select the profile View Controller. Open the Identity Inspector and change the Class to ProfileViewController. After that, open the Connections Inspector and connect the outlets with the corresponding interface elements. Just make sure you connect the tweetsLabel, followingLabel, and followersLabel outlets with the labels above the labels with corresponding text. So, don’t connect the tweetsLabel outlet with the label that says “Tweets”, but with the label above that one.
At last, open ProfileViewController.m and add the following line under @implementation:
@synthesize username;
Step 8: Give the Profile Image a Border and Shadow
The ProfileViewController.m file should still be opened so go to the viewDidLoad method and change it to read as follows:
- (void)viewDidLoad
{
    [super viewDidLoad];

    [profileImageView.layer setBorderWidth:4.0f];
    [profileImageView.layer setBorderColor:[[UIColor whiteColor] CGColor]];

    [profileImageView.layer setShadowRadius:3.0];
    [profileImageView.layer setShadowOpacity:0.5];
    [profileImageView.layer setShadowOffset:CGSizeMake(1.0, 0.0)];
    [profileImageView.layer setShadowColor:[[UIColor blackColor] CGColor]];
}
Here we use the QuartzCore Framework to give the profileImageView a border and some shadow.
Step 9: Get the Profile with SLRequest
Add the following method under the didReceiveMemoryWarning method:
- (void) getInfo
{
    // Request access to the Twitter accounts

    ACAccountStore *accountStore = [[ACAccountStore alloc] init];
    ACAccountType *accountType = [accountStore accountTypeWithAccountTypeIdentifier:ACAccountTypeIdentifierTwitter];

    [accountStore requestAccessToAccountsWithType:accountType options:nil completion:^(BOOL granted, NSError *error){
        if (granted) {

            NSArray *accounts = [accountStore accountsWithAccountType:accountType];

            // Check if the users has setup at least one Twitter account

            if (accounts.count > 0)
            {
                ACAccount *twitterAccount = [accounts objectAtIndex:0];

                // Creating a request to get the info about a user on Twitter

                SLRequest *twitterInfoRequest = [SLRequest requestForServiceType:SLServiceTypeTwitter requestMethod:SLRequestMethodGET URL:[NSURL URLWithString:@"https://api.twitter.com/1.1/users/show.json"] parameters:[NSDictionary dictionaryWithObject:username forKey:@"screen_name"]];
                [twitterInfoRequest setAccount:twitterAccount];

                // Making the request

                [twitterInfoRequest performRequestWithHandler:^(NSData *responseData, NSHTTPURLResponse *urlResponse, NSError *error) {
                    dispatch_async(dispatch_get_main_queue(), ^{

                        // Check if we reached the reate limit

                        if ([urlResponse statusCode] == 429) {
                            NSLog(@"Rate limit reached");
                            return;
                        }

                        // Check if there was an error

                        if (error) {
                            NSLog(@"Error: %@", error.localizedDescription);
                            return;
                        }

                        // Check if there is some response data

                        if (responseData) {

                            NSError *error = nil;
                            NSArray *TWData = [NSJSONSerialization JSONObjectWithData:responseData options:NSJSONReadingMutableLeaves error:&error];


                            // Filter the preferred data

                            NSString *screen_name = [(NSDictionary *)TWData objectForKey:@"screen_name"];
                            NSString *name = [(NSDictionary *)TWData objectForKey:@"name"];

                            int followers = [[(NSDictionary *)TWData objectForKey:@"followers_count"] integerValue];
                            int following = [[(NSDictionary *)TWData objectForKey:@"friends_count"] integerValue];
                            int tweets = [[(NSDictionary *)TWData objectForKey:@"statuses_count"] integerValue];

                            NSString *profileImageStringURL = [(NSDictionary *)TWData objectForKey:@"profile_image_url_https"];
                            NSString *bannerImageStringURL =[(NSDictionary *)TWData objectForKey:@"profile_banner_url"];


                            // Update the interface with the loaded data

                            nameLabel.text = name;
                            usernameLabel.text= [NSString stringWithFormat:@"@%@",screen_name];

                            tweetsLabel.text = [NSString stringWithFormat:@"%i", tweets];
                            followingLabel.text= [NSString stringWithFormat:@"%i", following];
                            followersLabel.text = [NSString stringWithFormat:@"%i", followers];

                            NSString *lastTweet = [[(NSDictionary *)TWData objectForKey:@"status"] objectForKey:@"text"];
                            lastTweetTextView.text= lastTweet;


                            // Get the profile image in the original resolution

                            profileImageStringURL = [profileImageStringURL stringByReplacingOccurrencesOfString:@"_normal" withString:@""];
                            [self getProfileImageForURLString:profileImageStringURL];


                            // Get the banner image, if the user has one

                            if (bannerImageStringURL) {
                                NSString *bannerURLString = [NSString stringWithFormat:@"%@/mobile_retina", bannerImageStringURL];
                                [self getBannerImageForURLString:bannerURLString];
                            } else {
                                bannerImageView.backgroundColor = [UIColor underPageBackgroundColor];
                            }
                        }
                    });
                }];
            }
        } else {
            NSLog(@"No access granted");
        }
    }];
}
That’s a lot of code, but I will explain it step-by-step.
    ACAccountStore *accountStore = [[ACAccountStore alloc] init];
    ACAccountType *accountType = [accountStore accountTypeWithAccountTypeIdentifier:ACAccountTypeIdentifierTwitter];
Here we first initialize an ACAccountStore object which will allow us to access the user's accounts. After that, we create an ACAccountType instance, call the accountTypeWithAccountTypeIdentifier method on the ACAccountStore instance we just created, and then set the account type to Twitter. You can use the same method if you want to use Facebook, but then you will have to set the account type identifier to ACAccountTypeIdentifierFacebook.
[accountStore requestAccessToAccountsWithType:accountType options:nil completion:^(BOOL granted, NSError *error){
        if (granted) {
 	}
}];
Here we simply ask the user to give our app access to their Twitter account(s).
NSArray *accounts = [accountStore accountsWithAccountType:accountType];

if (accounts.count > 0)
{
	ACAccount *twitterAccount = [accounts objectAtIndex:0];
}
Here we create an array of all the Twitter accounts of the user. We check if the user has any Twitter accounts. If so, we create an ACAccount instance of the first Twitter account in that array. To keep it simple, we use the first account in this tutorial, but in a real app you should give the user the option to select their preferred Twitter account in case they have more than 1.
   SLRequest *twitterInfoRequest = [SLRequest requestForServiceType:SLServiceTypeTwitter requestMethod:SLRequestMethodGET URL:[NSURL URLWithString:@"https://api.twitter.com/1.1/users/show.json"] parameters:[NSDictionary dictionaryWithObject:username forKey:@"screen_name"]];
                [twitterInfoRequest setAccount:twitterAccount];
Here we create our request, which will call the Twitter API. We set the service type to Twitter and the request method to GET. We wan’t to get some information about a user on Twitter. You can also use the request methods POST and DELETE. With POST, you can update a profile image or post a tweet. With DELETE, you can delete things from your account. The URL in this tutorial will be: https://api.twitter.com/1.1/users/show.json. This URL will make sure the request returns a variety of information about the specified user in a JSON format. As a parameter we add the entered username for the key screen_name so we will get the information about that user. After that, we set the account for the request to the ACAccount instance.
[twitterInfoRequest performRequestWithHandler:^(NSData *responseData, NSHTTPURLResponse *urlResponse, NSError *error) {
                    dispatch_async(dispatch_get_main_queue(), ^{


                        if ([urlResponse statusCode] == 429) {
                            NSLog(@"Rate limit reached");
                            return;
                        }


                        if (error) {
                            NSLog(@"Error: %@", error.localizedDescription);
                            return;
                        }
         });
                }];
Here we actually make the request and make sure it loads asynchronically, so our interface will keep being responsive while loading. We do this with GCD, Grand Central Dispatch. I won’t go into any details, but you can find more info about it here. When the request is finished, we first check if our app hasn’t reached the rate limit. After that, we check if there was an error.
if (responseData) {

                            NSError *error = nil;
                            NSArray *TWData = [NSJSONSerialization JSONObjectWithData:responseData options:NSJSONReadingMutableLeaves error:&error];
}
Here we check if the request returned some response data. If so, we create an array from the returned JSON file.
         NSString *screen_name = [(NSDictionary *)TWData objectForKey:@"screen_name"];
                            NSString *name = [(NSDictionary *)TWData objectForKey:@"name"];

                            int followers = [[(NSDictionary *)TWData objectForKey:@"followers_count"] integerValue];
                            int following = [[(NSDictionary *)TWData objectForKey:@"friends_count"] integerValue];
                            int tweets = [[(NSDictionary *)TWData objectForKey:@"statuses_count"] integerValue];

                            NSString *profileImageStringURL = [(NSDictionary *)TWData objectForKey:@"profile_image_url_https"];
                            NSString *bannerImageStringURL =[(NSDictionary *)TWData objectForKey:@"profile_banner_url"];
Here we filter the preferred data, we get the user's name, screen_name (username), the number of tweets, followers, and people following. We also get the URLs for the profile image and the banner.
        nameLabel.text = name;
                            usernameLabel.text= [NSString stringWithFormat:@"@%@",screen_name];

                            tweetsLabel.text = [NSString stringWithFormat:@"%i", tweets];
                            followingLabel.text= [NSString stringWithFormat:@"%i", following];
                            followersLabel.text = [NSString stringWithFormat:@"%i", followers];

                            NSString *lastTweet = [[(NSDictionary *)TWData objectForKey:@"status"] objectForKey:@"text"];
                            lastTweetTextView.text= lastTweet;
Here we simply update the text properties of our labels and textview with the data we just received and filtered.
                            profileImageStringURL = [profileImageStringURL stringByReplacingOccurrencesOfString:@"_normal" withString:@""];
                            [self getProfileImageForURLString:profileImageStringURL];
Because Twitter gives use the url for the normal sized profile image, which is only 48 by 48 pixels, we remove the string “_normal”, so we can get the original profile image. After that, we call the getProfileImageForURLString: method to download the profile image. We will create that method in a few minutes.
if (bannerImageStringURL) {
                                NSString *bannerURLString = [NSString stringWithFormat:@"%@/mobile_retina", bannerImageStringURL];
                                [self getBannerImageForURLString:bannerURLString];
                            } else {
                                bannerImageView.backgroundColor = [UIColor underPageBackgroundColor];
                            }
Here we check if the user has a profile banner. If so, we update the URL so we get the mobile retina version of the banner, which has as size of 640x320 pixels. After that, we call the getBannerImageForURLString: method to download the banner. If the user doesn't have a profile banner, we give the bannerImageView a background color.
Now add the following methods under the getInfo method to download the profile and banner image:
- (void) getProfileImageForURLString:(NSString *)urlString;
{
    NSURL *url = [NSURL URLWithString:urlString];
    NSData *data = [NSData dataWithContentsOfURL:url];
    profileImageView.image = [UIImage imageWithData:data];
}

- (void) getBannerImageForURLString:(NSString *)urlString;
{
    NSURL *url = [NSURL URLWithString:urlString];
    NSData *data = [NSData dataWithContentsOfURL:url];
    bannerImageView.image = [UIImage imageWithData:data];
}
The last thing we need to do to finish our app is to call the getInfo method in the viewDidLoad method, so go to the viewDidLoad method and add the following line at the bottom of that method:
[self getInfo];
Now that we have finished our app, click Build and Run or press ⌘R to test the app. If you enter a username from someone on Twitter, you should see a mini profile with information about that user.

Wrap Up
Thanks for reading this tutorial about making a Twitter request with the new Social framework. If you want to learn more about the Twitter API, I suggest you take a look at the official documentaion. I hope you liked this tutorial, and if you have questions or comment on this tutorial, leave them in the comments section below!

Comments