Introduction
It doesn’t take a genius to understand that an app that makes new users feel welcome and comfortable is likely to enjoy a lot more popularity than one that leaves them lost and confused. As a result, many developers these days are trying to ensure that their users have a nice onboarding experience.
If you are developing an innovative app whose functionality and uses might not be obvious to new users, you should consider adding a few onboarding screens to your app. In this tutorial, I will show you a simple way to quickly create and add such screens to your Android app.
1. Add Gradle Dependencies
First, add the Material Design Library as a compile dependency to the build.gradle file of the app module so that you can use user interface elements of Android L in older versions of Android.
compile 'com.github.navasmdc:MaterialDesign:1.5@aar'
Next, add a compile dependency for SmartTabLayout
, a library that offers a custom title strip element for the ViewPager component.
compile 'com.ogaclejapan.smarttablayout:library:1.2.1@aar'
We’ll also use classes that belong to the Android Support v4 Library. However, you don’t have to add it manually, because Android Studio adds it by default.
2. Define the Layout of the Onboarding Activity
The onboarding Activity will be responsible for displaying all the onboarding screens. Therefore, this Activity will have the following widgets:
- A
ViewPagerinstance that lets the users use the swipe gesture to move from one onboarding screen to the next. - A
ButtonFlatlabeled Skip, which allows impatient users to skip the onboarding process. - A
ButtonFlatlabeled Next, which takes the user to the next onboarding screen. - A
SmartTabLayoutthat serves as a page indicator for theViewPagercomponent.
After putting these widgets in a RelativeLayout and positioning them, the code in the layout XML file of the onboarding Activity should look like this:
<?xml version="1.0" encoding="utf-8"?>
<RelativeLayout xmlns:android="http://schemas.android.com/apk/res/android"
    xmlns:app="http://schemas.android.com/apk/res-auto"
    android:layout_width="match_parent"
    android:layout_height="match_parent">

    <android.support.v4.view.ViewPager
        android:layout_width="match_parent"
        android:layout_height="match_parent"
        android:id="@+id/pager"
        />

    <LinearLayout
        android:layout_width="match_parent"
        android:layout_height="wrap_content"
        android:layout_alignParentBottom="true"
        android:id="@+id/navigation">

        <com.gc.materialdesign.views.ButtonFlat
            android:layout_width="0dp"
            android:layout_height="wrap_content"
            android:layout_weight="0.5"
            android:text="Skip"
            android:id="@+id/skip"
            />

        <com.gc.materialdesign.views.ButtonFlat
            android:layout_width="0dp"
            android:layout_height="wrap_content"
            android:layout_weight="0.5"
            android:text="Next"
            android:id="@+id/next"
            />

    </LinearLayout>

    <com.ogaclejapan.smarttablayout.SmartTabLayout
        android:id="@+id/indicator"
        android:layout_width="wrap_content"
        android:layout_height="wrap_content"
        android:layout_above="@+id/navigation"
        android:layout_marginBottom="20dp"
        android:layout_centerHorizontal="true"
        app:stl_dividerThickness="0dp"
        app:stl_indicatorColor="#1e88e5"
        />
</RelativeLayout>
Feel free to change the layout to match your preferences. I will be calling this layout file activity_onboarding.xml.
3. Define the Layouts of the Onboarding Screens
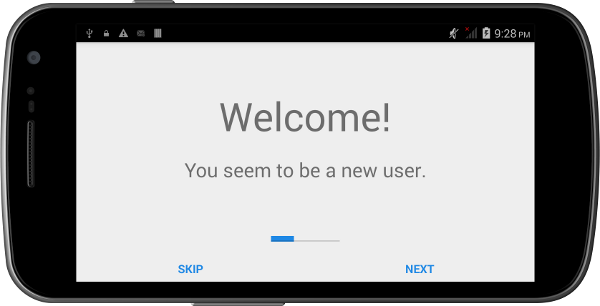
For this tutorial, you will be creating three onboarding screens. To keep the tutorial simple, the screens will have only two TextView widgets. In a real app, you should also strive to keep the onboarding screens as simple as possible to avoid that new users are overwhelmed when they open your app for the first time.
The layout XML file of the first screen is named onboarding_screen1.xml and has the following contents:
<?xml version="1.0" encoding="utf-8"?>
<LinearLayout xmlns:android="http://schemas.android.com/apk/res/android"
    android:orientation="vertical" android:layout_width="match_parent"
    android:layout_height="match_parent"
    android:padding="16dp"
    android:gravity="center_horizontal">

    <TextView
        android:layout_width="wrap_content"
        android:layout_height="wrap_content"
        android:text="Welcome!"
        android:textSize="48sp"
        android:layout_marginTop="50dp"/>

    <TextView
        android:layout_width="wrap_content"
        android:layout_height="wrap_content"
        android:textSize="24sp"
        android:layout_marginTop="20dp"
        android:text="You seem to be a new user."/>

</LinearLayout>
Use the same XML in the layout files of the other two screens and name them onboarding_screen2.xml and onboarding_screen3.xml. Of course, you should change the text property of each TextView widget so that each onboarding screen is unique.
4. Create a Fragment for Each Onboarding Screen
Create a new Java class and name it OnboardingFragment1.java. Make it a subclass of Fragment and override its onCreateView method. Next, call the inflate method to create a View using the layout we defined in onboarding_screen1.xml and return the View. Your class should look like this:
public class OnboardingFragment1 extends Fragment{

    @Nullable
    @Override
    public View onCreateView(LayoutInflater inflater,
					ViewGroup container, Bundle s) {

        return inflater.inflate(
          R.layout.onboarding_screen1,
          container,
          false
        );

    }
}
The Fragment for your first onboarding screen is now ready. Follow the same process to create two more Fragment subclasses, OnboardingFragment2.java and OnboardingFragment3.java, which use the layouts defined in onboarding_screen2.xml and onboarding_screen3.xml respectively.
5. Create the Onboarding Activity
Create a new Java class and name it OnboardingActivity.java. Make it a subclass of FragmentActivity and override its onCreate method.
public class OnboardingActivity extends FragmentActivity {

	@Override
    protected void onCreate(Bundle savedInstanceState) {
        super.onCreate(savedInstanceState);

	}
}
Next, declare a ViewPager, a SmartTabLayout, and two ButtonFlat widgets as member variables of the class.
private ViewPager pager;
private SmartTabLayout indicator;
private ButtonFlat skip;
private ButtonFlat next;
In the onCreate method, call setContentView to display the layout defined in activity_onboarding.xml and use the findViewById method to initialize the member variables.
setContentView(R.layout.activity_onboarding);

pager = (ViewPager)findViewById(R.id.pager);
indicator = (SmartTabLayout)findViewById(R.id.indicator);
skip = (ButtonFlat)findViewById(R.id.skip);
next = (ButtonFlat)findViewById(R.id.next);
You now have to create a FragmentStatePagerAdapter that the ViewPager can use to display the onboarding screens. Create a new variable of type FragmentStatePagerAdapter and name it adapter. Initialize it by passing the result of the getSupportFragmentManager method to its constructor. Because it’s an abstract class, Android Studio will automatically generate code for the abstract methods as shown below.
FragmentStatePagerAdapter adapter = new FragmentStatePagerAdapter(getSupportFragmentManager()) {
    @Override
    public Fragment getItem(int position) {
    }

    @Override
    public int getCount() {
    }
};
In the getCount method, return the number of onboarding screens.
@Override
public int getCount() {
    return 3;
}
Add a switch statement to the getItem method to return the correct Fragment based on the value of position.
@Override
public Fragment getItem(int position) {
    switch (position) {
        case 0 : return new OnboardingFragment1();
        case 1 : return new OnboardingFragment2();
        case 2 : return new OnboardingFragment3();
        default: return null;
    }
}
Still in the onCreate method, associate the FragmentStatePagerAdapter with the ViewPager by calling the setAdapter method.
pager.setAdapter(adapter);
Now that the ViewPager is ready, point the SmartTabLayout to it by calling the setViewPager method.
indicator.setViewPager(pager);
It is now time to add click handlers to the ButtonFlat widgets. You can do so using the setOnClickListener method, passing a new instance of the View.OnClickListener class to it.
In the handler of the skip button, call a method named finishOnboarding. We’ll implement this method in the next step.
In the handler of the next button, use setCurrentItem along with getCurrentItem to move to the next onboarding screen. Also, if getCurrentItem returns the last onboarding screen, call a method named finishOnboarding. We’ll implement this method in a moment.
The code for the handlers of the buttons should look like this:
skip.setOnClickListener(new View.OnClickListener() {
    @Override
    public void onClick(View v) {
        finishOnboarding();
    }
});

next.setOnClickListener(new View.OnClickListener() {
    @Override
    public void onClick(View v) {
        if(pager.getCurrentItem() == 2) { // The last screen
            finishOnboarding();
        } else {
            pager.setCurrentItem(
					pager.getCurrentItem() + 1,
					true
			);
        }
    }
});
You may want to make a few changes to the layout of the onboarding Activity, such as removing the skip button and changing the label of the next button to Done when the user reaches the last onboarding screen. You can do so by adding a SimpleOnPageChangeListener to the SmartTabLayout and overriding its onPageSelected method.
indicator.setOnPageChangeListener(new ViewPager.SimpleOnPageChangeListener() {
    @Override
    public void onPageSelected(int position) {
        if(position == 2){
            skip.setVisibility(View.GONE);
            next.setText("Done");
        } else {
            skip.setVisibility(View.VISIBLE);
            next.setText("Next");
        }
    }
});
6. Ending the Onboarding Experience
When the user has seen all the onboarding screens, or chose to skip them, you should end the onboarding experience by calling the finishOnboarding method (that’s the name we used in the previous step).
In the finishOnboarding method, get a reference to the SharedPreferences object of the app and set a boolean for the key onboarding_complete to true using the putBoolean method. We’ll be using this key in the next step to make sure that users see the onboarding screens only if they have not completed the onboarding process.
Next, create a new Intent and call the startActivity method to launch the main Activity (the Activity that is supposed to open when the user clicks the app’s icon).
Finally, call finish to close OnboardingActivity. The is what the implementation of the finishOnboarding method should look like:
private void finishOnboarding() {
	// Get the shared preferences
    SharedPreferences preferences =
            getSharedPreferences("my_preferences", MODE_PRIVATE);

	// Set onboarding_complete to true
    preferences.edit()
            .putBoolean("onboarding_complete",true).apply();

	// Launch the main Activity, called MainActivity
    Intent main = new Intent(this, MainActivity.class);
    startActivity(main);

	// Close the OnboardingActivity
    finish();
}
7. Starting the Onboarding Activity
The onboarding Activity should start as early as possible if a user that hasn’t finished the onboarding process opens the app. This means that you will be adding the code for detecting new users and launching OnboardingActivity in the onCreate method of your app’s main Activity.
By checking if the SharedPreferences object has a key called onboarding_complete whose value is true, you can determine if the user has finished the onboarding process. If the value of the key is false, close the main Activity immediately and create a new Intent to launch OnboardingActivity. Take a look at the following code block to better understand this concept.
// Get the shared preferences
SharedPreferences preferences =  getSharedPreferences("my_preferences", MODE_PRIVATE);

// Check if onboarding_complete is false
if(!preferences.getBoolean("onboarding_complete",false)) {
	// Start the onboarding Activity
    Intent onboarding = new Intent(this, OnboardingActivity.class);
    startActivity(onboarding);

	// Close the main Activity
    finish();
    return;
}
8.Update the App Manifest
If you haven’t done it already, declare OnboardingActivity in the app manifest.
<activity android:name=".OnboardingActivity"
    android:screenOrientation="landscape" />
9. Compile and Run
You can now compile your app and run it on an Android device. As this will be your first run, you should see the onboarding screens instead of the main Activity.
Conclusion
In this tutorial, you learned how to create simple onboarding screens and add them to your Android app. Use these screens to very succinctly answer questions, such as what your app can do and when it should be used.
For an optimal user experience, the onboarding process should be as short as possible and the user should be able to skip it at any time.

Comments