During the 2014 Google I/O conference, Google introduced the Cardboard VR viewer, an inexpensive device made of cardboard, which uses lenses and a user's phone to provide simple access to virtual reality apps. Two years later, Google announced plans to expand on this platform by selling a more durable viewer with a controller, known as the Daydream View, which is built following the same concept of using a phone as the main VR provider. In order to get more apps developed that support this platform, Google released Cardboard SDKs for Android (standard SDK and the NDK), iOS, the Unity game engine, and the Unreal game engine.
This tutorial is the first in a short series about the Android Cardboard and Daydream SDK. In this series, I'll show you how to use some of the SDK's tools and pre-made views to add simple features to your apps. There are a surprising number of ways you can integrate the Cardboard SDK into your apps for games and multimedia!
I'll focus on three examples that will get you started in the world of VR development: a photosphere viewer, a 360 video viewer, and an input reader for the Daydream controller. We will focus on the photosphere viewer in this tutorial, and revisit the other two topics in subsequent lessons.
Download the Cardboard SDK and Run the Sample Projects
Unlike most libraries in Android, the Android Cardboard SDK is not officially available in a remote repository that can be imported as a dependency through Gradle. In order to use it, you will need to clone the Android Cardboard SDK from GitHub to your computer via Git.
git clone https://github.com/googlevr/gvr-android-sdk.git
Once you've downloaded the SDK, let's start by running one of the prepackaged samples. On the Android Studio launch screen, select Import project. Next, select the root folder for the SDK that you just cloned and press OK.
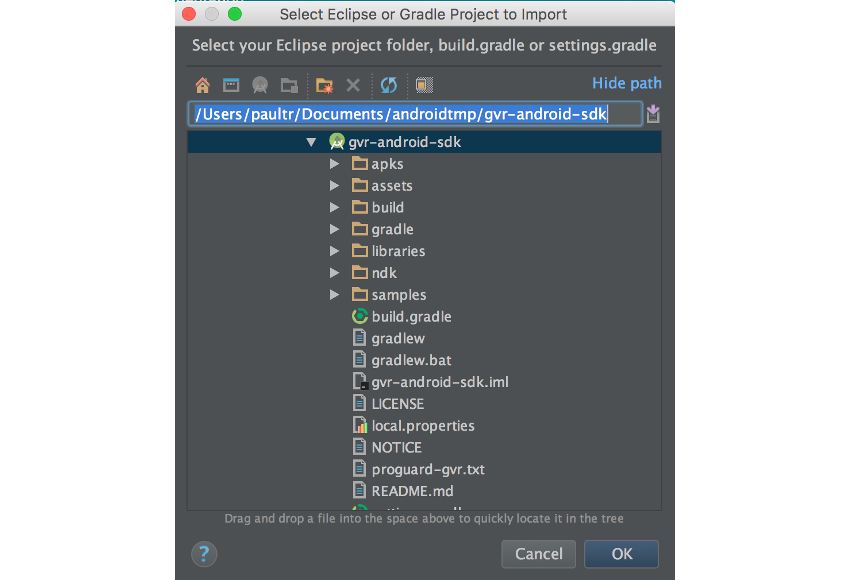
At this point you'll have access to all of the library components and samples available in the Cardboard SDK for Android. You can select one of the samples to run on your device from the module dropdown menu at the top of the Android Studio window. To make sure everything is working as expected, select samples-sdk-simplepanowidget and click on the green Run arrow.

Once the sample has compiled and installed, you should see an info screen about Machu Picchu, complete with a view that rotates around a photosphere when you move your Android device.
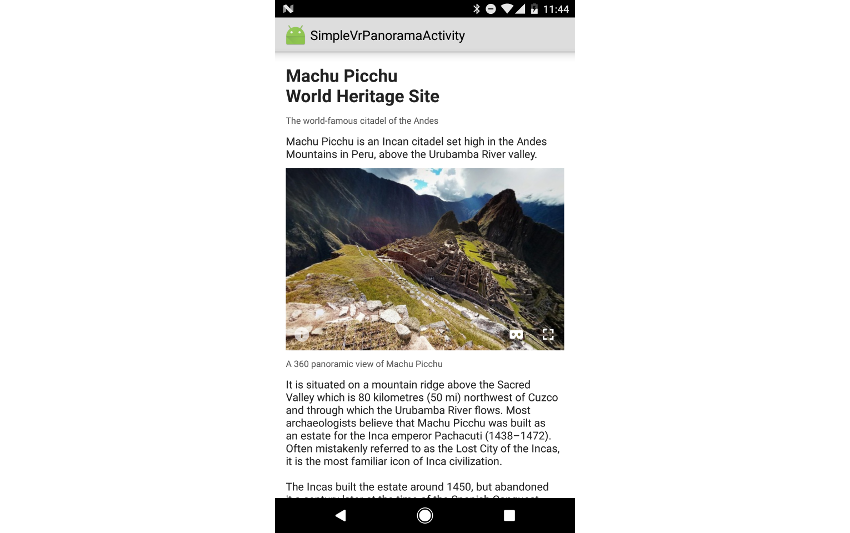
Now that you're able to run the sample applications on your device, let's dive into creating new Cardboard-enabled Android apps.
Creating a Panoramic Viewer
Let's start by creating a new Android project with a minimum SDK version of 19 (KitKat). After you've run through the standard steps of selecting and creating one of the app templates, you will need to copy the necessary libraries for your project from the Cardboard SDK libraries directory into your project's root folder. For this example, copy over the following folders: common, commonwidget, and panowidget.
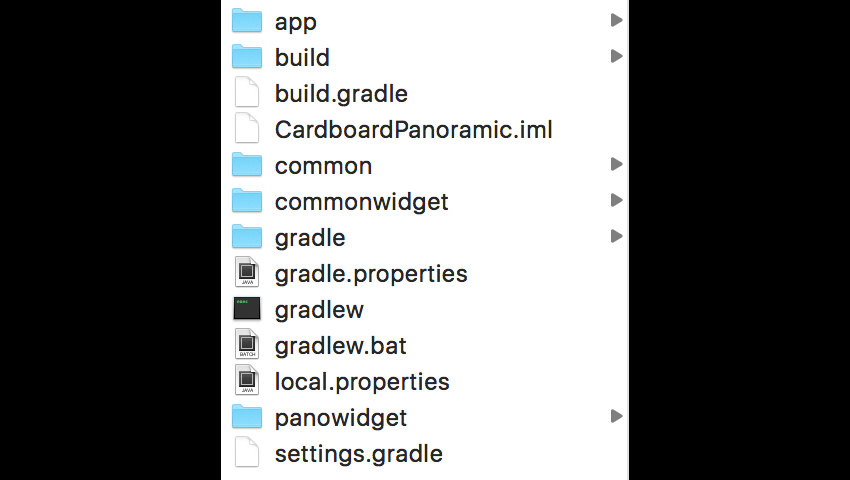
Once your library files are in their proper place, open your project's settings.gradle file. You will need to add those library modules to your project through this file.
include ':app', ":common", "commonwidget", "panowidget"
Next, you will need to reference these libraries in your build.gradle file under the dependencies node, allowing you to access the pre-made components for Cardboard. You will also need to add Google's Protocol Buffers JavaNano library, which is a code generation and runtime library to help manage the limited resources of Android devices.
dependencies {
    compile fileTree(dir: 'libs', include: ['*.jar'])
    testCompile 'junit:junit:4.12'
    compile 'com.android.support:appcompat-v7:25.0.0'

    compile project(':common')
    compile project(':commonwidget')
    compile project(':panowidget')

    compile 'com.google.protobuf.nano:protobuf-javanano:3.0.0-alpha-7'
}
After your dependencies have been set up, open your project's AndroidManifest.xml. At the top of the file, within the manifest node, you will need to add the INTERNET and READ_EXTERNAL_STORAGE permissions for the Cardboard SDK.
<uses-permission android:name="android.permission.INTERNET" />
<uses-permission android:name="android.permission.READ_EXTERNAL_STORAGE" />
Within the activity node for your MainActivity class, add a category to the intent-filter for the CARDBOARD viewer.
<activity android:name=".MainActivity">
    <intent-filter>
        <action android:name="android.intent.action.MAIN" />
        <category android:name="android.intent.category.LAUNCHER" />

        <category android:name="com.google.intent.category.CARDBOARD" />
    </intent-filter>
</activity>
Now that the setup process is done, we can dig into the fun part: the code. This project will read a photosphere image from app/src/main/assets and place it into a VrPanoramaView. You can take a photosphere image through the standard Android camera application and place it into this directory. For this example, I will use an image named openspace.jpg.

In the layout file for your Activity, add a VrPanoramaView that you will use in your app.
<?xml version="1.0" encoding="utf-8"?>
<RelativeLayout xmlns:android="http://schemas.android.com/apk/res/android"
    android:layout_width="match_parent"
    android:layout_height="match_parent">

    <com.google.vr.sdk.widgets.pano.VrPanoramaView
        android:id="@+id/pano_view"
        android:layout_width="match_parent"
        android:layout_height="wrap_content" />

</RelativeLayout>
Next, open the MainActivity class. You will need to first obtain a reference to your VrPanoramaView in onCreate(Bundle), and then you can load your Bitmap into it via the loadPhotoSphere() helper method that we will define in a moment.
private VrPanoramaView mVrPanoramaView;

@Override
protected void onCreate(Bundle savedInstanceState) {
    super.onCreate(savedInstanceState);
    setContentView(R.layout.activity_main);

    mVrPanoramaView = (VrPanoramaView) findViewById(R.id.pano_view);

    loadPhotoSphere();
}
loadPhotoSphere() retrieves our image from the assets folder and loads it into the VrPanoramaView with a VrPanoramaView.Options object. It's worth noting that these images can be relatively large, so this operation would normally occur on a background thread, though this lesson will keep everything on the UI thread for simplicity.
private void loadPhotoSphere() {
    //This could take a while. Should do on a background thread, but fine for current example
    VrPanoramaView.Options options = new VrPanoramaView.Options();
    InputStream inputStream = null;

    AssetManager assetManager = getAssets();

    try {
        inputStream = assetManager.open("openspace.jpg");
        options.inputType = VrPanoramaView.Options.TYPE_MONO;
        mVrPanoramaView.loadImageFromBitmap(BitmapFactory.decodeStream(inputStream), options);
        inputStream.close();
    } catch (IOException e) {
        Log.e("Tuts+", "Exception in loadPhotoSphere: " + e.getMessage() );
    }
}
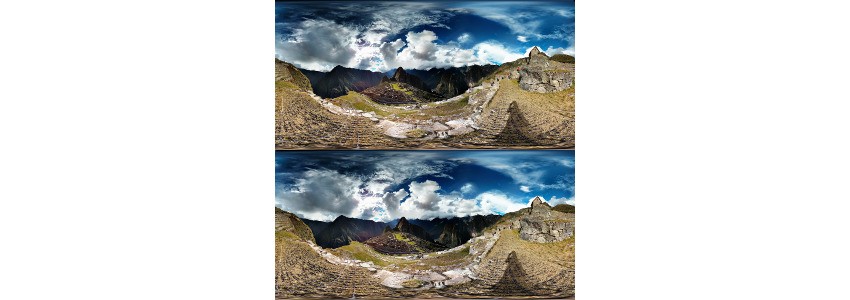
Notice that for the VrPanoramaView.Options.inputType value, we're using TYPE_MONO. This means that the VrPanoramaView is expecting a single channel image to display, whereas a inputType of TYPE_STEREO_OVER_UNDER would expect an image that is split vertically with the right and left eye seeing the top and bottom halves of that image, respectively.
The final thing you will need to do is pause and resume rendering the VrPanoramaView in onPause() and onResume(), as well as properly disconnect it in onDestroy().
@Override
protected void onPause() {
    mVrPanoramaView.pauseRendering();
    super.onPause();
}

@Override
protected void onResume() {
    super.onResume();
    mVrPanoramaView.resumeRendering();
}

@Override
protected void onDestroy() {
    mVrPanoramaView.shutdown();
    super.onDestroy();
}
Now that we're done setting up the app, let's go ahead and run it. Your app should display your photosphere on the screen, and you should be able to move your phone around to view different portions of the image.
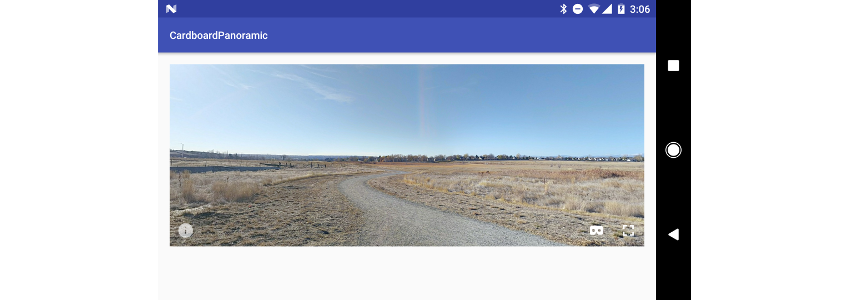
If you press on the cardboard icon in the lower right corner of the View, it will split the image into two slightly offset images that can be seen through a Cardboard or Daydream viewer.

Although not used in this tutorial, it's also worth noting that the VrPanoramaView can accept a VrPanoramaEventListener object that will notify your app when a new image has succeeded or failed to load.
Conclusion
Congratulations—you've created your first cardboard app, an image viewer for panoramic and photosphere pictures! Although this is a simplified example, it does give you the basics of how to create your own apps to use the Cardboard viewer. For an amazing example of an app that takes this concept a step further, I highly recommend Google's Expeditions education app.
I hope you've enjoyed dipping your toes into the world of VR. In the next tutorial, I'll show you how to play 360-degree video files through the Cardboard SDK.
In the meantime, check out some of our other Android VR courses and tutorials, right here on Envato Tuts+.



Comments