If you are someone who uses WordPress to earn a living and to tell your story, seeing a change that you wrote added to the WordPress code base is a pretty exciting thing. I know it was for me.
In this tutorial, you will learn the few simple things you need to know in order to create a patch for WordPress that can be accepted into the core software.
While WordPress is open source software that anyone can download and modify, only a handful of core contributors are able to commit their changes to WordPress itself. If you'd like to make a change to WordPress' core files you can propose it either by creating a ticket detailing the proposed change and attaching a patch, or by attaching a patch to an existing ticket.
A patch or diff file is a file that details the changes you made to the source that a version control system such as SVN or GIT can use to apply your changes. Creating a patch is easy via the command line or via a GUI tool like SourceTree.
For this article, I will be detailing how to use the excellent GIT GUI app SourceTree to checkout the latest version of WordPress and create your patch file. You can use the GUI tool of your choice or the command line if you prefer.
Find or Creating a Ticket in Core Trac
When you submit your patch to WordPress core, it must be attached to a ticket in WordPress' issue tracker, which is called trac. Therefore, the first step in submitting a patch is finding or creating a ticket.
While it is possible that a new ticket with a new feature could be accepted, it is not very likely. WordPress has literally millions of users and it only makes sense that the lead developers are very cautious about introducing new features. Almost all new features are now developed separately as plugins first and only after extensive testing and development are they merged into core.
Your best bet for getting a patch accepted is to create a patch for an existing ticket. Recently core trac was redesigned to make it easier to find tickets with easy fixes and those that are most likely to be included in the next point release and the next version of WordPress.
Reporting Bugs
If you would like to create a new ticket in core trac, which is a great thing to do if you have found a new bug you can do so here. Just make sure that you have searched trac for any reports of the same issue before creating a new ticket and that you have verified the bug exists with the most up to date version of WordPress.
By that I do not mean the most recent release, but the master branch in GIT terminology or trunk in SVN terminology. I will detail how to get the latest version in later on in this tutorial.
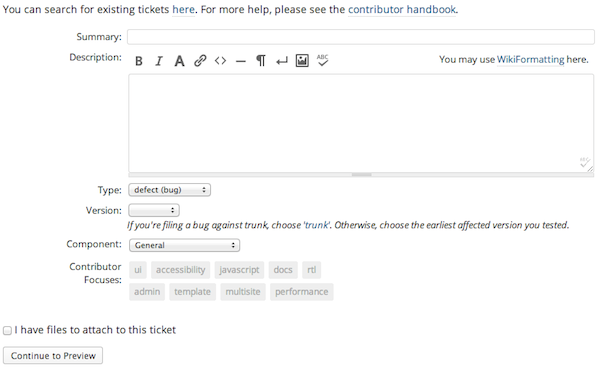
At the minimum, you must fill out the summary field, which is the title of the ticket, and the description field, which is the ticket's content. In the ticket's description, be as descriptive as possible.
At the 2013 WordCamp Orlando contributor's workshop, which I attended, WordPress lead developers Mark Jaquith and Andrew Nacin created this list of what goes into good bug report:
- steps to reproduce issue, starting with the earliest step
- description of the bug
- what you saw versus what you expected
- error messages or error codes
- PHP errors (what was the warning on page, what went in log, are there any JavaScript or Apache/ nginx errors?)
- what browser?
- environment (your PHP version, MySQL Apache or nginx version)
- Does it happen with no plugins and default theme?
- screenshots for user interface issues
- be clear and concise
- get to point first, then details.
- related ticket number
- one bug per ticket
- permalink settings
- Is multisite enabled or not?
- WP_DEBUG or equivalent enabled?
- user role logged in when the issue happened (or changed roles in database)
Keep in mind that not all of these are relevant to every bug, but there more relevant information you can add the better.
Unless you are sure of what to set in them, you should leave the fields below description alone and let a core contributor use them to categorize the ticket accordingly. I would recommend that you use the "Has Patch" or "Needs Patch" tag based on whether or not you are attaching a patch to fix the bug or not.
Checking Out the Latest WordPress From GitHub Using a GUI Tool
Before creating a patch for any ticket, it is important that you have the absolute latest version of WordPress as it there are many changes made to it every day. It is impossible to know if your fix works or your bug still exists unless you are using the most up-to-date code. Your patch will likely not be accepted if it modifies code that has already changed.
WordPress is managed in SVN, but that code is mirrored as a GIT repository in two places:
git://core.git.wordpress.org/- https://github.com/WordPress/WordPress
The GitHub repository is the easiest to use. Just keep in mind that even though it is the official GitHub repo, it is still not used for issue tracking and you should not submit pull requests to it.
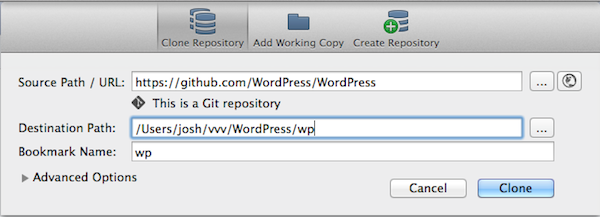
There are many ways to get the latest version of WordPress via SVN or Git. Personally, I find the easiest thing to do is to use the great GIT GUI tool SourceTree to clone the GitHub mirror. This is as simple as selecting "New/ Clone" from the file menu, entering the address for the Git repo in the "Source Path/ URL" field and then specifying a local path for cloning, which would be inside of your XAMMP or Vagrant testing environment.
Speaking of Vagrant, the popular WordPress Vagrant configuration VVV has a preconfigured testing environment for WordPress core, including the latest code and the unit tests.
Creating a Patch File
Once you have made the changes to WordPress that are needed to resolve the issue you are trying to fix and tested the fix you need to create a patch file to upload to the ticket. SourceTree includes a way to create a patch file or you can use the command line.
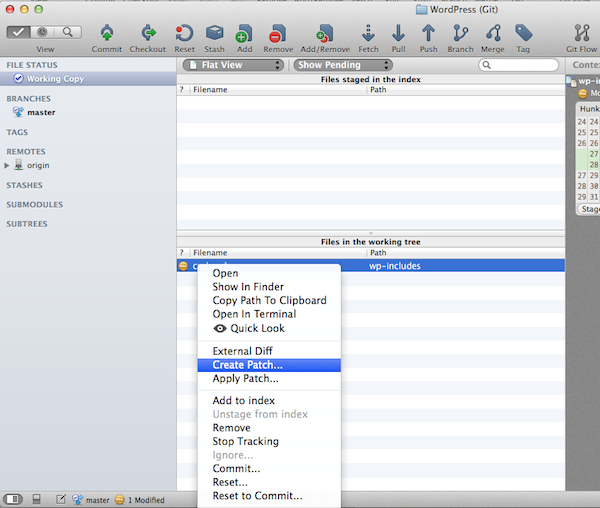
In SourceTree, you can create a patch file by going to your working copy, and right-clicking the file(s) that have changed. From the right-click menu select "Create Patch".
Alternatively, in your terminal, navigate to the root directory for your WordPress repo and use this command to create the diff:
git diff —non-prefix ~/name.path
No matter how you create your patch file, you should name it after the ticket number it is intended for. If it is the second patch uploaded to the ticket append .2 to the end of the number, or .3 if it is the third and so forth. For example, the fifth patch for ticket #12358 would be called #12358.5
Uploading a Patch to Trac
Now that your patch is ready to go, you need to upload it to the ticket in core trac. On any existing ticket, under the description is an "Attach File" button that you can use to upload your patch. On the next screen be sure to add a description of what the patch does.
Be Patient and Be Understanding
WordPress is a massive project, so it is unreasonable to expect a response to your patch immediately. Also, understand that the standards for a patch being committed to WordPress have to be very high in order to best serve all of its users.
Once you've submitted your patch be patient and be understanding of any feedback you receive. The lead developers are very approachable, if you have questions about your patch or why it was not improved, feel free to ask one of them in the #wordpress-dev IRC channel.
While waiting for a responses and having to make changes can be frustrating, it's worth it when your patch is committed to WordPress and the changeset description acknowledges you.

Comments