In this series, we'll be using AngularJS and Firebase to create a simple web application from scratch. It will be a simple blogging application where the user can sign in or sign up and publish a blog post.
This tutorial assumes you have basic knowledge of AngularJS, but it shouldn't be tough to pick up the topics along the way. If you're struggling with bugs or errors that you can't seem to fix, try one of the expert bug fixers on Envato Studio.

Introduction to AngularJS
AngularJS is one of the most sought-after JavaScript MVC frameworks. It's a structural framework for creating dynamic web applications by extending HTML capabilities. Features like data binding and dependency injection makes it easier to develop apps with less code.
From the AngularJS documentation:
HTML is great for declaring static documents, but it falters when we try to use it for declaring dynamic views in web-applications. AngularJS lets you extend HTML vocabulary for your application. The resulting environment is extraordinarily expressive, readable, and quick to develop.
Introduction to Firebase
Imagine creating a web application without having to worry about the back-end side. Firebase makes it possible to sync data in real time with our application without bothering about the back-end. All we need to do is make some API calls.
Firebase is a powerful API to store and sync data in real time. Combining the power of AngularJS two-way data binding with Firebase results in a three-way synchronization which is quite awesome.
Getting Started With AngularJS
The angular-seed project is a boilerplate to get started with creating web apps using AngularJS. Download or clone the angular-seed project from the repository.
$ git clone https://github.com/angular/angular-seed.git
Navigate to the project directory and install the required dependencies.
$ cd angular-seed
$ npm install             ## Install the dependencies
Start the node server:
$ npm start ## Start the server
Point your browser to http://localhost:8000/app/index.html and you should see the default app running.
Navigate to the app directory inside angular-seed. This is where the application code resides. Inside the app folder you'll find app.js which is the core of the app. We'll declare all the app-level modules and routes inside this file. By default, the angular-seed project has two views, view1 and view2. Delete the folders view1 and view2 from the app folder.
Let's start from scratch. Open up app.js and remove the existing code. In app.js we'll be defining our application routes, for example, how to handle a request like /home. In order to define routes, we'll need an AngularJS module called ngRoute. To use ngRoute we first need to inject it or add it into our application. We'll use angular.module to add the ngRoute module to our app as shown below:
angular.module('myApp', [
  'ngRoute'
])
The ngRoute module has a component called $routeProvider which is useful for configuring routes. We'll inject $routeProvider into the config method of angular.module and define our routes in its callback function as shown below:
'use strict';

angular.module('myApp', [
  'ngRoute'
]).
config(['$routeProvider', function($routeProvider) {
     // Routes will be here
}]);
Next, open up index.html and remove the script references to view1 and view2. Remove everything from the body of index.html except the script references and the div shown below with the ngView directive.
<div ng-view></div>
ngView is a directive which helps to render the view attached with a particular route into the main layout, index.html. So each time the route changes, the content of the above shown div changes.
Now let's create a new view for the user to sign in. Inside the app directory create a new folder called home. Inside home, create two files called home.html and home.js. Open up home.html and include the following HTML code:
<!DOCTYPE html>
<html lang="en" ng-app="myApp">

<head>
    <meta http-equiv="Content-Type" content="text/html; charset=UTF-8">
    <link rel="icon" href="http://getbootstrap.com/favicon.ico">

    <title>AngularJS & Firebase Web App</title>

    <link href="http://getbootstrap.com/dist/css/bootstrap.min.css" rel="stylesheet">
    <link href="http://getbootstrap.com/examples/signin/signin.css" rel="stylesheet">

    <link href="justified-nav.css" rel="stylesheet">

</head>

<body>

    <div class="container">
        <div class="jumbotron" style="padding-bottom:0px;">
            <h2>AngularJS & Firebase App!</h2>
        </div>
        <form class="form-signin" role="form">
            <input type="email" class="form-control" placeholder="Email address" required="" autofocus="">
            <input type="password" class="form-control" placeholder="Password" required="">
            <label class="checkbox">
                <a href="#"> Sign Up</>
        </label>
        <button class="btn btn-lg btn-primary btn-block" type="submit">Sign in</button>
      </form>

    </div>


</body></html>
As seen in the above code, we'll be using Bootstrap to create our application views.
Inside home.js, we'll declare the routes for the application to access the home view. $routeProvider has a method called when, which we'll use to create a route for our home view. When defining a new route, we'll set a templateUrl which would be rendered in the index.html. Along with that, we'll also set a controller for the newly created $scope of the home view. A controller is a logic which controls a particular view. Here's how it should look:
'use strict';

angular.module('myApp.home', ['ngRoute'])

// Declared route
.config(['$routeProvider', function($routeProvider) {
    $routeProvider.when('/home', {
        templateUrl: 'home/home.html',
        controller: 'HomeCtrl'
    });
}])

// Home controller
.controller('HomeCtrl', [function() {

}]);
Now open up app.js and include the home module myApp.home in the app. Also declare the default route of our application using the $routeProvider.otherwise method to the home view.
'use strict';

angular.module('myApp', [
    'ngRoute',
    'myApp.home'           // Newly added home module
]).
config(['$routeProvider', function($routeProvider) {
    // Set defualt view of our app to home

    $routeProvider.otherwise({
        redirectTo: '/home'
    });
}]);
Next, in order to display the homepage, we need to include home.js inside the main HTML template file of the app. Open up index.html and include the following:
<script src="home/home.js"></script>
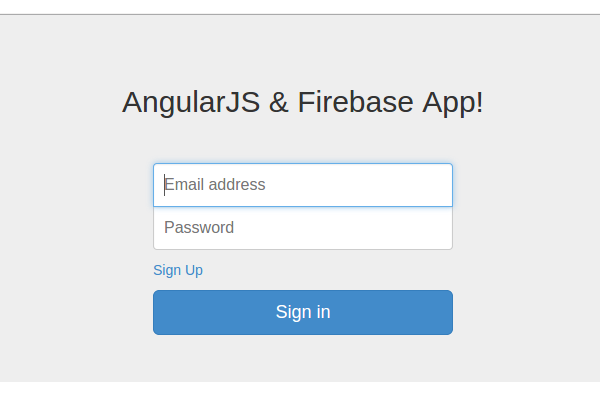
Restart the server and point your browser to http://localhost:8000/app/index.html and you should see the sign-in screen:
Getting Started With Firebase
In order to get started, we'll need to register for a free account on Firebase. On successful signup, we'll get a screen like this:
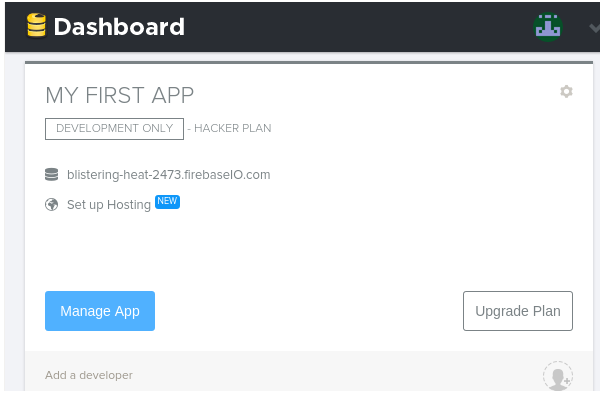
Make a note of the URL of the app created and click on the Manage App button. We'll be using this Firebase URL to interact with the Firebase database.
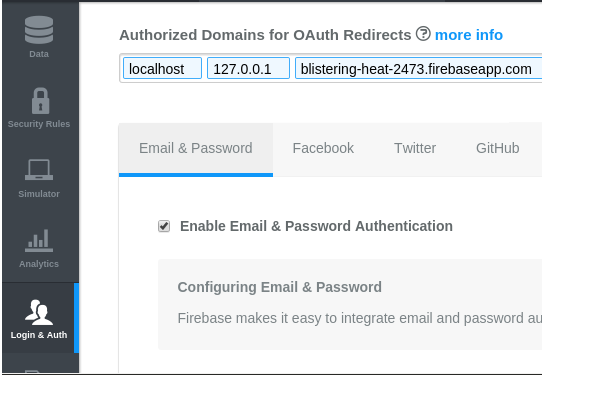
We'll be using Firebase to authenticate our application using an email and password. In order to get it working, we need to enable it from Firebase. From the dashboard, click on the Login & Auth tab in the left-side menu. In that screen, under the Email & Password tab, check Enable Email & Password Authentication as shown:
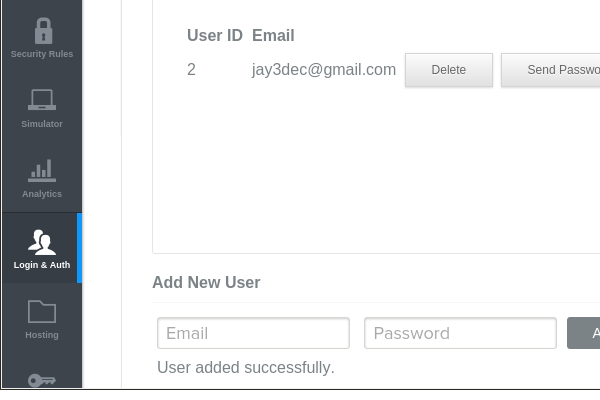
Add a new user with an Email and Password against which we'll authenticate after implementing the sign-in functionality.
Implementing Sign-In Functionality
In order to get started with using Firebase, include the following scripts in app/index.html:
<script src="https://cdn.firebase.com/js/client/1.0.18/firebase.js"></script>
<script src="https://cdn.firebase.com/libs/angularfire/0.8.0/angularfire.min.js"></script>
<script src="https://cdn.firebase.com/js/simple-login/1.6.2/firebase-simple-login.js"></script>
Next, we need to inject the firebase module in home.js. Add the firebase module in home.js as shown below:
angular.module('myApp.home', ['ngRoute','firebase'])
Now we are ready to interact with Firebase. Open up home.js and inside HomeCtrl, create a new function called SignIn to authenticate the user. We'll be using $scope to create the new function. $scope is an object that refers to the application model, and also acts as glue between the application controller and the view. Hence we'll inject the $scope object into the SignIn function so that the object model from view is accessible inside the SignIn function.
$scope.SignIn = function($scope) {
    var username = $scope.user.email;
    var password = $scope.user.password;

    // Auth Logic will be here
}
Next, inside HomeCtrl create a Firebase instance using the Firebase URL as shown:
var firebaseObj = new Firebase("https://blistering-heat-2473.firebaseio.com");
The $firebaseSimpleLogin module is used to authenticate against Firebase using an email ID and password. To use it, we'll need to inject the $firebaseSimpleLogin module into HomeCtrl as shown:
.controller('HomeCtrl', ['$scope','$firebaseSimpleLogin',function($scope,$firebaseSimpleLogin) {
Using firebaseObj create a $firebaseSimpleLogin instance as shown:
var loginObj = $firebaseSimpleLogin(firebaseObj);
Now, using the $login API, we'll authenticate the email ID and password against Firebase. loginObj.$login takes in the email and password as parameters. On successful authentication, we get a success callback and on an unsuccessful authentication, we get an error callback.
$scope.SignIn = function(event) {
    event.preventDefault();  // To prevent form refresh
    var username = $scope.user.email;
    var password = $scope.user.password;

    loginObj.$login('password', {
            email: username,
            password: password
        })
        .then(function(user) {
            // Success callback
            console.log('Authentication successful');
        }, function(error) {
            // Failure callback
            console.log('Authentication failure');
        });
}
Now for all the above controller code to work, we need to attach the controller to the view. AngularJS provides a directive called ngController to attach a controller to a view. Open up home.html and add the ngController directive to the body element to attach it to HomeCtrl.
We need the email and password values to be accessible inside the SignIn controller function. AngularJS provides a directive called ngModel to bind its value to $scope so that it's accessible inside the SignIn function. Include the ngModel directive to the email and password input elements as shown:
<body ng-controller="HomeCtrl">

    <div class="container">
        <div class="jumbotron" style="padding-bottom:0px;">
            <h2>AngularJS & Firebase App!</h2>
        </div>
        <form class="form-signin" role="form">
            <input ng-model="user.email" type="email" class="form-control" placeholder="Email address" required="" autofocus="">
            <input ng-model="user.password" type="password" class="form-control" placeholder="Password" required="">
            <label class="checkbox">
                <a href="#"> Sign Up</>
        </label>
        <button type="button" class="btn btn-lg btn-primary btn-block">SignIn</button>
      </form>

    </div>


</body>
Finally, add the ngClick directive to the sign-in button to call the SignIn function:
<button type="button" ng-click="SignIn($event)" class="btn btn-lg btn-primary btn-block">SignIn</button>
Save all the changes and restart the server. Point your browser to http://localhost:8000/app/index.html#/home and try to sign in using the email ID [email protected] and password jay. On successful user authentication, you should see the message Authentication successful in the browser console.
Conclusion
In this tutorial, we reviewed how to get started with creating an AngularJS web application. We implemented the sign-in functionality and successfully authenticated the user against the Firebase database.
In the second part of this tutorial, we'll take this to the next level by implementing validations, sign-up functionality, and some other features. Code from the above tutorial is available on GitHub.
Do let us know your thoughts in the comments below.
Also, be sure to check out the wide range of AngularJS resources on Envato Market. There's everything from CRUD table directives to ticketing systems and more.

Comments