Custom post types give you unlimited possibilities for creating content. The trick is trying to present it all to your users. We're talking bounce rate here, and one of the best ways to decrease your bounce rate and keep users on your site is to present as much content as possible in a clean and organized manner. This tutorial offers one solution by showing you how to create a custom, tabbed widget that grabs your latest articles from multiple custom post types, and as a bonus, shows you how to display star ratings next to each post!
Overview. Our Plan Of Attack
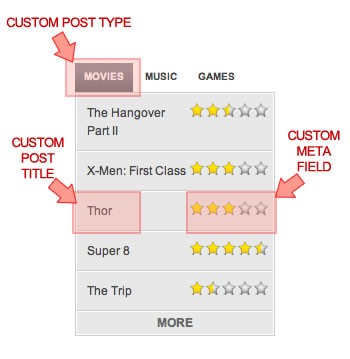
This tutorial explains how to modify an existing theme (not how to create a plugin) by adding new custom post types, and then creating a custom widget that tabs between the new custom post types using a fancy jQuery transition. Additionally, you will learn how to use custom meta fields on the new custom post types to assign a star rating which will show up in the custom widget we create.
Finally, the widget will be able to sort the custom post types by either date or rating. Here is a blueprint of our final product and where each of the elements come from:
There are only three files that you will need to modify in order to add this functionality to your theme, all of which are standard files that come with virtually all WP themes:
- functions.php
- header.php
- style.css
I will be using the default WP 3.0 theme called TwentyTen in this tutorial, but the method will be the same for any theme that you want to modify - you will still edit (or create if they don't exist) these three files no matter which theme you are modifying/creating. The custom post types I'll be creating are Movie Reviews, Music Reviews, and Game Reviews:
Step 1. Create The Custom Post Types
Before we build the widget that will display our reviews, we must first create the reviews themselves, and to do that we'll need to create three new custom post types. This tutorial assumes you are familiar with creating custom post types, so if you need to brush up on that before you proceed, the Codex explains how to register new post types in detail. Now we will create our Movie Reviews post type. Open the functions.php file and add the following code at the end:
//##########################################
//create custom post type of Movie Reviews
//##########################################

function create_oswc_movie_reviews() {
	register_post_type( 'oswc_movie_reviews',
		array(
			'labels' => array(
				'name' => __( 'Movie Reviews' , 'twentyten'),
				'singular_name' => __( 'Movie Review' , 'twentyten'),
				'add_new' => __('Add new review', 'twentyten'),
				'edit_item' => __('Edit review', 'twentyten'),
				'new_item' => __('New review', 'twentyten'),
				'view_item' => __('View review', 'twentyten'),
				'search_items' => __('Search reviews', 'twentyten'),
				'not_found' => __('No reviews found', 'twentyten'),
				'not_found_in_trash' => __('No reviews found in Trash', 'twentyten')
			),
			'public' => true,
			'menu_position' => 25,
			'rewrite' => array('slug' => 'movie-review'),
			'supports' => array('title','editor','author','thumbnail','excerpt','trackbacks','custom-fields','comments','revisions'),
			'taxonomies' => array('category', 'post_tag')
		)
	);
}
add_action( 'init', 'create_oswc_movie_reviews' );
This creates a post type called oswc_movie_reviews, tells WP what all the labels of the post type should be, makes the post type public, puts it right after the Comments menu in the WP admin menu structure, rewrites the slug of the post type (prettier in permalinks), tells WP to enable certain attributes for the post type (such as a thumbnail and an excerpt), and finally tells WP to let the user assign categories and tags to the post type just like regular posts.
For the sake of brevity we will not define any custom taxonomies, since the widget we'll be creating does not interact with taxonomies in any way. In a real-world situation, you would likely create cush custom taxonomies as Movie Genre, Movie Director, Actors, etc. To see how to create custom taxonomies, refer to the WordPress Codex linked to above.
"When writing your own functions and variables, it's always a good idea to use a prefix in the name just to make sure it doesn't share the same name as another WP or third-party plugin functions or variables. You'll notice this tutorial either prefaces, or includes within all function and variable names, the string oswc_."
Next, let's create the other two custom post types we'll use in this widget. The logic is exactly the same as the Movie Reviews type we just added. All we do is change the code to reflect Music Reviews and Game Reviews, respectively. Add this code after the code you added above:
//##########################################
//create custom post type of Music Reviews
//##########################################

function create_oswc_music_reviews() {
	register_post_type( 'oswc_music_reviews',
		array(
			'labels' => array(
				'name' => __( 'Music Reviews', 'twentyten' ),
				'singular_name' => __( 'Music Review', 'twentyten' ),
				'add_new' => __('Add new review', 'twentyten'),
				'edit_item' => __('Edit review', 'twentyten'),
				'new_item' => __('New review', 'twentyten'),
				'view_item' => __('View review', 'twentyten'),
				'search_items' => __('Search reviews', 'twentyten'),
				'not_found' => __('No reviews found', 'twentyten'),
				'not_found_in_trash' => __('No reviews found in Trash', 'twentyten')
			),
			'public' => true,
			'menu_position' => 26,
			'rewrite' => array('slug' => 'music-review'),
			'supports' => array('title','editor','author','thumbnail','excerpt','trackbacks','custom-fields','comments','revisions'),
			'taxonomies' => array('category', 'post_tag')
		)
	);
}
add_action( 'init', 'create_oswc_music_reviews' );

//##########################################
//create custom post type of Game Reviews
//##########################################

function create_oswc_game_reviews() {
	register_post_type( 'oswc_game_reviews',
		array(
			'labels' => array(
				'name' => __( 'Game Reviews', 'twentyten' ),
				'singular_name' => __( 'Game Review', 'twentyten' ),
				'add_new' => __('Add new review', 'twentyten'),
				'edit_item' => __('Edit review', 'twentyten'),
				'new_item' => __('New review', 'twentyten'),
				'view_item' => __('View review', 'twentyten'),
				'search_items' => __('Search reviews', 'twentyten'),
				'not_found' => __('No reviews found', 'twentyten'),
				'not_found_in_trash' => __('No reviews found in Trash', 'twentyten')
			),
			'public' => true,
			'menu_position' => 27,
			'rewrite' => array('slug' => 'game-review'),
			'supports' => array('title','editor','author','thumbnail','excerpt','trackbacks','custom-fields','comments','revisions'),
			'taxonomies' => array('category', 'post_tag')
		)
	);
}
add_action( 'init', 'create_oswc_game_reviews' );
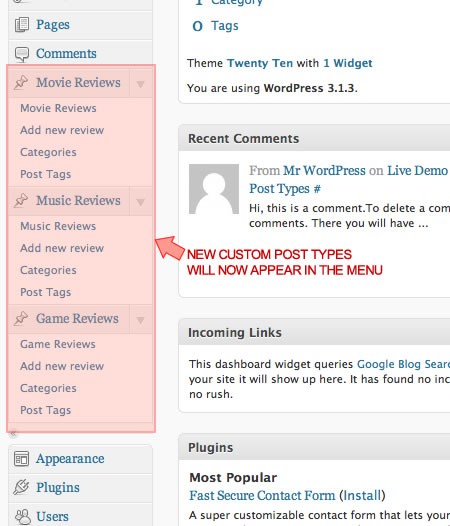
Upload your modified functions.php file and you will now see menu items for all three custom post types. Your admin panel should look like this:
Step 2. Write Some Reviews
The Review
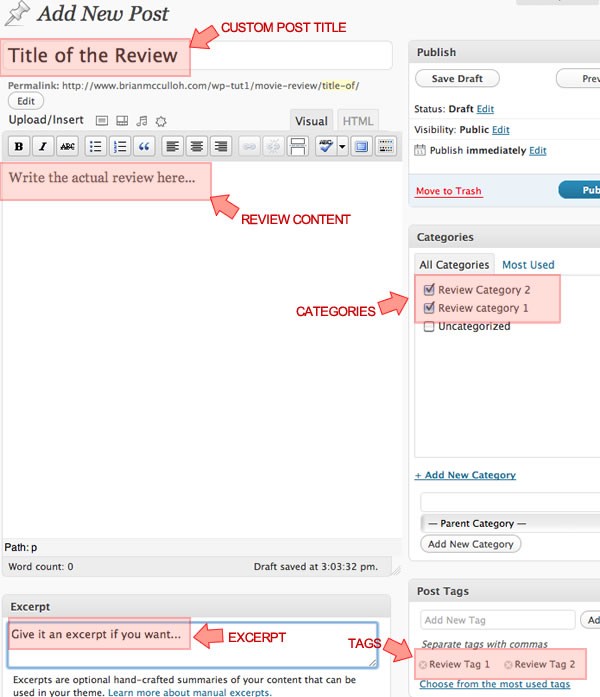
Now that we have enabled the option to add reviews, let's write some! Click Add new review under the Movie Reviews menu and write the review just like you would write a normal post. Give it a title, post content, categories, tags, and a featured image.
The Rating
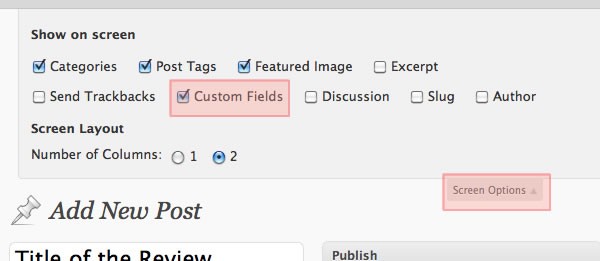
So what do we need to do so that the review has a star rating that shows up in the widget? Simple: add a Custom Field. First, make sure you have the Custom Fields panel enabled in your Screen Options toolbox by toggling the Screen Options tab and selecting Custom Fields:
With the custom fields visible, add a new custom field named Rating. Give it a number value from 0 through 5, incrementing by .5. So, the available values would be 0, 0.5, 1, 1.5, 2, 2.5, 3, 3.5, 4, 4.5, 5.
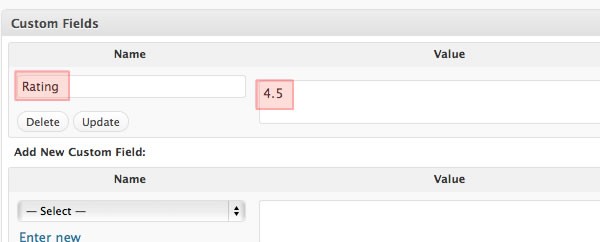
"The only part you need to add for this widget to work is the title and the custom field, everything else is there for example, and what you add depends on how you want to setup your specific site."
Add reviews the exact same way for the other two review types. Add at least a few reviews for each of the three types so that the widget will have something to display. With our content in place, now we're ready to build the widget that will display our reviews. We will attack the widget in three phases: the PHP, then the jQuery, and finally the CSS.
Step 3. Build the Custom Widget PHP
This is the most involved step of the tutorial. In this step, we will write the PHP code that creates and adds our custom widget to WordPress, and then write a custom PHP function that takes care of displaying the star ratings for each review.
The Custom Widget
There are four functions we need to add when extending the WP_Widget class in order to add our widget. Here is the structure of the code we will use to extend the class:
class My_Widget extends WP_Widget {
	function My_Widget() {
		// widget actual processes
	}

	function widget($args, $instance) {
		// outputs the content of the widget
	}

	function update($new_instance, $old_instance) {
		// processes widget options to be saved
	}

    function form($instance) {
		// outputs the options form on admin
	}
}
register_widget('My_Widget');
As you can see, we need a function that names and creates the widget, a function that controls how it displays on the front end, a function that handles updating the widget options, and a function that controls how it displays in the admin panel (the WordPress >> Appearance >> Widgets page). After we do all that, we register the widget with WordPress.
For details on developing widgets, see the Codex, which further explains the WordPress Widgets API.
Let's build out each function and make everything unique to our custom widget. First, we wrap it all in a class with our widget name:
class oswc_tabbed_latest_reviews extends WP_Widget {
	// ...widget functions...
}
Then we add the first function inside of that class. This function has the same name as the class, which is the name of our widget. We will be setting up the nice name of our widget that displays on the widgets page, as well as some default settings for the widget:
function oswc_tabbed_latest_reviews() {
	// widget settings
	$widget_ops = array( 'classname' => 'Latest Review Tabs', 'description' => 'Displays reviews by most recent or highest rated in a jQuery tabbed format.' );
	// widget control settings
	$control_ops = array( 'width' => 250, 'height' => 350, 'id_base' => 'oswc_tabbed_latest_reviews' );
	// create the widget
	$this->WP_Widget( 'oswc_tabbed_latest_reviews', 'Latest Review Tabs', $widget_ops, $control_ops );
}
Now let's add the next function. First, we grab the variables from our widget (which we'll setup in the next function), and then create a variable to see which way we're sorting the widget:
function widget( $args, $instance ) {

	extract( $args );

	/* User-selected settings. */
	$sort = $instance['sort'];
	$showmovies = $instance['showmovies'];
	$showmusic = $instance['showmusic'];
	$showgames = $instance['showgames'];
	$nummovies = $instance['nummovies'];
	$nummusic = $instance['nummusic'];
	$numgames = $instance['numgames'];

	if($sort=="highest-rated") {
		$feedsort="meta_value";
		$metakey="&meta_key=Rating";
	} else {
		$feedsort="date";
		$metakey="";
	}
Then, we start creating the HTML. Wrap the entire widget in a div with id of "tabbed-reviews" (the jQuery will hook into this later) and then setup a tab for each review type. Finally, another div wraps the content in each tab:
/* HTML output */
?>

<div id="tabbed-reviews">
    <ul class="tabnav">
        <?php if($showmovies) { ?><li><a href="#tabs-movies">Movies</a></li><?php } ?>
        <?php if($showmusic) { ?><li><a href="#tabs-music">Music</a></li><?php } ?>
        <?php if($showgames) { ?><li><a href="#tabs-games">Games</a></li><?php } ?>
    </ul>

    <div class="tabdiv-wrapper">
Inside of the tabdiv-wrapper div we need to create a loop that grabs post titles and star ratings from a specified custom post type. The first tab is for Movie Reviews, so we check to see if that review type is being shown in the widget options, and if so we display a tab with an unordered list inside of it. Here's the full block of code for the Movie Review tab content, which we'll pick apart below:
<?php if($showmovies) { ?>

    <div id="tabs-movies" class="tabdiv">
        <ul>
            <?php // setup the query
            $args='&suppress_filters=true&posts_per_page='.$nummovies.'&post_type=oswc_movie_reviews&order=DESC&orderby='.$feedsort.$metakey;
            $cust_loop = new WP_Query($args);
            if ($cust_loop->have_posts()) : while ($cust_loop->have_posts()) : $cust_loop->the_post(); $postcount++;
                // if we're sorting by rating and this item does not have a rating, hide it
                $rating = get_post_meta(get_the_ID(), "Rating", $single = true);
                if(($rating && $feedsort=="meta_value") || ($feedsort!="meta_value")) {
                    ?>
                    <li>

                        <?php oswc_show_rating($rating); // show the stars ?>

                        <a class="post-title" href="<?php the_permalink(); ?>" title="<?php the_title(); ?>"><?php the_title(); ?></a>

                    </li>

                <?php } ?>

            <?php endwhile;
            endif;
            wp_reset_query(); ?>

            <li class="last gentesque tooltip" title="View all movie reviews"><a href="movie-reviews/">More</a></li>

        </ul>
    </div>

<?php } ?>
The heart of that block of code is the custom loop that we create in order to grab posts from the Movie Reviews post type. Here are the arguments we use for the loop:
$args='&suppress_filters=true&posts_per_page='.$nummovies.'&post_type=oswc_movie_reviews&order=DESC&orderby='.$feedsort.$metakey;
First we use suppress_filters just to be sure we only grab the specific post type we want (some themes or plugins can have functionality which injects all loops with all post types - this argument makes sure our widget stays true to its specified post type).
The most important part is the post_type=oswc_movie_reviews, since that tells this loop to only look for the custom post type we created above. Finally, we just plug in our widget options for number of posts and sorting.
To get our stars, we grab the custom field value we added to the review:
$rating = get_post_meta(get_the_ID(), "Rating", $single = true);
And then we pass that value to a function that we haven't created quite yet:
<?php oswc_show_rating($rating); // show the stars ?>
After the loop, we include a More link. Put the URL to your specific custom post type page in for the link href (creating this page is outside the scope of this tutorial).
<li class="last gentesque tooltip" title="View all movie reviews"><a href="movie-reviews/">More</a></li>
Now we just need to do the same thing for Music Reviews and Game Reviews. Here's the full block of code for both review types:
<?php if($showmusic) { ?>

    <div id="tabs-music" class="tabdiv">
        <ul>
            <?php // setup the query
            $args='&suppress_filters=true&posts_per_page='.$nummusic.'&post_type=oswc_music_reviews&order=DESC&orderby='.$feedsort.$metakey;
            $cust_loop = new WP_Query($args);
            if ($cust_loop->have_posts()) : while ($cust_loop->have_posts()) : $cust_loop->the_post(); $postcount++;
                // if we're sorting by rating and this item does not have a rating, hide it
                $rating = get_post_meta(get_the_ID(), "Rating", $single = true);
                if(($rating && $feedsort=="meta_value") || ($feedsort!="meta_value")) {
                    ?>
                    <li>

                        <?php oswc_show_rating($rating); // show the stars ?>

                        <a class="post-title" href="<?php the_permalink(); ?>" title="<?php the_title(); ?>"><?php the_title(); ?></a>

                    </li>

                <?php } ?>

            <?php endwhile;
            endif;
            wp_reset_query(); ?>

            <li class="last gentesque tooltip" title="View all music reviews"><a href="music-reviews/">More</a></li>

        </ul>
    </div>

<?php } ?>

<?php if($showgames) { ?>

    <div id="tabs-games" class="tabdiv">
        <ul>
            <?php // setup the query
            $args='&suppress_filters=true&posts_per_page='.$numgames.'&post_type=oswc_game_reviews&order=DESC&orderby='.$feedsort.$metakey;
            $cust_loop = new WP_Query($args);
            if ($cust_loop->have_posts()) : while ($cust_loop->have_posts()) : $cust_loop->the_post(); $postcount++;
                // if we're sorting by rating and this item does not have a rating, hide it
                $rating = get_post_meta(get_the_ID(), "Rating", $single = true);
                if(($rating && $feedsort=="meta_value") || ($feedsort!="meta_value")) {
                    ?>
                    <li>

                        <?php oswc_show_rating($rating); // show the stars ?>

                        <a class="post-title" href="<?php the_permalink(); ?>" title="<?php the_title(); ?>"><?php the_title(); ?></a>

                    </li>

                <?php } ?>

            <?php endwhile;
            endif;
            wp_reset_query(); ?>

            <li class="last gentesque tooltip" title="View all video game reviews"><a href="game-reviews/">More</a></li>

        </ul>
    </div>

<?php } ?>
Don't forget to close the div tags we used at the beginning of our widget HTML and close the PHP function!
        </div>

    </div>

<?php
}
Our third function inside of the WP_Widget class is the update function. All this function does is receive the old and new options from the widget when the Save button is clicked, and updates the widget settings array accordingly:
function update( $new_instance, $old_instance ) {
    $instance = $old_instance;

    $sort = $instance['sort'];
    $showmovies = $instance['showmovies'];
    $showmusic = $instance['showmusic'];
    $showgames = $instance['showgames'];
    $nummovies = $instance['nummovies'];
    $nummusic = $instance['nummusic'];
    $numgames = $instance['numgames'];

    /* Strip tags (if needed) and update the widget settings. */
    $instance['sort'] = strip_tags( $new_instance['sort'] );
    $instance['showmovies'] = isset( $new_instance['showmovies'] );
    $instance['showmusic'] = isset( $new_instance['showmusic'] );
    $instance['showgames'] = isset( $new_instance['showgames'] );
    $instance['nummovies'] = strip_tags( $new_instance['nummovies'] );
    $instance['nummusic'] = strip_tags( $new_instance['nummusic'] );
    $instance['numgames'] = strip_tags( $new_instance['numgames'] );

    return $instance;
}
Our fourth and final function for creating our widget sets up how our widget will appear on the admin page. You'll notice a form field is created for each option that we need to deal with. This code will enable the widget to offer following 7 options:
- How to sort the posts
- Whether or not to display the Movie Reviews tab
- How many Movie Reviews to display
- Whether or not to display the Music Reviews tab
- How many Music Reviews to display
- Whether or not to display the Game Reviews tab
- How many Game Reviews to display
Here is the code that sets up our widget admin options:
	function form( $instance ) {

		/* Set up some default widget settings. */
		$defaults = array( 'sort' => 'latest', 'showmovies' => true, 'showmusic' => true, 'showgames' => true, 'nummovies' => 10, 'nummusic' => 10, 'numgames' => 10 );
		$instance = wp_parse_args( (array) $instance, $defaults ); ?>

		<p>
			<input class="radio" type="radio" <?php if($instance['sort']=='highest-rated') { ?>checked <?php } ?>name="<?php echo $this->get_field_name( 'sort' ); ?>" value="highest-rated" />
			Order reviews by highest rated<br />
			<input class="radio" type="radio" <?php if($instance['sort']!='highest-rated') { ?>checked <?php } ?>name="<?php echo $this->get_field_name( 'sort' ); ?>" value="latest" />
			Order reviews by latest
		</p>

		<p>
			<input class="checkbox" type="checkbox" <?php checked(isset( $instance['showmovies']) ? $instance['showmovies'] : 0  ); ?> id="<?php echo $this->get_field_id( 'showmovies' ); ?>" name="<?php echo $this->get_field_name( 'showmovies' ); ?>" />
			Display
			<input id="<?php echo $this->get_field_id( 'nummovies' ); ?>" name="<?php echo $this->get_field_name( 'nummovies' ); ?>" value="<?php echo $instance['nummovies']; ?>" style="width:30px" />
			movie reviews

		</p>

		<p>
			<input class="checkbox" type="checkbox" <?php checked(isset( $instance['showmusic']) ? $instance['showmusic'] : 0  ); ?> id="<?php echo $this->get_field_id( 'showmusic' ); ?>" name="<?php echo $this->get_field_name( 'showmusic' ); ?>" />
			Display
			<input id="<?php echo $this->get_field_id( 'nummusic' ); ?>" name="<?php echo $this->get_field_name( 'nummusic' ); ?>" value="<?php echo $instance['nummusic']; ?>" style="width:30px" />
			music reviews

		</p>

		<p>
			<input class="checkbox" type="checkbox" <?php checked(isset( $instance['showgames']) ? $instance['showgames'] : 0  ); ?> id="<?php echo $this->get_field_id( 'showgames' ); ?>" name="<?php echo $this->get_field_name( 'showgames' ); ?>" />
			Display
			<input id="<?php echo $this->get_field_id( 'numgames' ); ?>" name="<?php echo $this->get_field_name( 'numgames' ); ?>" value="<?php echo $instance['numgames']; ?>" style="width:30px" />
			game reviews

		</p>

		<?php
	}
}
Notice we closed out our entire class at the very end of that function. Now that we've created the guts of our widget, let's not forget to register it with WordPress!
//LOAD THE WIDGET
add_action("widgets_init", "oswc_load_widgets");
function oswc_load_widgets()
{
	register_widget('oswc_tabbed_latest_reviews');
}
Here is the full code block which is used to create the widget for your convenience:
//BUILD THE WIDGET
class oswc_tabbed_latest_reviews extends WP_Widget {
	function oswc_tabbed_latest_reviews() {
		// widget settings
		$widget_ops = array( 'classname' => 'Latest Review Tabs', 'description' => 'Displays reviews by most recent or highest rated in a jQuery tabbed format.' );
		// widget control settings
		$control_ops = array( 'width' => 250, 'height' => 350, 'id_base' => 'oswc_tabbed_latest_reviews' );
		// create the widget
		$this->WP_Widget( 'oswc_tabbed_latest_reviews', 'Latest Review Tabs', $widget_ops, $control_ops );
	}
	function widget( $args, $instance ) {

		extract( $args );

		/* User-selected settings. */
		$sort = $instance['sort'];
		$showmovies = $instance['showmovies'];
		$showmusic = $instance['showmusic'];
		$showgames = $instance['showgames'];
		$nummovies = $instance['nummovies'];
		$nummusic = $instance['nummusic'];
		$numgames = $instance['numgames'];

		if($sort=="highest-rated") {
			$feedsort="meta_value";
			$metakey="&meta_key=Rating";
		} else {
			$feedsort="date";
			$metakey="";
		}

		/* HTML output */
		?>

		<div id="tabbed-reviews">
			<ul class="tabnav">
				<?php if($showmovies) { ?><li><a href="#tabs-movies">Movies</a></li><?php } ?>
				<?php if($showmusic) { ?><li><a href="#tabs-music">Music</a></li><?php } ?>
				<?php if($showgames) { ?><li><a href="#tabs-games">Games</a></li><?php } ?>
			</ul>

			<div class="tabdiv-wrapper">

				<?php if($showmovies) { ?>

					<div id="tabs-movies" class="tabdiv">
						<ul>
							<?php // setup the query
							$args='&suppress_filters=true&posts_per_page='.$nummovies.'&post_type=oswc_movie_reviews&order=DESC&orderby='.$feedsort.$metakey;
							$cust_loop = new WP_Query($args);
							if ($cust_loop->have_posts()) : while ($cust_loop->have_posts()) : $cust_loop->the_post(); $postcount++;
								// if we're sorting by rating and this item does not have a rating, hide it
								$rating = get_post_meta(get_the_ID(), "Rating", $single = true);
								if(($rating && $feedsort=="meta_value") || ($feedsort!="meta_value")) {
									?>
									<li>

										<?php oswc_show_rating($rating); // show the stars ?>

										<a class="post-title" href="<?php the_permalink(); ?>" title="<?php the_title(); ?>"><?php the_title(); ?></a>

									</li>

								<?php } ?>

							<?php endwhile;
							endif;
							wp_reset_query(); ?>

							<li class="last gentesque tooltip" title="View all movie reviews"><a href="movie-reviews/">More</a></li>

						</ul>
					</div>

				<?php } ?>

				<?php if($showmusic) { ?>

					<div id="tabs-music" class="tabdiv">
						<ul>
							<?php // setup the query
							$args='&suppress_filters=true&posts_per_page='.$nummusic.'&post_type=oswc_music_reviews&order=DESC&orderby='.$feedsort.$metakey;
							$cust_loop = new WP_Query($args);
							if ($cust_loop->have_posts()) : while ($cust_loop->have_posts()) : $cust_loop->the_post(); $postcount++;
								// if we're sorting by rating and this item does not have a rating, hide it
								$rating = get_post_meta(get_the_ID(), "Rating", $single = true);
								if(($rating && $feedsort=="meta_value") || ($feedsort!="meta_value")) {
									?>
									<li>

										<?php oswc_show_rating($rating); // show the stars ?>

										<a class="post-title" href="<?php the_permalink(); ?>" title="<?php the_title(); ?>"><?php the_title(); ?></a>

									</li>

								<?php } ?>

							<?php endwhile;
							endif;
							wp_reset_query(); ?>

							<li class="last gentesque tooltip" title="View all music reviews"><a href="music-reviews/">More</a></li>

						</ul>
					</div>

				<?php } ?>

				<?php if($showgames) { ?>

					<div id="tabs-games" class="tabdiv">
						<ul>
							<?php // setup the query
							$args='&suppress_filters=true&posts_per_page='.$numgames.'&post_type=oswc_game_reviews&order=DESC&orderby='.$feedsort.$metakey;
							$cust_loop = new WP_Query($args);
							if ($cust_loop->have_posts()) : while ($cust_loop->have_posts()) : $cust_loop->the_post(); $postcount++;
								// if we're sorting by rating and this item does not have a rating, hide it
								$rating = get_post_meta(get_the_ID(), "Rating", $single = true);
								if(($rating && $feedsort=="meta_value") || ($feedsort!="meta_value")) {
									?>
									<li>

										<?php oswc_show_rating($rating); // show the stars ?>

										<a class="post-title" href="<?php the_permalink(); ?>" title="<?php the_title(); ?>"><?php the_title(); ?></a>

									</li>

								<?php } ?>

							<?php endwhile;
							endif;
							wp_reset_query(); ?>

							<li class="last gentesque tooltip" title="View all video game reviews"><a href="game-reviews/">More</a></li>

						</ul>
					</div>

				<?php } ?>

			</div>

		</div>

	<?php
	}
	function update( $new_instance, $old_instance ) {
		$instance = $old_instance;

		$sort = $instance['sort'];
		$showmovies = $instance['showmovies'];
		$showmusic = $instance['showmusic'];
		$showgames = $instance['showgames'];
		$nummovies = $instance['nummovies'];
		$nummusic = $instance['nummusic'];
		$numgames = $instance['numgames'];

		/* Strip tags (if needed) and update the widget settings. */
		$instance['sort'] = strip_tags( $new_instance['sort'] );
		$instance['showmovies'] = isset( $new_instance['showmovies'] );
		$instance['showmusic'] = isset( $new_instance['showmusic'] );
		$instance['showgames'] = isset( $new_instance['showgames'] );
		$instance['nummovies'] = strip_tags( $new_instance['nummovies'] );
		$instance['nummusic'] = strip_tags( $new_instance['nummusic'] );
		$instance['numgames'] = strip_tags( $new_instance['numgames'] );

		return $instance;
	}
	function form( $instance ) {

		/* Set up some default widget settings. */
		$defaults = array( 'sort' => 'latest', 'showmovies' => true, 'showmusic' => true, 'showgames' => true, 'nummovies' => 10, 'nummusic' => 10, 'numgames' => 10 );
		$instance = wp_parse_args( (array) $instance, $defaults ); ?>

		<p>
			<input class="radio" type="radio" <?php if($instance['sort']=='highest-rated') { ?>checked <?php } ?>name="<?php echo $this->get_field_name( 'sort' ); ?>" value="highest-rated" />
			Order reviews by highest rated<br />
			<input class="radio" type="radio" <?php if($instance['sort']!='highest-rated') { ?>checked <?php } ?>name="<?php echo $this->get_field_name( 'sort' ); ?>" value="latest" />
			Order reviews by latest
		</p>

		<p>
			<input class="checkbox" type="checkbox" <?php checked(isset( $instance['showmovies']) ? $instance['showmovies'] : 0  ); ?> id="<?php echo $this->get_field_id( 'showmovies' ); ?>" name="<?php echo $this->get_field_name( 'showmovies' ); ?>" />
			Display
			<input id="<?php echo $this->get_field_id( 'nummovies' ); ?>" name="<?php echo $this->get_field_name( 'nummovies' ); ?>" value="<?php echo $instance['nummovies']; ?>" style="width:30px" />
			movie reviews

		</p>

		<p>
			<input class="checkbox" type="checkbox" <?php checked(isset( $instance['showmusic']) ? $instance['showmusic'] : 0  ); ?> id="<?php echo $this->get_field_id( 'showmusic' ); ?>" name="<?php echo $this->get_field_name( 'showmusic' ); ?>" />
			Display
			<input id="<?php echo $this->get_field_id( 'nummusic' ); ?>" name="<?php echo $this->get_field_name( 'nummusic' ); ?>" value="<?php echo $instance['nummusic']; ?>" style="width:30px" />
			music reviews

		</p>

		<p>
			<input class="checkbox" type="checkbox" <?php checked(isset( $instance['showgames']) ? $instance['showgames'] : 0  ); ?> id="<?php echo $this->get_field_id( 'showgames' ); ?>" name="<?php echo $this->get_field_name( 'showgames' ); ?>" />
			Display
			<input id="<?php echo $this->get_field_id( 'numgames' ); ?>" name="<?php echo $this->get_field_name( 'numgames' ); ?>" value="<?php echo $instance['numgames']; ?>" style="width:30px" />
			game reviews

		</p>

		<?php
	}
}
//LOAD THE WIDGET
add_action("widgets_init", "oswc_load_widgets");
function oswc_load_widgets()
{
	register_widget('oswc_tabbed_latest_reviews');
}
The Star Rating Function
That's it for our widget. One last thing to do in our functions.php file: create the function that we called above which outputs the HTML for the star rating. Here's the function you should add below the widget code that you added above:
//html display of stars
function oswc_show_rating($rating) {
	$output = '<div class="stars">';
	$output .= '<div class="star';
	if($rating>=1) {
		$output .= ' full';
	} elseif($rating>0) {
		$output .= ' half';
	}
	$output .= '"> </div>';
	$output .= '<div class="star';
	if($rating>=2) {
		$output .= ' full';
	} elseif($rating>1) {
		$output .= ' half';
	}
	$output .= '"> </div>';
	$output .= '<div class="star';
	if($rating>=3) {
		$output .= ' full';
	} elseif($rating>2) {
		$output .= ' half';
	}
	$output .= '"> </div>';
	$output .= '<div class="star';
	if($rating>=4) {
		$output .= ' full';
	} elseif($rating>3) {
		$output .= ' half';
	}
	$output .= '"> </div>';
	$output .= '<div class="star';
	if($rating>=5) {
		$output .= ' full';
	} elseif($rating>4) {
		$output .= ' half';
	}
	$output .= '"> </div>';
	$output .= '</div>';
	echo $output;
}
"The star images this widget uses are contained in the download file for this tutorial."
This function accepts the rating value (a number between but including 0 and 5) and uses if...else statements to check and see how many stars to make yellow and how many stars to make grey. It displays a div with class "star" five times in a row, and each time it checks the rating and compares it to which star it's displaying, and adds either a class of "full" if the rating is greater than or equal to the current star, or a class of "half" if the rating is greater than the previous star.
Confused by the half star logic? It simply means if the star is greater than the previous star, but not greater than or equal to this star, this must be the half star.
Note: the stars are all inside a div with class "stars", which is what we'll target to apply our styles later.
Step 4. Setup The Widget
Now that we have done all the work of coding our widget, WordPress will recognize it on the widgets page, and we can set it up to appear in our sidebar. Go to Appearance >> Widgets and drag our new widget, called Latest Review Tabs, into one of the sidebars. We will use the Primary Widget Area in the TwentyTen theme. Expand the widget settings to see the available options we setup in the previous step:
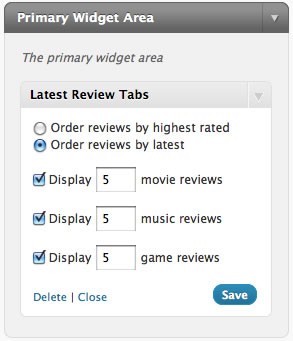
Select how you'd like to sort the widget (either by highest rated or latest), select to display each of the three review types, and indicate how many of each review type you'd like to display. Save your options and you will now have a (somewhat) working widget on your site. Of course, we haven't applied any style yet, so it's not going to look too pretty until we complete the next two steps: applying jQuery and CSS.
Step 5. Splash In Some jQuery
This widget uses the jQuery UI for tab transitions. So, we need to do three simple things in order to hook up the jQuery UI with our widget: 1) load the jQuery library, 2) load the jQuery UI plugin, and 3) call the jQuery UI tabs function on our widget.
Load the jQuery library
WordPress comes with jQuery already included. Some people prefer to load it from a CDN or even upload the library and use it within their theme. To learn about loading jQuery within WordPress, visit the Codex. To include it in the TwentyTen theme, all we have to do is all one line of code in the header.php file. Open the header.php file and add the following call to jQuery before the wp_head() function (so that would be somewhere before line 51 in the TwentyTen theme):
<?php wp_enqueue_script("jquery"); ?>
Load the jQuery UI plugin
This is the same technique as loading the jQuery library, except we want to call this one after the wp_head() function (so that would be somewhere after line 51 in the TwentyTen theme):
<script type="text/javascript" src="http://ajax.googleapis.com/ajax/libs/jqueryui/1.5.3/jquery-ui.min.js"></script>
Call the jQuery UI tabs function on our widget
Add the following code directly after the jQuery UI code we just added:
<script type="text/javascript">
	jQuery.noConflict();
	jQuery(document).ready(function() {
		jQuery('#tabbed-reviews > ul').tabs({ fx: { opacity: 'toggle', duration: 200 } });
	});
</script>
We are simply calling the tabs function (which the jQuery UI provides for us) on the unordered list inside of the #tabbed-reviews div tag, and we are applying an opacity toggle on the transitions between the tabs. You can decrease the duration for a faster toggle, or increase it for a slower toggle (think of this number as a delay instead of a speed).
Step 6. Style the Widget Using CSS
If you view your widget right now you probably won't be very pleased since we have not styled it at all. The last step is to apply some CSS rules which will make our widget actually look like a widget, and function correctly as well. Open your style.css file and add the following style at the end of the file:
/*************************************************
jquery tabs
*************************************************/
#tabbed-reviews a {
	font-family:Arial, Helvetica, sans-serif;
}
#tabbed-reviews a:hover {
	text-decoration:none;
}
ul.tabnav {
	margin:0px !important;
	padding:0px !important;
}
ul.tabnav li {
	display: inline;
	list-style: none;
}
ul.tabnav li a {
	text-decoration: none;
	text-transform: uppercase;
	color: #444;
	font-weight: bold;
	display:inline-block;
	padding: 5px 9px 6px 9px;
	outline: none;
	font-size:.8em;
}
ul.tabnav li a:hover, ul.tabnav li a:active, ul.tabnav li.ui-tabs-selected a {
	color:#FFF;
	background:url(images/sidebar-header-bg.png) repeat-x 0px 0px;
}
.tabdiv-wrapper {
	border:1px solid #CCC;
	margin-bottom:20px;
}
.tabdiv {
	background: #E8E8E8;
	border:1px solid #FFF;
	border-top:0px;
	font-size:1em;
}
.tabdiv ul {
	margin:0px !important;
}
.tabdiv li {
	list-style-type:none;
	list-style-image: none !important;
}
.tabdiv li a {
	display:block;
	padding:10px 10px;
	border-bottom:1px solid #ccc;
	border-top:1px solid #fff;
	color:#444;
}
.tabdiv li a:hover {
	background:#F0F0F0;
	color:#222;
}
.tabdiv li.last a {
	text-align:center;
	font-weight:bold;
	text-transform:uppercase;
	color:#666;
	font-size:1em;
	padding:2px 0px 2px 0px;
	border-bottom:0px;
}
.ui-tabs-hide {
	display: none;
}

/*stars*/
.tabdiv .stars {
	float:right;
	margin-top:3px;
}
.tabdiv .stars {
	margin:10px 5px 0px 0px !important;
}
.tabdiv .star {
	width:14px;
	height:14px;
	float:left;
	margin-left:2px;
	background:url(images/star-empty-small.png) no-repeat 0px 0px;
}
.tabdiv .star.half {
	background:url(images/star-half-small.png) no-repeat 0px 0px;
}
.tabdiv .star.full {
	background:url(images/star-full-small.png) no-repeat 0px 0px;
}
The first part of the style applies to the tabs and the content areas inside of each tab. As you can see, padding, borders, and background colors are given to the different elements that make up the tabs container. The second part of the style applies to the star containers. A background image is used for the three different star states of empty, half, and full, and the stars are floated next to each other so they appear in a horizontal line.
Conclusion
Developing in WordPress is all about leveraging different technologies to present a rich user experience for your site visitors. In this tutorial we used the standard WordPress core features including the custom post types and the custom widgets API, and we expanded upon that by adding in the helpful jQuery library, followed by the jQuery UI plugin, and finally we used the power of CSS to make everything look sleek and professional.
The greatest benefit of ideas such as this widget is that you can present more content to your users without overwhelming them, with the ultimate goal of getting them to stay within your site for as long as possible.
Hopefully this particular widget can help you to decrease that bounce rate and create a more enjoyable experience for your users! If you haven't already, be sure to take a look at the demo before giving it a try yourself.

Comments