One of the first things I noticed when I started using WordPress was how well it employs the developer's mantra, "Separation of Concerns." In the programming world, you want each component to rely on the other components as little as possible; this makes each component more reusable. A perfect example of this in WordPress is Themes. They totally separate the design from the content. We can change the theme, and the content remains unchanged. WordPress does something similar with they way we can build on themes in WordPress. Instead of modifying an existing theme (and risk losing the changes at the next update), we can create a child theme, which separates our changes from the parent. In this tutorial, I will show you how to create a simple child theme.
What is a Child Theme?
From the WordPress Codex:
In essence, what this means is we can build upon the parent theme without modifying its files. We can change the CSS, add a custom post type, or build in our own set of functions. This is also the recommended way of creating a theme based on another theme.
Aside from child themes, there are two other ways we can create a theme that's based off of another. The first way is to just modify that theme. However, if we do that and the theme is updated, we will lose all of our changes. The second way is to copy that theme into another folder and go from theme. We wouldn't lost the theme (provided we renamed it properly), but we'd have duplicates of all of the files, even the ones we didn't modify.
"A WordPress child theme is a theme that inherits the functionality of another theme, called the parent theme, and allows you to modify, or add to, the functionality of that parent theme."
In this tutorial, we will be modifying the latest default theme (as of 3.2), Twenty Eleven
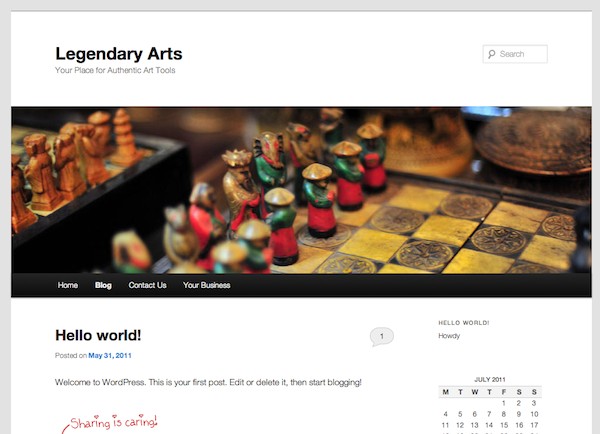
The Twenty Eleven WordPress Theme
Step 1. Set-Up/Required Files
The first thing we'll want to do after upgrading WordPress to 3.2 or downloading and installing Twenty Eleven is create out own directory for our child theme. In /wp-content/themes/ create the directory twentyeleven-child. We can now start adding files to our child theme.
Style.css
There is only one required file when creating a child theme: style.css. It is here that we will declare our theme, as well as tell WordPress that it is the child of another theme. Create style.css in the twentyeleven-child folder and add the following lines:
/*
Theme Name:     Twenty Eleven Child
Theme URI:      http: //example.com/
Description:    Child theme for the Twenty Eleven theme
Author:         Your Name
Author URI:     http: //your-site.com/
Template:       twentyeleven
Version:        0.1.0
*/
Most of the above information is what you'd fine in any other theme: it's name, link, Author credit, and version. However, there is also a line for Template. This is where you tell WordPress what it should use for the parent theme. It must be the name of the directory of the parent theme, and it is case-sensitive.
One thing to note before we begin adding our own custom CSS: Our child theme's style.css file will completely over-write the parent's. Therefore, after our theme declaration info, our first line should import the parent's CSS:
@import url("../twentyeleven/style.css");
We're now ready to modify the parent's CSS. While we're going to do some simple changes here, if you'd like to do more advanced editing I'd suggest using Firefox with Firebug or Google Chrome's Developer Tools to help you out. They are quite useful! For now, add the following lines to your style.css file, under the @import line:
a{ color: #254655; }

body{
background: #727D82;
}

header#branding{
background: #29305C;
color: #B3BDC1;
}

header#branding h1, header#branding h2, header#branding a{ color: #B3BDC1; }

#respond{ background: #E7DFD6; }
These lines will change the background and font-color of the body, header, and comment boxes. You, of-course, can play around as much as you'd you :-)
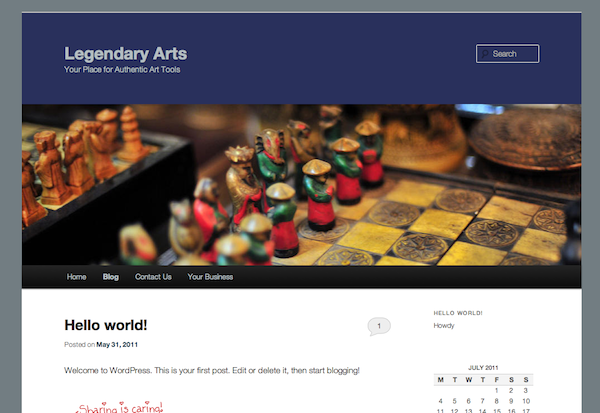
Here's what we have so far...
Step 2. Functions.php
If I were to rank WordPress theme files in order of importance, I would put style.css and index.php in a tie for first as you need them to run. At second I would put functions.php. The functions.php file is how you add custom functionality to your theme: custom types, menu and thumbnail support, extra sidebars, and modifications for the loop, amongst other things.
While functions.php is not required for a child theme (remember, style.css is the only required file), it is the best way hands down to add in your own functionality. And unlike style.css, which overwrites the parent's style.css, our child's functions.php is loaded before the parent's. We're going to create a widget area for the header and override one of Twenty Eleven's built-in functions.
First, we'll add the widget area. Create your functions.php and add the following code:
<?php
register_sidebar( array(
	'name' => __( 'Header Widget', 'twentyeleven-child' ),
	'id' => 'header-widget',
	'before_widget' => '<div id="%1$s" class="widget %2$s">',
	'after_widget' => "</div>",
	'before_title' => '<h3 class="widget-title">',
	'after_title' => '</h3>',
) );
?>
This will register the widget area that we'll add to the header in the next step.
Now we will override one of the built-in Twenty Eleven functions. The Twenty Eleven makers made it very easy for child theme developers to override their functions, as they first check to see if a function of the same name exists. Take a look at the example in twentyeleven/functions.php that we'll be modifying:
if ( ! function_exists( 'twentyeleven_posted_on' ) ) :
/**
 * Prints HTML with meta information for the current post-date/time and author.
 * Create your own twentyeleven_posted_on to override in a child theme
 *
 * @since Twenty Eleven 1.0
 */
function twentyeleven_posted_on() {
	printf( __( '<span class="sep">Posted on </span><a href="%1$s" title="%2$s" rel="bookmark"><time class="entry-date" datetime="%3$s" pubdate>%4$s</time></a><span class="by-author"> <span class="sep"> by </span> <span class="author vcard"><a class="url fn n" href="%5$s" title="%6$s" rel="author">%7$s</a></span></span>', 'twentyeleven' ),
		esc_url( get_permalink() ),
		esc_attr( get_the_time() ),
		esc_attr( get_the_date( 'c' ) ),
		esc_html( get_the_date() ),
		esc_url( get_author_posts_url( get_the_author_meta( 'ID' ) ) ),
		sprintf( esc_attr__( 'View all posts by %s', 'twentyeleven' ), get_the_author() ),
		esc_html( get_the_author() )
	);
}
endif;
Notice how the first line checks to see if there is a function by the name twentyeleven_posted_on() first. By placing a function with that name in our child theme's functions.php, we will override the parent theme's function.
Note for theme developers:If you'd like to make your theme easier for child theme developers ('plugable'), you should follow Twenty Eleven's lead and make sure a function by the same name does not exist for each of your custom functions as well!
The function prints a line after the post title with the date and hidden author information. We'll be changing this line a little bit using the same function call. Add the following code to your functions.php file:
function twentyeleven_posted_on() {
	$link= esc_url( get_permalink() );
	$title= esc_attr( get_the_title() );
	$time= esc_attr( get_the_time() );
	$dateGMT= esc_attr( get_the_date( 'c' ) );
	$date= esc_html( get_the_date() );
	$authorURL= esc_url( get_author_posts_url( get_the_author_meta( 'ID' ) ) );
	$author= esc_html( get_the_author() );

	echo ('<span class="sep">Posted on</span> <a href="'.$link.'" title="'.$title.'" rel="bookmark"><time class="entry-date" datetime="%3$s" pubdate>'.$date.' at '. $time.'</time></a> <span class="sep"> by </span> <span class="author vcard"><a class="url fn n" href="'.$authorURL.'" title="'.$author.'" rel="author">'.$author.'</a></span>');

}
The first thing we did was put all of the values we are using in variables. This is a personal preference of mine as I feel the code is a bit easier to read. As you can see, we didn't change too much here. First, we printed the time as well as the date. Second, we unhid the byline, so people could see the link to the author's other posts.

Here's our new posted data.
Again, while we didn't do any groundbreaking, we were able to demonstrate how to override a [properly coded] custom theme function. Now let's move on to the actual template files!
Step 3. Template Files
The last thing I want to cover here is template files for the child theme. Maybe we want to modify the header for the site, or the single post loop, or even add an archive page. That and more is possible using child themes. We would just name our file the same name as whatever file we want to replace in the parent. These files, like style.css, will override the parent's file. We'll be modifying the header and creating a new page template.
First we'll do the header. Create header.php, copy the code from twentyeleven/header.php and paste it into our header.php file. Once we do that we're going to replace lines 104 and 109 (<?php get_search_form(); ?>) with the following function call:
<?php techild_header_widget(); ?>
Now we'll add the following code to our functions.php file:
function techild_header_widget(){
	if ( ! dynamic_sidebar( 'header-widget' ) ) :
		get_search_form();
	endif;
}
This code will make it so if there are any widgets in the Header Widget area, we show them, otherwise we'll show the search bar. Finally, we'll need a bit of CSS to make our header widget-friendly. Add this to your style.css file:
header#branding .widget{
position: absolute;
top: 2em;
right: 7.6%;
}
This will style the widget the same way the search box is styled, but be careful. This method isn't exactly bulletproof. It's just to demonstrate modifying template files in child themes. Here is our result:

Our header widget
Next Up, we'll create a new page template. Create the file twentyeleven-child/page-welcome.php and copy the code from Twenty Eleven's page.php (twentyeleven/page.php). The first thing we'll need to do is modify the comments at the top to let WordPress know this is a page template. Replace the comments at the top with this:
/**
 * Template Name: Welcome
 */
When we create a new page, we'll be able to use the "Welcome" template. What we're going to do now is add a custom message to the top of the page. You're entire file should look like this:
<?php
/**
 * Template Name: Welcome
 */

get_header(); ?>

		<div id="primary">
			<div class="welcome">
				<p>Welcome to my website! I'm running a modification of WordPress' Twenty Eleven theme. Feel free to poke around a bit!</p>
			</div>
			<div id="content" role="main">

				<?php the_post(); ?>

				<?php get_template_part( 'content', 'page' ); ?>

				<?php comments_template( '', true ); ?>

			</div><!-- #content -->
		</div><!-- #primary -->

<?php get_footer(); ?>
Note that in between the #primary and #content divs, we've added a div with the class welcome. Let's go to our style.css file and add some CSS for it:
.welcome{
margin: 15px 60px;
background: #fbffd8;
border: 1px solid #f6ff96;
padding: 15px;
text-align: center;
}
Our end result should look like this:
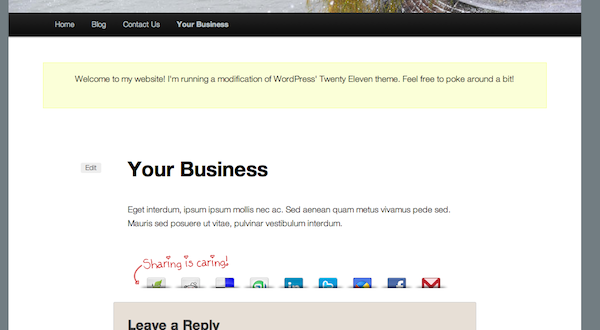
The Welcome page template
I should mention that the better way to do this would be to add a custom field to that template, but like I said earlier, I wanted to keep things simple so we could focus on creating the child theme.
Conclusion
While the post would get a little long for me to re-list the code in each of the files, I have included the child theme for you to download. Obviously, we just scratched the surface of creating child themes; my goal was to give you a good idea of how to create one based on how WordPress handles each type of file. One thing to note is that when referencing images or other files from your child theme, you need to use get_stylesheet_directory_uri() as opposed to get_template_directory_uri() as the latter will link to the parent theme.
Remember, you can create a child theme from any WordPress theme. However, there are also a bunch of theme frameworks out there from which we can create pretty in-depth child themes. Some of the more popular ones include Carrington, Thematic, and Thesis. They each have a learning curve, but they are all very powerful!

Comments