As a developer evangelist for Twilio, I spend a lot of time going to events. When I’m chatting with event organizers and they realize I work for Twilio, one of the most common requests they have is for me is a simple application they can use to power voting at their events. Generally they are trying to solicit feedback from their attendees and SMS is the one of the only apps that everyone has installed.
Their requirements generally include letting people vote using SMS, preventing people from voting more than once and sometimes displaying real-time results of the voting. Over time, I’ve built several iterations of this application and have learned quite a bit about building full stack web applications using Node and Angular.
Introduction
Over the course of this three part tutorial, we are going to build a full stack Node/Angular web application, from scratch. Instead of building a simplistic to-do app, we’re going to build a real piece of software that integrates with a third party API (Twilio), persists information to a database (CouchDB), displays real-time information (Socket.io) and much, much more. In the first part of this tutorial, I am going to walk you through:
- Creating your Node app
- Adding the Hapi web framework
- Integrating Twilio
Preparation
This tutorial will assume that you have access to a terminal on your development machine. You’ll also need to do the following:
Getting Started With Node & Hapi
Now that you have Node installed, creating a new Node application is simple. First open up a terminal. Create a new directory for your application, change into that directory and run:
npm init
This will walk you through the process of creating a package.json file, which defines the basics of your application (name, dependencies, and so on). Feel free to hit enter at each prompt to stick with the defaults. Next, let’s install the Hapi web framework:
npm install hapi --save
I chose Hapi over the more popular Express framework for two reasons:
- It comes pre-configured to handle basic web application tasks (like processing HTTP
POSTbodies). - It is equally focused on building both application and services.
Create a new file called index.js and open it up in your code editor of choice. Let’s walk through a few simple lines of code to get our app up-and-running:
var Hapi = require('hapi');
var server = Hapi.createServer('localhost', process.env.PORT || 3000);
This code makes the Hapi module available in our code, creates a server bound to localhost and makes the web app available at whatever port is defined by process.env.PORT or 3000 if that environment variable isn’t defined. This code is necessary so that when you deploy this application to a production environment, it gets bound to the proper port. Next let’s define a route:
server.route([{
  method: 'GET',
  path: '/vote/sms',
  handler: function (request, reply) {
    reply('hello world');
  }
}]);
A route is just a tuple consisting of an HTTP method, a URL path and a handler function. So above, we are telling Hapi that if any GET requests come in for the path /vote/sms, send a reply with the string “hello world”. Now add this final line:
server.start();
This will start the server on your development machine and listen at port 3000. Save index.js and go back to your terminal. Run your app like this:
node .
Our app is now running. Open up a browser and go to http://localhost:3000/vote/sms. You should see this:
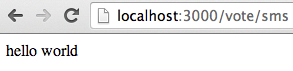
That, my friends, is Hello World using Node and Hapi.
Processing SMS Using Twilio
Now that we have a functional Node application, we can start to thinking about processing votes via SMS. In order to do this, we are going to integrate our Node application with Twilio, a third party API that makes it easy for developers to send and receive text messages, make and receive phone calls and embed VOIP in their web application.
In our case, we want to process incoming text messages. Twilio uses a construct known as webhook to notify web applications of incoming text messages or phone calls. A webhook is simply a URL, configured by the developer, that gets called in response to an event taking place. Here is a simple diagram of how Twilio webhooks would work with our Node app:
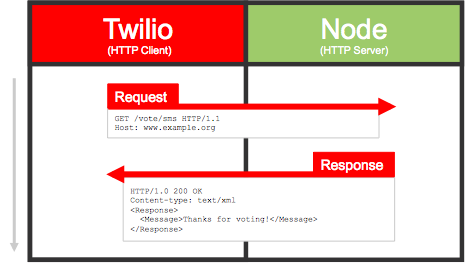
When Twilio makes the HTTP request (either a GET or a POST, also configurable by the developer) it will also include a well-defined set of parameters including information such as who the text message is from, the body of the text message, and so on. When your web app is done processing the request, Twilio expects a response in the form of a properly formatted TwiML document. This XML document provides optional instructions for Twilio to execute.
In order to more easily work with the Twilio API, let’s install the Twilio NPM module. Open up the terminal, go to the root directory of your app and run the following command:
npm install twilio --save
Creating a Route for Our Webhook
Now that we have a high-level understanding of how Twilio works, let’s create a URL that Twilio can call when an SMS vote comes in. In your application directory, create a subdirectory called routes. In this new directory, create a new file called index.js. This file will house the logic for our application’s URL routing so that our core application file does not get cluttered. You’ll see this pattern over and over again as we add more complexity to our application. Keeping things modular makes it easier to understand and test our application. Now, add the following code:
var twilio = require('twilio')
  , Hapi;

module.exports = function(hapi) {
  Hapi = hapi
  return exports;
};

var voteSMS = exports.voteSMS = function(request, reply) {
  var resp = new twilio.TwimlResponse();
  resp.message('Thanks for voting!');
  reply(resp.toString()).type('text/xml');
};
Three things are happening here:
- We require the Twilio Node module
- We override
module.exportsto accept a reference to Hapi - We define a route handler
The route handler is a little different from the first one we wrote. In this iteration, we’re using the Twilio module to create and populate a TwimlResponse object. We then convert this object to a String and pass it to the reply method. Lastly, we're explicitly setting the Content-Type to text/xml. This will become a familiar pattern when we’re responding to Twilio webhook requests.
In order to complete this example, open up your main index.js file (at the root of your app directory) and add the following line of code underneath where you required the Hapi module:
var routes = require('./routes')(Hapi);
Next, edit the route you’ve defined to remove the anonymous function and replace it with a reference to routes.voteSMS. Now restart your Node server and visit http://localhost:3000/vote/sms in your browser. You should see:

Configuring Your Webhook
Now that we’ve got our route up-and-running the next step is to configure Twilio to request this URL whenever an SMS comes in. In order for this to happen, the URL we provide Twilio must be publicly accessible. Configuring Twilio to make a request to localhost isn’t going to fly. In production, your application will be deployed to the VPS/host of your choice. However, it would be great if we could hold off on deployment for the purposes of fast, iterative development. As it turns out, there’s a wonderful tool for doing just this: Ngrok.
Ngrok is a small piece of software that creates a secure tunnel between your local machine and a publicly accessible domain. It’s useful for testing Twilio applications, but you can also use it to share live URLs to web applications running on your development machine for the purposes of testing, feedback, or other tasks.
Assuming you’ve installed Ngrok, make sure your Node server is running and then, in another terminal, start running Ngrok:
ngrok 3000
You should see a screen like this:
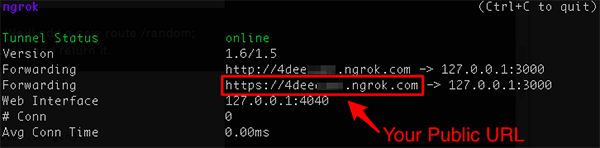
You can validate that your local Node web app is indeed live on the public internet by copying the following URL into your browser: https://YOUR-SUBDOMAIN.ngrok.com/vote/sms. If you see the XML output from before, you’re good to go!
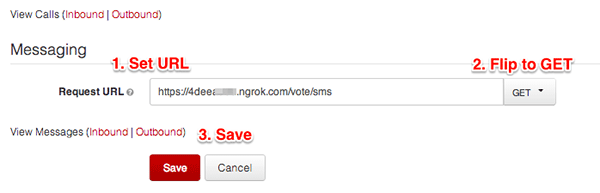
Now, we can configure Twilio. Log-in to your Twilio account, click on the “Numbers” tab and select a number to work with. If you’ve created a free developer account, you should have been assigned a Twilio number. In the “Messaging” section, set the Request URL to your Ngrok URL, including the path /vote/sms:
Testing Your App
Now the moment of truth! Let’s test our application by sending it a text message. Take out your mobile phone and send a text message to your Twilio number. You can send any message that you'd like. Within a couple of seconds, you should see a reply:

Securing Your Twilio Webhook
The astute among you might have noticed a slight security issue with our application. What is there to stop a bad actor from figuring out the URL to your webhook and then mimicking Twilio by sending their own HTTP requests? That seems like a pretty straightforward way to stuff the ballot box for our voting application. Luckily, Twilio anticipated the need to secure webhooks and the Twilio Node module provides a method, to validate that an HTTP request is indeed coming from Twilio.
First, you’ll need your Auth Token. Every Twilio account has an Account SID and an Auth Token. They’re kind of like a username and password, but for programmatic API access to your account. If you’re logged-in to the Twilio website you’ll find both of these pieces of information on your dashboard:

Click on the padlock icon to reveal your auth token. Then select it and copy it to your clipboard. Next, create a file in your app directory called config.js. Add the following lines:
var config = {};

config.twilio = {};
config.twilio.key = 'yyy';
config.twilio.disableSigCheck = false;

module.exports = config;
Now, open up routes.js and import our new config module by adding the following line to the top of the file:
var config = require('../config');
Next, let’s make a small modification to our voteSMS route:
var voteSMS = exports.voteSMS = function(request, reply) {
  if (fromTwilio(request) || config.twilio.disableSigCheck) {
    var resp = new twilio.TwimlResponse();
    resp.message('Thanks for voting!');
    reply(resp.toString()).type('text/xml');
  }
  else {
    reply(Hapi.error.unauthorized('Sorry, no black hats allowed'));
  }
};
All we’re doing is calling a function to see if the request is indeed from Twilio. If it is, then proceed. If it’s not, return a 403 Unauthorized error to the client. The fromTwilio function is pretty straightforward:
var fromTwilio = function(request) {
  var sig  = request.headers['x-twilio-signature']
    , url  = config.twilio.messagingUrl + request.url.search
    , body = request.payload || {};

  return twilio.validateRequest(config.twilio.authToken, sig, url, body);
};
Here we’re simply using the Twilio Node module’s validateRequest method to see if the request came from Twilio. Those who are interested should read more about its implementation, but let's move on. The function takes four parameters: your Twilio Auth Token, a header value passed by Twilio, the fully qualified URL that Twilio invoked (including any GET parameters) and the body of the POST (empty if it wasn’t a POST request). It will return true if the request came from Twilio and false otherwise.
It’s easy to test if this is working. First, send an SMS to your Twilio number and see if you get a reply. Next, open up your browser and try to open the URL. You should see this:

Secured!
Conclusion
And that’s it for part one of this tutorial on building full stack Node and Angular web apps.
Starting from scratch we've:
- Created a Node web app
- Added the Hapi web framework
- Built a route to return some XML
- Used Twilio to route incoming text messages to our app
- Secured the URL to only accept requests from Twilio
In part two, we are going to create a data model for our voting application, use CouchDB to persist this data, add business logic to intelligently handle incoming votes and load test our solution using Blitz.io. Until then, happy hacking!

Comments