Introduction
In this short series, I will be showing you how to create a plane fighting game reminiscent of the old 1942 arcade game. Along the way, you'll learn about Corona's storyboard functionality, timers, moving a character, and a bit of trigonometry.
The graphics used in this tutorial were created by Ari Feldman and provided under the Common Public License, which means that they are free to use. Make sure to check out Ari Feldman's SpriteLib. Let's get started.
1. New Project
Open the Corona Simulator, click New Project, and configure the project as shown below. Select a location to save your project and click OK. This will create a folder with a number of icons and three files that are important to us, main.lua, config.lua, and build.settings. We'll take a look at each file in the next few steps.

2. Build.Settings
The build.settings file is responsible for the build
time properties of the project. Open this file, remove its contents, and
populate it with the following code snippet.
settings =
{
    orientation =
    {
        default ="portrait",
        supported =
        {
          "portrait"
        },
    },
}
In build.settings, we are setting the default orientation and restricting the application to only support a portrait orientation. You can learn which other settings you can include in build.settings by exploring the Corona Documentation.
3. Config.lua
The config.lua file handles the application's configuration. As we did with build.settings, open this file, remove its contents, and add the following code.
application =
{
    content =
    {
      width = 768,
      height = 1024,
      scale = "letterbox",
      fps = 30,
    }
}
This sets the default width and height of the screen, uses letterbox to scale the images, and sets the frames per second to 30.
You can learn what other properties you can set in config.lua by checking out the Corona Documentation.
4. Main.lua
The main.lua file is the file that the application loads first and uses to bootstrap the application. We will be using main.lua to set a few default settings for the application and the Storyboard module to load the first screen.
If you're not familiar with Corona's Storyboard module, then I recommend giving the Documentation a quick read. In short, Storyboard is the built-in solution to scene ("screens") creation and management in Corona. This library provides developers an easy way to create and transition between individual scenes.
5. Hide Status Bar
We don't want the status bar showing in our application. Add the following code snippet to main.lua to hide the status bar.
display.setStatusBar(display.HiddenStatusBar)
6. Set Default Anchor Points
To set the default anchor (registration points) add the following to main.lua.
display.setDefault( "anchorX", 0)
display.setDefault( "anchorY", 0)
The anchorX and anchorY properties specify where you want the registration point of your display objects to be. Note that the value ranges from 0.0 to 1.0. For example, if you'd want the registration point to be the center of the display object, then you'd set both properties to 0.5.
7. Seed Random Generator
Our game will be using Lua's math.random function to generate random numbers. To make sure that the numbers are truly random each time the application runs, you must provide a seed value. If you don't provide a seed value, the application will generate the same randomness every time.
A good seed value is Lua's os.time function since it will be different each time the application is run. Add the following code snippet to main.lua.
math.randomseed( os.time() )
8. Require Storyboard
Before we can use the Storyboard module, we must first require it. Add the following to main.lua.
local storyboard = require "storyboard"
9. Loading the Start Screen
Enter the following code snippet below the line in which you required the Storyboard module.
storyboard.gotoScene( "start" )
This will make the application go to the screen named start, which is also a Lua file, start.lua. You don't need to append the file extension when calling the gotoScene function.
10. Start Screen
Create a new Lua file named start.lua in the project's main directory. This will be a storyboard file, which means we need to require the Storyboard module and create a storyboard scene. Add the following snippet to start.lua.
local storyboard = require( "storyboard" )
local scene = storyboard.newScene()
The call to
newScene makes start.lua part of the application's storyboard. This means that it becomes a screen within the game, which we can call storyboard methods on.11. Local Variables
We only need one local variable, startbutton, in the main chunk of start.lua. This local variable is used to reference the start button in this scene.
local startbutton
It's important to understand that local variables in the main chunk only get called once, when the scene is loaded for the first time. When navigating through the storyboard, for example, by invoking methods like gotoScence, the local variables will already be initialized.
This is important to remember if you want the local variables to be reinitialized when navigating back to a particular scene. The easiest way to do this is to remove the scene from the storyboard by calling the removeScence method. The next time you navigate to that scene, it will be automatically reloaded. That's the approach we'll be taking in this tutorial.
12. Storyboard Events
If you've taken the time to read the Documentation on storyboards I linked to earlier, you will have noticed the documentation includes a template that contains every possible storyboard event. The comments are very useful as they indicate which events to leverage for initializing assets, timers, etc.
The template can seem a little overwhelming at first. However, for this tutorial, we're only interested in three events, createScene, enterScene, and exitScene.
13. Create Scene
Add the following to snippet to start.lua.
function scene:createScene( event )
local group = self.view
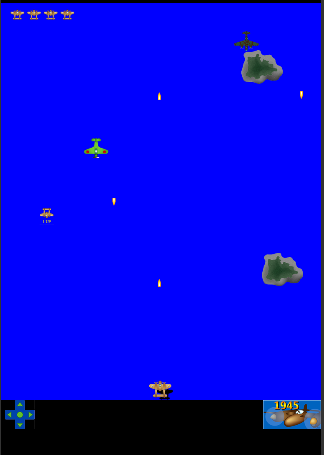
local background = display.newRect( 0, 0, display.contentWidth, display.contentHeight)
background:setFillColor( 0,.39,.75)
group:insert(background)
local bigplane = display.newImage("bigplane.png",0,0)
group:insert(bigplane)
startbutton= display.newImage("startbutton.png",264,670)
group:insert(startbutton)
end
This method is called when the scene's view doesn't exist yet. This is where you should initialize the display objects and add them to the scene. The group variable is pointing to self.view, which is a GroupObject for the entire scene.
We then draw a rectangle for the background. Corona's Display object comes with some drawing methods, such as newCircle, newLine, and, as shown in the above snippet, newRect. We also invoke setFillColor to give the rectangle a blueish color. The parameters we pass are percentages.
We then insert the background into the group. It's important to insert display objects into the view's group to make sure they are removed when the main view is removed. Finally, create the start button and add it to the group as well. The display object has the newImage method, which takes as its parameters the path to the image and the x and y values for the image's position on-screen.
14. Enter Scene
The enterScene method is called immediately after the scene has moved on-screen. This is where you can add event listeners, start timers, load audio, etc. Add the following snippet below the code you added in the previous step.
function scene:enterScene( event )
    startbutton:addEventListener("tap",startGame)
end
In enterScene, we're adding an event listener to the startbutton, which will call the startGame function when the users taps the start button.
15. Exit Scene
The exitScene method is called when the scene is about to move off-screen. This is where you want to undo whatever you set up in the enterScene method, such as removing event listeners, stop timers, unload audio, etc. Add the following snippet below the code you added in the previous step.
function scene:exitScene( event )
    startbutton:removeEventListener("tap",startGame)
end
All we do in the exitScene method is removing the event listener we added to the startbutton.
16. Start Game
The startGame function is simple. It has the storyboard load the gamelevel scene.
function startGame()
    storyboard.gotoScene("gamelevel")
end
17. Adding Listeners to Scene
Having added the createScene, enterScene, and exitScene methods, we must register the scene to listen for these events. Enter the following code snippet to do this.
scene:addEventListener( "createScene", scene )
scene:addEventListener( "enterScene", scene )
scene:addEventListener( "exitScene", scene )
18. Return the Scene
The last thing you must make sure you do in a storyboard is returning the scene, because it's a module.
return scene
19. Adding the GameLevel scene
Before we can test our progress, we need to add the gamelevel scene. Create a new Lua file in the project's main directory and name it gamelevel.lua. Add the following code snippet to the file you've just created.
local storyboard = require( "storyboard" )
local scene = storyboard.newScene()

return scene
As we saw earlier, we first require the storyboard module, create a new scene, and return the scene. The gamelevel scene is the scene in which we'll implement the gameplay of the game.
Conclusion
This bring the first part of this series to a close. In the next part of this series, we'll begin implementing the game's gameplay. Thanks for reading and I will see you there.

Comments